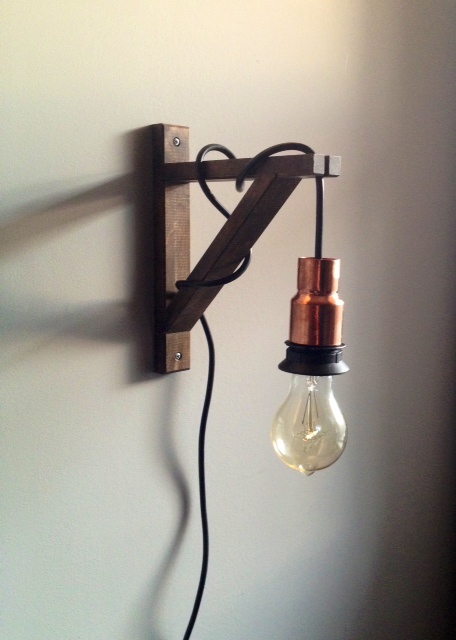
I find things on the internet, fall in love, cant afford them, then get sad. I will drool over things for weeks, then finally I will snap, have to do something about it, and get my ass in gear. Continue reading “DIY West Elm Copper Light”
Category: DIY Versions of Brand Name Stuff
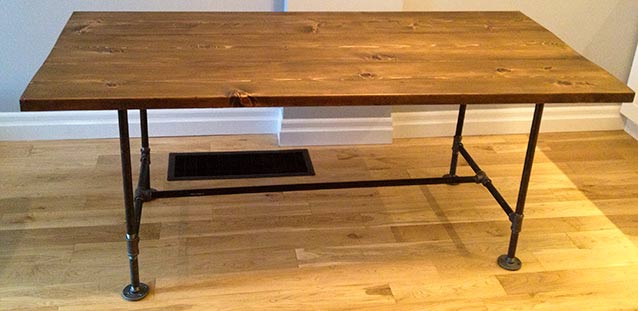
Pipe & Wood Table V2
We loved our DIY Pipe & Wood table and bench. However, we started to fall out of love with it after living with it for a few months. In order to get the table done on a budget & quick timeline we used framing grade spruce lumber from the big box store. Over time the wet wood warped, and our table was looking a bit topsy-turvy. Oops. The framing grade spruce also had rounded edges, which made for serious crumb catchers between the joints. Thirdly, we used Tung Oil to finish the table, and after a while, the tung oil started to smell, well, like spoiled oil. Nowhere in all my research did I find anyone saying tung oil would smell like butt after a few months. Lesson learned. (Although as a finish the tung oil was doing otherwise great, not a single water spot or mark on the table, if you can get past the butt smell.)
If you know me (and my neuroses) at all, you will know that I couldn’t just leave the table. I can live with dust bunnies rolling around the house becoming dust monsters, and I can live with dirty dishes in the sink, but a wonky smelly table? Not a hope.
So here it is kids:
DIY Pipe & Wood Table Version 2 (6’x 34 1/2″)
Lumber Buy List: (purchased from a local Home Hardware Building Center. Check your neighborhood to see if you have a Home Hardware Building Center or another lumber yard . They will carry a larger amount of lumber than the big box stores, at about the same prices.) If you’re in Toronto, try Downtown Lumber (a Home Hardware) or Central Fairbank Lumber.
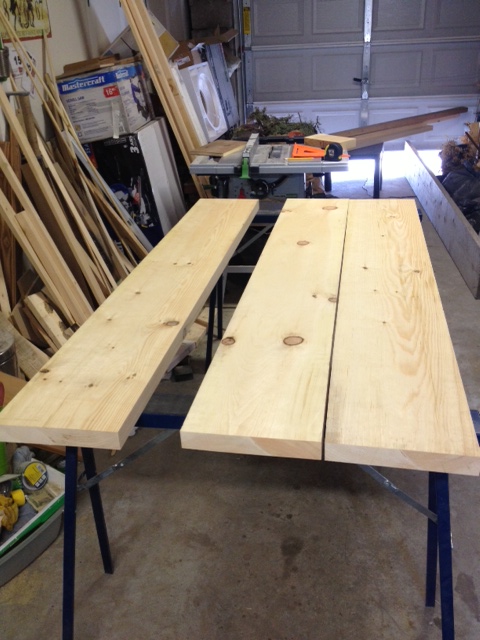
3 – Kiln dried pine 2×12’s @ 6′ (square cut edges, not rounded ones)
1 – Kiln dried pine 2×2 @ 8′ (support pieces)
Cut List:
3 – 2×12’s @ 6′ (our lumber yard rough cut them to just over 6′, then we did nicer cuts with our sliding miter saw at home. If you do not have a sliding miter saw, or a circular saw that can cut through that thickness of wood, have your lumber yard cut it for you with their good saw, not their rough cut one.)
3 – 2×2’s @ 26″, cut to a 45 degree miter on either end.
Instructions:
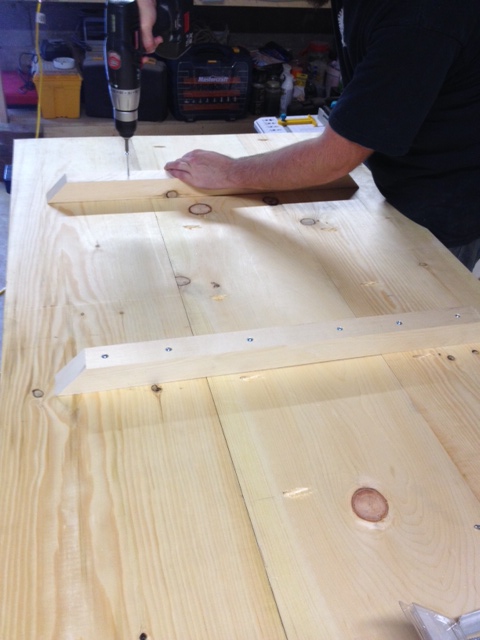
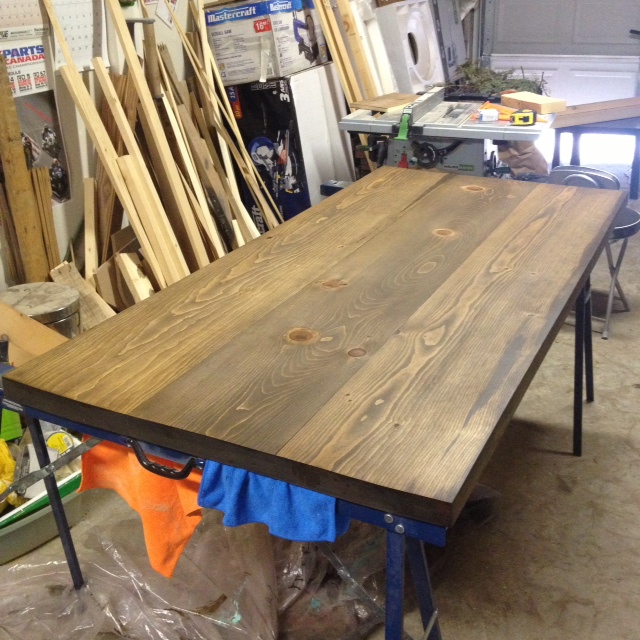
Lay out your table top boards and decide which sides you want up. Make sure to flip the grain so that one board’s grain is up, and the next is down. When you have everything laid out (and square!) mark for Kreg pocket holes every 8″ or so on the bottom of 2 of your tabletop boards. Using the 1 1/2″ thick wood setting, drill your pocket holes. (see how to drill a Kreg pocket hole here.)
Attach your tabletop boards together with wood glue and 2 1/2″ Kreg Pocket Hole screws. Make sure your table is square before attaching the boards together. (You can check it with a square and by measuring corner to corner diagonally. If both sides are the same, your table is square.) Wipe off any excess glue that may have squeezed up between boards with a wet rag before it dries.
Once glued and screwed, attach the support pieces. We put one in the middle, and two right behind where our pipe legs would go. The ends are cut to a 45 so that its looks nicer, and you’ll be less likely to whack your knee off it later. We used some 2 1/2″ screws to attach the supports, making sure we got at least 2 screws into each board. These support pieces will try to keep your table from warping. Remember wood is a living organism, and changes during high & low humidity and heat. So you can never guarantee your wood will stay exactly the same. (That’s why you leave an expansion joint on your hardwood floors, or else they might buckle.)
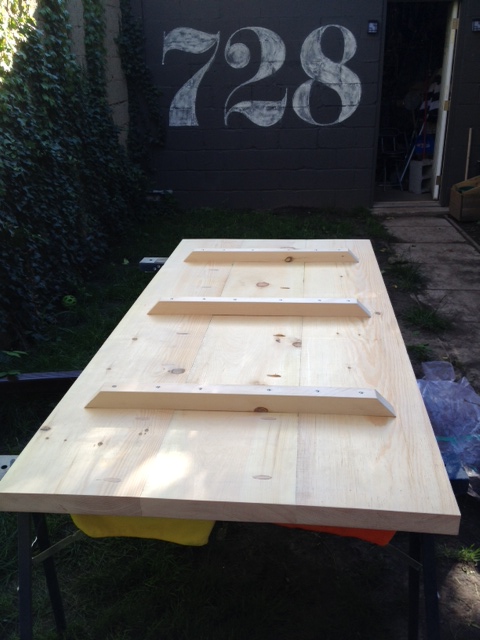
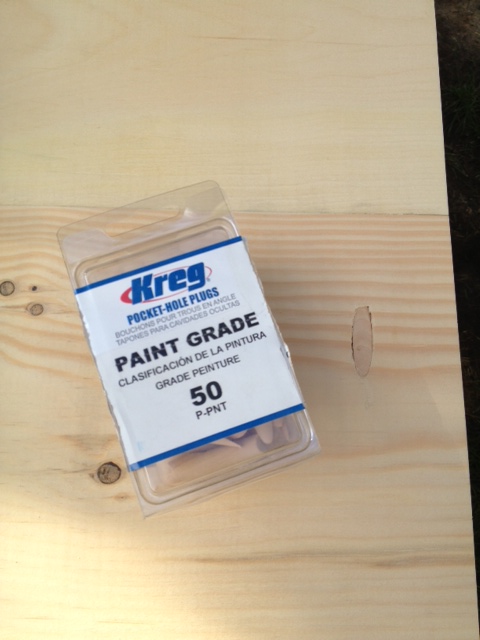
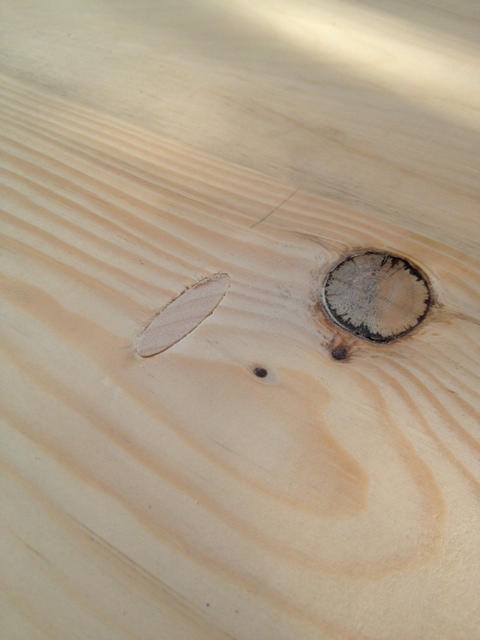
We also filled the pocket holes with Kreg wood plugs. You wouldn’t see the holes, but if you ran your hand along the underside of the table you would feel them. They also might catch on pants or stockings. The Kreg plugs are easy to use. A bit of wood glue and careful placement and they were done. After the glue dried we gave them a sand to ensure everything was nice and smooth.
Now its time to sand. I like to sand outside in the summer, so out the table went. We sanded away, then I stained the table and royally screwed it up. OOPS. Time to fix my mistake, and try again.
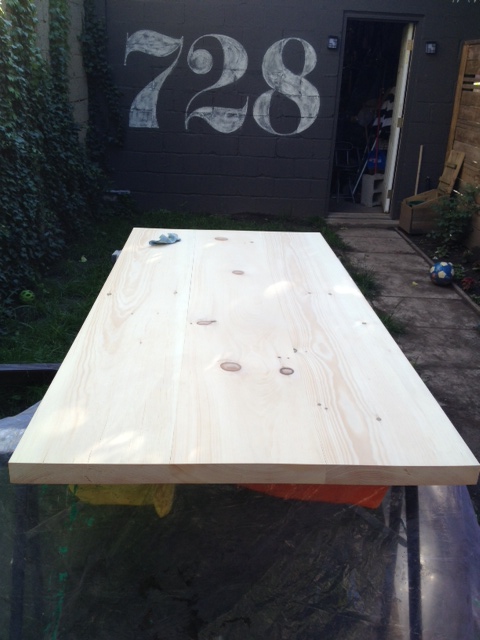
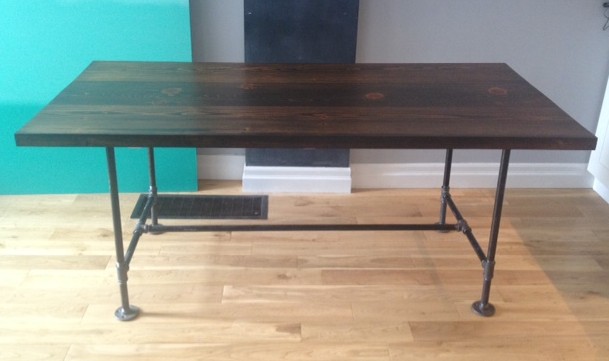
After the sanding came two coats of Varathane Chocolate Stain (check out my finishing post to see all my steps in sanding, wood conditioning & staining.)
I can tend to get a wee bit anal retentive, so when it came to polyurethaning the table, I had to stop myself at 6 coats. Any more would be a bit cray cray. Realistically as long as you have at least three coats, you should be good.
Now to re-attach the legs from the old table. A bit of measuring to make sure its centered, and a few screws and we’ve got legs people.

Want to see what it looks like all finished?! (ignore my terrible lighting, the dining room is impossible to shoot in.)
Dum da da daaaaaa

***UPDATE*** We also made a new bench to go along with the table. Check it out here.
SOURCE LIST:
Materials & Cut List:
(see above)
Tools Used:
Miter saw
Drill
Kreg Jig
Orbital sander
Measuring Tape
Difficulty Level (on a scale of 1-5):
two out of five
Total Cost: $100 (for the new wood, we already owned the pipe, stain & poly)
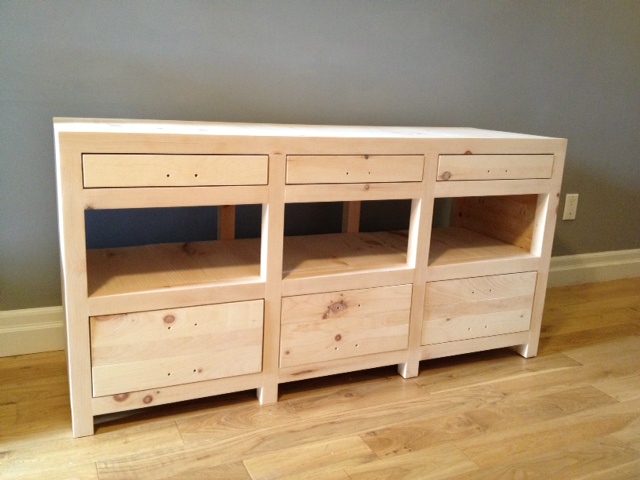
Printmakers Media Cabinet – The Reveal
Its been six weekends of hard work, but we finally reached the final stretch of the printmakers media cabinet project.
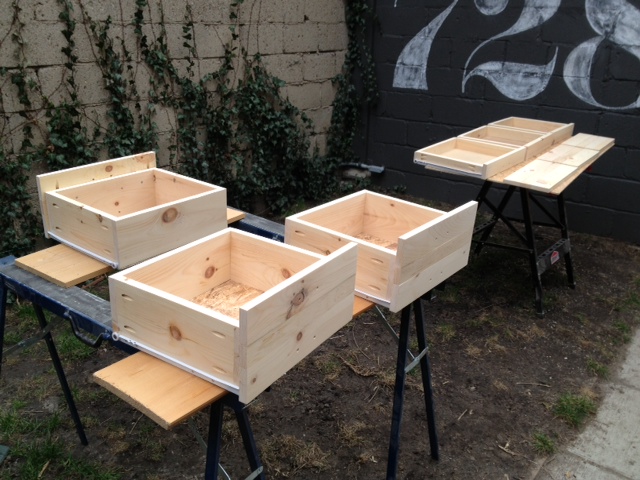
This is where we left off. The cabinet was built and sanded and ready for finishing. If you missed it, check out part one, two, three, four, and five of the project.)
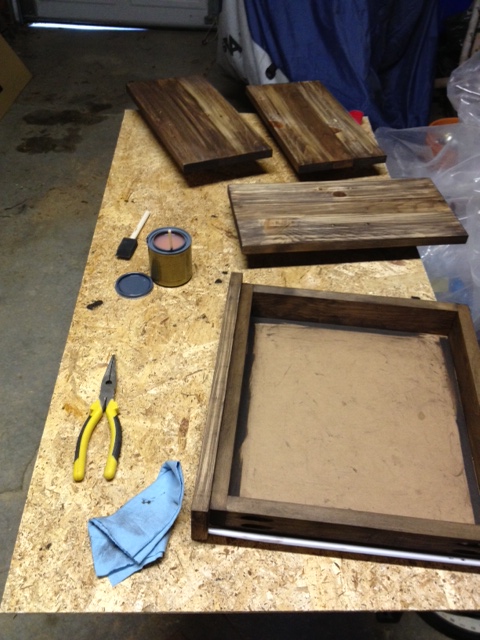
Next up we took all the drawers outside, and set up a staining station, and gave everything a coat of wood conditioner.
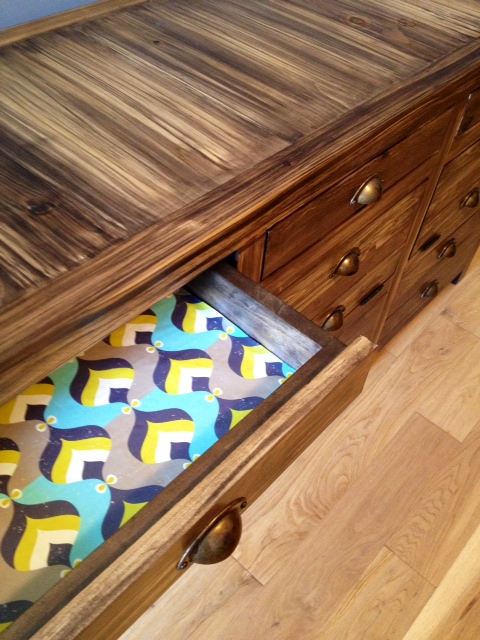
After letting the wood conditioner sit for half an hour, we set out to staining. We had done many a test on stain, and came across a cool technique we wanted to try on the cabinet. It involved wetting the wood, then putting on oil based stain on top of the water, then quickly wiping away. It left an almost zebra like effect. We knew it was going to be a risk, but decided to give it a try none the less. It involved several hours staining, many a swear word, lots of teamwork, and a whole lot of second guessing.

We took two days to stain everything, the first day we did the cabinet and all the drawer & door fronts. The next day we stained the interior of the cabinet and the drawer boxes. For the interior, we didn’t bother doing our stain technique, and instead just used the stain traditionally.
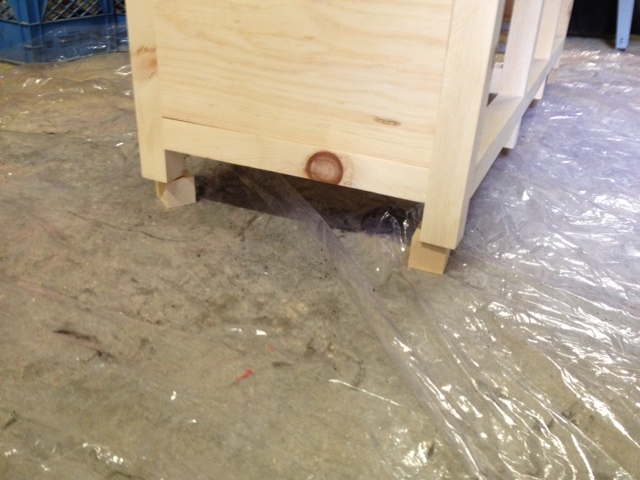
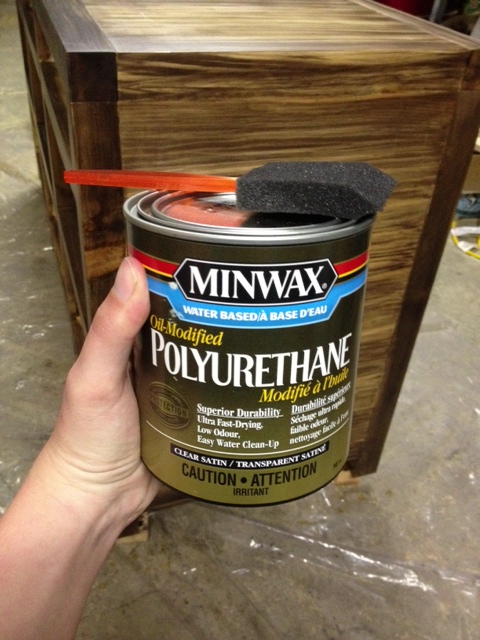
After the stain dried, we applied several coats of polyurethane, sanding with a 320 grit sandpaper in between coats. We put a total of 5 coats on the top of the cabinet, and three everywhere else.
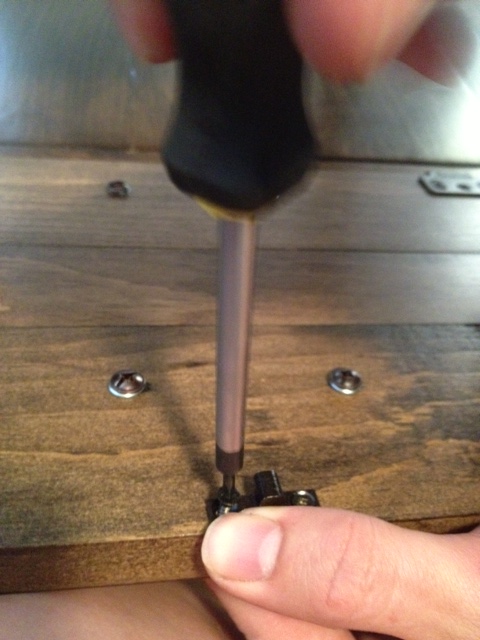
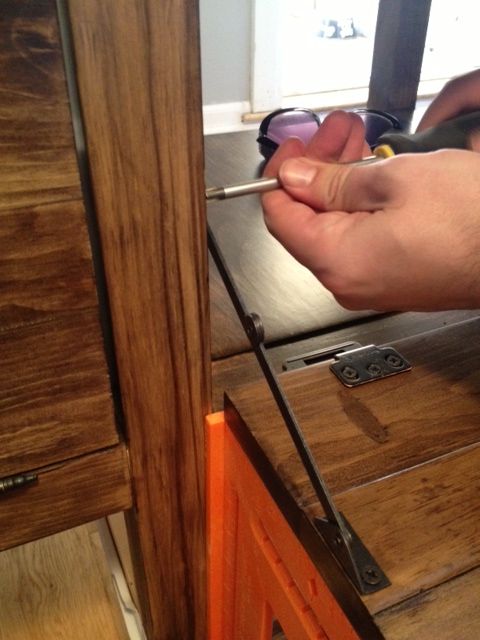
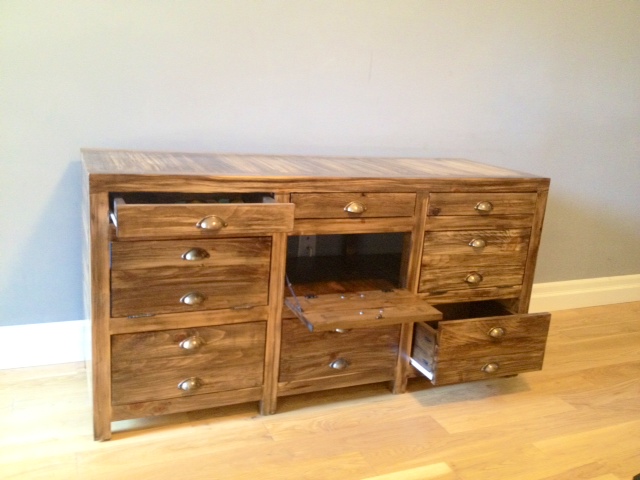
Once the poly had dried, we set to installing hardware. The screws that came with our cup pulls were too short for the double thick drawers, and too long for the single thickness doors. So we headed to the hardware store and picked up longer screws for the drawers, and El Granto cut down the screws with the dremel for the doors.

After the handles were installed, we set to installing the hinges, stays and clasps for the doors.
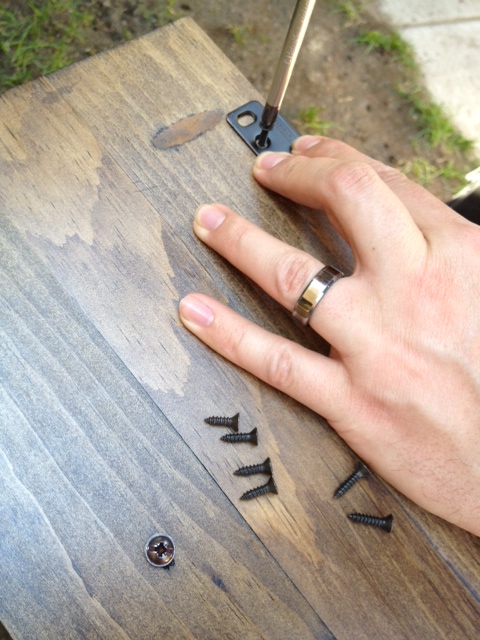
This involved a whole load of finikity work, lots of tiny screws, and stubby little screw drivers to fit into the cabinet.
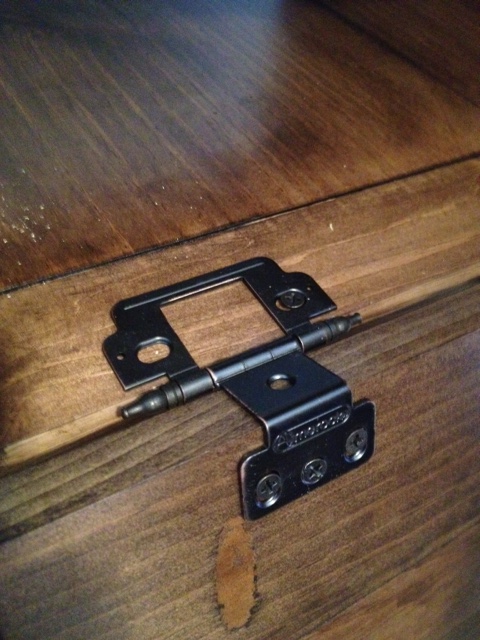
Next up, we needed to add the lid stays to make sure the doors dont open too far. We wanted them to stop at 90 degrees.
We used a square to hold the door at 90 degrees and attached the stays with small screws.
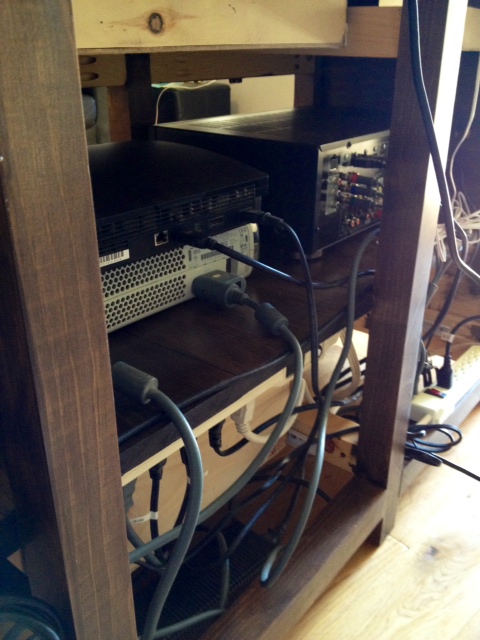
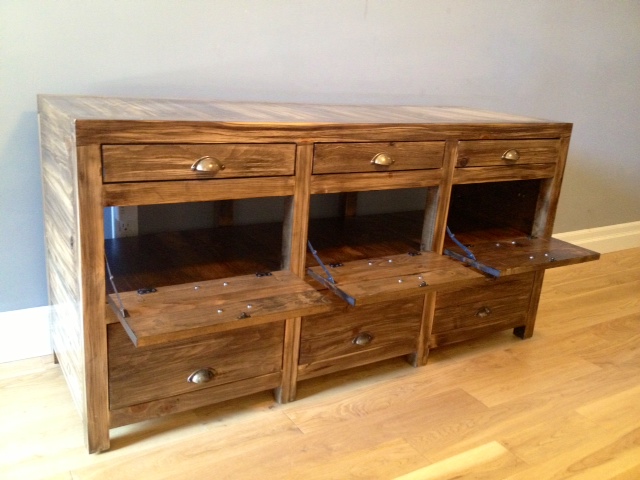
Now we could set to putting all our electronics into the cabinet. To keep things neat, we installed power bars to underneith the back of the shelves. This keeps the cords off the ground, and makes it so that the cabinet can sit flush with the wall.
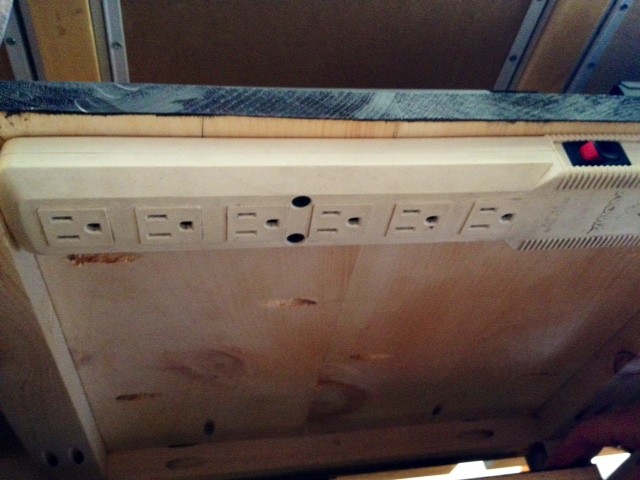
We routed all the cables and electronics as best we could through the cabinet, and its so much more organized than our old media center!
Enough with the technical stuff, are you ready to see what it looks like all finished?
DRUMROLL PLEASE
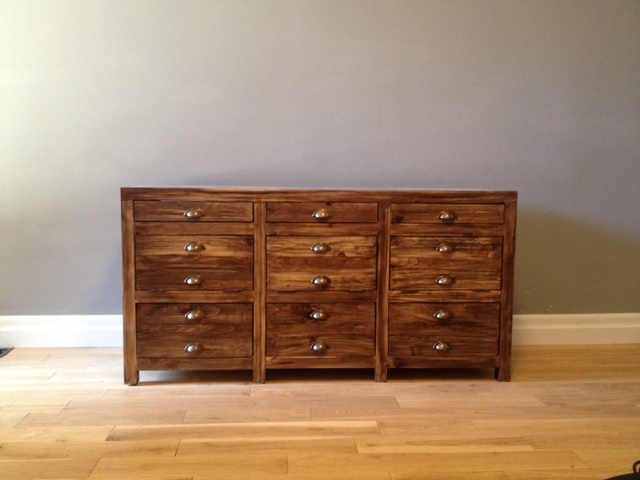
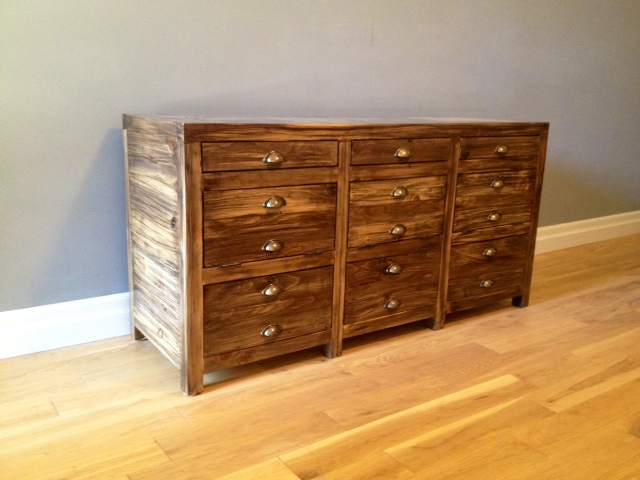
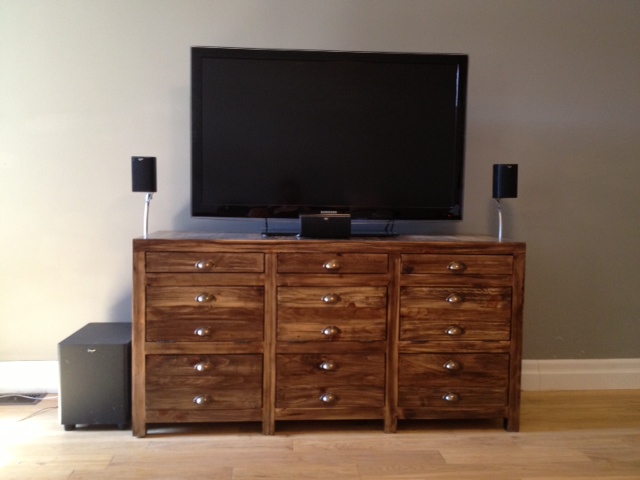
Now a little comparison between our cabinet and our inspiration: the Restoration Hardware Printmakers Media Cabinet. (ours on top, the RH cabinet below)

What do you think?!
SOURCE LIST:
Plans:
DIY Plans for an RH Inspired Printmakers Media Console – Design Confidential *(a BIG Thanks to Rayan @ Design Confidential! Her plans are awesome!)
Materials:
Hardware: ($130)
15 cup pulls – Lee Valley
6 inset hinges – Lee Valley
6 sets drawer slides – Lee Valley
3 lid stays – Lee Valley
3 cabinet clips – Lee Valley
8 1 1/2″ felt furniture pads – Dollarama
Lumber: ($100)
8 – 2x2x8 – Downtown Lumber
2 – 1x6x8 – Downtown Lumber
5 – 1x10x6 pine shelves – Home Depot
3 – 1x2x8 – Downtown Lumber
6 – 1x4x8 – Downtown Lumber
Finishing/Misc: ($50)
Wood conditioner (already owned)
Stain – Varathane “Kona” – Home Depot
Polyurethane – Minwax Oil Modified in Satin
Minwax Stainable wood filler – Home Depot
Kreg Screws – Lee Valley & Home Depot
Foam brushes – Dollarama
Shop rags
Sand paper
Tools Used:
Kreg Jig
Drill
Mitre saw
Table saw
Palm sander
Square
Level
Wood clamps
Corner clamps
Short Kreg drill bit
Stubby screw drivers
Stats:
Trips to lumber yard -4
Trips to hardware stores -10+
Coats of polyurethane – 5 on the top, 3 everywhere else
Stain samples made before deciding on one – 11
Time involved – 6 weekends, 70-80 hours total
Number of electronics in the cabinet – 11
Number of screw-ups – 3
Number of arguments – 2
Total pieces of wood – 119
Screws – about 300
Injuries – 0!
Swear words – more than I’m proud of
Difficulty Level (on a scale of 1-5):
five out of five
Total Cost: $280
Ikea Hack – Vittsjo Laptop Table
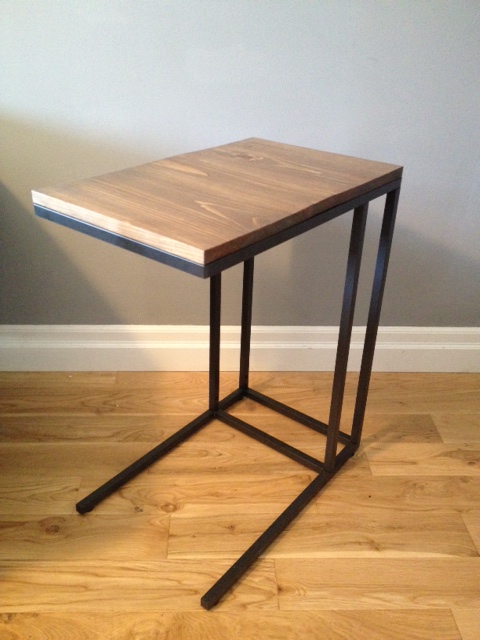
I was wandering through Ikea the other day, when I ended up in the office section. I didn’t need anything for the office (much less furniture!) but I browsed none the less. Out of nowhere, I spied this little table. Continue reading “Ikea Hack – Vittsjo Laptop Table”
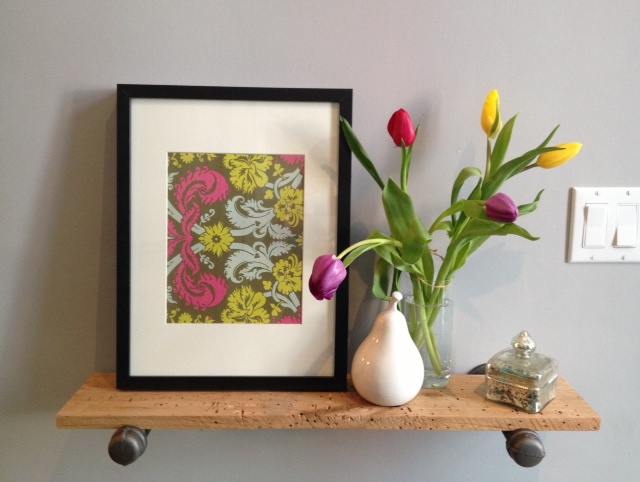
Pinterest Challenge – Restoration Hardware Shelf
We had so much fun doing the Fall Pinterest Challenge, that we jumped at the opportunity to do it again this time. The jist of the Pinterest Challenge is to stop just pinning ideas, and start creating. You’re supposed to DIY something from Pinterest. Whether it be a recipe, craft, home project etc.

I have a few pins over on Pinterest (only 2,555 or so…) so I had a good amount of things to choose from! I figured this was a good opportunity to knock something off the to-do list as well.
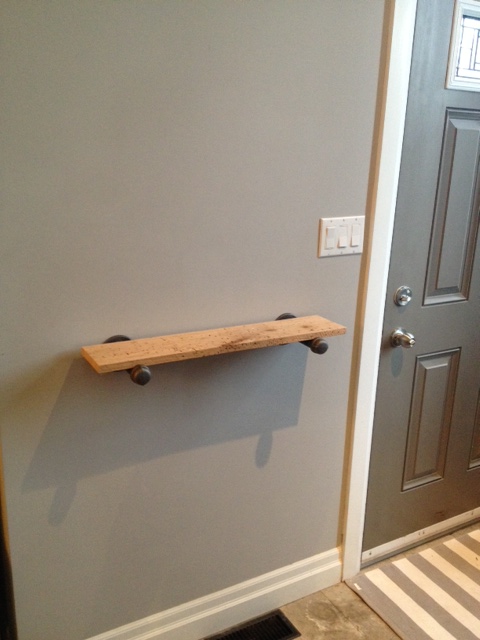
Our front door opens onto the dining room. We have built a coat rack, installed an Ikea wardrobe and we have a nice bench and mirror. The only thing lacking in the entry was somewhere to put your keys and mail, or to keep a coffee away from the dog while you’re tying your shoes pre-puppy walk. We don’t have a lot of space, so a traditional console table was going to be too big.

Here is our inspiration:

Source: restorationhardware.com via Kristen on Pinterest
If we love the shelf so much, why didn’t we just go buy one? errrr… The price for shelf + brackets was $240. Yep, for one lil shelf. Ouch. We just don’t roll like that.
So we made it (with our spin on it of course)
So how’d we do it?
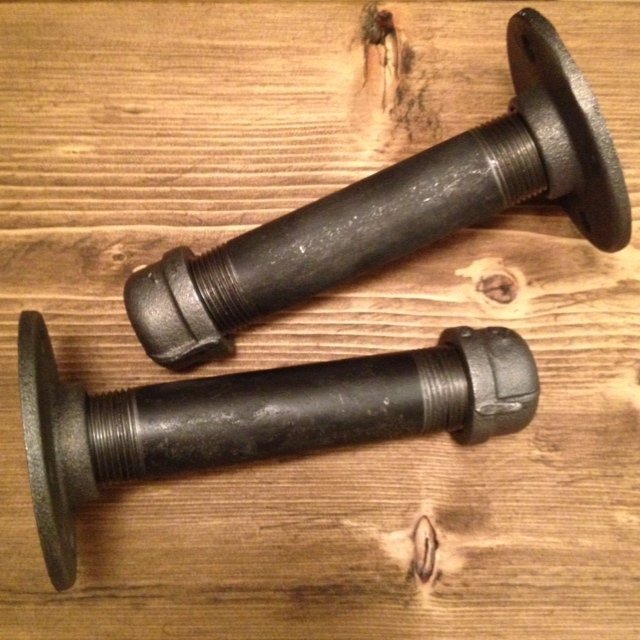
Bought some 1″ gas line pipe (it matches our dining table!) from Home Depot.
Supply List:
- 2 – Floor Flanges
- 2 – 6″ Nipples (teehee)
- 2 – End Caps
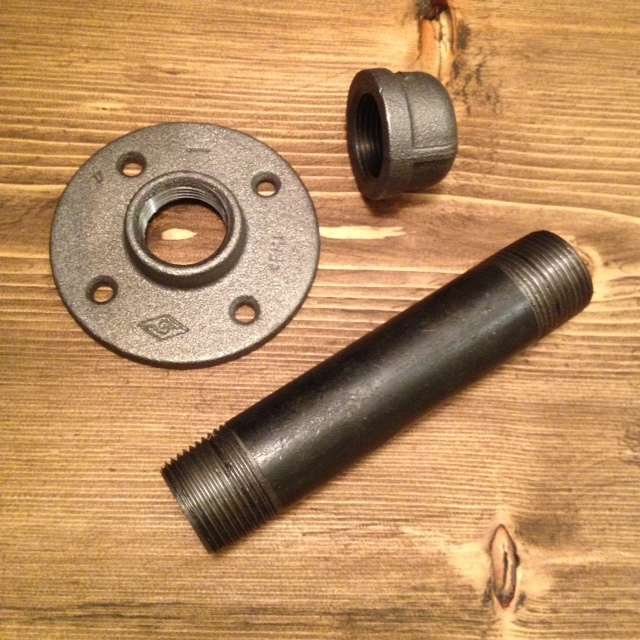
Assemble them all together and this is what you get:
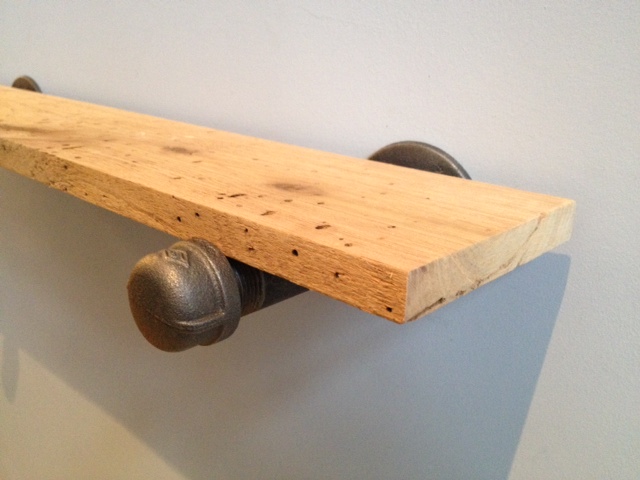
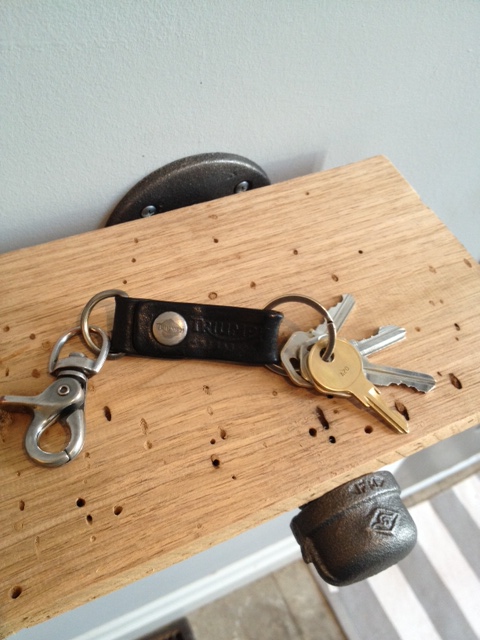
Now you need a shelf. We headed to the garage to check out what cool wood we had. We found some awesome worm eaten Butternut that El Granto had gotten for Christmas (yep we ask for building materials for Christmas). We loved the character of the butternut and decided it was the way to go.
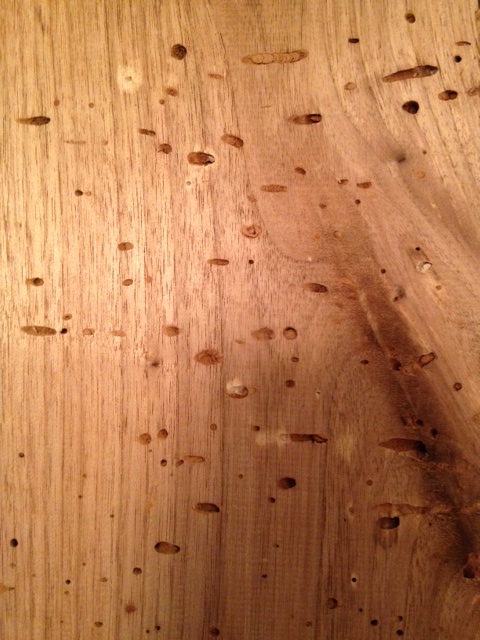
We cut the piece of wood 28″ long, and trimmed the width to 5.5″. This would enable the wood to sit on the pipe, but inside the edges of the end cap and flange. We wanted to be able to see the cool bracket. You can easily make the shelf wider by resting it on top instead of inset.
Next up, after deciding on placement and height (centered on the wall and 40″ off the floor) we went stud hunting, and found that we could hit one of our brackets into a stud. So we marked out the placement.
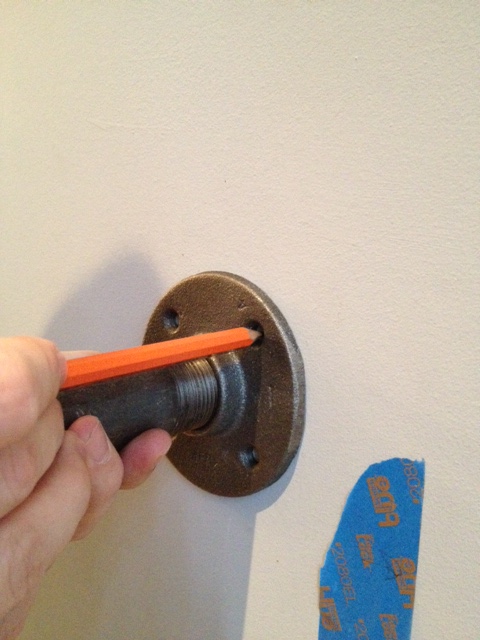
After the holes were marked, El Granto screwed the bracket into the studs.
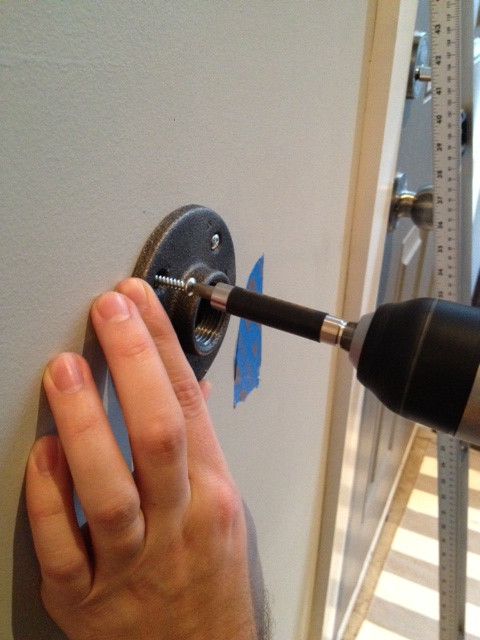
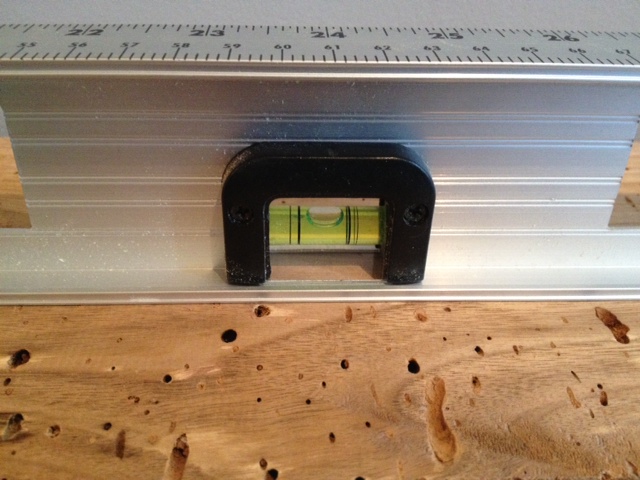
After the first bracket was attached, we attached the pipe nipple and used it to help us level the second bracket.
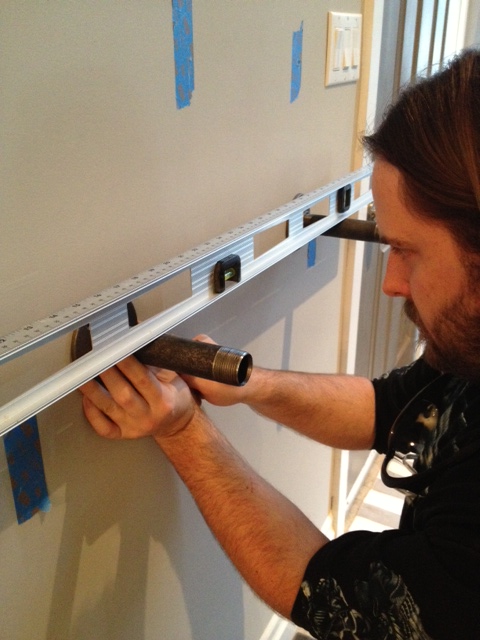
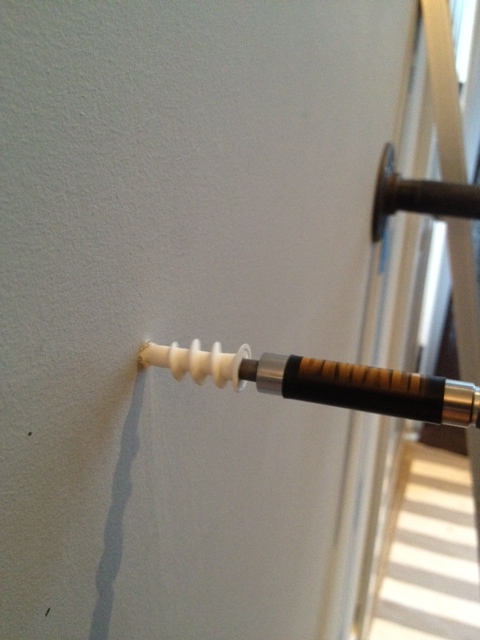
Next up we marked the second bracket, and used EZ Ancors to ensure the shelf would be attached to the drywall nice and sturdy.
We then attached the other flange to the wall with screws into the wall anchors, and then screwed on the pipe nipple and end cap.
We gave our wood two coats of furniture wax and laid it on top of the pipe, screwing the end caps against the wood to hold it steady. Oh and it’s nice and level!
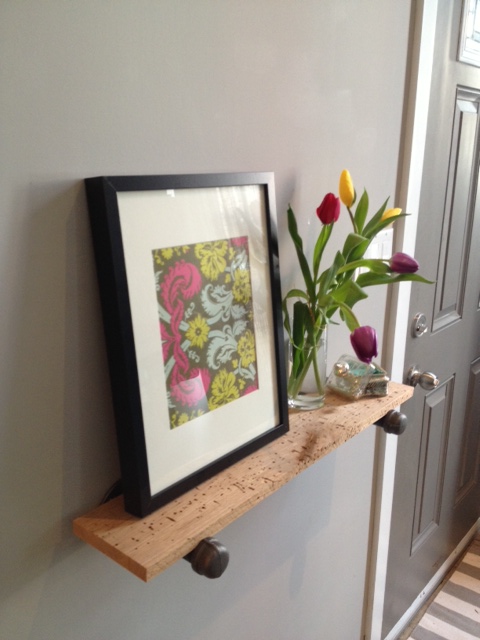
TA DA! What do you think of our DIY Restoration Hardware Shelf & Bracket?

Make sure you check out all the other awesome Pinterest Challenge projects, check out the hosts blogs too!
Sherry @ Young House Love
Katie @ Bower Power
Megan @ The Remodeled Life
Michelle @ Decor and The Dog
SOURCE LIST:
Materials:
1″ Gas Line Pipe (2 flanges, 2 end caps & 2 6″ pipe nipples) – Home Depot
Butternut Wood – Gift
Furniture Wax – Home Depot
EZ Ancors – Home Depot
Tools Used:
Miter Saw
Sandpaper
Dish Soap (to wash the pipes)
Drill
Level
Pencil
Difficulty Level (on a scale of 1-5):
one out of five
Total Cost: $16
DIY Pipe & Wood Bench
BIG Milestone today kids! This is our 100th post!
So we made the dining table, then we finished the table, and now we’re making a quick and easy (and cheap) bench to go along with it.
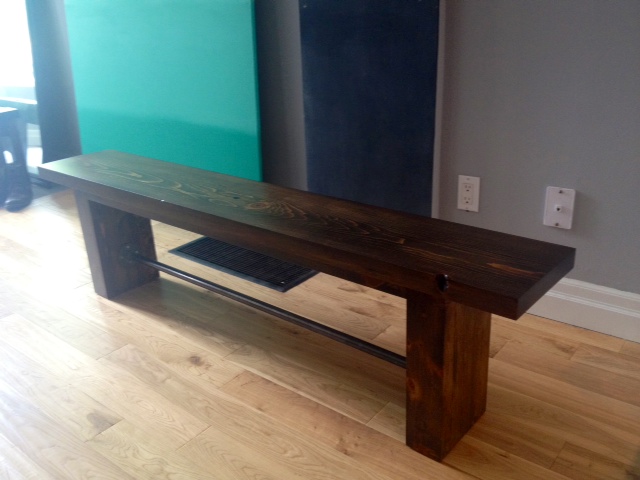
Left over from our table offcuts, was a 2×12 piece of wood just about 6′ long. El Granto decided to surprise me and make a matching bench to go along with our table. The bench will add a lot more seating (you can squeeze a truck load of people around a bench when necessary.) It also reduces the amount of chairs we have to have, and a bench can be tucked close into the table and not take up a ton of room.
Here’s the shopping and cut list for what you need to make a 68″ long, 11 1/2″ wide and 18″ high wood & pipe bench.
Shopping List
(leftover 2x12x6′ from the table project)
2 – Premium 2×4’s
2 – 3/4″ Flanges
1 – 48″ precut piece of 3/4″ black pipe
8 – 1″ wood screws
Cast Iron Square Nails (Optional)
Wood Cut List
1 – 2x12x68″‘ spruce
4 – 2x4x16 1/2″
4 – 2x4x6 1/2″
Pipe Cut List
You don’t need any custom cut pipe. Use your 48″ precut piece as is. Woot!
Assembly
Pre-sand your pieces of 2×4 (these will be the bench legs, and once assembled are a bit more of a pain in the ass to sand.) While you’re at it, sand the bench top as well. Start at a 60 grit or so, then work your way up to 220.
Assemble bench legs using your attachment method of choice. We decided to go with the Kreg Jig pocket hole system, but you can easily use dowels & glue. El Granto got a bit carried away in the assembly process, and forgot to take any pics until it was all done (oops!).
Here’s a shot of one set of legs, where El Granto is adding some decorative square nails. You can see how we used the pocket holes to attach the top support piece, we also used pocket holes below the bottom vertical support piece. The bottom support piece is vertical because we are going to attach our pipe cross beam there.
")
")
After the legs are assembled, attach the flange to one set of the legs, then attach the pipe and the second flange and screw the other flange to the other set of legs.
")
Flip the bench top upside down, and place your upside down legs on top, and screw legs into bench top using 2 1/2″ screws.
")
")
After the legs were attached, we took the bench inside to start the finishing process. We stained and oiled it to match the table.
")


")
We now really need some new chairs. In the interim, I think I will give the ones I have a coat of paint. I am leaning towards turquoise or red. Eventually I would really love some Tolix chairs or some Emeco navy chairs. The dining room also desperately needs some high impact art, as does the area over my kitchen cupboards.
SOURCE LIST:
Materials:
2 – Premium 2×4’s – Home Depot
1 – 3/4″x4′ black pipe – Home Depot
2 – 3/4″ Floor Flange – Home Depot
2×12 spruce – Rona
1″ wood screws – Home Depot
Varathane stain in Chocolate – Home Depot
Varathane wood conditioner – Home Depot
Pure Tung Oil – Lee Valley
Square Nails – Lee Valley
Tools Used:
Miter Saw
Kreg Jig
Measuring Tape
Hammer (for decorative nails)
Drill
Difficulty Level (on a scale of 1-5):
Three out of five
Total Cost: $16 (bench top wood, and finishing materials were left overs from the table project)
DIY Pipe & Wood Table Pt 2
If you missed it, we built a Wood & Pipe Dining Table, check it out here.
DIY Pipe & Wood Table Pt 1
****UPDATE**** Check out our revised version of the Pipe & Wood Table
We are hosting my family’s Christmas at our house this year. We currently have a 4 person dining table. No way could we all perch around that table no matter how many chairs we pushed against it. We needed to scrap the kids table, and nut up and get a grown up table.
INSPIRATION:

We put pen to paper and designed a simple tabletop with industrial black pipe legs. I had taken inspiration from this Restoration Hardware Flatiron table. Except we went with a basic “H” leg construction with a cross beam near the bottom of the legs.
We had originally wanted a nice thick reclaimed wood top, and had sourced a supplier, however that fell through and everything else we could lay our hands on was “city priced” (you know when you go to an antique store in the city and a simple item is priced 10 times higher that you ‘d find it at a flea market in the country? That’s “City Priced”.) So the cheap ass me wasn’t gonna pay city price for wood, so I nixed that idea and instead we decided to use 2×12″ construction lumber. We don’t have much invested in the tabletop, so if we get our hands on some nice reclaimed wood in the future, it won’t hurt our pocketbooks to swap it out. The legs are hardware store “black pipe” gas line pipe and fittings. These can be sourced at any large hardware store (orange & blue) and as they can cut and thread the pipe for you at the store, its super easy to work with.
We made a 72″ x 34.5″ table that is 30″ high. This is a standard 6 person table, but 8 can easily be squeezed around it.
Shopping List
1 – 3/4″x10′ black pipe $18.99
1 – 3/4″x6′ black pipe $13.80
4 – 3/4″x6″ nipple (heehee) $1.64/each
8 – 3/4″ Floor Flange $3.99/each
6 – 3/4″ Tee $1.64/each
1pkg 3″ felt furniture pads $4
2 – 2x12x12 spruce $17.50/each
Wood finishing materials (to be discussed in pt. 2)
Wood Cut list
3 – 2x12x6′
(Cut 2x12x12’s in half to make 4 – 6′ long pieces, and you can use the left over piece to make a bench.)
Pipe Cut list
The hardware store will cut and thread your pipe for you. There is a (substantial) fee for this. At our home depot it was $1 per cut and $2 per thread. We ended up having about $40 in cutting fees, which was actually more expensive that the pipe itself, but a necessary evil.)
1 – 3/4″ pipe 51″ long
4 – 3/4″ pipe 20″ long
4 – 3/4″ pipe 10″ long
")
We got our pipe and wood cut, gathered all the rest of our supplies and like a strange hardware store parade, headed to the checkout. A word to the wise, the pipe is greasy and dirty and yucky. Make sure you put your nice wood on a separate cart, and bring a tarp to protect your car. Also have some dish soap and goo gone ready at home to thoroughly clean and de-sticker your pipe when you get it back. Be prepared to get little metal splinters that will hurt. A lot.
")
We decided to use the Kreg Jig for attaching our boards together to make the tabletop. This is quick and oh so very easy, and all the screws are under the table where no one other than the dog or a crawling child will ever see them. We laid out our three best boards on saw horses in the garage.
")
We decided on placement making sure to alternate the crown of the wood (the crown is the way the grain curves, look at the end of a piece of lumber and you’ll see the grain pattern). Once we were happy with how our board would be arranged, we flipped them over and aligned them, making sure they were square. Our saw guy at the local hardware store didn’t fare so well with making all the boards the same length, so we lined up one end, and let the other end overhang knowing we’d trim it down later. Then we marked our kreg jig screw placements.
We put two screws in 8″ from the edge of the boards, and about every foot for the rest of the table. We alternated which side the screws came from so that we would get a more stable and solid tabletop.
The Kreg Jig is super easy to use. We set the jig and drill bit to 1.5″ thick wood, clamped out the jig (with protection on the “good side” so the clamp wouldn’t mar the table top) and drilled. Easy-peasy lemon-squeezey.
")
After all the holes were drilled, we re-aligned everything, and got to screwin!
")
After the tabletop was screwed together we trimmed off the scraggily cut edges using a circular saw. Then we gave the table a good sand with the palm sander. We wanted to leave a few of the rough wood’s imperfections, but ensure everything was nice and smooth.
After it had been sanded, we took it inside and got working on the legs. We thoroughly cleaned the pipes using a combination of citrus grease cutting cleaner, dish soap and goo gone. There was a lot of errant stickers and tape on the pipes along with the grease, so all these tools were needed. Be careful for any sharp metal or burrs, definitely wear protective gloves and eye protection.
To start out, attach each the 6″ pieces of pipe to flange. Next up attach a T to each of the 6″ pipes.
")
Screw a 10″ pipe into the side of each T. Attach another T to 2 of the 10″ pipes. Attach two legs together by the middle T, then do the same to the other set.
")
Now attach the 20″ pipe to the top of the T’s and another flange while the dog enjoys a peanut butter filled bone.
")
Make sure all your legs are exactly the same height. You may need to tighten or loosen a few joints to get everything equal.
Here’s the tricky part. Grab a friend and attach the long 51″ piece to the two open T’s. One of you will have to spin a set of legs around to get this done. You will look like an absolute fool doing this, but its the only way to get it done. Once everything is screwed together, you’re ready to attach your legs to the table.
")
")
Flip your tabletop over, and set the legs on top. Make sure everything is square, straight and level, and screw in your flanges using 1″ screws.
Apply your felt furniture pads to the bottom of the feet flanges, and flip your table back over. Now you’re ready for finishing! (we will be finishing the table inside due to the cold cold cold temperatures of our unheated garage.)
So here it with its legs attached and waiting for its finish work. Whatcha think?
")
")
One great thing we quickly found about this table is that if you have an uneven floor like we do you can unscrew certain parts to even the table out so it won’t wobble!
Promise, we’ll be back soon with how we finished the table, and a cost breakdown.
**UPDATE** Check out how we finished the table.
****SUPER UPDATE**** Check out our revised version of the Pipe & Wood Table
DIY Iron & Rope Mirror
I love love love Restoration Hardware’s Iron & Rope mirror, but I could in no way afford it’s $650 price tag (sad face). Continue reading “DIY Iron & Rope Mirror”