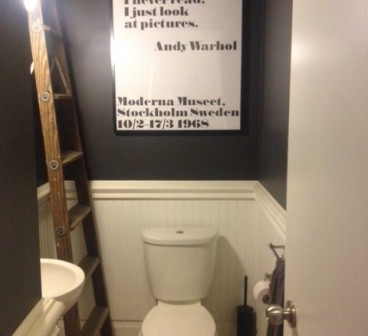
What a difference a little bit of art can make. After lugging home the big frames last week, and flattening the stored-too-long-in-a-tube art prints, I finally got a print framed and up on the wall. Continue reading “Powder Room Art”
Tag: art
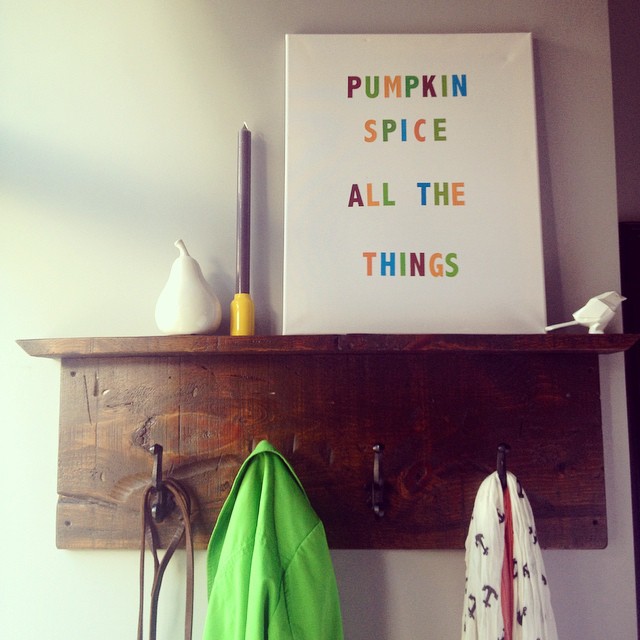
Pumpkin Spice All The Things
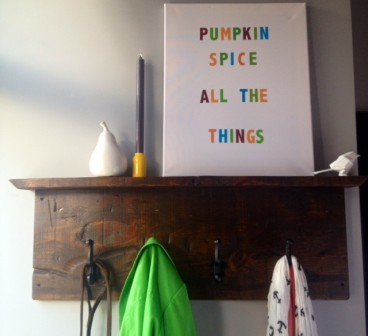
We at the Storefront are mantel-less home owners. As such, come fall or winter, we are the only blog on the entire internets to not have a decorated mantel. No really, find me another home/decor blog without a mantle post this week. Never to be left out, we tend to decorate the front porch (with heavy, and/or bolted down items of course.) One extension of our seasonal decorating, is the front entryway coat rack. With it’s small shelf, it is about the closest thing we have to a mantel.
We have a variety of canvases and prints that get trotted out seasonally to grace our front entryway. Feeling a little bored with our fall decor this year, I opted to add a new canvas to the repertoire. Enter my latest “masterpiece”.
Pumpkin spice all the things
How to:
$3 Dollar Store Artist Canvas
+$2 Dollar Store Adhesive Letters
+2 parts cheeky 😉
Whats on your mantel this season?
Custom Framing Mats
Have you purchased any Ikea (or similar) frames only to have the provided mat be completely the wrong size for your art? You could go to an art or framing store and pay (heavily) for custom cut mats, or if you’ve got a few dollars and some time and patience you can do it yourself.
Back in my art school days, sick of trying (and failing) to cut mats with a straight edge, I broke down spent $50 of my poor ass college budget on a mat cutting kit. I then proceeded to cut all my art school project mats, as well as did a pretty handsome black market trade in cutting mats for my fellow students.
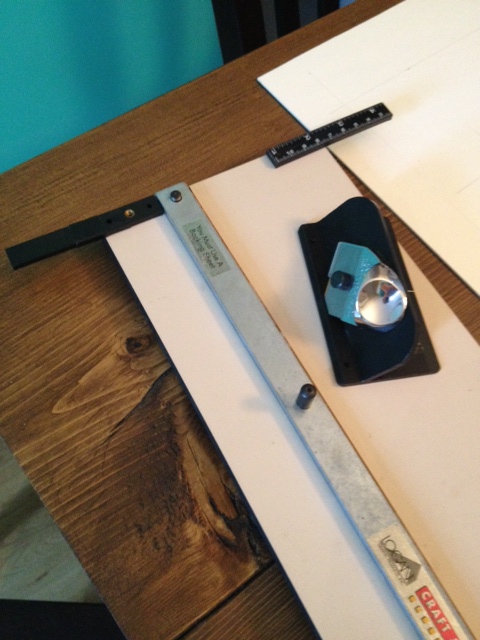
That (old battered) mat cutting kit still gets used several times a year, and has paid for itself many times over. If you are in need of several mats cut (doing a gallery wall any time soon?) If so, this may be the tool for you. Let me show you how it works.
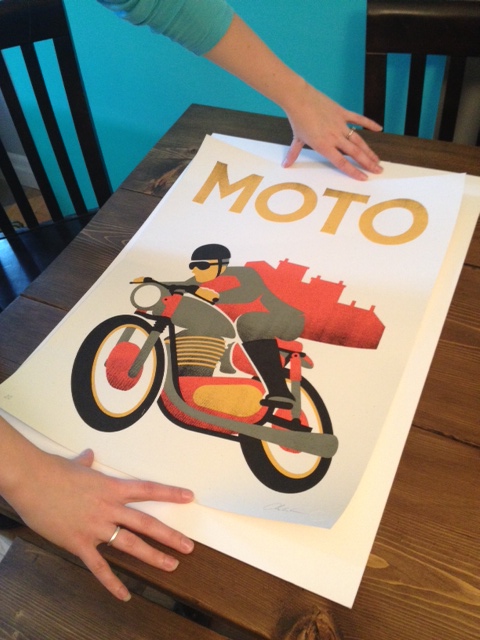
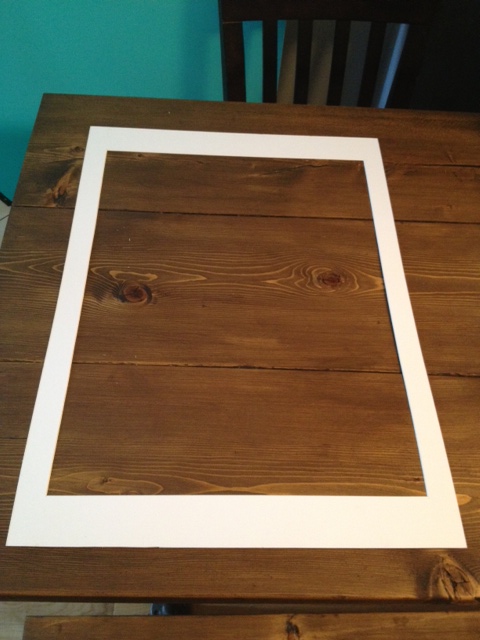
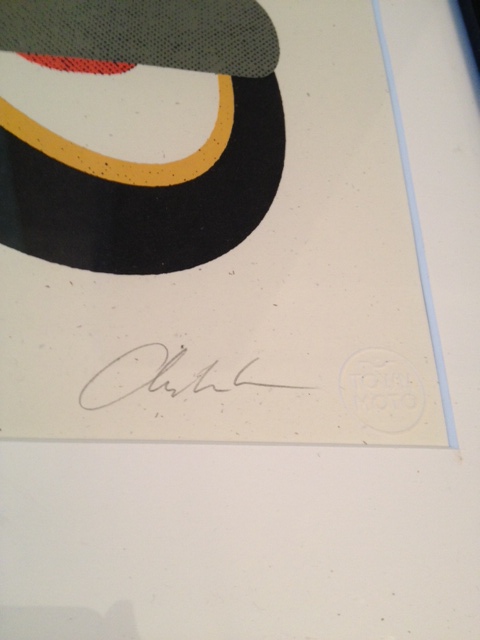
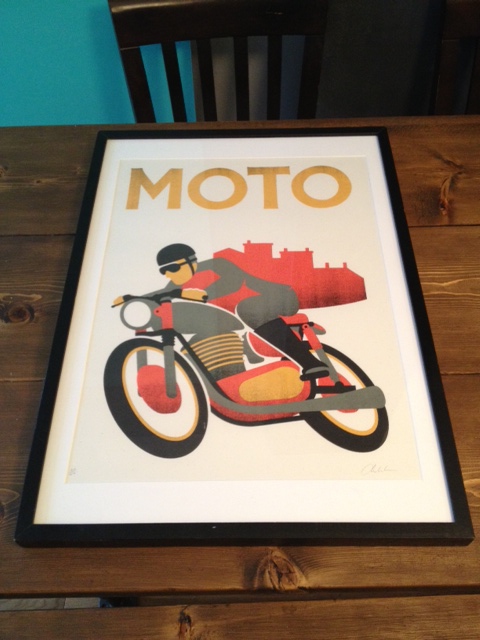
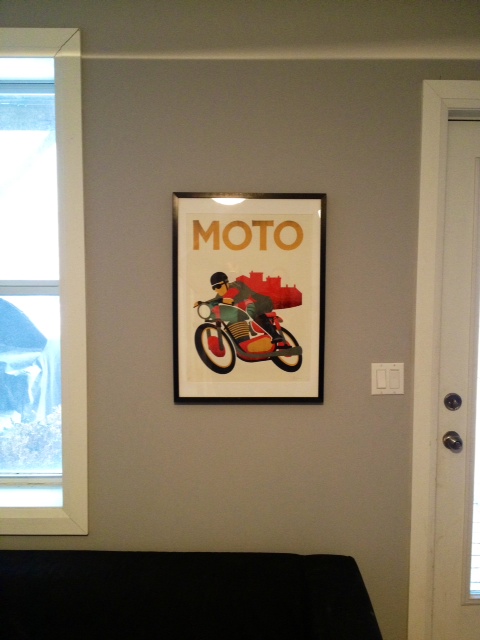
A few weeks ago we purchased a beautiful print from a great local shop Town Moto. This vintage inspired motorcycle gear shop is one of El Granto’s favorite places. They have great gear & accessories as well as an in house design & print shop. They produce some beautiful motorcycle themed prints, and we brought a purdy new Moto print home. The print is gorgeous. Its printed on a lovely heavy paper, and its signed, stamped and numbered. A print like this needs to be presented in a way that equals its awesomeness. So I went frame hunting in the basement and found a great big Ikea Ribba frame previously used for an old highschool drawing. I ousted the drawing from its frame and stole the mat to use with the Moto print.
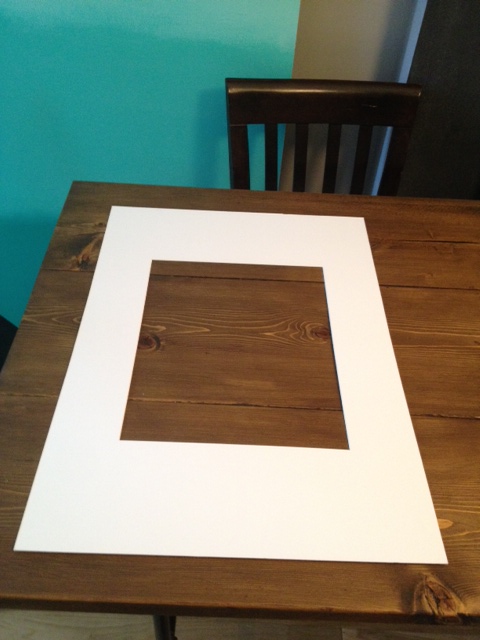
Problem is, the mat hole is MUCH too small for my print. The easiest thing to do here is flat mount the print, but that doesn’t look as nice.
So I got out my mat cutting kit and set to work.
You need to figure out how big you want the new mat hole to be, and you need to draw the location of the new hole on the back of the mat so you can cut it. There are several different ways to do this. We wanted our print centered, so we did a bit of math (minusing the size of the new cut hole from the overall size of the mat to figure out how far from each side the cut hole needed to be.) Measure twice, if not three times before you cut, its easy to go astray especially if you’re dealing with 16ths of an inch etc. If you’re having problems with this step, feel free to ask questions and I will try (as best I can!) to explain in greater detail.
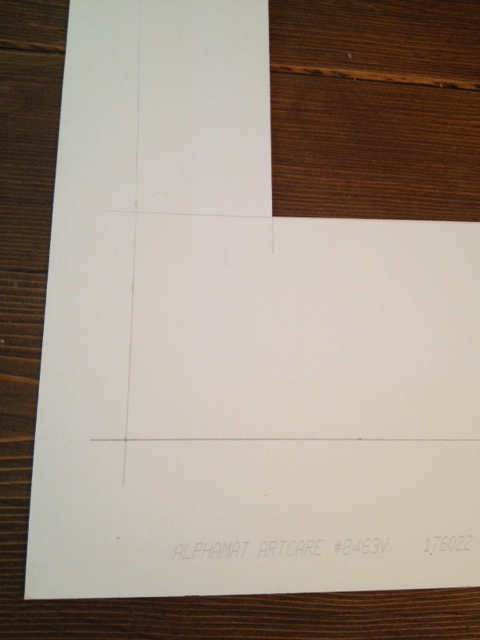
Place the mat (still upside down) into the mat cutter, and align one of your lines to the straight edge of the cutter.
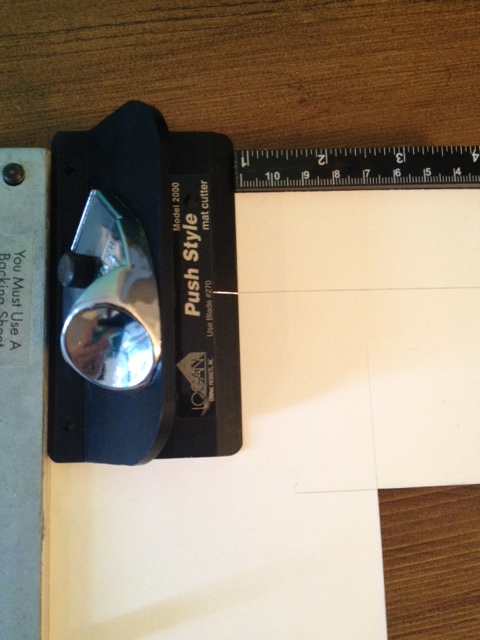
Now starting at the bottom of the mat, place your cutter onto the mat, matching up the starting line on the cutter with the corner of the intersecting cut line. Push the blade into the mat, while holding the straight edge steady, and push the cutter along the straight edge, stopping at the top line of your cut hole. The key to this step is using a steady hand and pressure. Proceed to do all four sides of the mat, and ta da! Beautifully cut mat.
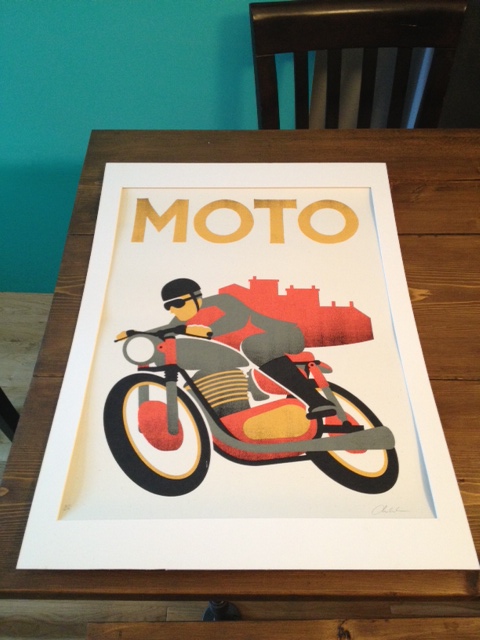
Now insert your print, attach the back and hang your professional framed print on your wall.
*If my instructions are confusing, let me know. This may be a situation where its easier explained by a video tutorial*
SOURCE LIST:
Materials:
Print – Town Moto
Frame – Ikea
Mat – Art Store
Tools Used:
Mat Cutting Kit (we have the Logan one, you can pick up a basic mat cutting kit for about $50 at art stores)
Measuring tape or ruler
Hammer & Nail (to hang)
Old Butter Knife (my secret for prying up the tabs on the back of the frame)
Difficulty Level (on a scale of 1-5):
one out of five
Total Cost: $30
XL Art Project
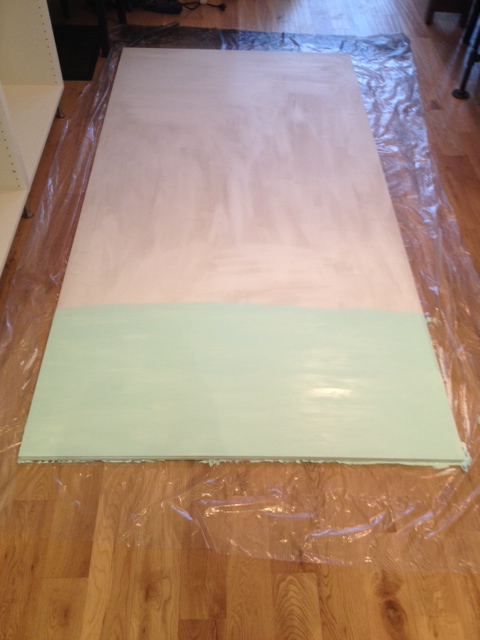
The main floor of the Storefront has almost 11 foot ceilings and is open concept, and to be honest its been very hard to decide on art for the space. Everything I own and try to hang is way to small for the large walls. I have been hunting for some large art in my budget, but have struck out. I decided to take matters into my own hands, and set out to make some extra large art.
My Mom was coming to visit and was bringing my Dad’s truck. A truck meant that I could get some big building materials that I cant normally buy and take on the bus. We got materials for a few projects, and also picked up a 4×8 sheet of 1/4″ masonite hardboard. A lot of artists actually use masonite as artist canvas. It is a nice smooth surface to paint on, and is acid free.
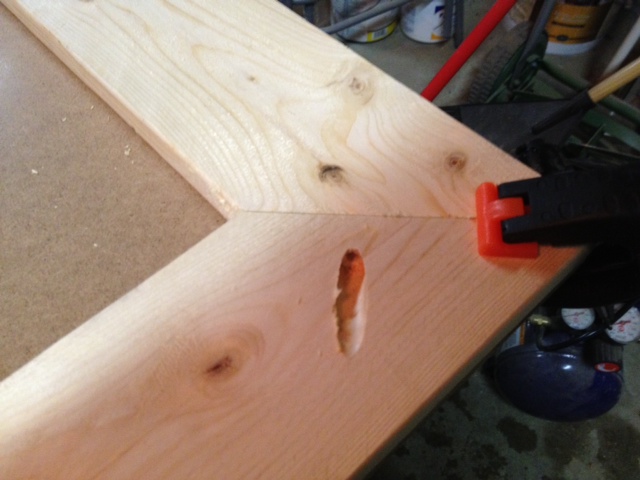
I took my 4×8 sheet and built a frame for it out of 1×3 lumber (I wanted a shallow frame/support as I dont have a lot of space for a thick frame, in hindsight however 2×3’s would have made a beefier support). The frame consisted of an outer stretcher bar with mitered corners, and two cross supports.

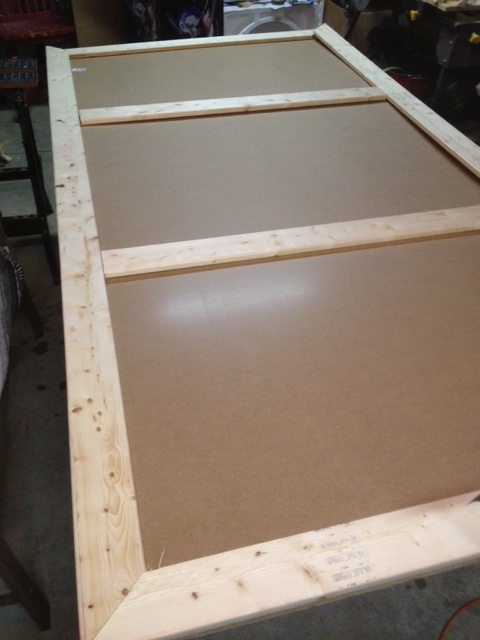
I used pocket holes to secure my frame, then brad nailed my masonite to the frame using 5/8″ brad nails.
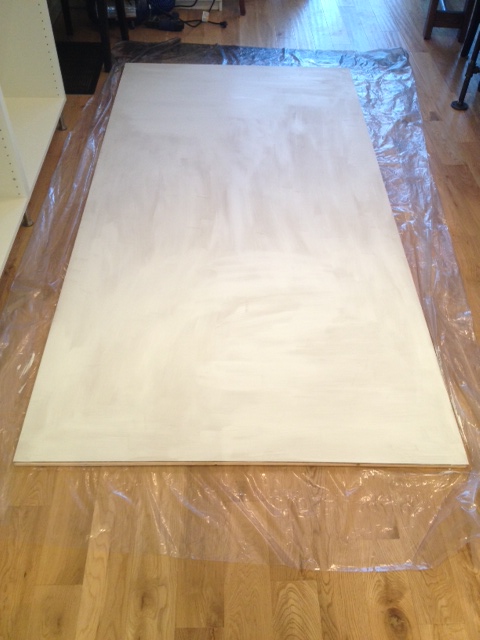
After that was completed, I sanded the masonite to rough up the surface for painting.

The hardest part is maneuvering the super sized canvas. I advise having a friend to help you carry and flip this lightweight but awkward art project.
I primed the whole shebang with some left over primer/sealer I had laying around, then I set to painting my art.
I wanted something with some colour, but that wasn’t super in your face (the painting is 4×8 after all, its already gonna have a ton of impact!) Heeding the ombre trend, I decided to do a turquoise ombre painting. I hit up my Home Depot, and got 5 sample pots of paint in varying shades of turquoise (from light to dark).
After my primer had dried, I got to painting. I painted a stripe at the top about 20″ high of the lightest colour.
Then proceeded to do stripes 19″ high of all the other colours. I painted the lightest and darkest colours first and let them dry, then worked my way fading the colours. The lightest colours were fairly easy to fade, but the darkest colours were harder.
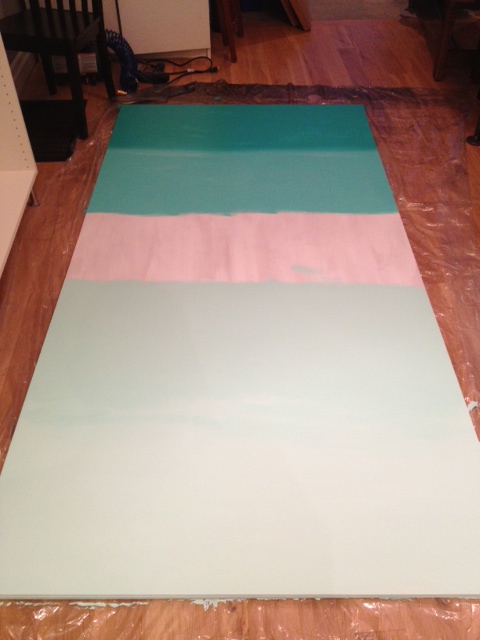
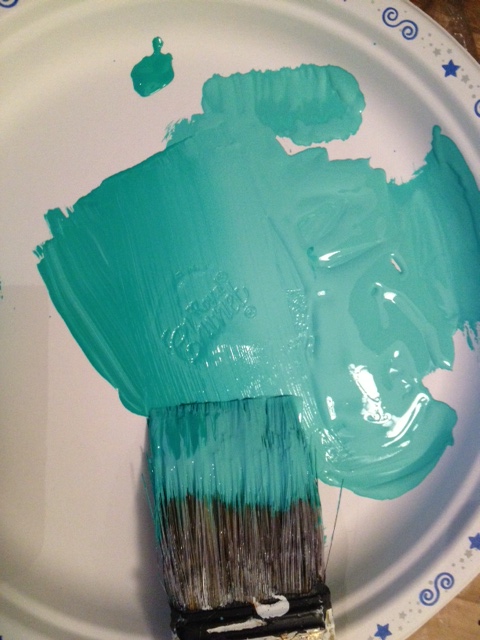
I ended up mixing up a “pallet” (paper plate) of paint where I faded the colours together, having dark on one side of a large paint brush and light on the other.
I then painted one stripe between the two colours with the fade in the middle. It only took me one afternoon to complete, and it makes quite an impact.
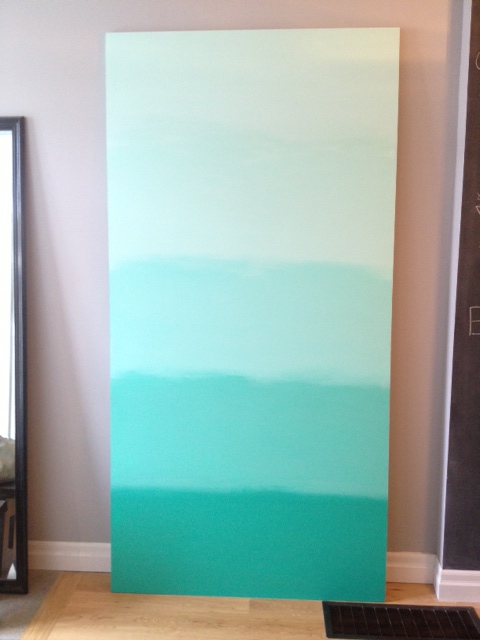
It currently is leaning against the wall in my dining room, but I think it will end up in my kitchen or even sideways over my sofa. So many options!
SOURCE LIST:
Materials:
4×8 sheet of masonite – Rona
4 – 1x3x8 spruce – Rona
CIL Primer – Home Depot
Behr Paint + Primer Sample pots – Home Depot
Tools Used:
Mitre Saw, Kreg Jig, Brad nailer, Paint brush
Difficulty Level (on a scale of 1-5):
Two out of five
Total Cost: $45
DIY Holiday – Chrismas Carol Art
I have taken to decorating the little shelf over our front hall coat rack as a would-be mantle. It got decorated for Halloween, Thanksgiving and now its getting a little Christmas cheer. My local dollar store sells 12×16 stretched artist canvases for the low price of $2. They also sell $1 acrylic paint. I figured this was an excellent excuse to make some inexpensive holiday art.

While singing Christmas carols at my desk one day (yep I’m one of those holiday spirit kinda people) I decided that my art project should revolve around Christmas carols. I promptly went home and laid down some type in Illustrator of the lyrics “Faithful friends who are dear to us, gather near to us once more”. Hopefully our visiting friends and family will feel welcome this holiday season!

After I was happy with my type layout and font selection, I cut out the type using my Silhouette SD onto adhesive vinyl. If you don’t have a silhouette, you can pick up alphabet stickers from craft stores, or you can cut your own out of adhesive material. After my stickers were cut, I removed the excess vinyl (called weeding) and transferred my stickers using transfer paper (it’s sticky paper which pulls off the vinyl from their backing, then you place it where you want your stickers and apply using a credit card.)
")
After my stickers were adhered I took a look and loved it just the way it was! I know, lazy me! If you want to do it right, paint around the edges of the stickers with some white acrylic paint. You do this so that if any of the paint bleeds under the stickers, its white like the canvas so it wont be visible. After it dries, coat the whole canvas in 2 coats of black, red or green paint.
After the paint dries, remove your stickers, and reveal the white canvas below. Or be lazy like me and just put stickers on canvas, then go drink some rum laced eggnog instead.
Where was I? Eggnog? Oops. Right. Project…
Then I placed it up on my mini mantle with a small artificial tree, candles, fresh greenery and a ceramic pear.
")
")
SOURCE LIST:
Materials:
12×16 Art Canvas
Adhesive Vinyl
White & Black Acrylic PaintEggnog for extra holiday cheer
Tools Used:
Silhouette SD
Paint Brush
Difficulty Level (on a scale of 1-5):
One out of five
Total Cost: $2 ($4 if you paint it)
Guest Room Art Project
We needed some art to flank the bed in the guest room. I wanted something fun and lighthearted, and to bring a bit of colour to our now grey and white guest room. I rummaged through my box-o-frames and found a couple black gallery frames that had seen better days. They were a bit bashed and mangled and were not looking their best. I decided to give them a bit of a facelift. I painted them a shade of pinky coral (although in hindsight I wish they were a bit more red). Then I set out to find some prints. As you may know we have a crazy Vizsla named Odin who I love to bits and have tons of photos of, but I didn’t want the guestroom to be a creepy shrine to my dog. Instead I set to look for Vizsla themed prints, that were not shots of Odin. I found a great print of a vintage stamp from Hungary (where Vizsla’s are from) as well as a fun “Obey the Vizsla” propaganda style poster. I cut new mats for the frames with my mat cutter (a handy tool if you frame a lot!)
Here they are in the space. I like how they add a bit of colour to the space.


The guest room still needs a few more things. Accent pillows, some sort of art above the bed, a chair for reading or putting on your shoes, bedside lamps, a new light fixture, and some closet organization.