Yet Another Bench

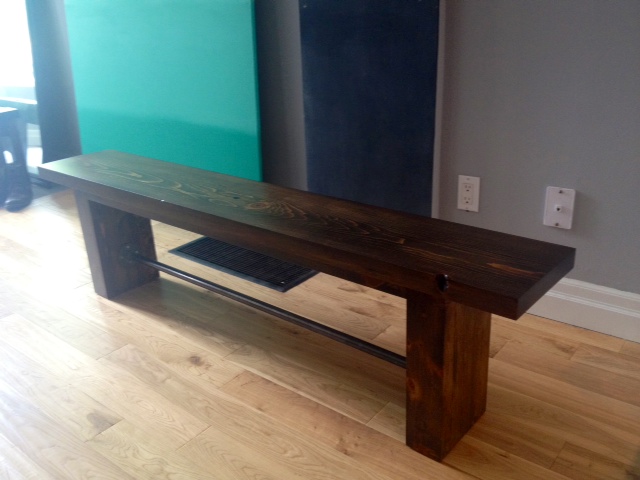
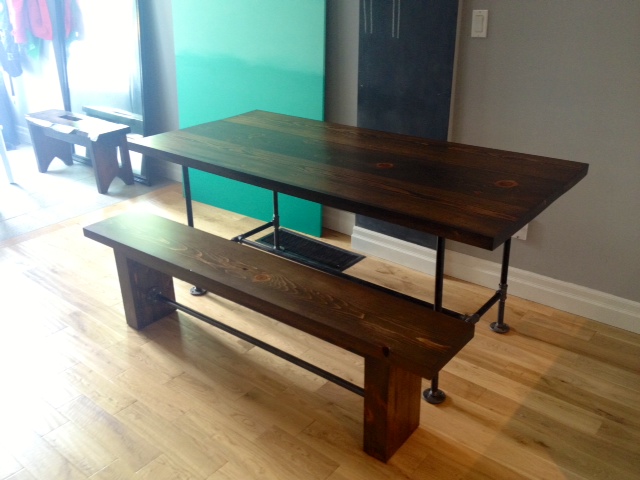
I know, I know, ANOTHER BENCH?! REALLY? Here’s the deal. We replaced the top of our pipe leg dining table, and our old bench was looking sad in comparison. It’s unfair to give one kid a present, and then stiff the other one. So Mr. Bench got an upgrade.

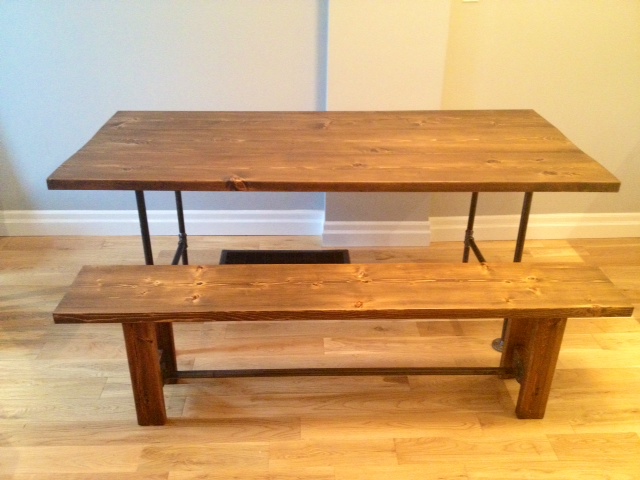
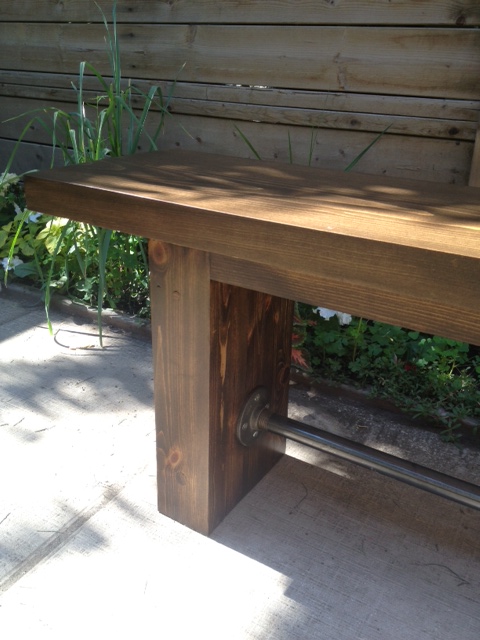
If you remember correctly, this is what the old bench (& table) looked like:

The Table & Bench
The Table & Bench

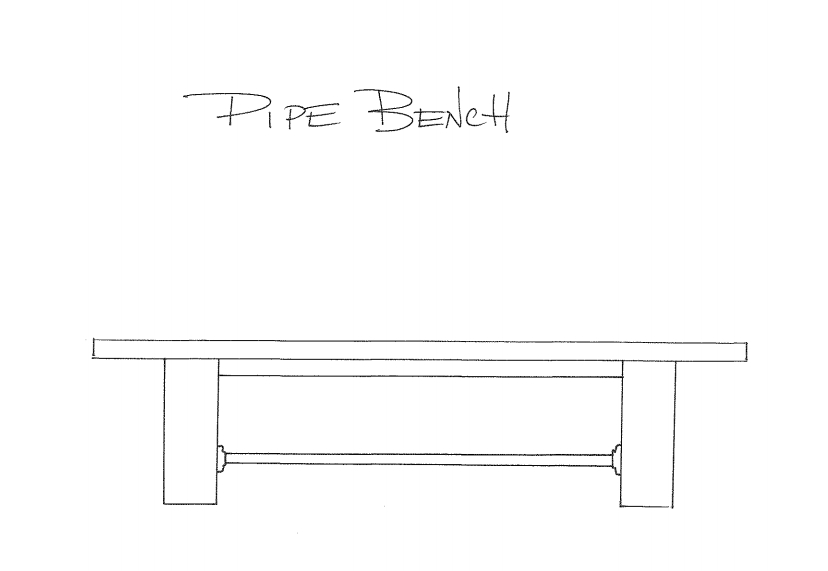
We salvaged the pipe stretcher from the old bench, and got to work making new legs & a top. We wanted something a bit more industrial looking. The old bench was fine, but a bit traditional. So we searched for inspiration and found this on Pinterest:

I loved the chunky legs and thought it had the perfect shape. So we set to building our own version with a pipe stretcher.

pipebench

Buy List:

1 – 2×12 x 6′ piece of kiln dried pine (same as our table)
2 – pine 2×2’s @ 8′ for aprons
2 – pine 2×4’s @ 8′ for the legs (make sure these are square edged 2×4’s, not rounded ones like you use for framing)
3/4″ dowel
Wood Glue
4′ pre-cut piece of 3/4″ gas line pipe (threaded on both ends)
2 – 3/4″ pipe floor flanges
2 1/2″ pocket screws

Cut List:

1 – 2×12 at 68″ (bench top)
2 – 2×2 at 48 5/8″ (aprons)
10 – 2×4 at 16 1/2″ (legs) if you can, set yourself a jig on your saw to make sure all the pieces are cut exactly the same size

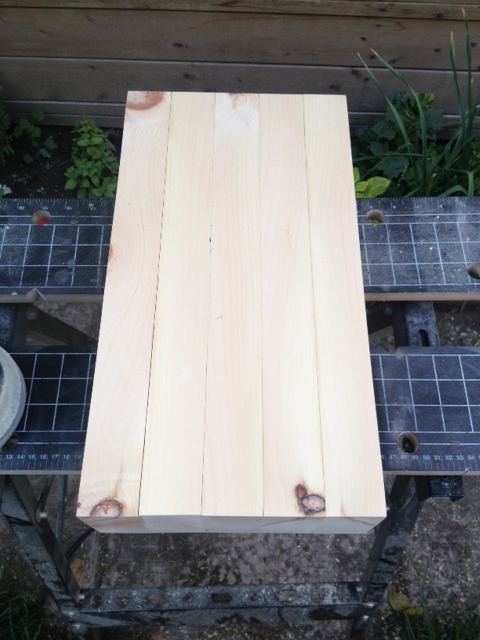
First up, glue 5 2×4’s together with wood glue and clamps making one great big 4×10, repeat with the other 5 2×4’s (if you don’t have enough clamps, do one leg, then let it dry for a day, unclamp and do the other leg.)

Five 2x4's
Five 2×4’s glued together

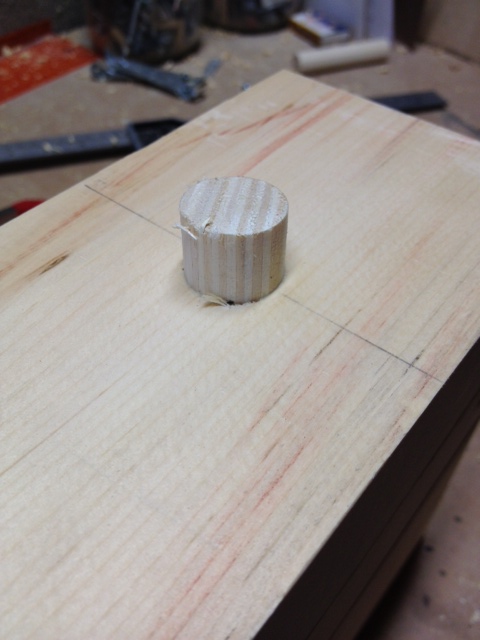
To make sure those legs aren’t gonna move, we also strengthened them with dowels (and a few screws). We liked the way the exposed dowels looked on Daniel & Adelle’s table, so we opted for that route. After the legs have dried, mark 3″ up from the bottom of the leg on one end and mark the center of the board. Then drill a 3/4″ hole with a spade bit about half way through your leg. Ideally it would go all the way through, but to do that nicely (without any tear out) and straight you really need a drill press (which we dont have!). So we opted to do a dowel from each end.

Dowel Hole Drilled
Dowel Hole Drilled

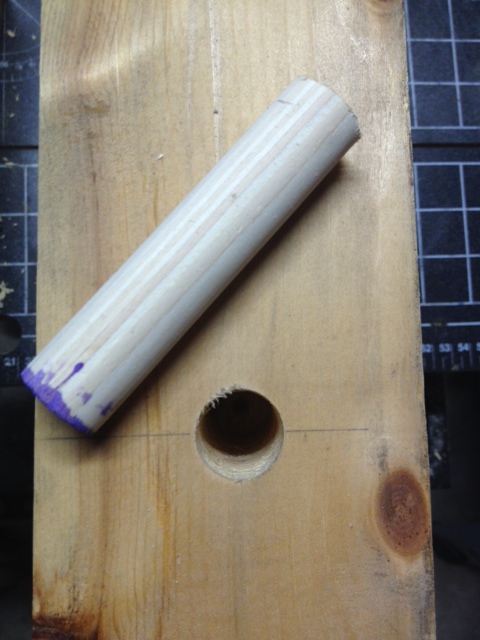
After your hole is drilled, cut a piece of dowel a bit longer than your hole, glue & tap in place. Repeat for all the other sides of both legs and let dry.

Dowel Insterted
Dowel Inserted

To strengthen the top of the legs we used a 3″ counter sunk screw from either end. We pre-drilled the holes with a 3/8″ drill bit, inserted the screws, then filled the hole with a wood plug & some glue. If you must use screws on a project, using wood plugs will make them a lot less glaringly obvious.

Wood Plug
Wood Plug

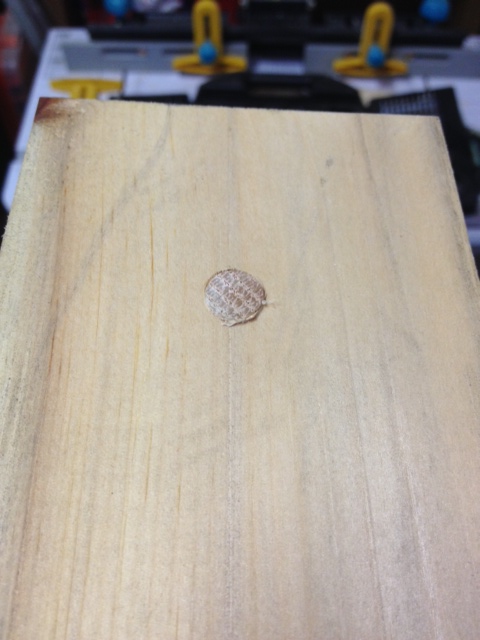
Once all the glue has dried (another day) you can cut the dowels close to flush using a coping saw, chisel, hand saw, Dremel, or oscillating multi-tool.

Now it is time to make a few pocket holes for attaching the legs to the top. We put three holes in each leg (kreg pocket hole jig set to 1 1/2″ thick material).

Time to sand. I always find that it is MUCH easier to sand pieces like legs before installing them. As we needed to sand down the exposed dowels, we started sanding with 80 grit until the dowels were flush, then switched to 100, then 150 and finally 220 grit.

The apron pieces got 2 pocket holes drilled in each end (to attach to the legs) and a good sand as well.

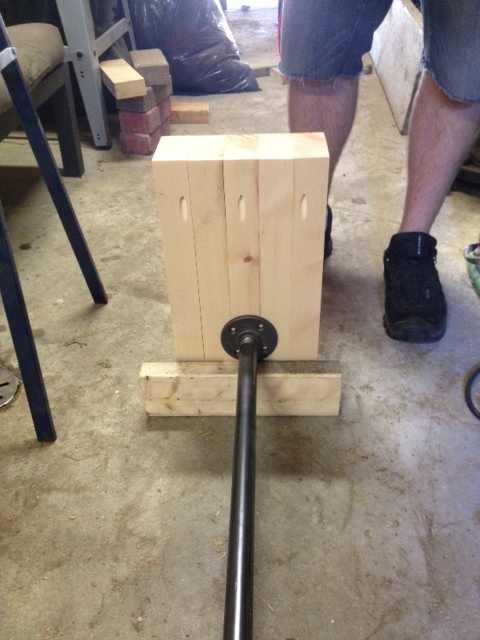
Next up, attach the flanges to either end of the pipe and attach the pipe stretcher to the legs with screws. We used a scrap 2×4 to set the flanges up from the bottom of the legs.

Attaching Pipe
Attaching Pipe Stretcher

Next up, attaching the legs to the table and the aprons. Flip the bench top upside down and use it as a work table to attach the aprons. The aprons will give the bench even more strength, and stop it from wanting to shift sideways.  Once the aprons are attached to the legs, center the legs on the bench top, and attach the legs with the pocket holes you drilled earlier.

Assembly
Attaching the aprons to the legs, and the legs to the bench top

Put in a few 2 1/2″ screws through the aprons into the top, and fill the Kreg holes with pocket hole wood plugs and glue.

Time to head back outside, give the top a sand, and an overall finish sand to the rest of the bench.

Bench ready for stain (there's painters tape over the pipe)
Bench ready for stain (there’s blue painters tape over the pipe)
Bench legs
Bench legs sanded and ready for stain

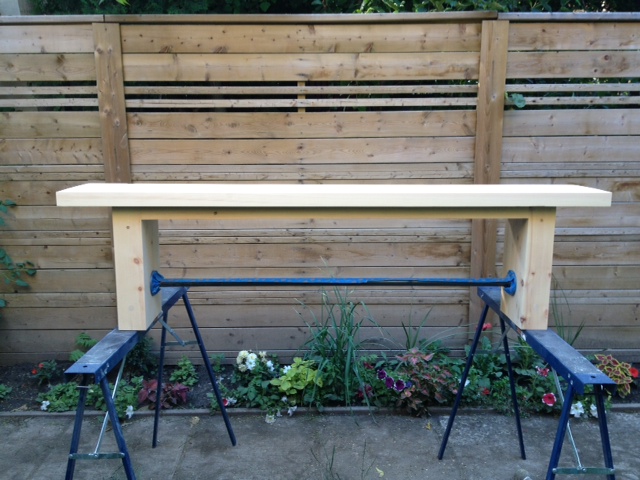
A coat of wood conditioner, two coats of Varathane Chocolate stain, and three coats of polyurethane later and this is what we’ve got. (check out my post on finishing wood here.)

Bench
Yep, I moved my nice new bench out into the dirty alley to take this photo.
bench
Big legs are sexy. Men take note.
Benchy Bench Bench
Benchy Bench Bench
Bench & Table
Completed Bench & Table

SOURCE LIST:

Materials & Cut List:
(see above) – Wood from Downtown Lumber
Stain – Varathane Chocolate
Polyurethane – Minwax Oil Modified in Satin

Tools Used:
Miter saw
Drill
Kreg Jig
Orbital sander
Measuring Tape
Finishing Supplies

Difficulty Level (on a scale of 1-5):

two out of five

Total Cost: $60 (for the new wood, we already owned the pipe, stain & poly)

Kitchen Cabinet Cover Panels

You may remember we started the kitchen coffee bar project waaaay back at Christmas time. We knew that the project would be done in stages.  Simply because it would cost too darn much to do it all at once! However, we have been a bit lazy on the coffee bar front, and last we left it, this is how it looked.

coffee bar progress
Coffee Bar

The base & upper cabinets were installed, there were doors on the bottom cabinets, and a temporary countertop.

Still nagging on the to do list:

  • Make & install cover panels
  • Make floating shelves for between the upper cabinets
  • Buy & install glass doors for the upper cabinets
  • Buy & install drawer unit for middle lower cabinet
  • Run electrical outlets for counter top appliances
  • Install backsplash
  • DIY concrete countertop

Time to get off my butt and knock a few things off the list. The one nagging thing were the cover panels. You see Ikea cabinets are meant to have cover panels on the sides of your cabinets that match your doors.  They also cover up the gap between the cabinet and your wall. Ikea’s installation system involves a metal rail that is attached to the wall, and the cabinets themselves hang off the rail. Because of this, the cabinets actually stick out from the wall about 3/8″. Ikea sells pre-cut cover panels to neatly cover everything up, and make your cabinets look pro.

Look at that GAP!
Look at that GAP!

Problem is, our old house has very crooked walls & floors, and due to that + our baseboards, the base cabinets of the coffee bar stuck out farther from the wall than they normally would. This meant that the pre-cut Ikea cover panels were too small. Sad face.

We had two options:

  • Option One: Buy larger Ikea cover panels, and cut them down to size. This would be a bit of a pain, and expensive. Cost $250
  • Option Two: Make our own. Aubrey & Lindsay’s Little House Blog conveniently has the same kitchen cabinets as us,  and Lindsay mentioned in a post that she found the perfect shade of paint to match the cabinets. We could fabricate our own cover panels & paint them to match the cabinets.  Cost: $60

Which option do you think we went for? You guessed it; the cheaper one. We headed to Home Depot, got 1/2″ mdf cut to the rough size we needed, and stopped at Benjamin Moore retailer West Toronto Paint & Wallpaper, and got a quart of Benjamin Moore Regal Select paint mixed in Paper Mache (pearl finish).

At home, we scribed the panels to fit the crooked walls & baseboards, and cut with a combination of the table saw, circular saw and jig saw to get the correct sizes we needed.

Next up, I applied a thin coat of spackle to the mdf edges (mdf edges are rough, and I find spackle is the best way to get a super smooth finish. Apply a thin coat, let try, and sand smooth.) After the spackle was sanded, a coat of primer was applied.

Priming cabinet covers
Instagram garage
We had 6 cover panels total. Here’s our garage mid painting panels & finishing an 8′ table & benches.

When dry, a light sand removed any roughness. Next up, four coats of paint, and we were ready to install.

We used 1″ screws through the cabinet shelf holes, and in a few minutes all the panels were up.

Here’s some before and afters:

Bottom Cabinet Before
Bottom Cabinet After
Bottom Cabinet After (still needs a smidge of caulk at the baseboard)
Upper Cabinet Before
Upper Cabinet After
Upper Cabinet After
Another Upper After
Here’s the other upper cabinet with the cover panel

The upper cabinets look a bit silly right now, as the panels stick out 5/8″ farther than the cabinets. That’s because when the doors are installed the panels will come out right to the edge of the door, making for a perfect fit.

A lot of the time the finishing touches on a job get put to the back burner, they are usually a lot of work, with little reward, but it is worth it to go the extra mile, and get it done! Now…for the rest of the items on that list!

Coffee Bar
Coffee Bar

SOURCE LIST:

Materials:

2 – 4×4 1/2″ MDF Handy Panels – Home Depot
Benjamin Moore Regal Select paint mixed in Paper Mache (Pearl) – West Toronto Paint & Paper

Tools Used:

Table Saw
Circular Saw
Jig Saw
Painting Supplies (brush, roller, tray etc.)

Difficulty Level (on a scale of 1-5):

two out of five

Total Cost: $60

Update Chairs w/ Spray Paint + The Best Paint News Ever!

We re-used our old dining chairs when we made our DIY iron & wood dining table. As you can see below, it’s not ideal. The chairs don’t  “match” the table, yet they’re not different enough to pair well with the table.  Why didn’t we get new chairs? Chairs are expensive!  I wanted pretty metal Navy chairs, or metal Tolix chairs. Then I remembered one of those chairs is more than our grocery budget for a whole month…eeep

Dining Room
Dining Room & Kitchen

Chair vs. Food. I choose food.

However those chairs were still driving me nuts. They have lived with us since we moved to Toronto 7 years ago. They’re well built, but they lived through our late 20’s, a lot of fun and a few exuberant parties. They are scratched, and are finished with that really dark espresso stain color that might as well be painted on. You cant even tell that there is real wood hiding under it. Combined with the dark dining table in our otherwise bright kitchen/dining room, it was making a bit of  black hole.

It was time for a change.

Now. As you may have noticed, I heart spray paint, and in particular I have a soft spot for RustOleum Universal spray paint. Their oil rubbed bronze finish may be the best spray paint finish on the market. Really. In the past we’ve made a knock off Restoration Hardware mirror with RustOleum Universal, refinished a busted rocking chair, given new life to mismatched heat registers, brought a light fixture back from the 80’s, gave a bit of glam to a plastic frame, and even saved some shabby door handles.

The choice was obvious. Chairs; meet spray paint.

I set up my DIY spray booth in the garage. Gave a light sand, and a good cleaning to the chairs, then gave them several coats of RustOleum Universal in gloss white.

DIY TIPS! When spray painting, the prep is the most important step! Ensure your surface is very clean. Use a degreasing cleaner such as TSP to remove any oil or wax from the surface. If your surface is very shiny and slippery, always rough it up a bit with some sandpaper, to ensure good adhesion. Spray painting is all about light coats. Give your piece several light coats using a sweeping motion about an arms length away from your surface. To avoid drips and runs, don’t spray too close.  For surfaces that are going to see a lot of wear, put on an extra coat. Make sure you re-coat within an hour, or after 48 hours to avoid the paint cracking or not adhering properly. Go out and paint something!

Chairs Before
Chairs Before
Chair in the paint booth
Newly painted chairs drying
Chair After
Chair After

That’s just a sneak peek of the changes to the dining room. We have another couple projects in the works, so a full reveal in a few weeks!

Now for my super special awesome paint news!

I had the chance to meet the folks from RustOleum last week at the Home Depot DIY 101 day, and they let a super big secret drop. RustOleum is coming out with SEVEN new colors of Universal paints in Home Depot stores this week. Yep, 7! They look amazing, and I cant wait to try them all out. Check your local Home Depot Canada store in the coming weeks for these new colors:

RustOleum Universal Flat Metallic:

  • Chestnut
  • Burnished Amber
  • Soft Iron
  • Antique Nickel

RustOleum Universal Hammered Metallic:

  • Chestnut
  • Burnished Amber
  • Antique Pewter.

These paint finishes look amazing! Very Restoration Hardware-ish. Perfect for refinishing dated hardware, light fixtures, furniture and anything else you can think of.  I cant wait to try them out!

Have you spray painted anything lately? Ever used RustOleum Universal paint?

Chalkboard Menu

My family is rolling into town for the holidays in less than 24 hours. My to-do list is a mile long, I am contemplating giving up sleep to get it all done.

So it why on earth was I standing on a ladder drawing on our new chalkboard wall at 10pm? It was because I had a vision. I wanted a Christmas dinner chalkboard menu, and dammit I was gonna have one.

I had already planned out the menu, I just needed to decide how it was going to look on the wall. I decide to start small. While I love the amazing chalkboards on Pinterest, those are all done by chalkboard artists, and frankly the last time I touched chalk was writing lines on the blackboard in grade school. So I decided to set the bar low, and make a simple menu.

I laid out my type in illustrator on a canvas the same size as my wall.

Then I taped off the spacing on my wall, so I would know where each line of text was supposed to go, and so that the last line of dessert did not dip below the height of the table, so that everyone could see the menu. Once that was done, I started drawing.

“Menu” drawn, and all my tape marks for the rest of the text

I had the computer open beside me and I kept referencing my layout and tried to draw the “Menu” all pretty. Its not perfect, but I have absolutely horrid hand writing. For the actual menu I just wrote in my normal uppercase printing.

Chalkboard Menu Done

I don’t think it turned out that bad. I am by no means a chalkboard artist, but at least its legible. (Although El Granto thinks my “P” ‘s look like D’s. And that people will think we’re having “Dave Potatoes” for dinner…

Dining Room & Menu

Now all I need to do is clean the house, set the table, and cook all the food…

Chalkboard Wall

Our entryway, dining room and kitchen are all one great big open concept room. As soon as you walk in the front door you can see straight to the back of my kitchen. Its nice because the storefront window allows in a lot of natural light, and the open concept high ceiling space makes everything look a lot bigger than it actually is. Since moving into the house we have done very little to the main floor. The main reason being that anything we did would either cost a lot, or impact the whole main floor (i.e. we have one 60 foot long wall that runs from the front door to the back door, going through every room on the main floor except the powder room. So you cant just paint the kitchen or the dining room, you literally are painting the whole first floor.)

We have big plans for the space, we want to create a coffee bar in the dining room, replace the sink, faucet and countertop in the kitchen (and backsplash if I get my way). We just made a new dining table and bench. I have some art projects in the design stage, and a lot of projects for the livingroom.

In the interim I wanted to get the dining room ready for my holiday guests and for Christmas dinner. There is a chimney wall that juts out in the kitchen (see it behind the table in this shot).

See the small wall that juts out right behind the middle of the table?

I decided to give it a bit of a focal point, and paint it with black chalkboard paint. That way I can feature a menu board for dinner parties etc.

To start out I sanded down the wall to remove any imperfections and to make it as smooth as possible. Then I coated in one coat of primer.

Priming
Wall Primed

I sanded the primer than applied one coat of chalkboard paint. I started to get a bit worried at this point as it didn’t cover well at all…

One coat of Paint
Detail shot of one coat of the chalkboard paint

After a second coat it was started to look much better, but it still needed at least one more coat. I sanded at this point to try to make it as smooth as possible (chalkboards work best when they super smooth!)

So after sanding and a third coat of chalkboard paint I was starting to get the result I was looking for.

Several coats of chalkboard paint

After this I gave it one more sand and what I thought would be the final (4th) coat. However after it dried it was even rougher than before. Eep!  So once again I sanded and sanded and sanded some more then I painted a coat sideways instead of up and down. After that, I sanded and painted two more coats. Yes that’s right, if you’ve been counting you’ll know that we’re up to seven coats of paint. At this point I still wasn’t convinced it was smooth enough, but gave up because I had had enough of this project…and i deemed it “good enough”. Having never worked with chalkboard paint before I am not sure if I was just being anal retentive, or if you can actually get a perfectly smooth effect on a wall.

Once it had dried for three days, we covered the whole wall in a coat of chalk (rub the side of a piece of chalk over the whole wall.) Consider this like seasoning a cast iron pan. Then rub off with a dry cloth, and you can use your chalkboard wall. Just don’t wipe it with a wet cloth for at least a week.

Chalk Rubbed on Wall
Detail of Chalk
Chalkboard Done!

Check back tomorrow to see how I designed my Holiday Chalkboard Menu!

***UPDATE*** Here’s the Menu

Chalkboard Menu Done

SOURCE LIST:

Materials:

Rust-oleum Chalkboard Paint in Black – Canadian Tire
CIL Primer – Home Depot

Tools Used:

Paint brush, tray & roller

Difficulty Level (on a scale of 1-5):

Two out of five

Total Cost: $20