If you missed it, we built a Wood & Pipe Dining Table, check it out here.
****UPDATE**** Check out our revised version of the Pipe & Wood Table
")
Today we’re gonna finish it!
Although I love the thickness and width of the construction grade spruce 2×12’s that we used, I don’t love the colour. They are yellowy light wood. Its just not my thing. We wanted something a bit darker, but that would not overpower our open concept dining room/kitchen. Our walls are a light grey, floors are a natural ash, and our cabinets are white. After considering several stain options, we opted to go with Varathane Stain in Chocolate. We also opted to drop $15 on Wood Conditioner. A lot of people think wood conditioner is an overpriced fad. However, I have stained softwood before and had utterly terrible blotchy results, and a stain that was waaaay to dark. So rather than ruin my whole tabletop, I opted to spend the $15 and give it a shot. So we applied the wood conditioner and let it dry for 30 minutes. Then I came back and applied a generous coat of stain to the table (one board at a time) with a foam brush. I let it soak in for about 5 minutes then wiped it back with a clean rag. OMG I cant believe how amazing just one coat looked!
")
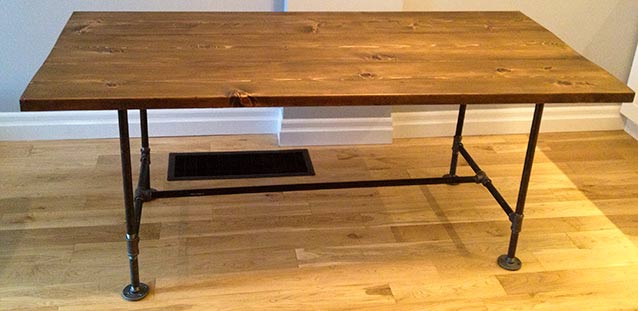
I let it dry for about an hour, then came back and gave it a second coat of stain.
The stain really brought out the textures and grain of the wood, and made it look a lot more rustic and well… less cheap. Ha ha! I was very happy with the colour, and I knew that when we put our final finish on it would get a bit darker.
")
As we choose a low grade lumber, there are a lot of knots, and a few cracks. I like the looks of the knots, but there were a couple big knots that had considerable holes in them (which will be crumb catchers and a bucket of pain in the butt later). We decided to epoxy the large cracks and knot holes. I picked up a $8 tube of 2 part epoxy that dries transparent (this is very important). After the stain had dried for 24 hours, we taped off around the knots and mixed up some 2 part epoxy.
")
We filled the knots/cracks with epoxy using a small wooden stir stick as an applicator.
")
After the epoxy dried we removed the tape, and carefully scraped any over spilled epoxy with a sharp razor blade. Here is a close up of one of the filled knots.

In hindsight, I probably would have delicately stained the knots and cracks before staining the whole table, then epoxied the knots, then sanded them, and stained the rest of the table. I overfilled a few of the cracks, and they could have used a sand. I also would have removed the tape before the epoxy dried entirely. Trial by fire!
After the stain and epoxy had dried for 24 hours, I started oiling the table. We decided to try tung oil as a finish for the table. We liked the idea of using the table like a big cutting board or butcher block counter top. Meaning if we wanted to have a wine and cheese night, we could literally put the cheese on the table. We like the idea of the table getting bashed, beaten up and abused. The idea of a shiny varathane finish just didn’t work for us. So we did a bit of research and settled on tung oil, which is a natural oil that actually dries. Problem with it, is it requires a LOT of applications, a long dry time, and a lot of muscle power for rubbing that thick oil into the table.
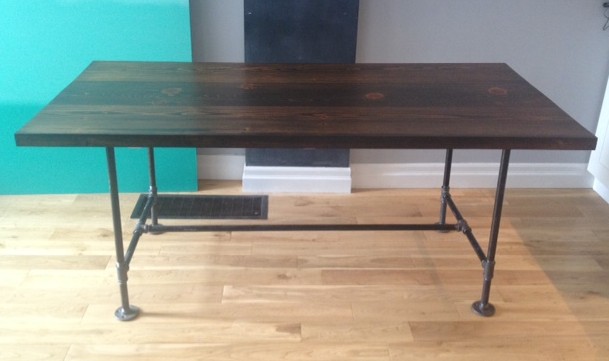
So we got started on our oiling, and oiled some more, and some more, and some more. A weeks worth of oiling and this is what we’ve got now.
***UPDATE*** We continued oiling once a week, and started using a 600 wet/dry sandpaper to lightly rub in the oil. This made the table super smooth, and did not damage the finish/stain. We only started using the sandpaper after 6 or 7 coats of oil were already on the table.
")
")
")
")
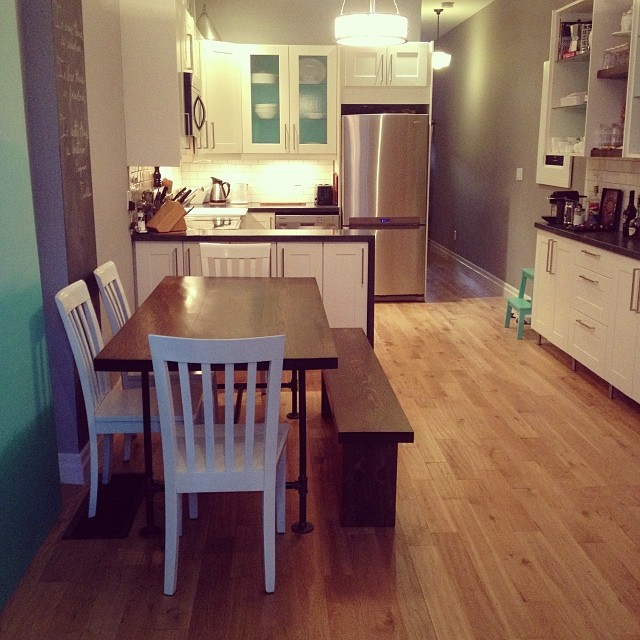
What do you think? We also sneaked in another little project to go with the table, will be back with it later this week!
")
**UPDATE** Check out the matching bench we made.
****SUPER UPDATE**** Check out our revised version of the Pipe & Wood Table, painted chairs and bench.
SOURCE LIST:
Materials:
1 – 3/4″x10′ black pipe – Home Depot (cut & threaded to size, for a complete cut list check out this post)
1 – 3/4″x6′ black pipe – Home Depot
4 – 3/4″x6″ nipple – Home Depot
8 – 3/4″ Floor Flange – Home Depot
6 – 3/4″ Tee – Home Depot
1pkg 3″ felt furniture pads – Home Depot
2 – 2x12x12 spruce – Rona
Varathane stain in Chocolate – Home Depot
Varathane wood conditioner – Home Depot
Pure Tung Oil – Lee Valley
Tools Used:
Circular Saw
Kreg Jig
Measuring Tape
Difficulty Level (on a scale of 1-5):
Total Cost: $200 ($35 in Lumber, $120 in pipe/fittings, $45 in finishing materials)
I want to make this seat 10-12 people. Do you have plans for one that size?
You used felt pads on the bottom how did u attach them to the flanges
They have their own adhesive.
Can this table be broken down?
Table is gorgeous!!
I would like to use your plans for an outside table on our patio. Any suggestions on what type of wood to use??? Also, it looks like your table seats 6 and I think I might want to extend it for 8. How would you change/alter your plans? Would you recommend adding a third support in the middle for a larger table? Sorry for all the questions!!!
Hi Mike,
For outdoors, cedar is awesome! For 8 I would add a cross brace, and just add 2′ to your long pipe measurement.
Oh boy….looked easier than it was. My FIRST attempt at making this table: I bought the wrong lumber, which did not have straight edges (i think it’s calld framing wood in the construction section of the big box hardware stores). Although itlooked fabulous stained with “provincial stain” color (minwax gel), it was completely lop sided when I glued the three planks together, not useable as i could not get it to rest on the pipe legs. I would have had to shim up a couple of the corners and then the table still would not be straight.
Went back to store, bought the right wood this time (white pine planks). Started over. Attempted to glue, then clamp the planks and then screw with 5/8 x 3″ wood planks to secure even further under the table top. Those pieces of wood to secure, split once drilled into, way too dry. Did not even get to the part where i screw in the flange to the table top. Back to store to buy plywood (cut to 5/8 x 4 inch pieces x 3) to secure the base to the tabletop (as per recommendation from contractor with experience with wood). This is the step i am at now…not yet complete.
For me, i live in Canada, our big box stores DO NOT thread pipes for free (at least not in Montreal), it’s 3-5$ per threading which adds a lot of cost to the pipes. AND, I had to find a specialty store that would do this for me since the three big stores i went to, none had the machine to thread pipes.
I’ll get there…eventually and I will love my rustic table. I do love the stain I chose, not as dark as most of the pipe furniture posted on pinterest. Wanted a lighter look where I could really see the grain of the wood. So once I am sure my table is secure and straight, i will re-stain the same color….what a journey!
Oh no Gina! It does sound like you’re getting there! To avoid your wood splitting, pre-drill it first. Take a drill bit smaller than your screw, and drill a pilot hole where your screw is going. Then when you screw, there is not as much wood being forced out by the screw, and your wood wont split. Also, make sure to use wood screws. Finer toothed screws can cause some splitting as well.
Great idea to epoxy the knots! The table looks fabulous!
I am making the exact same table, except as a high seated bar. I am finding my piping to be way more expensive than what you have listed and my black pipes are super grimy and gross. How did you clean them off? THANK!
We used Goo Gone! Worked like a charm!
Just found your website and love this table! Do you think that epoxy technique would work on the gaps in between each board? Have you had issues with crumbs getting into those gaps? Thanks so much for sharing.
Hi Maggie, great question! We have found that a LOT of crumbs get caught in the gaps! So much so, that you should expect to see a follow up post in about a week. The epoxy might work perfectly for the gaps. Either that or source straight edged wood. You could also cut off the rounded edges using a table saw or circular saw.
Hello Kristin ! Nice job ! I absolutely love this table.
I was wondering what stain you used (brand / color). We’re about to repaint our wood fence and that color is really beautiful !
Thanks !
Thanks Marie! The stain we used is Varathane Chocolate. I love the color, and we have used it in several other places around the house since!
love the table! looks so good- very inspiring!
off topic, but I’m wondering what kind of wood you have on your floors…do you mind sharing? thanks!
Hi Robyn, Thanks for the kind comment! Our floors are hand scraped Ash. We love them. They are perfect for an energetic dog and busy house!
Thanks so much for the reply! I’ll be sure to check it out!
hello how did you connect/attach the wood to the metal/leg???
did you use screws???
thanks
Hi Maria,
The legs have a flange at the top, and we attached the flanges to the tabletop using 1″ screws. You can see it a bit better in this post http://www.storefrontlife.com/diy-pipe-wood-table-pt-1/
Looks great guys!
That is a gorgeous table. You did a great job and your tutorial tells us what to do and why. I showed my husband and I think we are going to make one for our daughter. Sure hope we actually complete it.
Thanks Cathy!
At first we were a little apprehensive about making a whole table! But it came together really easily and wasn’t much fuss at all.
One word of advice. When you stain and oil it the boards will naturally warp with the moisture. Don’t worry. As they dry back out they’ll straighten again. We had a miniature freakout the first time we noticed it thinking our table was all wibbly-wobbly.