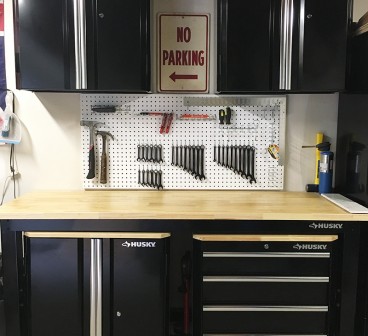
After hours of organizing, cleaning, dump runs, and squealing like a little girl when finding cobwebs and/or spiders in my hair, the garage is finally done! Continue reading “Garage Reveal”
Tag: organization
The garage is a black hole
Our garage is like an old comfortable pair of shoes. Well worn, often used, but not well cared for, and not very pretty. The garage is where things get built, tools and motorcycles get stored, and where things that have no place in the house go to die. Oh and everything is covered with a solid layer of sawdust and/or cobwebs. I’m painting quite the picture, aren’t I? After two renos, and copious amounts of projects, our poor garage was really in a sad state. Continue reading “The garage is a black hole”
Pinterest Challenge – Restoration Hardware Shelf
We had so much fun doing the Fall Pinterest Challenge, that we jumped at the opportunity to do it again this time. The jist of the Pinterest Challenge is to stop just pinning ideas, and start creating. You’re supposed to DIY something from Pinterest. Whether it be a recipe, craft, home project etc.

I have a few pins over on Pinterest (only 2,555 or so…) so I had a good amount of things to choose from! I figured this was a good opportunity to knock something off the to-do list as well.
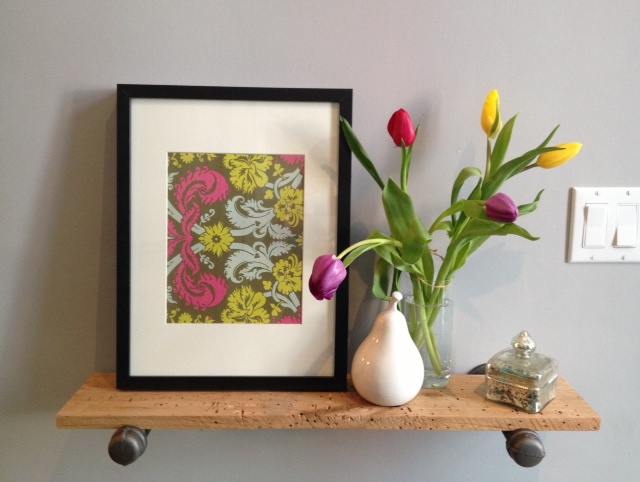
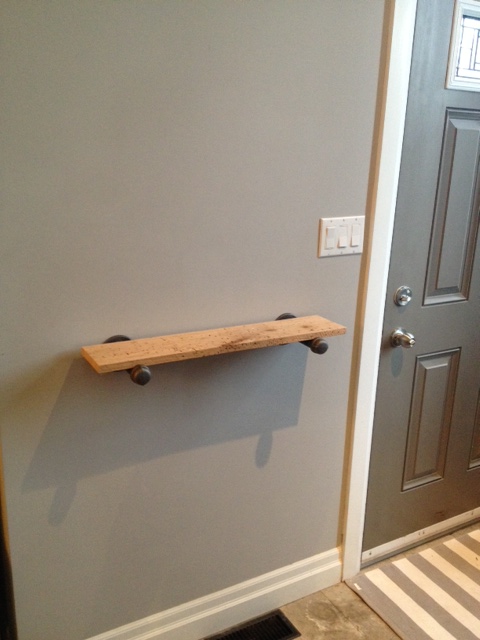
Our front door opens onto the dining room. We have built a coat rack, installed an Ikea wardrobe and we have a nice bench and mirror. The only thing lacking in the entry was somewhere to put your keys and mail, or to keep a coffee away from the dog while you’re tying your shoes pre-puppy walk. We don’t have a lot of space, so a traditional console table was going to be too big.

Here is our inspiration:

Source: restorationhardware.com via Kristen on Pinterest
If we love the shelf so much, why didn’t we just go buy one? errrr… The price for shelf + brackets was $240. Yep, for one lil shelf. Ouch. We just don’t roll like that.
So we made it (with our spin on it of course)
So how’d we do it?
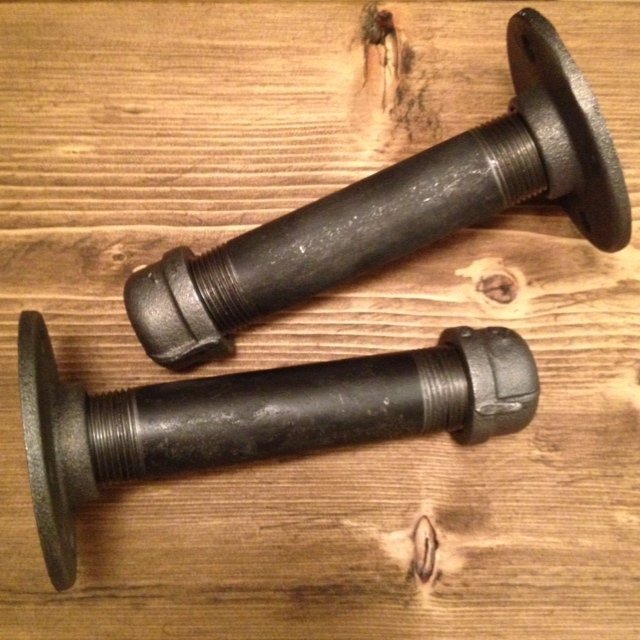
Bought some 1″ gas line pipe (it matches our dining table!) from Home Depot.
Supply List:
- 2 – Floor Flanges
- 2 – 6″ Nipples (teehee)
- 2 – End Caps
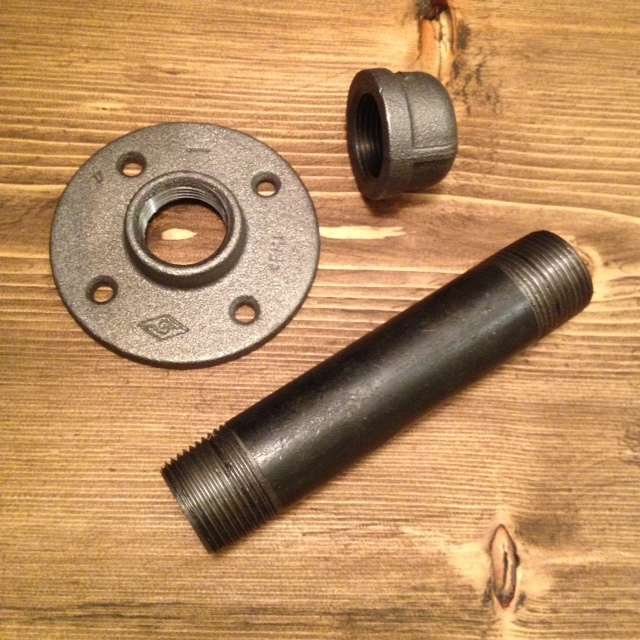
Assemble them all together and this is what you get:
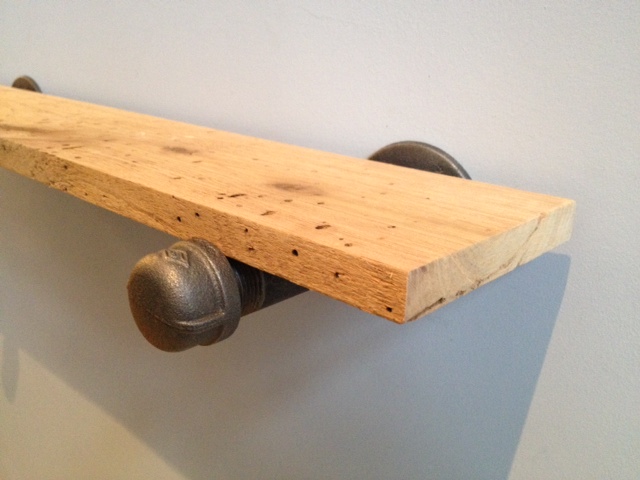
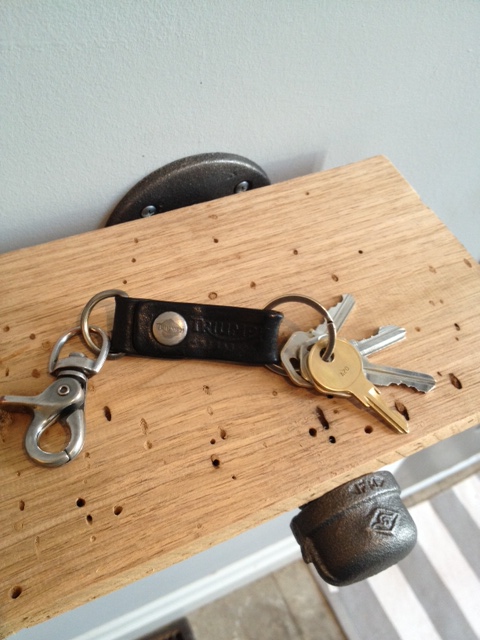
Now you need a shelf. We headed to the garage to check out what cool wood we had. We found some awesome worm eaten Butternut that El Granto had gotten for Christmas (yep we ask for building materials for Christmas). We loved the character of the butternut and decided it was the way to go.
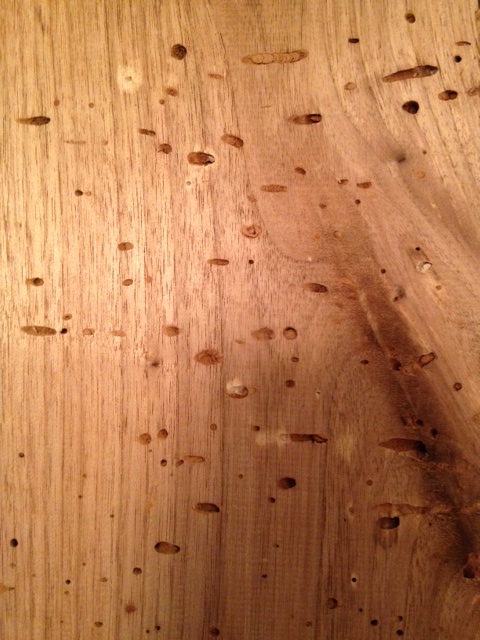
We cut the piece of wood 28″ long, and trimmed the width to 5.5″. This would enable the wood to sit on the pipe, but inside the edges of the end cap and flange. We wanted to be able to see the cool bracket. You can easily make the shelf wider by resting it on top instead of inset.
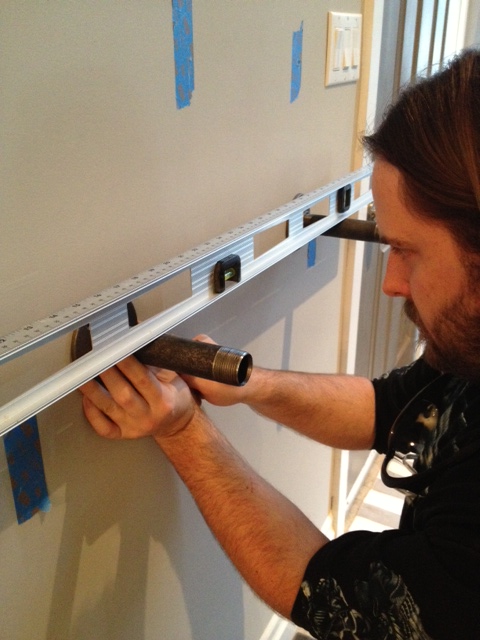
Next up, after deciding on placement and height (centered on the wall and 40″ off the floor) we went stud hunting, and found that we could hit one of our brackets into a stud. So we marked out the placement.
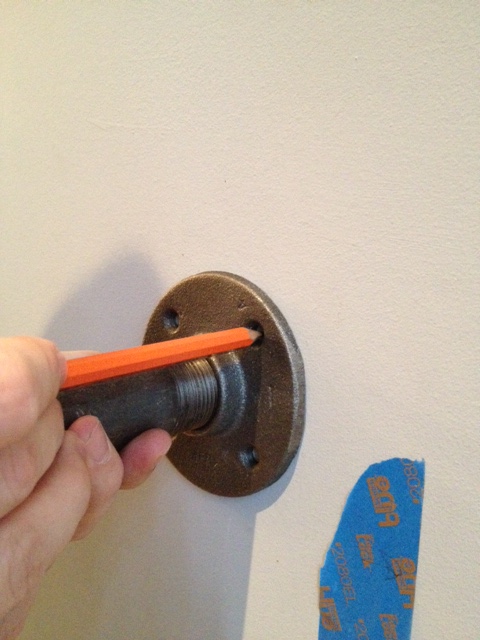
After the holes were marked, El Granto screwed the bracket into the studs.
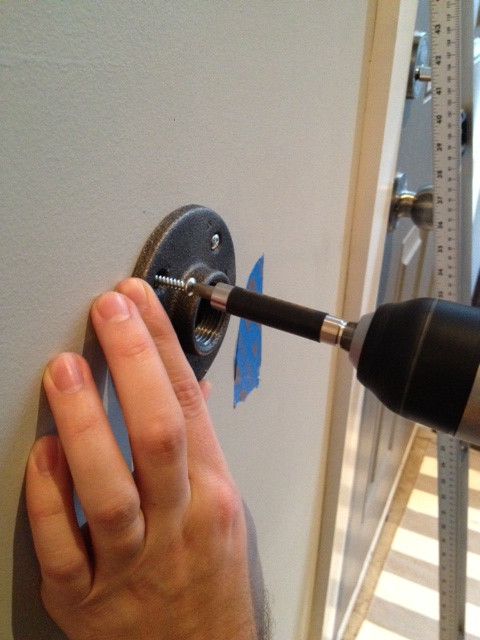
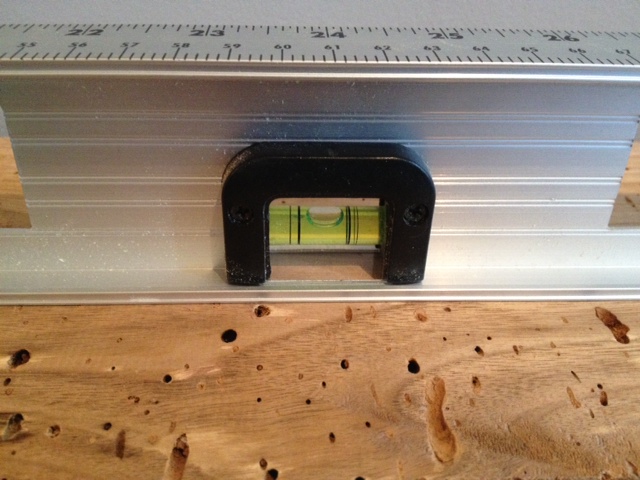
After the first bracket was attached, we attached the pipe nipple and used it to help us level the second bracket.
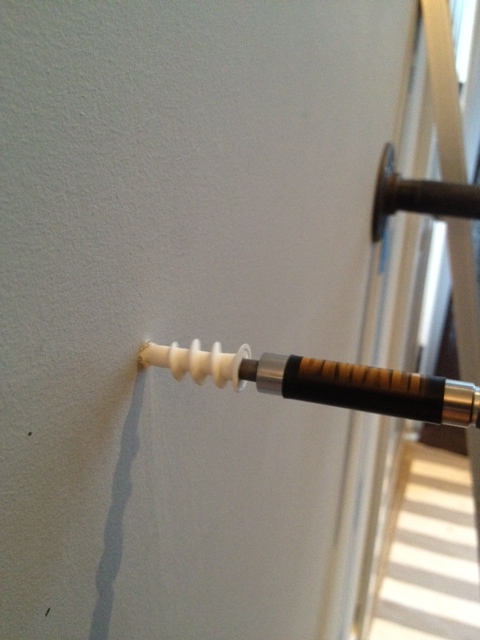
Next up we marked the second bracket, and used EZ Ancors to ensure the shelf would be attached to the drywall nice and sturdy.
We then attached the other flange to the wall with screws into the wall anchors, and then screwed on the pipe nipple and end cap.
We gave our wood two coats of furniture wax and laid it on top of the pipe, screwing the end caps against the wood to hold it steady. Oh and it’s nice and level!
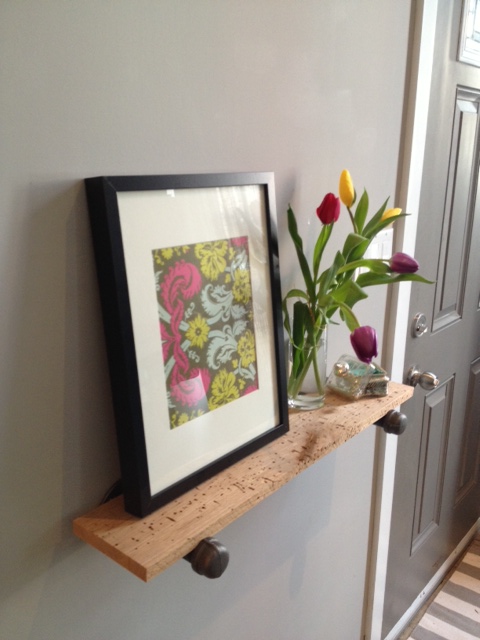
TA DA! What do you think of our DIY Restoration Hardware Shelf & Bracket?

Make sure you check out all the other awesome Pinterest Challenge projects, check out the hosts blogs too!
Sherry @ Young House Love
Katie @ Bower Power
Megan @ The Remodeled Life
Michelle @ Decor and The Dog
SOURCE LIST:
Materials:
1″ Gas Line Pipe (2 flanges, 2 end caps & 2 6″ pipe nipples) – Home Depot
Butternut Wood – Gift
Furniture Wax – Home Depot
EZ Ancors – Home Depot
Tools Used:
Miter Saw
Sandpaper
Dish Soap (to wash the pipes)
Drill
Level
Pencil
Difficulty Level (on a scale of 1-5):
one out of five
Total Cost: $16
Knobs as Hooks
Girls come with a lot of accessories. We have purses, shoes, scarves, jewelry and a plethora of other crap things. This is often why we require so much closet space to store it all. Most of my rarely used handbags and shoes are packed away, but my often used purses, scarves and shoes need to be close at hand, and thus can be kind of a mess.
To get them out of the way, yet keep them accessible I decided to hang some knobs inside our new master closet to hang my favorite accessories.
The problem with knobs is that they are meant to be screwed into a cabinet. This means that they have what you call machine screws (screws without a pointy bit) to attach them to the cabinet. They screw through the back of the cabinet into the knob. This makes them impossible to attach to a wall without some DIY’ing.
Here’s what you need to do. Take your knob screws out to the garage and cut off the heads of the screws using a saw with a metal blade. This now makes them headless screws (which means they can be screwed into things on both ends. )

Head back inside wielding drywall anchors and a drill. Attach your wall anchors into the wall where you want your knobs.

Then simply thread your now double sided screws into your knobs and your wall anchors. Ta Da! Knobs on a wall.

Now hang your accessories, and get your nagging husband off your back.


You can easily do this with all sorts of knobs, for holding towels in the bathroom, coats at the front door, or even the dog’s leash handy but out of the way.
SOURCE LIST:
Materials:
Saata Knobs (6 pack $1.49) – Ikea
EZ Ancors – Home Depot
Tools Used:
Hack Saw
Drill
Difficulty Level (on a scale of 1-5):
One out of five
Total Cost: $1.50
Organizing & Purging
Fueled by El Granto’s searching for a specific article of clothing that never got unpacked when we moveed (yeah I know!), we did a bit of a mini organization session last weekend. It involved taking every single thing out of our closet, organizing and purging and filling five, yes FIVE! bags of clothes to donate.
")
We also made some room in our closet and dressers by swapping all our summer wear into storage, and getting out all our cold weather clothing.
After doing all that work in our closet, it inspired us to clean out a few more areas around our house. We had a few bigger pieces (dvd bookcases, a dishwasher, an office chair & some bedside tables) that were taking up too much real estate. A few minutes taking photos and writing up Craigslist/Kijiji postings, and we’d sold over half of it in less than 24 hours! (and given away a few items for free!) The cash made will get re-invested in home projects, and now there’s some extra room in our garage and basement!
I always forget how easy it is to purge old unused things, and kick myself for not doing it more. I may not need things anymore, but I bet someone does.
For our clothing to donate, we set up a pick-up appointment with The Canadian Diabetes Association’s Clothesline program. You can call, or schedule it online, and they will come and pick up your donations. (and no one needs to be home, just label everything with a “D” and put it on your front doorstep.)
The garage also got a tidy, and up next I am looking at you basement…
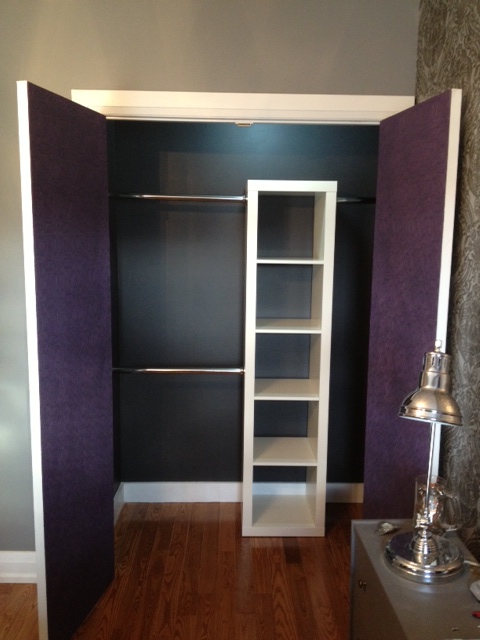
Master Bedroom Closet Part 2
*If you missed the first part of our closet makeover, check it out here* Continue reading “Master Bedroom Closet Part 2”
Hide Your Ugly Office Tech
I enjoy having internet, hell without it I wouldn’t be posting this. However I hate all the technology required for it. Wifi cable modem, router, cables, wires…yuck. They are always a tangled mess of blinking lights and ugly plastic. So what do you do about it? Make friends with some cigar smokers (thanks El Granto & Father in-law) & steal some of their pretty cigar boxes.

Drill some holes for cables, antennas and air flow in your cigar boxes. Plunk your tech junk in them and stack em up.
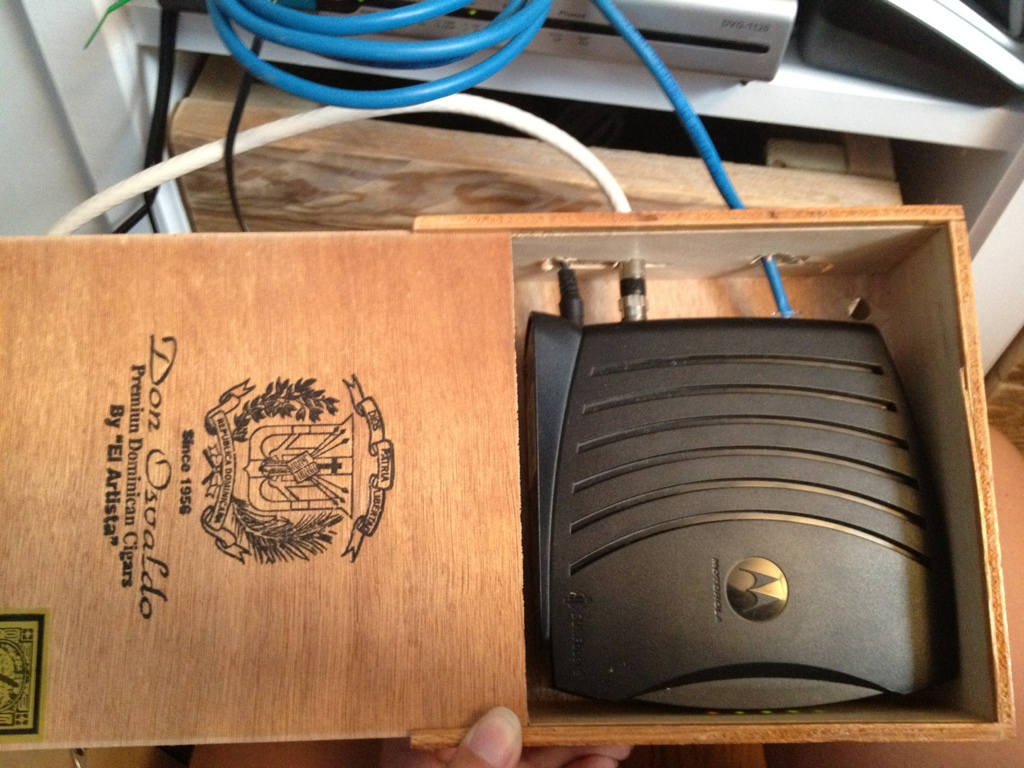

All our tech fit into two boxes other than my stupid VOIP gateway which is giant and stupid, and wouldn’t fit in anything. There… I told it. (until I find a box or old book for the gateway to fit in, he will just sit below the boxes.)
No one would know these unsuspecting boxes on my bookshelf hold all that ugly crap. There may be dirty dishes in the sink and laundry piling up but it makes me sleep a little better at night knowing that my tech junk is neatly tucked away.


So now you have no excuse. Go hide your tech!
SOURCE LIST:
Materials:
Cigar Boxes: Unsuspecting Family
Tools Used:
Pencil, Drill,
Difficulty Level (on a scale of 1-5):
One out of five
Total Cost: $0
DIY Coat Rack
For those who follow me on Pinterest, you may have noticed a lot of front hall coat storage solutions being pinned to my “Organization” board lately.
Our front entryway is well…a mess. Our front door opens to a square tiled area with no closet and a blank wall. No place to put your keys, coat, shoes or, well… anything.
Slowly we have introduced a few good things to the front entryway. A Ikea Pax wardrobe for storage, a handcrafted bench from a local artisan and a giant mirror that came with our last apartment. The black sheep of the entryway however is an ugly, broken $15 Ikea RIGG coat rack that we’ve had since college.

In fact, I believe its been broken since college. Held together by duct tape and zip ties (really!) The thing fell down every time you put a winter coat on it, and generally looked like a giant blob of coats taking up a massive amount of space in our entryway. We wanted to change it for a long time…we just never actually did.
So finally we got off our butts and decided to make a wall mounted coat rack to streamline the entryway some. Our lovely reclaimed wood bench was our inspiration. We wanted something that looked like it belonged with our bench. Like a brother from another mother. We picked up a piece of 1x12x10 rough pine (also used in the bath table DIY) from Home Depot. We measured our space, and decided for a 12×33″ wide rack with a 4×36″ mini shelf on top (to hold some art etc.)

We cut down the pieces of wood, sanded the roughest bits out and got to distressing.

We hammered, nailed, sawed, chiseled, and generally beat the crap out of our wood. My favourite part is some rusty nails (that I salvaged from my pallets) that we bashed into the wood, leaving nail heads and in one case the whole nail showing. It really does make it look like its been around 100 years.

As we wanted to match the bench, I headed out to pick up the darkest brown stain I could find. I came back with Varathane “Chocolate” and put on a coat. It looked great at first, but as it dried, it was still too light. So I put on a second coat of stain, then followed it up with a coat of Minwax Water Based Oil-Modified Polyurethane.

After it dried, I sanded lightly with a fine sandpaper, then gave it a second coat. Once it was completely dry we attached some nice cast iron coat hooks, and attached it to the wall (into the studs) with some nice 2 1/2″ long black screws.
So here is the before and after:


SOURCE LIST:
Materials:
1×12 wood: Home Depot
Varathane Chocolate Stain: Home Depot
Minwax Water Based Oil-Modified Polyurethane: Home Hardware
Cast Iron Coat Hooks: Home Depot
Tools Used:
Circular saw, miter saw, measuring tape, level, stud finder, drill, small foam paint brush, rag, misc. tools to distress
Difficulty Level (on a scale of 1-5):
Two out of five
Total Cost: $40 ($16 of that is the for the hooks)
Office Closet Storage
As our office is actually our third bedroom, it conveniently had a closet. A closet was the perfect place to store all the not so pretty office essentials. i.e. paper, cd’s, printer, El Granto’s ugly utilitarian college filing cabinet, as well as some oversize items that take up a lot of space in our own closet (I’m looking at you luggage…) To get the best usage out of our closet, we decided to place the filing cabinet on the floor of the closet and to build a shelf over top of it to house the printer and misc supplies. I mentioned to El Granto that I would like to work on this mini project after work one night and I came home it was magically built! I quickly put a coat of primer on it.

Then stood back and said, well now that works so well we need MORE shelves. We decided to put in a shelf and a closet rod so we could hang extra clothes or for if the office is ever turned into a nursery. So we got to work, hung a rod and another shelf.

I then primed it all and gave the whole closet two coats of white paint. It’s not like anyone will be inspecting my office closet, but it just neatened everything up. Now all our crap unattractive items can be safely shut behind doors (and I have a place to quickly shove rogue office items when company is coming over.)

The office is really starting to shape up now!
SOURCE LIST:
Materials:
5/8″ Plywood for shelves: Home Depot
2×2’s and 2×4’s for shelf supports: Home Depot
Behr Sealer and Undercoater: Home Depot
Behr Premium Plus Interior Eggshell paint in Pure White: Home Depot
Frog Tape: Canadian Tire
Closet Rod: Home Depot
Tools Used:
Circular saw, measuring tape, level, stud finder, drill, small foam paint roller & brush
Difficulty Level (on a scale of 1-5):
Two out of five
Total Cost: $10 (most materials were left overs from other projects)