After hours of organizing, cleaning, dump runs, and squealing like a little girl when finding cobwebs and/or spiders in my hair, the garage is finally done! Continue reading “Garage Reveal”
Tag: garage
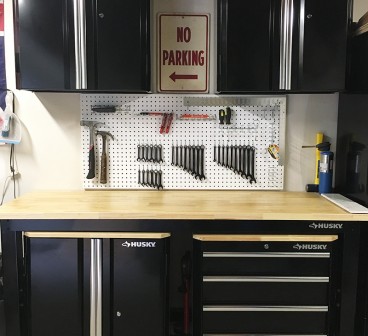
The garage is a black hole
Our garage is like an old comfortable pair of shoes. Well worn, often used, but not well cared for, and not very pretty. The garage is where things get built, tools and motorcycles get stored, and where things that have no place in the house go to die. Oh and everything is covered with a solid layer of sawdust and/or cobwebs. I’m painting quite the picture, aren’t I? After two renos, and copious amounts of projects, our poor garage was really in a sad state. Continue reading “The garage is a black hole”
Making a Paint Booth
When I need to spray paint a small item (knob, handle or vent cover) I usually put it on some cardboard and head out into the alleyway behind our house to paint. I then bring it inside our garage to dry. However when the weather turns cold, or when you’re painting a big item, that may not be an option. Such was the case this past weekend when we needed to spray paint a rocking chair we were working on. It was BIG and I needed a lot of space to paint, which mean a lot of over spray. We decided to set up a temporary spray booth in our garage. Which El Granto proceeded to call my Dexter Kill Room for the entire weekend. He even posted this pic on facebook with the caption “Built Kristen her own Kill Room”. No wonder no one wants to come over for dinner…

So here’s how we did it. I bought some heavy weight plastic drop sheets. We stapled them to the ceiling rafters in our garage in a 6’x6′ square.
")
")
We laid down a canvas drop cloth on the ground (which was an old wall hanging in our loft!) And using plastic clamps, shut the sides.

I left one side open for easy entry to the spray booth. We moved in our project.

After I finished painting (wearing a mask of course!), I opened up the sides of the spray booth and let the paint dry (note the garage was getting a bit cool by then, so to ensure my paint dried right I put a heater on to warm up the garage a bit.)
")
The next day after everything had dried, we took down the plastic, folded it up and its ready to go for next time.
SOURCE LIST:
Materials:
10×25′ Heavy Weight Plastic Drop Cloth – Home Depot (note, the so called 25′ drop cloth was less than 20 feet long! We didnt have enough plastic, and had to use an old drop sheet we had laying around… insert grumpy face here.)
Tools Used:
Scissors for Cutting Drop Cloth
Staple Gun
Difficulty Level (on a scale of 1-5):
One out of five
Total Cost: $8