Light it up!

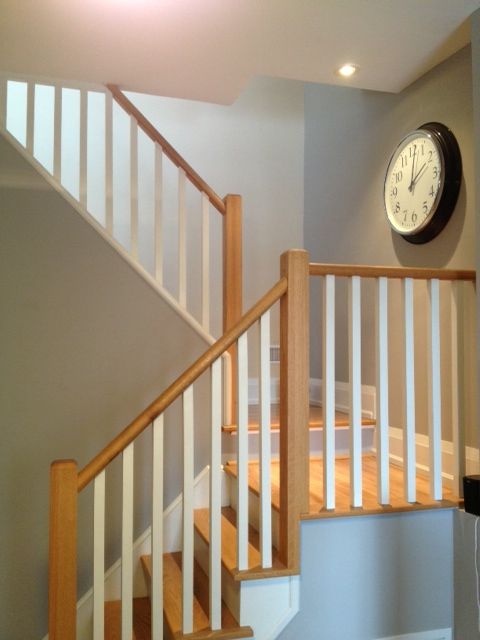
The Storefront has potlights in a few areas on the main floor, most notably the entryway and the kitchen. They’re great for keeping the place generally looking nice and bright, what’s not so great about them is that they are perpetually burning out, and are a pain to change.  The type of socket in our lights is a tiny screw in one, which we could only find bulbs for at Rona. A two pack of bulbs cost around $14, and on average would last less than three months. When one light would burn out, the next were sure to follow within days. If we didn’t have spares on hand (which I’m terrible with!) We would often find ourselves in the dark. UGH. We are carless, so a trip to the hardware store for new bulbs would always be left to the following weekend. The kitchen at least had under counter lighting to aid with the whole seeing the food I am cooking business, but the entryway did not have any backup lighting. If you came home after the sun had set you were essentially left in the dark to take your shoes off.

The day before Halloween the entryway light burnt out (of course!) Not wanting to freak trick or treaters out, or have the neighborhood think we were shirking away from candy duty, El Granto attempted to take one of the working light bulbs from the kitchen and put it in the entryway. I say attempted, as the moment he tried to take that bulb out of the death grip of a pot light, the thing shattered into a million pieces. This luck continued until El Granto had exhausted ALL WORKING LIGHTBULBS, and our house was essentially in the dark. Needless to say Halloween was embarrassing. I over compensated by lighting EVERY CANDLE WE OWN and placing them in the entryway and front window. Hopefully our house appeared spooky, not like we forgot to pay the power bill.

That weekend, we promptly headed to the hardware store to pickup bulbs. El Granto had been suggesting LED bulbs for ages, but gosh darnit, they are expensive, and we had not seen any in person that fit our strange potlights.  We were convinced we would not be able to find new, better bulbs for our lights, and we would resort to replacing ALL the pot lights.

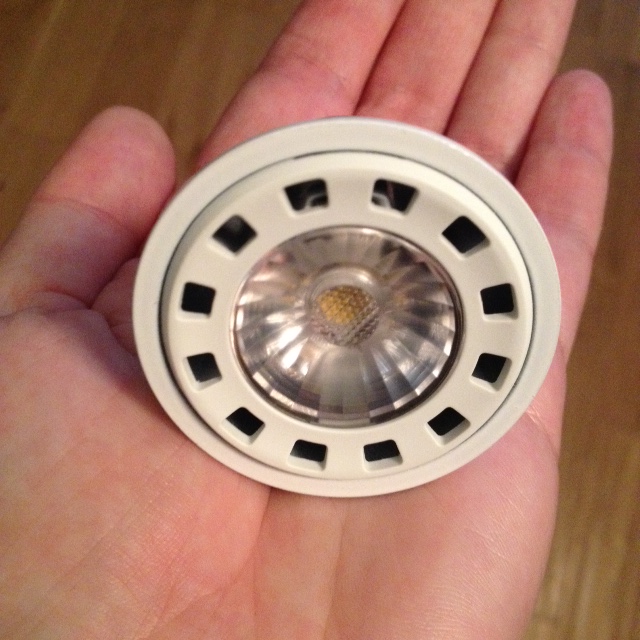
I left El Granto alone in the lighting isle at Home Depot (dangerous), and went in search of supplies for another project.  When I returned, expecting the worst, I found El Granto with childish grin on his face. He had managed to find not only bulbs for our lights, but LED bulbs. Philips MR16 LED bulbs. Ones that promised to last for longer than three months, and avoid us looking like the neighborhood weirdos without lights. I was skeptical. We hadn’t been able to find iridescent or florescent bulbs in this socket size, how could he really have found well priced LED ones? But after taking apart packing in the store (yes, we were THOSE people.) The light bulbs looked almost exactly the same. Except the new ones were a tiny bit longer. We took a chance, and bought enough bulbs for the main floor. They weren’t cheap, but definitely not as expensive as I thought. We have 5 pot lights, four in the kitchen and one in the entryway.

Philips LED Lights Philips LED Lights

We purchased two 2 packs, and one single, and our total came in at just over $75 before taxes.

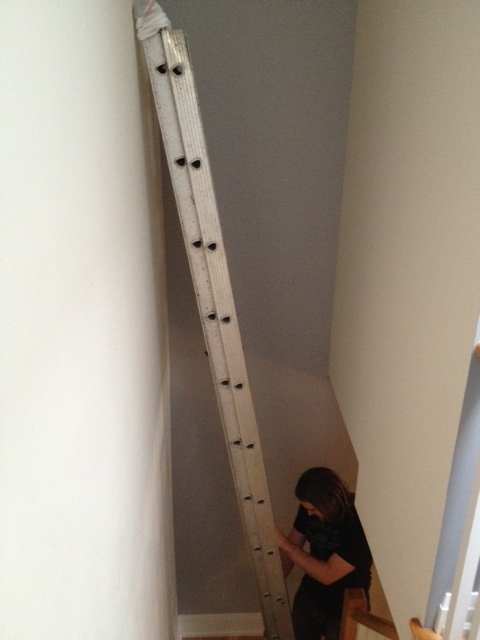
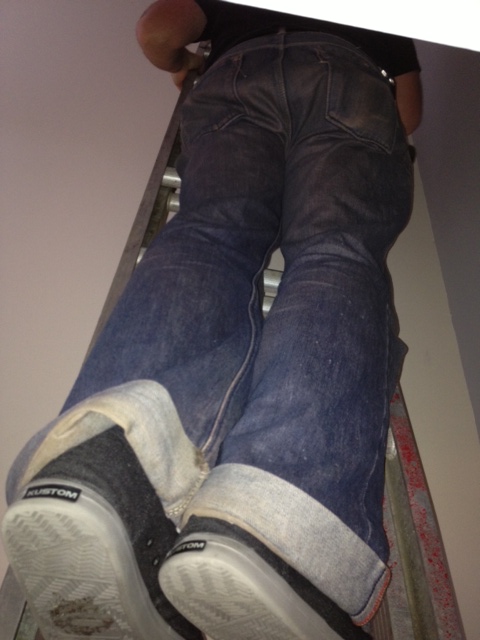
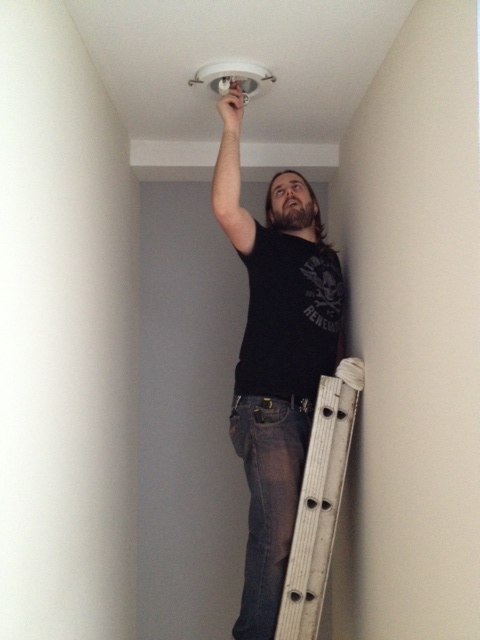
Back at home, El Granto set to installing them. After reading the package, it says they cannot be installed in closed light fixtures. Our pot lights had a glass cover at the bottom, which we decided to remove. It would look exactly the same (the glass was completely clear) and hopefully that would let out the heat better (perhaps that’s why our bulbs went so fast!?) as well as give us a bit more space in case the new slightly longer bulbs were a really tight fit. The new bulbs installed quickly and easily (no problems with the length).

Philips LED Lights Installed

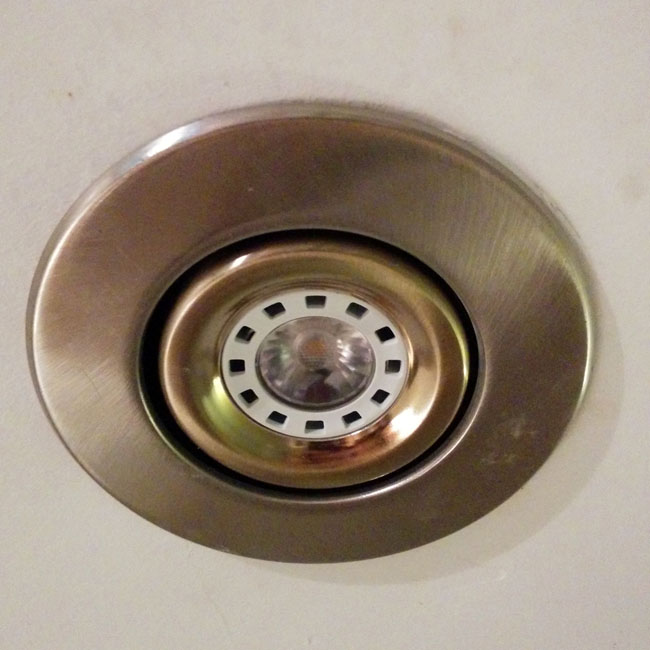
The color is a nice bright white. The kitchen receives a lot of light from the front storefront window, and the bright white works perfectly with that natural light, without being too blue, or industrial feeling.

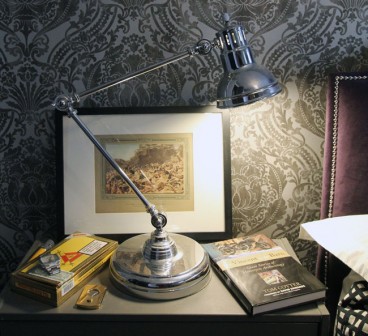
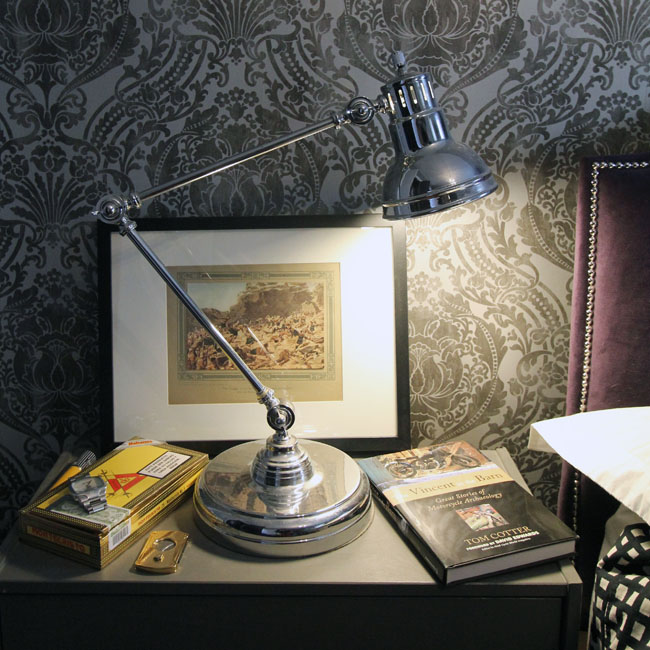
After living with our new potlight LED’s for a couple months, we received a sample of the Philips SlimStyle LED bulb in the mail. This one has a regular light bulb connection, and we decided to try it in a lamp in our bedroom.

Philips LED LightPhilips LED Light

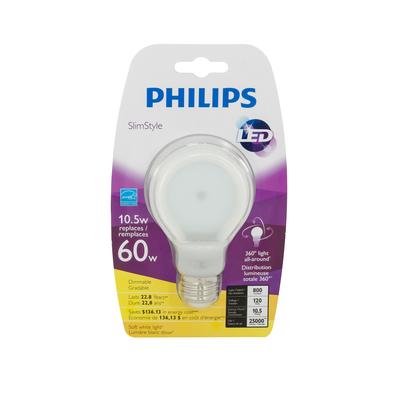
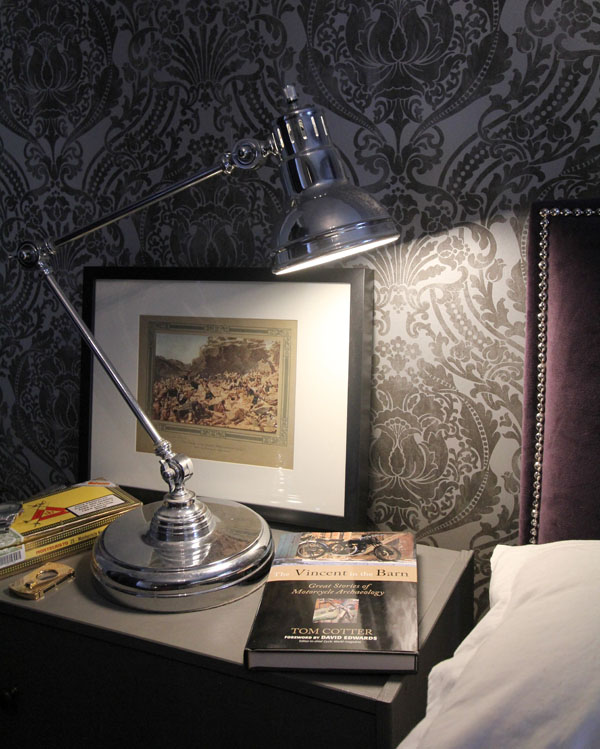
El Granto has a desk lamp for a beside lamp. It is nice and manly, but the current bulb  is a CFL that is a gazillion watts, and laying in bed it shines directly in my eyes. It’s like a fog lamp. It was unattractive, way too bright, and not a very nice color. That lamp was the obvious choice to try out the the SlimStyle bulb.

The SlimStyle knocked it out of the park. It has a nice soft light, great colour, and looks nice in the lamp (as opposed to the CFL that stuck out past the end of the shade with its weird looking tubes). It also dims in a neat way when you turn it off.

Philips SlimStyle Bulb

IMG_3025WEB

After several months using the Philips LED bulbs (both the potlight & the SlimStyle) we are very happy. No burnt out lights! Apparently the Philips LED bulbs are also dimmable, which is pretty cool.

Disclosure: The SlimStyle bulb was a sample that we received for free. We paid out of pocket for the potlight bulbs, and we did not receive any compensation for this post. As always, all opinions, words, typos, poor grammar and overuses of the word awesome are our own.


Thrift Store Tour

There is one big consequence of blogging, that I never would in my wildest dreams have imagined. Something that caught me so off guard.

As a grown up, out of college/university, working a steady 9-5 in an office, meeting new people is hard. Really hard. If its hard to meet ANYONE its damn near impossible to meet people with common interests. As a grown woman, I don’t walk up to strangers and ask if they like decorating, thrifting, or woodworking. I certainly don’t ask them if they’d like to be my friend.

Then blogging happened, and I started to chat with readers, and other bloggers. People my age, who were into the same stuff as me. Discussing fabric, power tools and paint colors! Making connections with real people.

Then this happened:

Lucy, Dani, Virginia, Myself & Melissa.  Photo Credit: Virginia @ Fynes Designs
Lucy, Dani, Virginia, Myself & Melissa.
Photo Credit: Virginia @ Fynes Designs

Myself and four other bloggers, traveling around Toronto in Ford Escapes on a whirlwind thrift store tour. We traveled throughout the city hunting for great home decor finds at Value Villages. Not just one store, we’re talking every single store in about a 30km radius.

Photo Credit: Melissa @ The Sweet Escape

It was SO.MUCH.FUN. Virginia from Fynes Designs, Dani from Lifeovereasy, Lucy from Craftberry Bush and Melissa from The Sweet Escape were a blast. We all had completely unique styles and tastes, and wandered the stores grabbing finds for ourselves, and ones we knew the other gals would like.

I feel bad for the other shoppers. We scoured those Value Villages high and low searching for the best scores in store. I got some amazing stuff. My (unintentional) theme was lighting. I found some fab items! My first nab was this brass lantern with smoked glass. I needed a new light for the guestroom, and knew this could be turned into something cool.

Brass & Smoked Glass Lantern

Next I spotted a couple of brass lamps. These were also picked for the guestroom. I have visions of wood and metal, with some badass shades.

I love lamp
I love lamp

Next I spotted a small chandelier. I have been on the hunt for some candle lighting for the back deck, and knew this would be perfect converted into a candelabra.

Chandelier hidden on a shelf

This mirror jumped out at me from the shelf screaming “take me home!” I loved its shape, only wished it was a bit bigger. Will still make a great accessory in our office or powder room.

The Mirror! Swoon!
The Mirror! Swoon!

Last but not least, I spied a whole collection of Nancy Drew books. I used to read my Mom’s collection when I was a kid and adored them. I nabbed every single book and can’t wait to pour over them.

Checking out with my finds

The other bloggers got some amazing finds as well. It was really cool to see their process, and how they picked things. You would have thought we’d be fighting for the items, but we really went in different directions. I can happily say that there were no cat flights or any arm wrestling for items.

Virginia, Lucy, Melissa & Dani discussing their finds

With bags and bags filled with finds, we piled into our Ford Escapes. I got to drive the red one the whole day.

Who let me drive?
Who let me drive?

I have to say, I went in with little expectations. The last Ford I was in was a “vintage” bare bones clunker. For small SUV’s I really enjoy driving my mother in laws Honda CRV, but I have to say the Escape impressed me. The model I was driving had a bunch of fancy pants features including a backup camera, this cool blind spot warning, and one heck of a nav/console touch screen.  The only problem I had was trying to operate the rear door. I learned afterwards that it was one of those fancy hands-free foot operated ones, but I just kept trying to lift it manually and it was giving me attitude. Guess I should have read the manual eh?

Our rides. I may have named the red one Suzy.

With all my finds at home, I set to transforming one item from my haul. I will be working the rest of the items into upcoming projects I promise, but I have to start somewhere! I took my brass lantern apart, and set to giving it a refresh for our guest room.

Lantern Disassembled

I picked up some angle iron and got El Granto to cut me a few pieces to make new sides for the lantern. The smokey glass needed to go (and good thing, as we broke a panel. oops!). El Granto and the dremel made quick work of the angle iron, and I got to priming all the pieces.

El Granto cutting the new sides for the lantern
Priming the lantern parts

We have oil rubbed bronze accent pieces I the guest room, and thought that would be a nice bold color for the lantern. After the primer had dried I used Rustoleum Universal spray paint to give some nice even coverage to the pieces.

Spray painting the light

After everything was painted, I assembled it all together, and this is what I ended up with.


Finished Lantern
Finished Lantern

What do you think?

Can you also spy a few of my Nancy Drew books on the nightstand?

Make sure you check out all the other bloggers finds! Thank you so much Virginia for organizing this, and the event sponsors Value Village and Ford. It was amazing to spend a day doing what home bloggers do best, with some badass blogging ladies.  Make sure you check out their posts:

 Virginia @ Fynes Designs

Lucy @ Craftberry Bush

Melissa @ The Sweet Escape

Dani @ LifeOvereasy


Staircase Lighting

I have been on a quest to eliminate all the boob & spaceship lights in the storefront.  There are only two remaining; in our guestroom and at the top of our staircase. The light in the staircase actually burned out a few months ago, and we have not yet replaced it.  The ceiling is 25 feet tall in the staircase, and we didn’t have a ladder tall enough to reach it.

The (dead) light at the top of our staircase

We decided we’d replace the light fixture & bulb at the same time and borrow or rent a ladder to get it done. Problem is, we just haven’t found the right light. We wanted something that looked nice from the top of the stairs, wasn’t too overpowering. We wanted something light but pretty, and that hung down a few feet. We also needed a fixture that wouldn’t break the bank.

While browsing through HomeSense the other day, I spotted this light in the center isle.

Glass Pendant from HomeSense $59

It’s almost exactly the same as a West Elm Glass Jar Pendant but for half the price. I scooped up the light and headed for the checkout.

Now we had to deal with the issue of not having a ladder. Thankfully our awesome neighbors were home and let us borrow their ladder. Phew!

We delicately maneuvered the ladder up and over our staircase (this is the biggest obstacle in getting things up our stairs) and put socks on the end of the ladder so it wouldn’t bash up the walls.

The Switchback Staircase
The ladder in the staircase
The ladder in the staircase (see how skinny & tall the staircase is?!)
El Granto making his way up the ladder

Once El Granto precariously climbed up the ladder, he realized that it wouldn’t work. The way the ladder was positioned he couldn’t reach the light. S%#t! So down he came, and we tried to move the ladder around to a better position. Thankfully we leaned it against the other wall and it worked. El Granto climbed back up and set to taking down the old light.

El Granto doin his magic

I stood at the bottom being the lackie handing El Granto things when he needed them and hoping he didn’t fall to his death.

10 minutes later and we had a new light!

The light! (view from the top of the stairs)
The Light (looking down the staircase)
The Light (from below looking up from the bottom of the stairs)

We purchased a 60 watt Edison Bulb from a (great) local shop Metropolis Living. It casts a beautiful warm glow in the staircase, and I love the look of the Edison bulb (will try to break out the tripod this weekend and get a better shot of the bulb for ya.) The light hangs down about 5-6 feet and its the perfect height.

Now I need to paint the staircase walls, frame & hang a gorgeous painting we have for the staircase landing wall, and perhaps a nice plant for the landing.

What do you think? Better than the big box lights?

SOURCE LIST:

Materials:

Glass Pendant – HomeSense
Edison Bulb – Metropolis Living

Tools Used:

Screw Driver, Ladder

Difficulty Level (on a scale of 1-5):

Three out of five

(extra hammer for being on a ladder 20 feet off the ground)
Total Cost: $80 ($60 for light and $20 for the bulb)

Hallway Update

I posted a little while ago about my hallway hopes & dreams. I have not yet convinced anyone that I should paint the doors black (I still think its an excellent idea, but thank you everyone for not having any faith in me.) 😉

While we havnt made tons of progress, there have been a few improvements. We completed the transom window from the guest room, and it adds a ton more light to the hall, especially in the mornings.

Transom!

We also replaced the ugly cheapo hallway lights with new school house lights that match the downstairs hall.

I got the best deal ever on these schoolhouse lights. The one for the downstairs hall was on clearance for $36 (which was amazeballs all on its own.) I went back to get another two for the upstairs hall but they were sold out. Sad face. Instead of giving up, I set the Mom’s on the task to check their local Home Depots. My Mom struck out, but my Mother in Law struck it rich when she landed on a stach of the at a HD in Brampton. She picked up two and guess what, they were reduced further to TWENTY FOUR BUCKS. Yep, you heard me $24. Holy effing awesomesauce.

So heres what it looked like before:

Hallway Before
Hallway with new transom but old lights

And heres what we’ve got now.

After
After
After

The one big thing is how much more neutral colour the new lights put off. The old ones were soooo warm, they made the whole hall feel crowded and tight. The new ones are much cooler (in every sense!) There is one small thing that is driving me a bit nuts, the ceiling isnt level, but the lights are made to sit level. This makes them look a smidge crooked. Which drives my eyes nuts. Until I figure out a fix however, I will have to live with it.

We still have a long way to go. Need some paint, art, a runner and a plant & mirror for the nook, but its a good start!

Light Fixture Facelift

Do you have something in your house that works perfectly well, it looks fine, and you have no justification what so ever to replace it, but you HATE IT? Yeah…that was my living room light fixture. It was fine…I just didn’t like it. It was also big, and costly to replace with anything I like. So it had no hope of getting replaced anytime soon. I had come to terms that our whole living room is in fact an epic fail (sofas don’t fit the space, the tv console is hideous, the dogs crate lives in the living room, and there’s no place to set down a drink.) So you think I would just concede the light failure and learn to live with it. Like the way hoarders seem to have come to terms with crawling over their belongings to get to the bathroom. Not so. I my friend am what you would call anal retentive, and if I can possibly change something I hate; I will.

This weekend I had enough of that light fixture, so I got El Granto to take it down, and I marched it outside and I spray painted that light. Take that heinous light. Now you are the same heinous light with a prettier color! Nah, I’m not giving it enough credit, I think it looks much better, and definitely good enough to get it off my hit list for a few months.


So here’s what we did.

Took the light apart (the bowl came attached from the rods, and the rods from the light fixture). It’s hard to see the lights terrible color from my before pic. It was white with gold brush strokes and a hint of green. Waaaay to country for this city house.

Close up of strange gold faux finish

I cleaned everything, then dragged a few saw horses outside, and made myself a little work station. I hung the rods and the hoop that the bowl sits in from an old piece of wood with some nails in it. I sat the light on some cardboard. In hindsight I should have hung the light as well as it would have been easier to paint. I made sure to mask off the light socket with tape. I painted with my favorite spray paint; Rustoleum Universal. This time with some left over Oil Rubbed Bronze. I painted with several light coats, ensuring I got into the nooks and crannies of the light.  Sorry grass, you were collateral damage in this project.

Painting the light in the backyard

After it dried we took it back inside and re-hung. Easy peasy lemon squeezy.

SOURCE LIST:

Materials:
Rustoleum Universal Spray Paint in Oil Rubbed Bronze – Home Depot

Tools Used:
Screw Driver, Ladder, Husband

Difficulty Level (on a scale of 1-5):

One out of five

Total Cost: $0 (already owned the paint, $10 if you needed paint)

Hallway Schoolhouse Light

You may have noticed that I have gushed about schoolhouse lights once or twice in the last few weeks. It’s true, I was in love. However my budget wasn’t allowing me to date any of those lights (sad face).

Not to be so easily broken, I set out to find a way to get my schoolhouse lights in my budget. I found schoolhouse glass at Home Depot for $7.50 (awesome!) I just needed to find an inexpensive fixture to use with the glass…not so awesome. I must have opened every box in Home Depot trying to find one that fit the glass. I didn’t even care about colour, as I could easily spray paint them. I struck out, hard. Nothing would work. In my depressed state, I wandered around Home Depot feeling sorry for myself. Then I spied on a bottom shelf, a clearance priced Hampton Bay Schoolhouse Semi-Flush pendant. Priced at…wait for it…$36. WTF? Where did this come from? I had never before seen this light (and I was SURE I knew of each and every schoolhouse light HD carried.) I took a pic, sent it to El Granto for approval. He gave me the thumbs up, so I promptly marched one over to the checkout.

Hampton Bay $36 Schoolhouse Light

Ideally I would have gotten three, so I could replace all the heinous hallway lights in the house, but they only had 2 left at my Home Depot (boo) and realistically I was already buying paint, so I really couldn’t carry them all. So I just took my one treasured light home, and vowed to check other Home Depot’s later.

I quickly roped El Granto into swaping out our main floor hallway light for the new schoolhouse light. So quickly in fact that I didn’t take a pic. So instead here is a pic of an identical spaceship light elsewhere in my house. (all told my teeny tiny house holds 6, yes six of these ugly little UFO’s.)

Careful; this UFO masquerading as a light may steal your children from their beds at night and take them off to space
After: New Hallway Schoolhouse Light
View down Main Floor Hallway

Ahhh…so much better. I have been loving gazing at my new light every time I pass it by. It’s true love I say.


SOURCE LIST:

Materials:
Hampton Bay Schoolhouse Light: Home Depot

Tools Used:
Screw Driver, Ladder

Difficulty Level (on a scale of 1-5):

One out of five

Total Cost: $36

Crushing on Schoolhouse Electric & Supply Co

The storefront was very neutral when we moved in. Walls beige, fixtures neutral. The light fixtures were especially neutral. Builder basic “spaceship” lights in hallways, Ikea nondescript fixtures in washrooms and bedrooms. The sellers obviously wanted to dress the house to sell, and I get that. But I also think they missed the boat a little bit. The house was a 100 year old Edwardian Storefront. It is eclectic. The neighborhood that it’s in, the proximity to downtown and a vibrant arts community, makes me wonder why they didn’t “work” the unique aspect to it. A similar Storefront a few streets over, was renovated fantastically with period charm and character, and sold for over 150k more than we paid. Hey, I’m not complaining! I am fine with adding the detail, it just seems the sellers had their eyes closed to this fact.

Back to the lighting. Obviously changing the lighting in the whole house is e.x.p.e.n.s.i.v.e  so we’ve been working it at one room at a time. Recently I have been crushing big time on Schoolhouse Electric’s lighting.

For my hallways I love the Thunderbird 4”

or the the Loyola 4”

For the guestroom I love the Waldorf Pendant

or the Mercer Pendant

For the Dining Room I love two Factory Light No 5’s

For my Master bedroom, I am crushing on Keen Wall Sconces for beside lamps

A girl can dream right?

*Come back next week to see some new DIY hallway lighting!

(nope, I have no affiliation or sponsorship from Schoolhouse Electric & Supply  Co, I just like their stuff!)

Office Lighting

The office light was originally a Ikea Erbium ceiling light that the moment a truck drove by would shake and rattle so hard you thought it was going to explode and rain glass down on your head.

Ikea Erbium Light

Not only was the light noisy, it was also b.o.r.i.n.g. So we needed to change things up.

We needed a fancy, pretty, shiny new light.

I started looking at Barn Light Electric‘s offerings and lusted after their Flush Mount Warehouse Pendant

Barn Light Electric’s Flush Mount Warehouse Pendant

I dreamed about  the Cimarron Pendant

Barn Light Electric’s Cimarron Pendant

And I swooned over School House Pendant “The Volusia”.

Barn Light Electric’s School House Pendant “The Volusia”

Then I realized I had already long ago spent the whole budget for the room on the makings of the bookcase and the desk, and I had NO budget left for lights. That meant that buying from Barn Light Electric, shipping to Canada, and then paying brokerage & duty fees was not going to be a feasible endeavor. Enter sad sad Kristen face.

So ‘pretty’, ‘new’, and/or their friends ‘shiny’ and ‘fancy’ were out of the question. We needed something cheap.

We just so happened to have a random light we took down from our bedroom sitting around taking up space and we swiftly swapped it out. It’s better, its not great, but will make do for now. The room has so much natural light from the giant skylight, that the light wouldn’t be on much anyways. So here it is, the new old light.

Moving forward I will be daydreaming about changing it out for one of the lusty Barn Light Electric lights.

Yeah…I’m a lighting loving weirdo, I know…