Leaded Glass Storefront Window

Almost two years ago, I started adding lead strips to the storefront transom windows, to create a faux leaded glass effect. I ran out of lead when I was halfway through, leaving one window unfinished. El Granto even purchased me a new roll of  lead last summer, but I had yet to get around to finishing the project. I often have trouble finishing projects. Once the project goes from fun to mundane, pulling the trigger on the last 10% is tough. I often find myself running onto the next project with full steam, and forgetting the last finishing bits.

Well this past weekend was finishing up projects & home maintenance weekend. From weed pulling and grass cutting to touch up painting, and yes that’s right, finishing the lead windows.

Armed with soap and water, windex and a broom, I headed out to the front of the Storefront and gave everything a thorough cleaning. The windows were washed, porch swept, doors and trim cleaned, and I even managed to clean out the leaf littered garbage room.

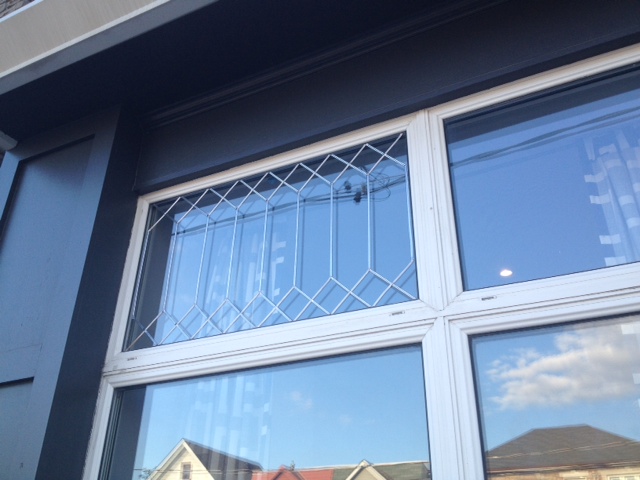
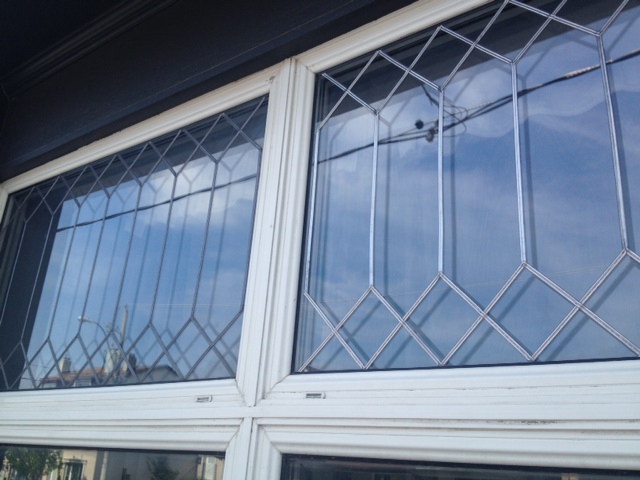
While up on the ladder washing the windows, I opted to get out my leaded glass drawing, a roll of Pebeo Vitrail Stained Glass Effect Self Adhesive Lead Strip, and finish the damn leaded glass windows. I taped my template on the inside of the window, and started measuring and cutting strips to length. I applied the lead strips starting with the long tall vertical pieces, then worked my way out from the middle adding the shorter criss-cross strips.

photo 1(13)
In progress: The vertical lead strips and the bottom criss-cross pattern applied to the right transom window.

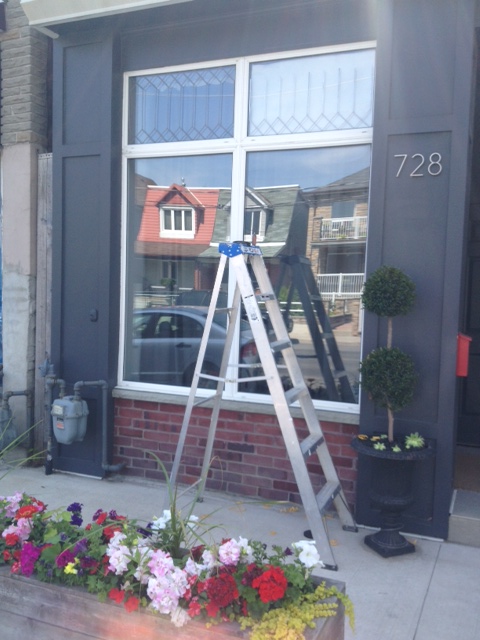
The strips are not very adhesive, and don’t really stay on the glass until you burnish them with the provided tool. This project would be a lot easier on the ground. Being up on a 8′ ladder applying the lead to the 12′ tall windows was definitely the hardest part.

The old lead on the left, and the newly applied lead on the right.
The old lead on the left, and the newly applied lead on the right. You can see how the new lead is a bright shiny silver, whereas the old lead has gathered a lovely patina.

All told it took me about an hour and a half to complete the project, and now I can finally knock it off my to-do list!

Leaded Glass Complete!

In fact, the exterior of the Storefront now complete!
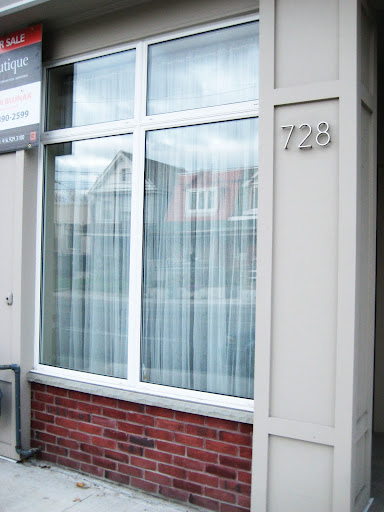
 

BEFORE:

Storefront Before
Storefront Before

Here is what we have done so far:
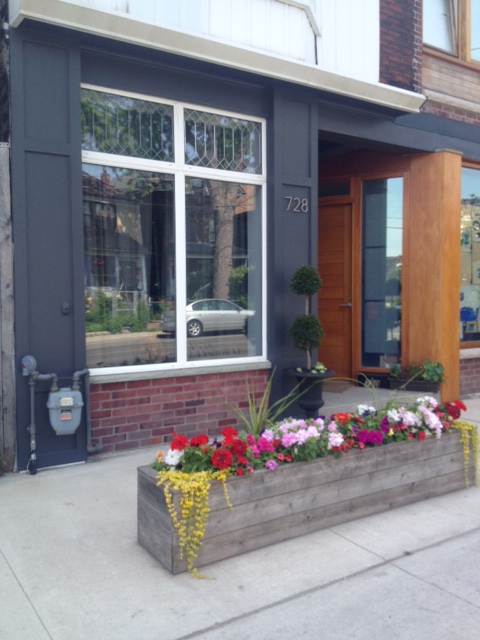
AFTER:

Storefront Complete for Now

The only remaining tasks for the Storefront exterior are wish list items, that will likely never get done. We would love to remove the vinyl siding on the second floor, repoint and clean the brick, and have the window & roof overhang re-flashed. Would also love to install a gooseneck light above the house number. This would involve drilling through brick, cutting through spray foam, running new electrical, then patching everything up.  So until pigs fly, I hereby pronounce the exterior completed!


P.S. I have had several comments and emails about the lead strips. You can purchase them online from Amazon, or from local art stores. We found ours at Curry’s art store on Queen West in Toronto. The price varies, but is usually about $25-30 per roll. We need two rolls to complete our two windows. Each window is just shy of 24″x48″.

The lead has been exposed to the elements for two years, and has not fallen off the window, or ruined the glass in any way. The only change to the lead was it’s patina. It has not run, rusted, or in anyway discolored the glass.

Hallway Update

I posted a little while ago about my hallway hopes & dreams. I have not yet convinced anyone that I should paint the doors black (I still think its an excellent idea, but thank you everyone for not having any faith in me.) 😉

While we havnt made tons of progress, there have been a few improvements. We completed the transom window from the guest room, and it adds a ton more light to the hall, especially in the mornings.

Transom!

We also replaced the ugly cheapo hallway lights with new school house lights that match the downstairs hall.

I got the best deal ever on these schoolhouse lights. The one for the downstairs hall was on clearance for $36 (which was amazeballs all on its own.) I went back to get another two for the upstairs hall but they were sold out. Sad face. Instead of giving up, I set the Mom’s on the task to check their local Home Depots. My Mom struck out, but my Mother in Law struck it rich when she landed on a stach of the at a HD in Brampton. She picked up two and guess what, they were reduced further to TWENTY FOUR BUCKS. Yep, you heard me $24. Holy effing awesomesauce.

So heres what it looked like before:

Hallway Before
Hallway with new transom but old lights

And heres what we’ve got now.

After
After
After

The one big thing is how much more neutral colour the new lights put off. The old ones were soooo warm, they made the whole hall feel crowded and tight. The new ones are much cooler (in every sense!) There is one small thing that is driving me a bit nuts, the ceiling isnt level, but the lights are made to sit level. This makes them look a smidge crooked. Which drives my eyes nuts. Until I figure out a fix however, I will have to live with it.

We still have a long way to go. Need some paint, art, a runner and a plant & mirror for the nook, but its a good start!

Adding a Transom Window

As you may remember I went buck wild a few weeks ago and cut a hole above our guest room door to make a transom window. I really need to get out more if thats I what I called buck wild…eep.

So I cut a hole in the wall, and then 4 days later my in-laws were set be rolling into my house for Thanksgiving. I know…who starts a project days before company is due to arrive and sleep IN the room where the project is happening… Dont worry, it wasnt such an epic fail. I may not have finished the transom in time, but it was presentable. Now after a few more days work, and some custom cut glass, I am pleased to reveal our new transom.

How how’d we do it?

  • We used a stud finder to generally figure out what was behind the wall above the door. We found studs on either side of the door, and one right in the middle above it.
  • We did our research, and found that building code in our area has doors framed with King Studs and Jack Studs and a Header, and that the cripple stud above the door was nothing structural. (which means we can take it out without having to reinforce anything else)
  • Using the markings of our stud finder, we drew straight lines on the insides of the studs to use as a guide for cutting.
  • We cut our hole using a drywall hand saw (or should I say I cut 1/4 of it, then wussed out and El Granto cut the rest…there are you happy you got your due Mr. Granto?)

  •  We removed the cripple stud with a combination of a reciprocating saw and a hammer.

  • We cleaned up our drywall ensuring there wasn’t any in our way for when we put casing on the transom hole.

  • We cased the window using 5/8″ mdf that we had laying around the house. It also happened to be the same thickness as our current door trim. We measured the depth of our transom hole and ripped some mdf with our circular saw to fit. We then brad nailed it in place.

  • We trimmed the transom frame with more of our 5/8″ mdf.
  • We made a little frame inside the casings to hold the window. Filled, caulked and sanded.

  • We painted two coats of our trim paint.
  • We measured our hole and got a piece of glass cut at an awesome local glass shop Snap Services.
  • We installed the glass with some silicone caulking and a couple glazing points. Now if you’re home owner with an old home you’re probably asking why we didn’t use glazing compound? Well it’s an interior window, and it wont be subject to direct sunlight or weather of any kind. SO, silicone will hold it in just fine (and keep it from moving rattling around when a truck drives by.) The glazing points combined with the mini frame we built for it will ensure the glass never moves.
Transom Painted
See how much light it brings to the hallway?!
Ta Da Transom!

SOURCE LIST:

Materials:
5/8″ MDF – Home Depot (scraps from our bedside table project)
CIL Trim Paint – Home Depot
Caulking
Custom Cut Glass – Snap Services

Tools Used:
Circular Saw
Mitre Saw
Brad Nailer
Caulking Gun
Paint Brush & Tray

Difficulty Level (on a scale of 1-5):

Two out of five

Total Cost: $10

DIY “Leaded” Glass

I love leaded glass, especially in exterior transom windows of old storefronts. The transom above our front door is a leaded glass window (albeit new) and I love it. I WISH our house had some original leaded glass, but alas all we have are energy efficient double pane windows. I know, I am the only person on earth who complains about how energy efficient her house is…

The Storefront Window

We looked into getting some real leaded glass for the storefront window transoms, but it was darn near impossible, and pretty much a huge waste of money as our current windows are perfectly fine. The problem is however, that once I get an idea into my head I am not easily dissuaded. So I started researching for a solution and came across this:

Pebeo Vitrail lead adhesive strips. It’s used for faking your own stained glass. They have a line of glass paints, and you literally make your design out of this tape, then fill it in with the glass paint.

I didn’t want the stained glass look, but the lead looked like a pretty cool idea. So I popped into every art store I came across, and on my third try I managed to find a package. It was $24 for 33 feet. I thought that would be plenty for my project and headed home.

I then did some research for leaded glass patterns.

We narrowed it down to either a Diamond pattern, or  a Regent pattern. I drew both out to the size of our transom windows, and once drawn out, we liked the Regent the best.

I headed outside and thoroughly cleaned the windows and then taped my drawn out pattern on the inside of the window. I then set to re-create the pattern on the outside of the window. It was a bit tricky due to the space between the front pane of glass and the back one where the pattern was. If I change the angle I was looking at the window it changed the pattern. I tried hard to keep it straight and true but alas its a bit crooked. Shh don’t tell.

The adhesive leaded glass was very easy to cut, but the backing wasn’t that sticky. You really need to burnish it in place with the provided application tool to make sure it stays where its supposed to. Once I got into the swing of things my lines became straighter and my cuts more precise. Just as I was fining the first of two windows I noticed that I was dangerously low on adhesive lead! Eeep. Apparently 33 feet doesn’t go that far when you have an intricate pattern. So I was unable to finish both windows, so for now I have one leaded glass transom window. What do you think?

“Leaded” Glass Window (view from outside)
“Leaded” Glass Window (view from inside)

Cutting a Hole in the Wall

I cut a hole in the wall and I liked it. (There really are too many commercials for the Katy Perry DVD on TV right now). Back to the hole. YEP, there’s a hole in my wall, on purpose. Nothing was leaking, there were no fires and nothing had burst. I just wanted a hole.

You see, my upstairs hallway is a dark sad cave (see it with your own eyes here).

Our guestroom however is bombarded with natural light from a lovely big bay window. So I thought I would steal some of the guest room’s natural light, and give it to the hallway…by cutting a hole in the wall. Now now, I’m not gonna leave it as a big gaping hole. It will be turned into a transom. Transom’s are something that an Edwardian home would have had. We do have one operating transom above our front door.

So after cutting a great big ole hole in the wall, I will case it, trim it, paint it, get some custom glass cut, install it, and I will have a pretty transom.

Until then…HOLE