In the modern and Scandinavian home scene you notice a lot of similar trends. Monochromatic palettes, clean uncluttered design, negative space, candles, wood, black and white etc. One other motif you will note is Swiss crosses. They’re on blankets, pillows, art and accessories. Find a scandi home pic on Pinterest, and play the find the Swiss cross game. Why is this motif so popular? It’s simple, bold and classic. Not a design fad, but a timeless design element.
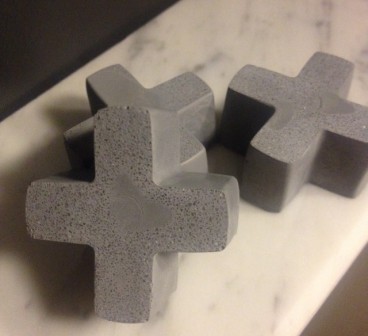
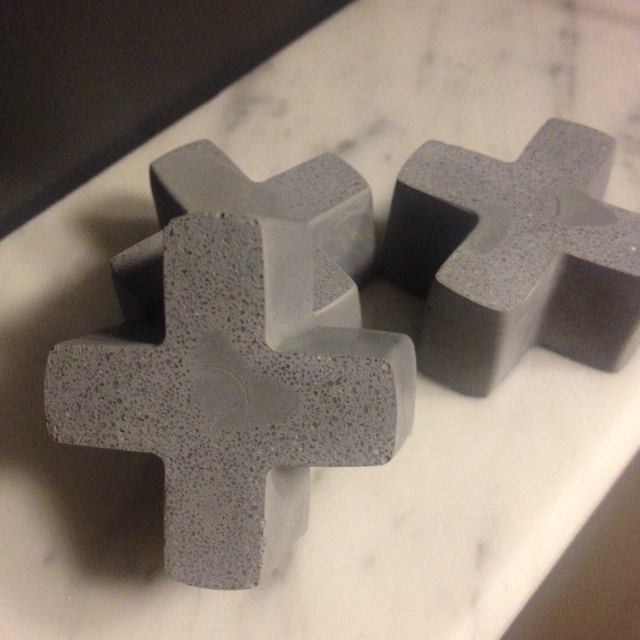
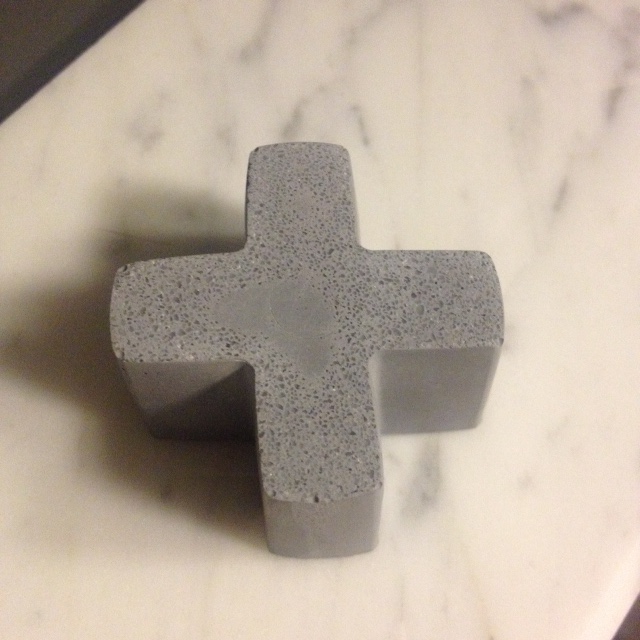
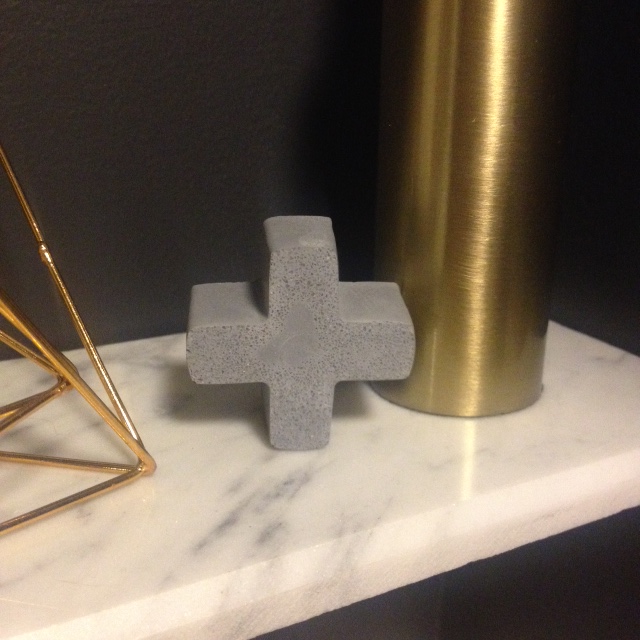
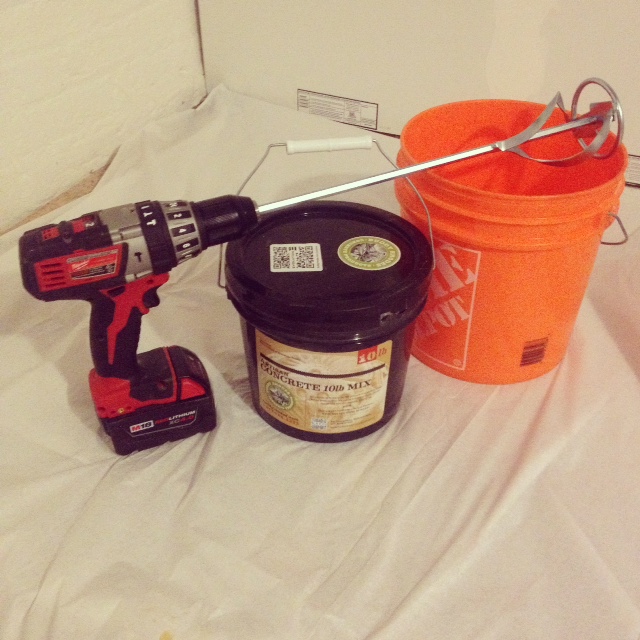
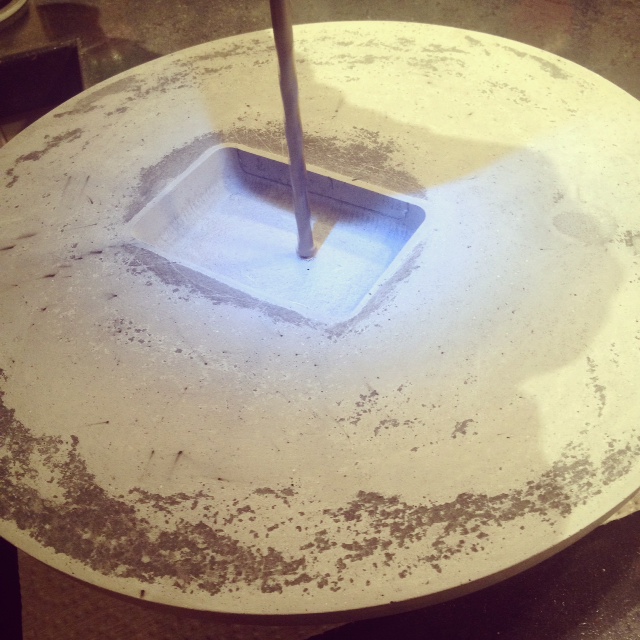
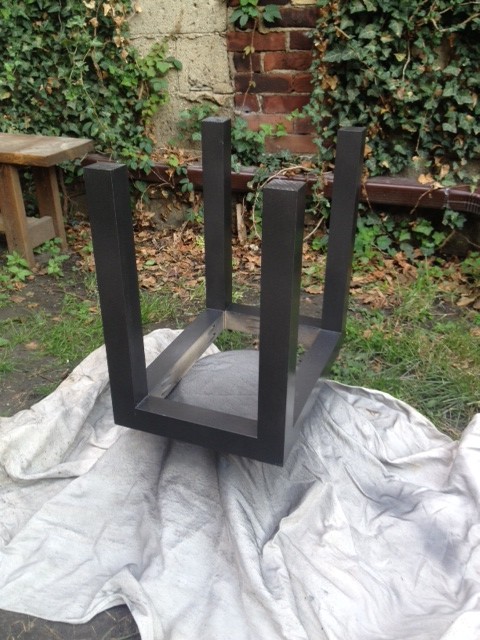
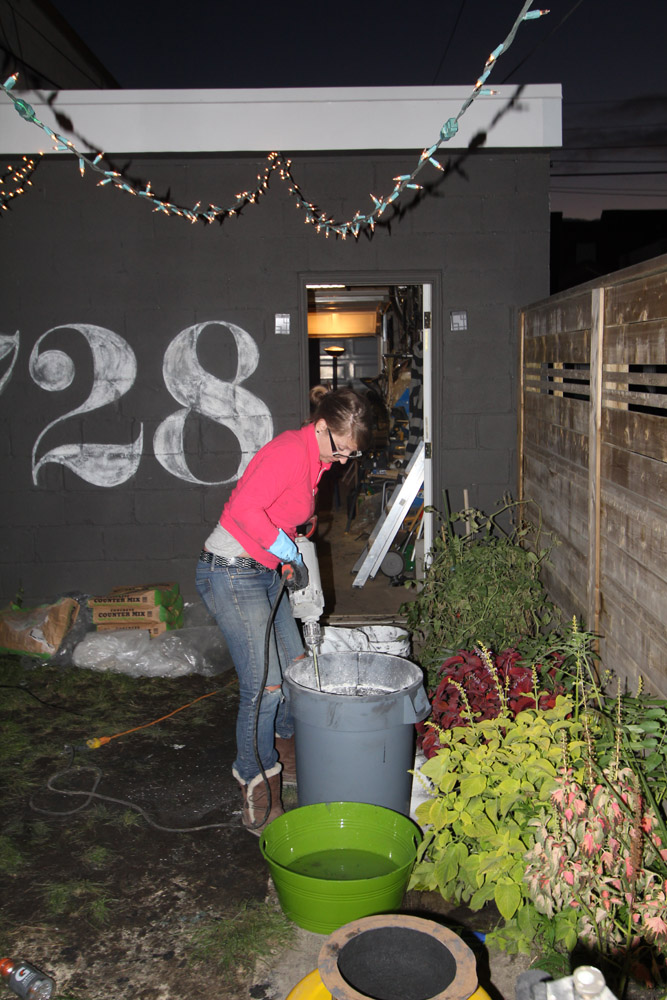
I’ve been Scandinspired as of late, so when I spotted X silicone ice cube trays at Ikea, I saw them not as X’s but as +’s. With silicone + tray in hand, I used some leftover concrete from my concrete clock project to make concrete Swiss crosses.
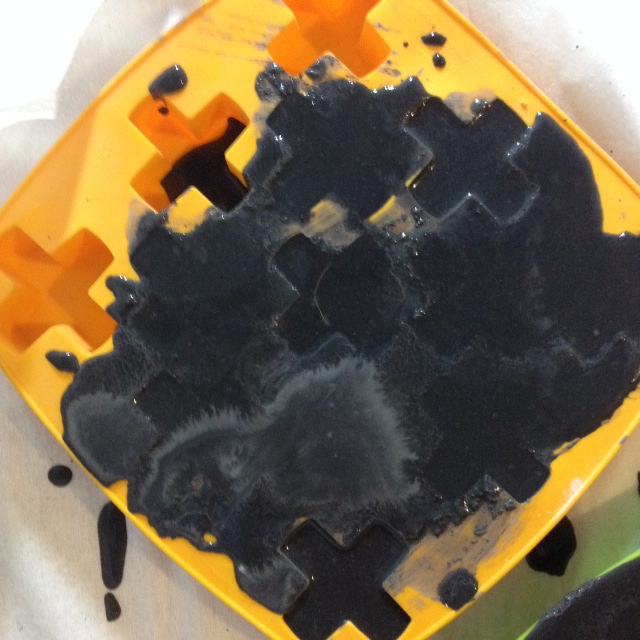
I poured excess grey concrete into my silicone ice cube trays, and covered with plastic. I left them to cure overnight, then easily popped them out of the silicone mold. [see how to mix & pour the concrete here.]
Any excess concrete was lightly sanded off, and the crosses were lightly sanded the edges of the +’s so they would stand up easily.
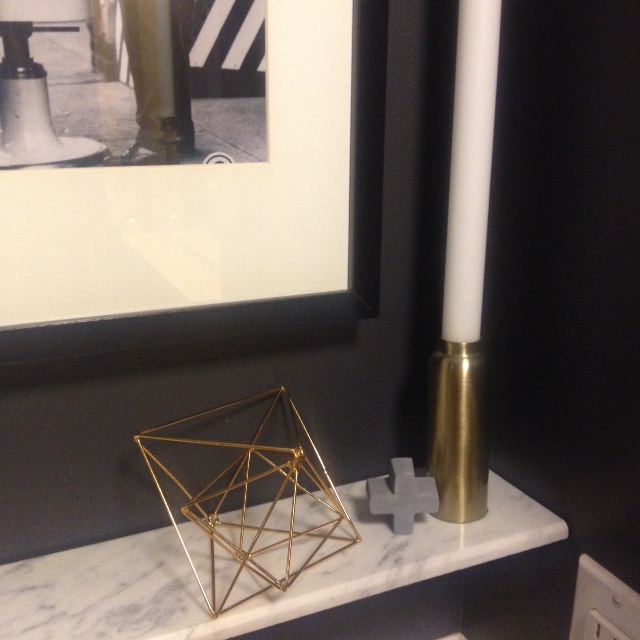
Not only did I use up my excess mixed concrete, I also made a cute decor item. The little Swiss crosses look sweet in my black and white powder room.
Working with concrete and silicone molds was incredibly easy. I am now on the hunt for other cool silicone molds. One of those sphere ice cube trays perhaps?
I’m so excited to share today’s project! It’s something I’ve wanted to make for over a year. When I first started talking to Jeremy at Buddy Rhodes about making our concrete counters, he told me to take a look at his portfolio of work. He wanted me to be inspired by the awesome stuff you could do with artisan concrete, and to brag a bit about how awesome he is.
One of the first projects of his that caught my eye was a series of concrete clocks. I sent him an email saying something along the lines of “omggggg I need to make a clock!” said in over excited girl squeal. He kept saying clocks were easy, and after we pour our kitchen including a badass one piece waterfall countertop, I will be able to make a clock in my sleep. But clocks seemed like such a big project. So much so that I never tried to make one. Then a few buckets of Buddy Rhodes 10lb artisan mix showed up at my door a few weeks ago, with a few curse words gentle push from Jeremy to get off my butt and make something. So I made this:
DIY concrete clock! It was so easy. Really truly so easy. Here’s how I did it:
I sourced a mold in a shape I liked. I went with a $1 Christmas Snowman cookie tray from the dollar store.
The only other item I used for my mold was an empty plastic screw container. It was the perfect size for a inset in the back of the clock for my clock works. Note, you don’t even have to do this, your clock works can totally stick off the back of your clock.
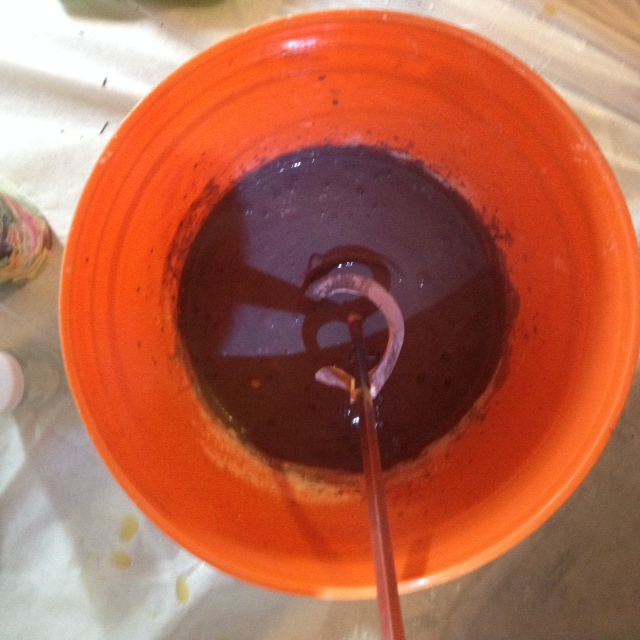
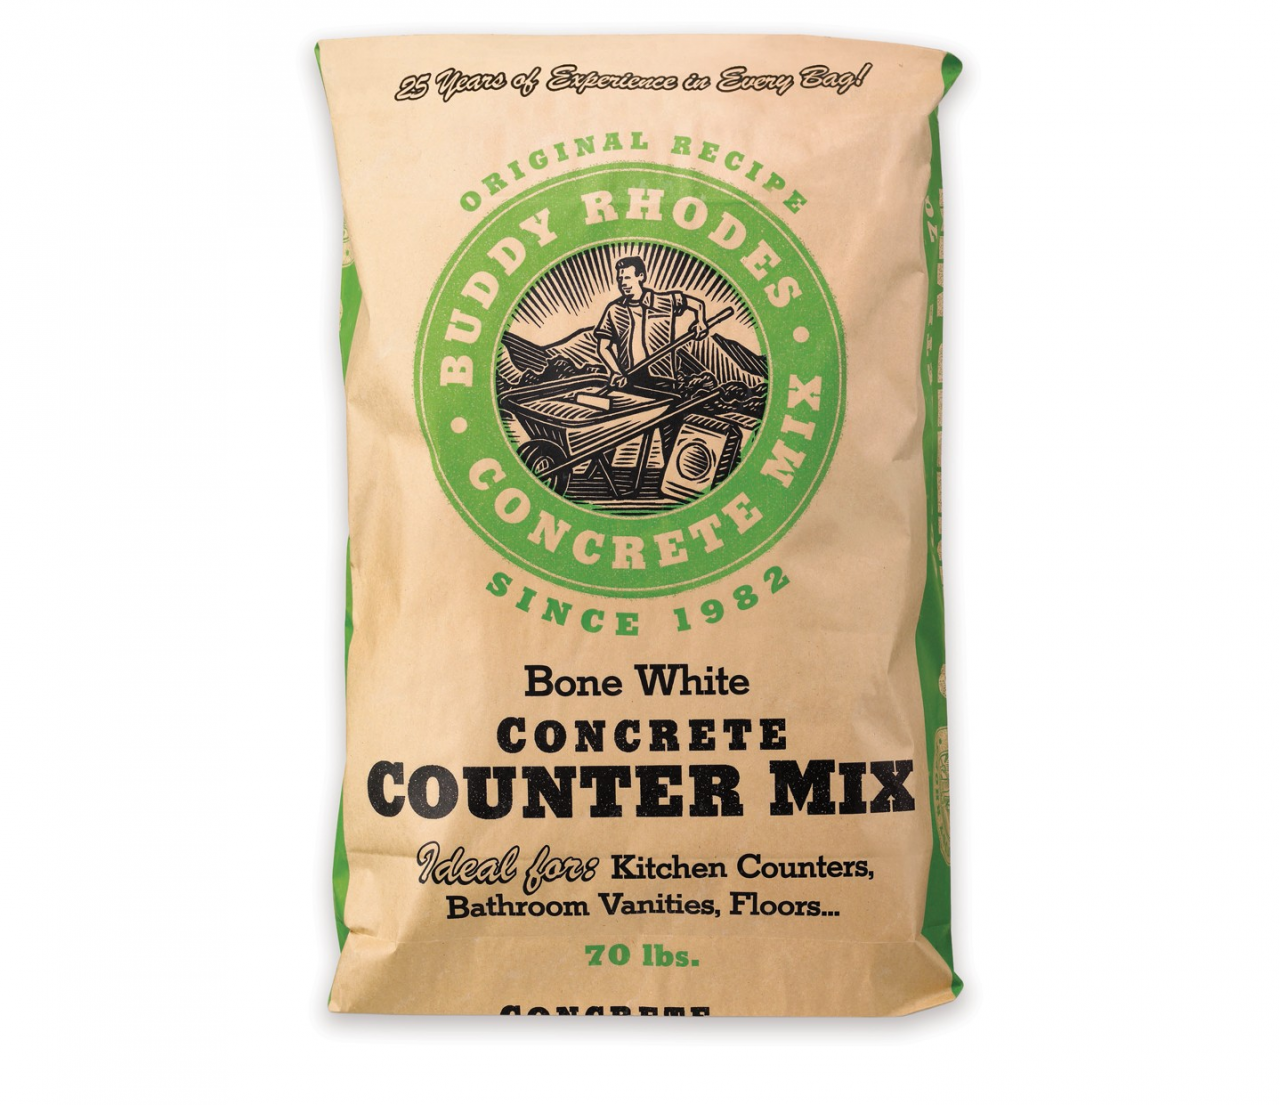
I mixed up a small batch of the BR mix, with a teaspoon of coal coloring & a dash of water reducer. This is also optional. The water reducer will let me put less water in the mix, but still get a nice workable mix. I used coloring to get a grey color, but the BR mix is bone white, and If you don’t want to tint it, you don’t have to. The mix has no large aggregate (gravel) so it can be made into tiny or thin molds without issue. I mixed up my concrete with a paint mixing paddle from the hardware store. My Milwaukee Hammer Drill made quick and easy work of mixing.
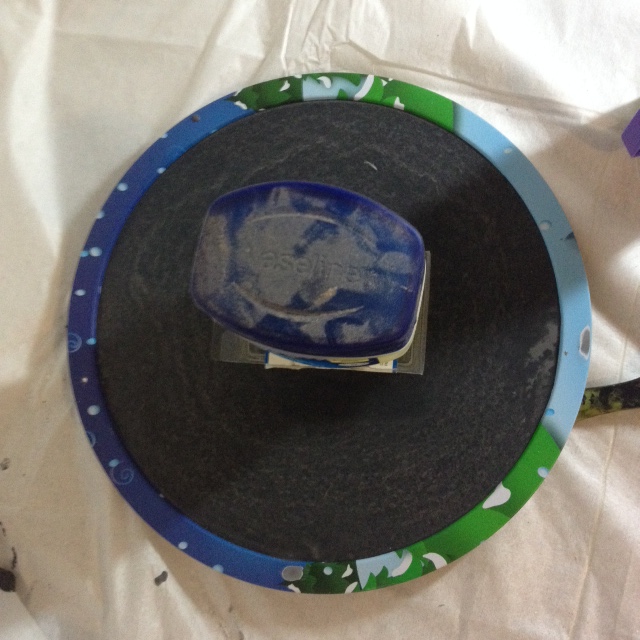
Once it was to the viscosity of a milkshake, I poured it into my mold. I filled it 3/4 full. I inset in the screw container, and weighed it down with a jar of Vaseline (Vaseline can be used as a mold release, so I had it on hand. I’m not a creepy weirdo who keeps Vaseline in their basement workshop for no good reason).
I gave it a shake to level everything out, and a bit if vibration from a palm sander. I covered with plastic sheeting, and left to cure in our nice warm basement.
I had a bit of extra mix left over, and I also had some simple silicone molds nearby, so I poured the excess in to them. (I will show you how they turned out next week.)
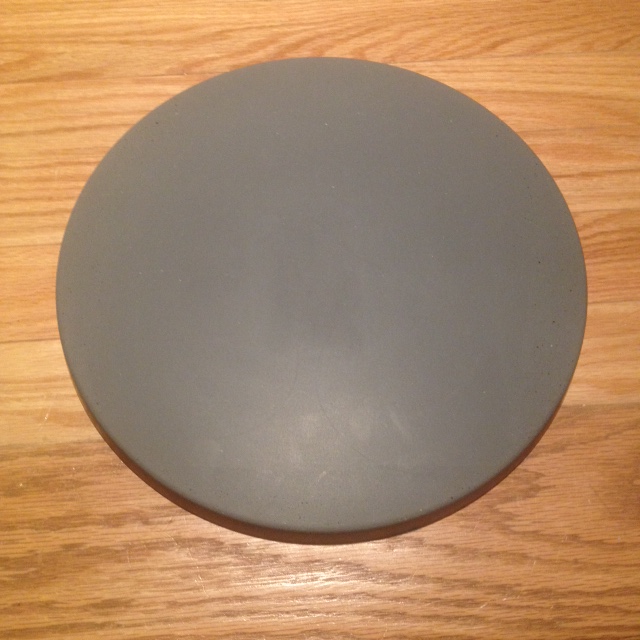
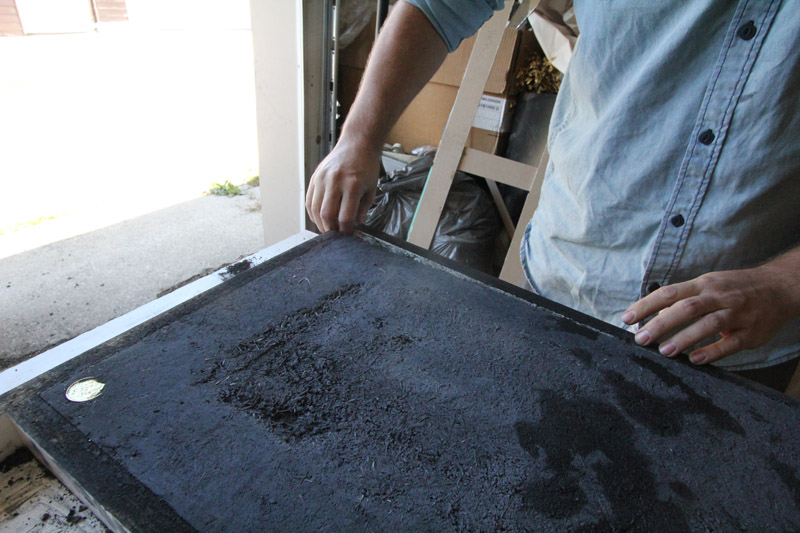
The next day I unmolded it by very carefully flexing the tray until it popped out. This is what it looked like after unmolding.
It was almost perfect, except you could just slightly see the outline of the snowman design. To remedy this I lightly wet sanded with 400 grit diamond hand sander. In hindsight, I would have not sanded. The finish was even more perfect before sanding, and I don’t think you would have seen the snowman after a quick buff. Where I did need to sand however was the back of the clock. I evened things out and took off any roughness around the edges.
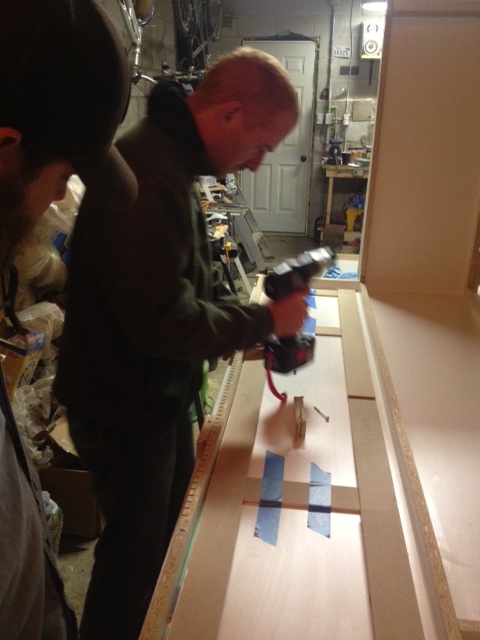
Next we drilled out a hole for the clock works. Note, each brand requires a different size. We used one from Lee Valley, and it required a 5/16 hole. We purchased a masonry bit, marked the center of the clock and got drilling.
I applied four coats of Buddy Rhodes satin sealer with a lint free cloth. After the sealer dried, the clock & hands were quickly installed with the provided hardware (read the directions for your brand). My clock works came with a hanging attachment, which wrapped around the clock works. It saved me figuring a way to attach a hanger to a piece of concrete. I opted to not apply any hour indicators to keep it more modern, but adhesive ones are sold in the clockmaking isle at your local craft store. For my next clock I think I may just put one number on. Perhaps a three? You can also make your own with adhesive vinyl. If you’ve got a craft cutter, you can easily make anything you’d like. Heck, even make an Alice in Wonderland clock with wonky numbers. (Storing that idea for LATER!)
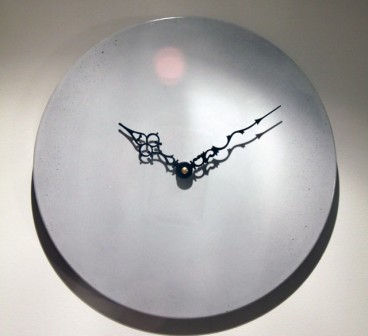
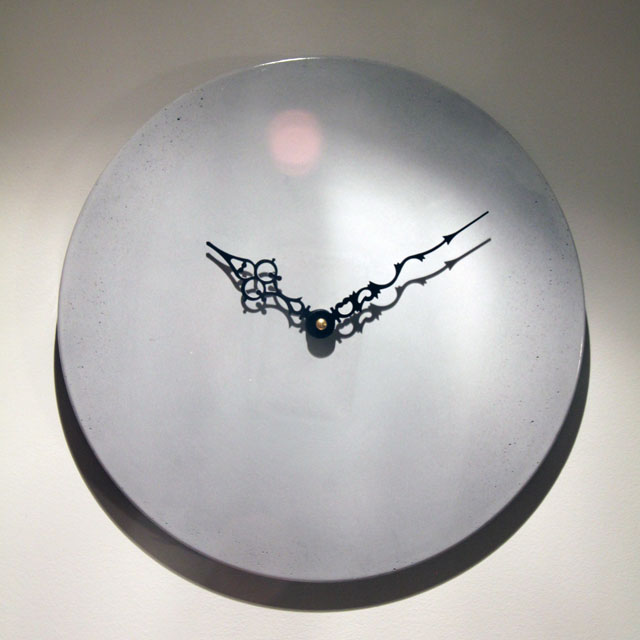
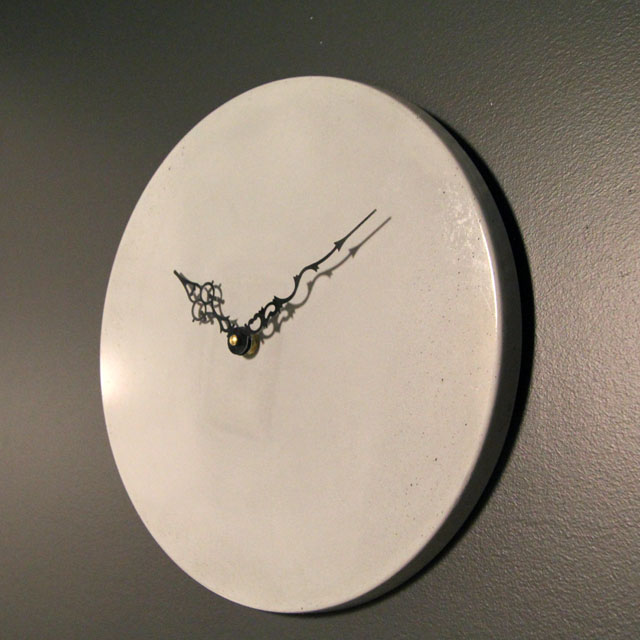
The clock has a nice polished concrete surface, in fact, it’s so polished its hard to photograph. I have tried the clock in a few places in the house. Here is is against the black wall of our powder room. I love the contrast.
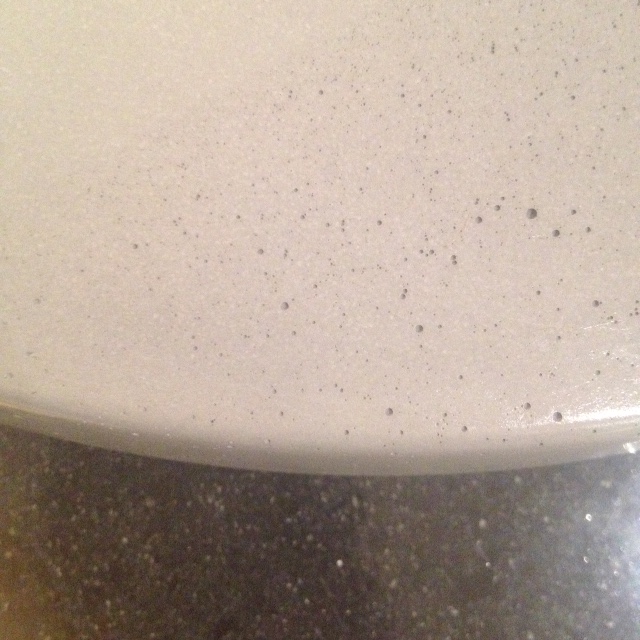
The concrete surface is nice and uniform with a few tiny bubble holes where I could have given it a bit more vibration. Honestly, if it was any more perfect it would look like plastic, so I don’t mind the imperfections much.
Overall I’m very happy with the results, and am itching to make concrete clocks for everyone for the holidays.
Tools: Milwaukee M18 Hammer Drill
Bucket
Paint mixing paddle – Paint isle at the hardware store Buddy Rhodes diamond hand sanding pads
Trowel for scraping bucket
Dust mask (wear during mixing)
Rubber Gloves (concrete dries out your hands)
Plastic drop cloth
Masonry drill bit (the size recommended for your clock works)
Difficulty Level (on a scale of 1-5):
two out of five
Total Cost: $25
Disclosure: Buddy Rhodes sent me a sample of their new mix, with no obligation or compensation for me to post about it.
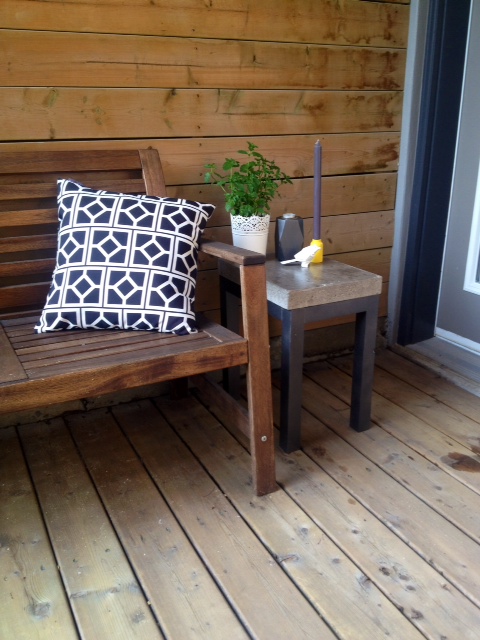
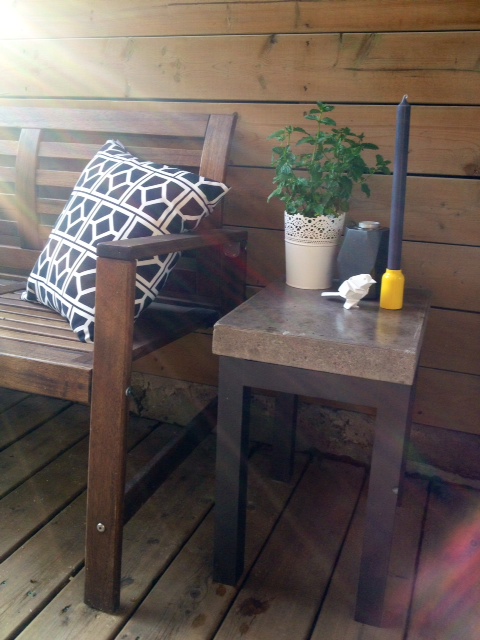
As we continue to push ahead with the backyard reno, I am starting to think about the smaller details. Accessories, lighting, flowers, furniture etc. We are currently happy with our outdoor chairs, but the rest of our outdoor furniture leaves a lot to be desired. We were using a old chipped green table with a cigar burn as a side table. Not the best looking piece of furniture…
As a place to set a drink and small plate of food is a must have in any backyard, I did what any DIY’er would do. I set out to make a useful, stylish new side table.
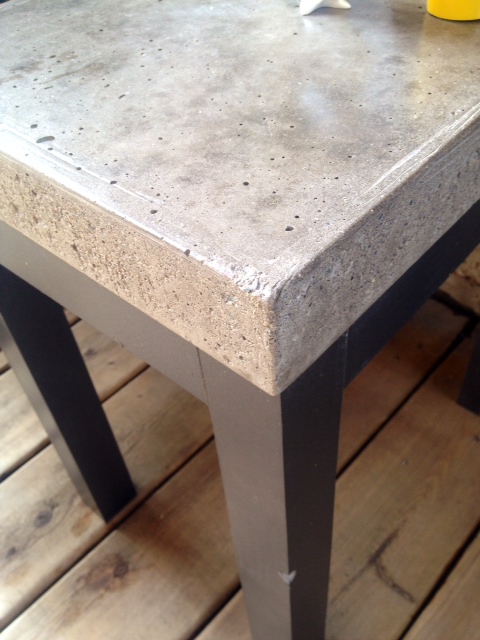
Back before we embarked on our concrete countertop project I made a small concrete test slab with some cheap big box store concrete mix. It had some big flaws, and I cringe when looking at it now. I used the wrong mix, did some sketchy form caulking, used a product with too large aggregate, and didn’t get out all the bubbles! None the less, I had created it, and rather than throwing it into landfill, I opted to re-use it.
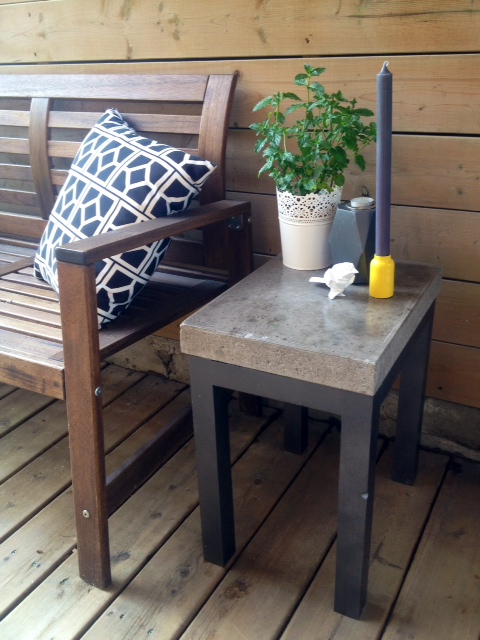
I fabricated some simple modern table legs, and this is the end result.
DIY Concrete Side TableCompleted Table
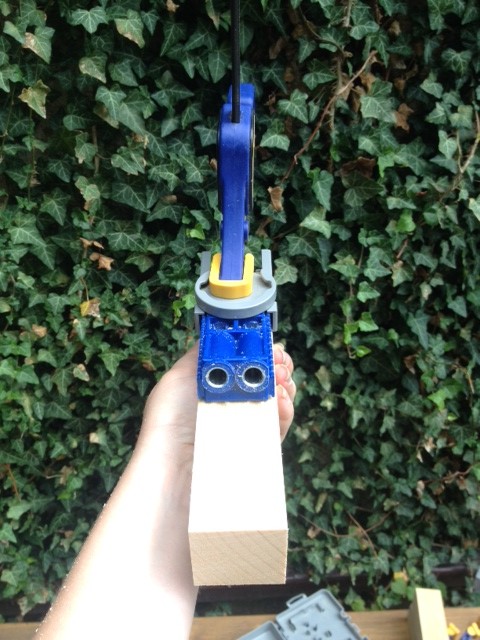
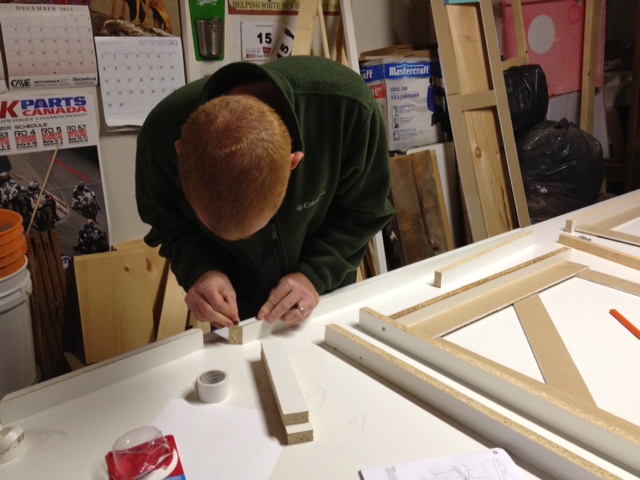
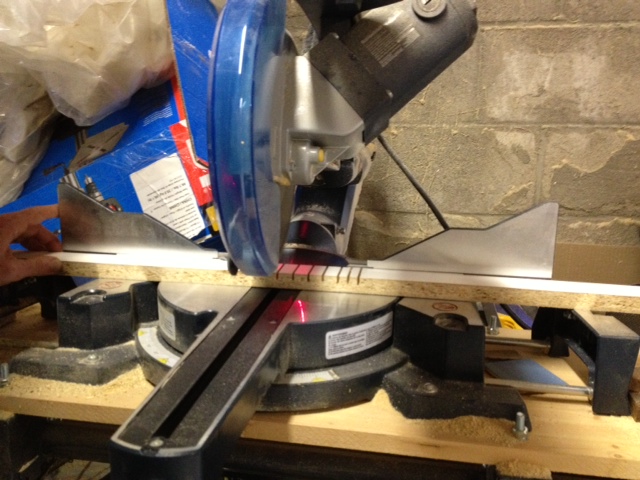
The legs are made with some kiln dried 2×2 pine from our local lumber yard. It was assembled with some simple pocket holes and screws.
Drilling Pocket Holes with a Kreg Jig
DIY TIP! I like to have two drills (or a drill and a driver) for working with pocket holes. One for drilling, and one for driving the screws. It saves having to change the bit every few minutes!
One for Drilling the Holes and one for Driving the Screws
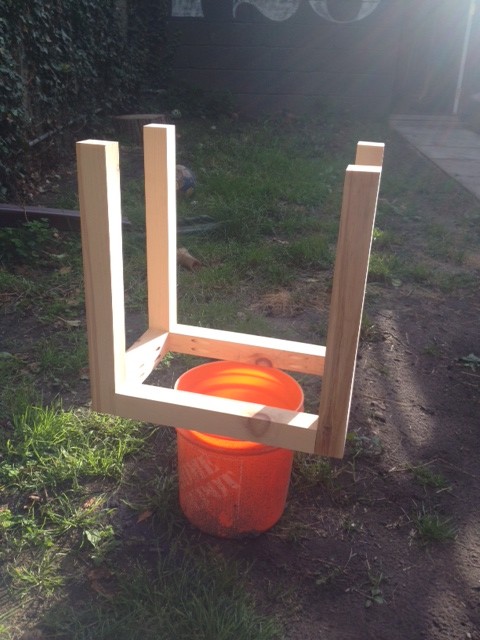
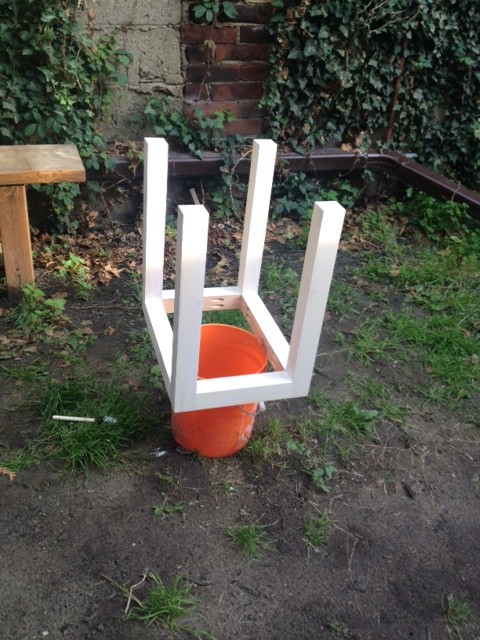
Legs Fabricated with 2×2 pineTable Legs Primed with Exterior PrimerLegs Painted with Rustoleum Universal Metallic Flat Soft Iron spray paint
We topped the legs with our recycled concrete slab and sealed the concrete with the Buddy Rhodes concrete countertop sealer. If was to do this project again, I would have used the Buddy Rhodes mix instead of the cheap big box mix (the BR mix is lot lighter and easy to use.)
Sealed with Buddy Rhodes Satin Sealer
If you were to do this project, you could easily pour the concrete top yourself, or buy a prefab concrete patio stone at the big box store. If your patio stone has a texture on it, consider flipping it upside down so the raw concrete side is exposed. Make legs to fit your slab, seal it and you’ve got an inexpensive industrial table!
Here’s a few more shots of our finished table.
DIY Concrete Side TableConcrete Side TableCompleted Table
SOURCE LIST:
Materialst:
Concrete – Hardware Store
Concrete Sealer – Buddy Rhodes
1 2x2x10 kiln dried pine – Downtown Lumber
2 1/2″ pocket hole screws – Lee Valley Tools
Zinnser Primer – Home Depot
Rustoleum Universal Flat Metallic Soft Iron spray paint – Home Depot
Tools
Drill & Driver – Milwaukee
Measuring Tape
Kreg Jig – Lee Valley
Difficulty Level (on a scale of 1-5):
two out of five
Total Cost $40
Beats spending $1155 at Restoration Hardware for this, doesn’t it?!
Restoration Hardware Belgian Trestle Weathered Side Table
What do you think of our new table? Would you give a try at making one?
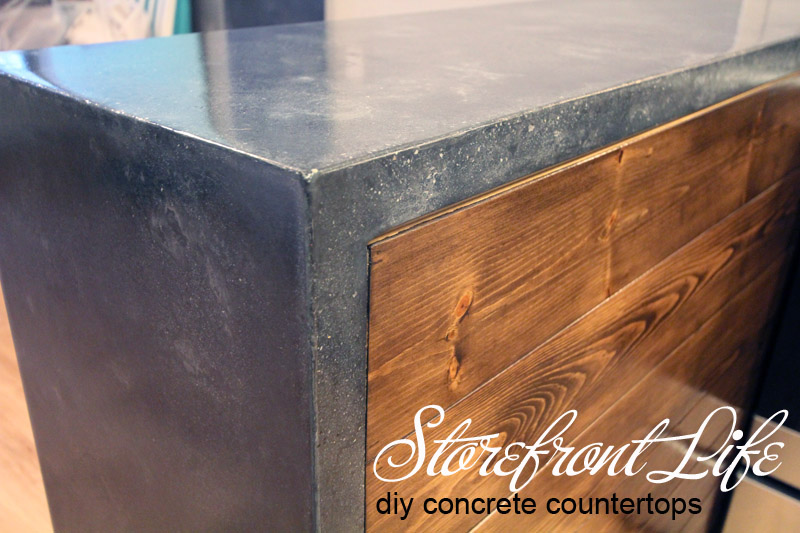
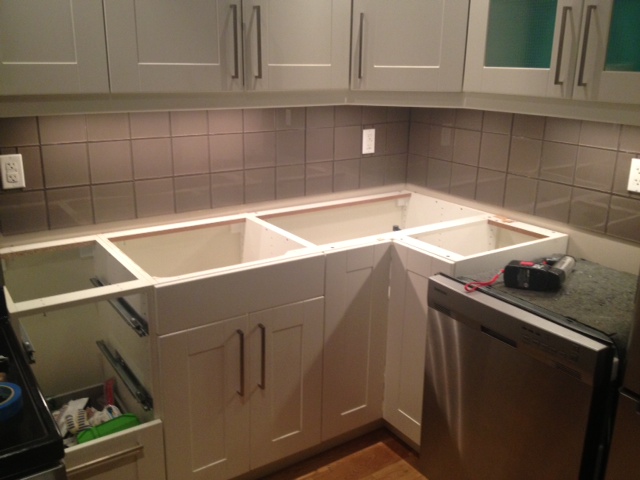
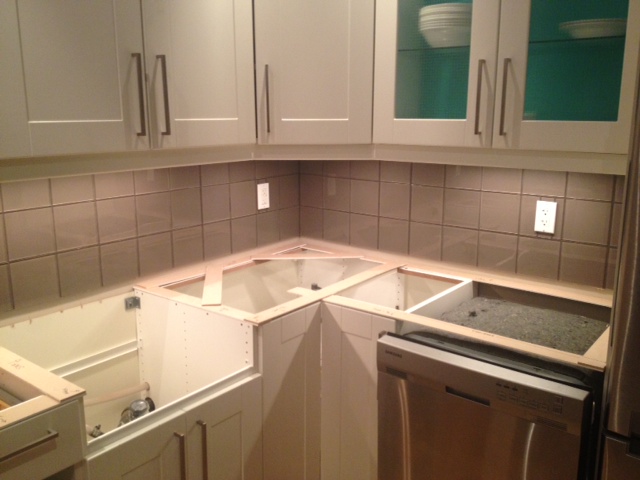
We’ve got a bit more housekeeping to do on the countertops before we’re done. After we brought them into the house, they needed to be installed, sealed & caulked.
This may sound like the boring parts, but they are the most important (seriously). If you don’t seal the countertops properly, they will stain and mark and you’ll be peeved. I think most people that give concrete countertops a bad rap, have skipped this important step, or didn’t use the right sealer.
Okay, lets get sealing! Now, you do not want to go out and buy a concrete patio sealer from the hardware store. A.) You won’t know how it will turn out, B.) it could wreck your protect and C.) It’s probably not foodsafe. So just buy actual concrete counter sealer, m’kay?
We used Buddy Rhodes Satin Sealer cause its super easy to apply and works well.
Buddy Rhodes Satin Sealer
After our counters dried a few more days (leave it a week if you can). We applied about 7 or 8 coats of sealer with a soft (clean) microfiber cloth.
I made a video of myself applying said sealer, then viewed it, and realized I maybe should have, oh I dunno, washed my hair, or changed out of my work clothes so that I didn’t look like a complete mess. So instead I give you a much better video of Buddy himself applying the sealer.
How do you know when to stop applying the sealer? Essentially when the surface of the concrete looks uniformly coated. Then do a test to see if it repels water (if the water beads up). If the water soaks in, you need more sealer (just wait for it to dry out first).
Our counters were a bit too wet when we first sealed them (and the sealer couldn’t soak in as much as it could have), so we ended up putting a few more coats of sealer on a week or so after when we noticed the counters were starting to absorb water.
You can also finish with a beeswax to add even more protection (only after your counters are super sealed).
Buddy Rhodes Beeswax
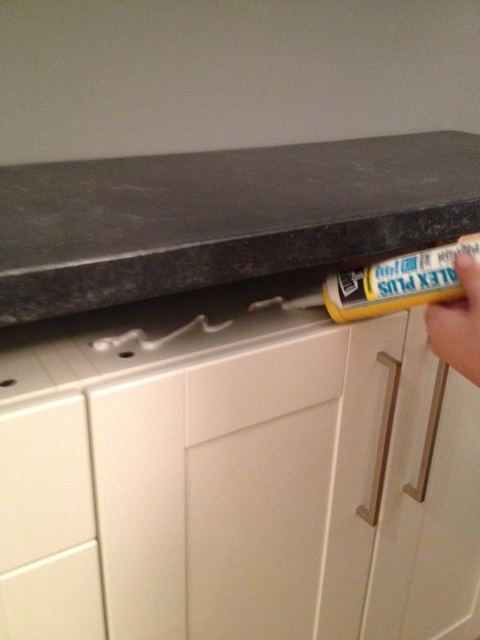
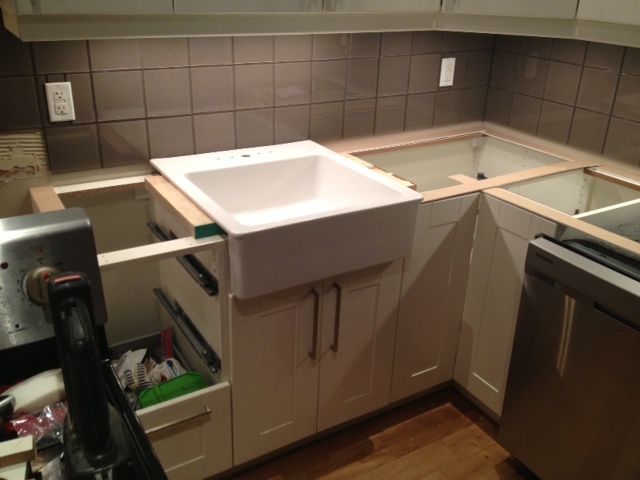
After they were sealed and we were happy as clams, we attached the counters to the cabinets using some latex caulking w/ silicone. We lifted the countertops, squirted in some caulking (we used about a tube for the whole kitchen) and put the countertops in place and let everything dry.
Attaching Countertops to cabinets (sorry for the blurry photo!)
Then we caulked the countertop edges where they met the wall and cabinets.
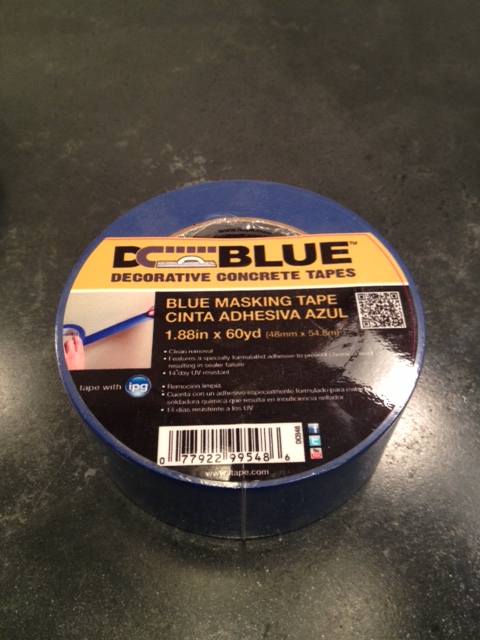
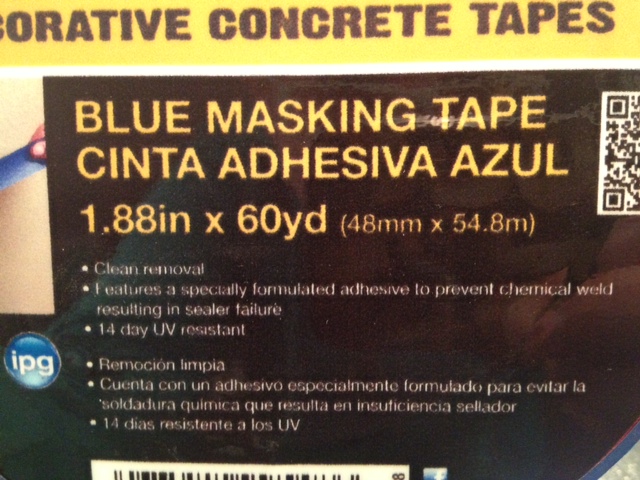
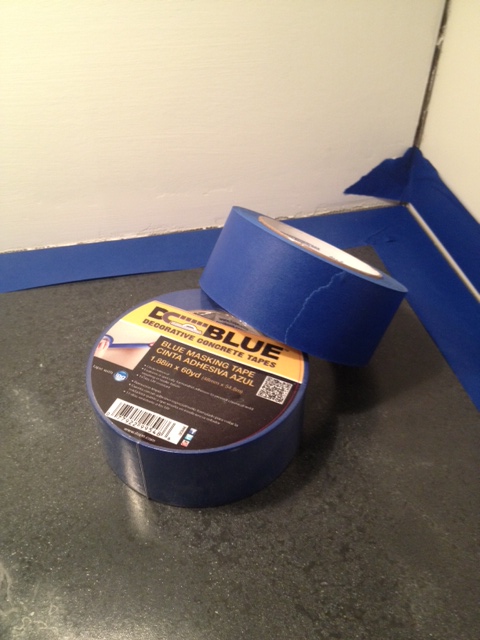
Do NOT put regular masking tape on your countertops while caulking. Regular masking tape can react with your sealer and cause huge problems (aka chemical weld). You NEED to use a concrete sealer safe tape. This one is well priced, works great and easy to find at your local big box hardware store:
DC Blue Concrete Masking Tape (safe for your sealer!)
Why is this so important:
Listen to the tape packaging, it knows its stuff
“Features a specially formulated adhesive to prevent chemical weld resulting in sealer failure”
So yeah, don’t mess up your concrete by being a cheap-o and using regular tape.
Tape off your countertop & cabinets/sink with the concrete tape, and tape off your walls with regular masking tape, and apply your caulking.
Concrete safe tape applied to countertop & cabinet.
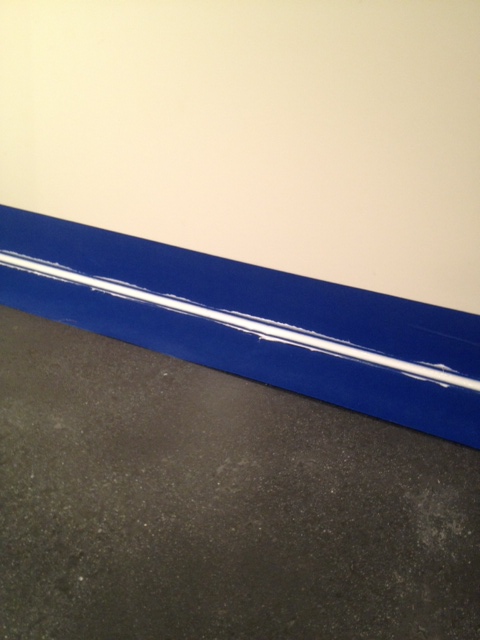
Smooth the caulking out, remove excess caulk, and then remove the tape & let dry.
Caulking AppliedTape removed
At this point in time I actually started letting people touch the countertops, and even look at them!
The concrete is not indestructible. You still need to take care of it, and try to prevent stains. Aka don’t go cutting lemons on the countertop, and clean up oil after it splatters or spills. Oils & acids are the nemesis of almost all natural stone, and concrete is not exempt from that. Clean up spills, and don’t leave things hanging about, and your countertops will do just fine.
I am an avid cook, and usually have olive oil & balsamic close at hand. I used a small ceramic tray to hold my oft used bottles, to prevent possible rings forming on the countertops over time. (I can never manage NOT to drip oil down the side of a bottle!).
Use a tray to hold oil or vinegar (oil & vinegar are the arch nemesis to stone counters)
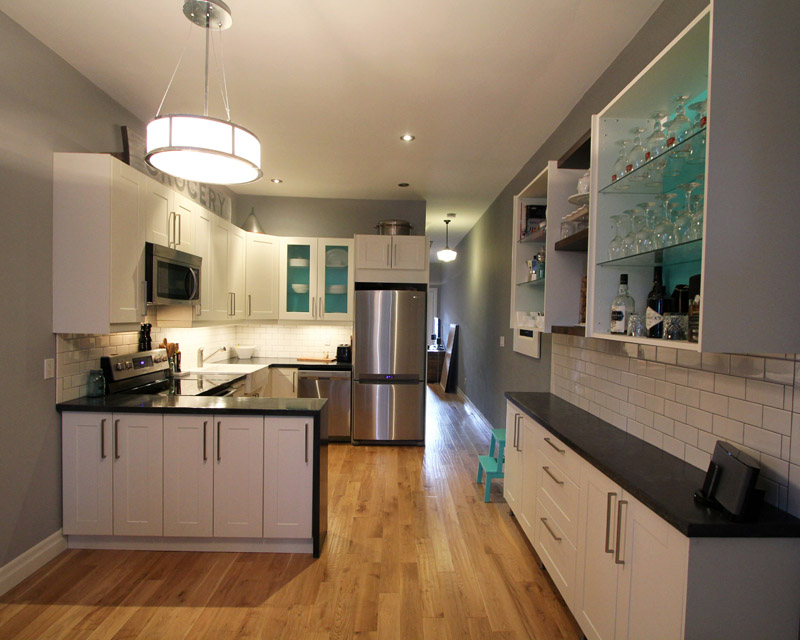
Thanks guys for sticking with us through five yes FIVE posts on concrete countertops. The thing is, this project was BIG. Even with five posts I have probably bored you all to death with my insistence on telling you exactly how we did everything. The thing is, I want you guys to make your own counters too! You CAN do it! Real concrete, solid surface, with professional looking results. So thanks for sticking with me, cause I think it was totally worth it. Wanna see what all our hard work actually looks like?
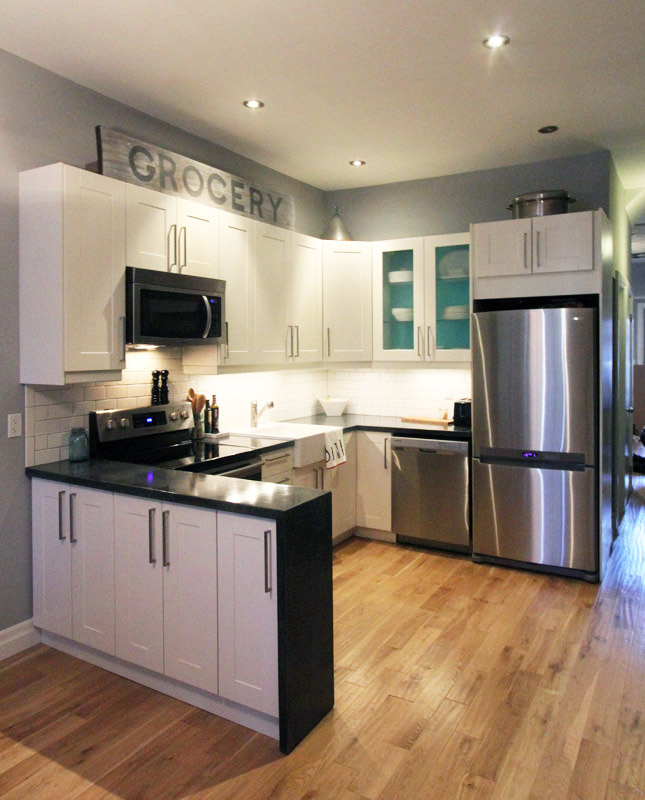
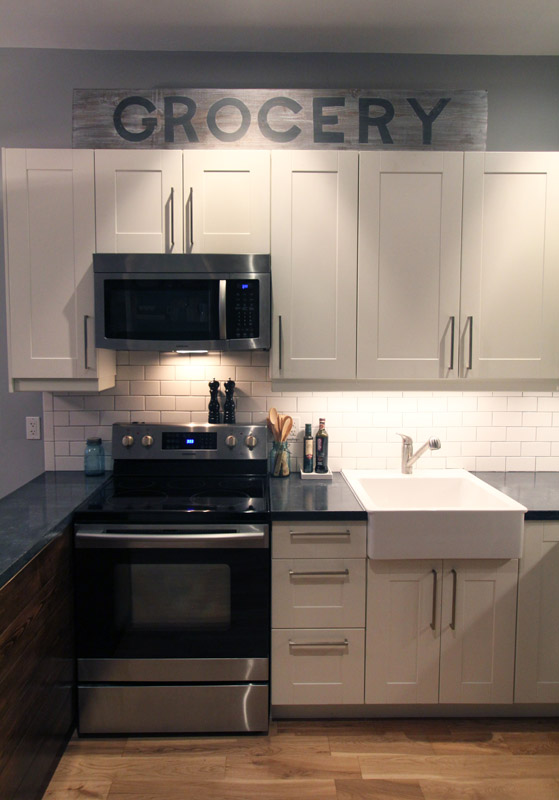
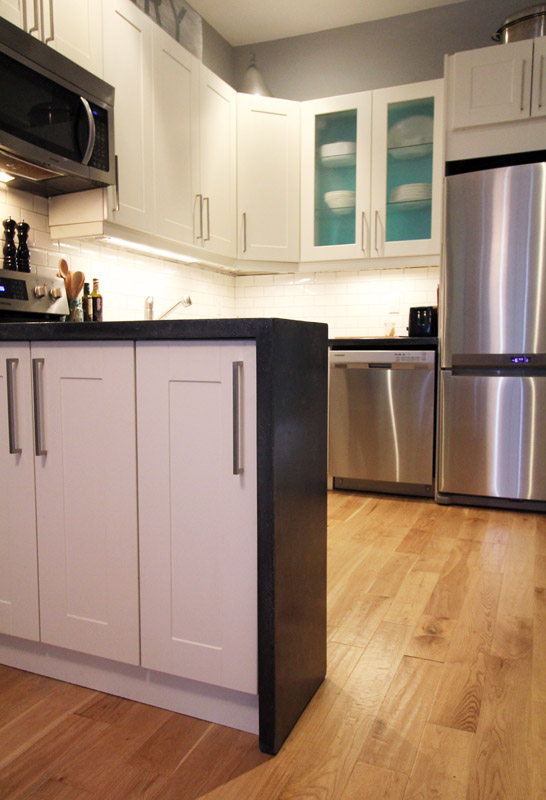
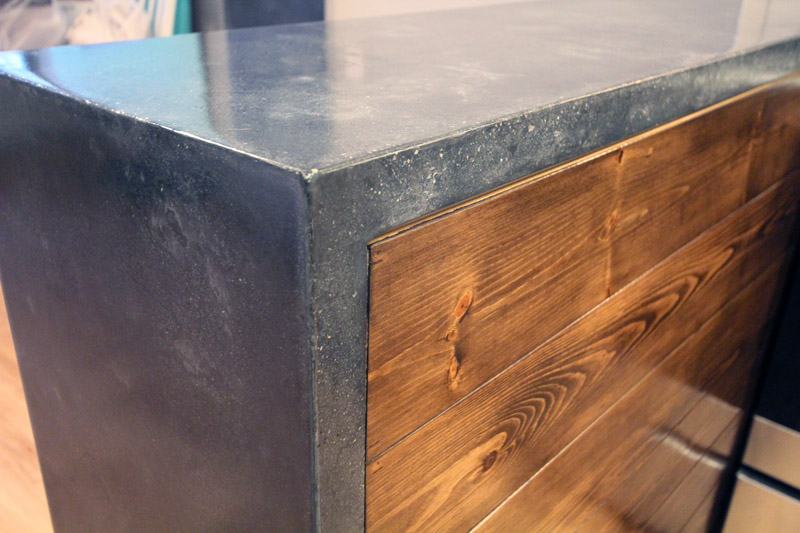
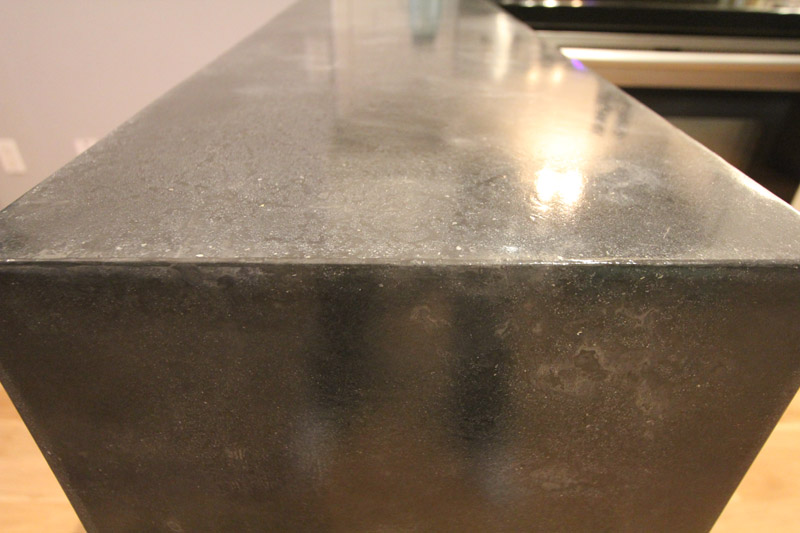
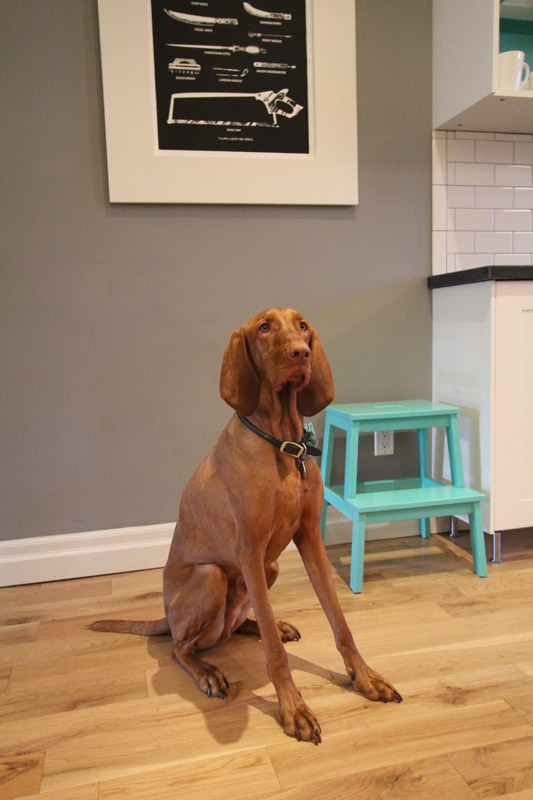
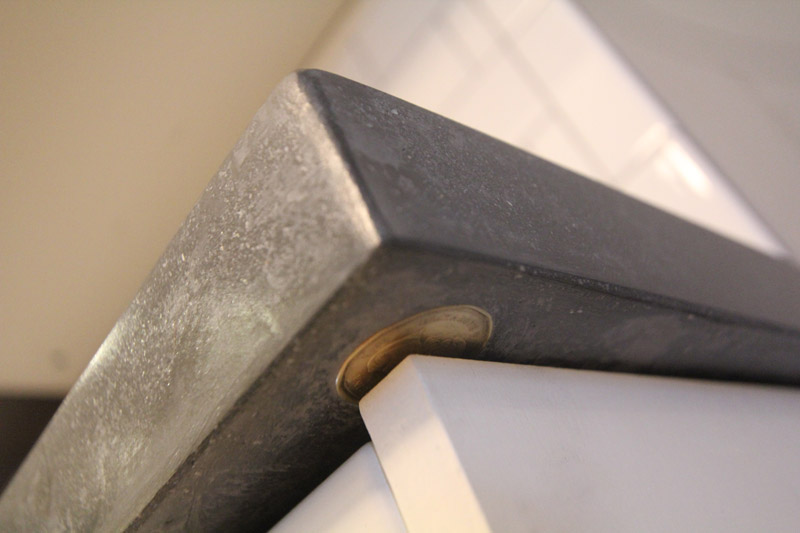
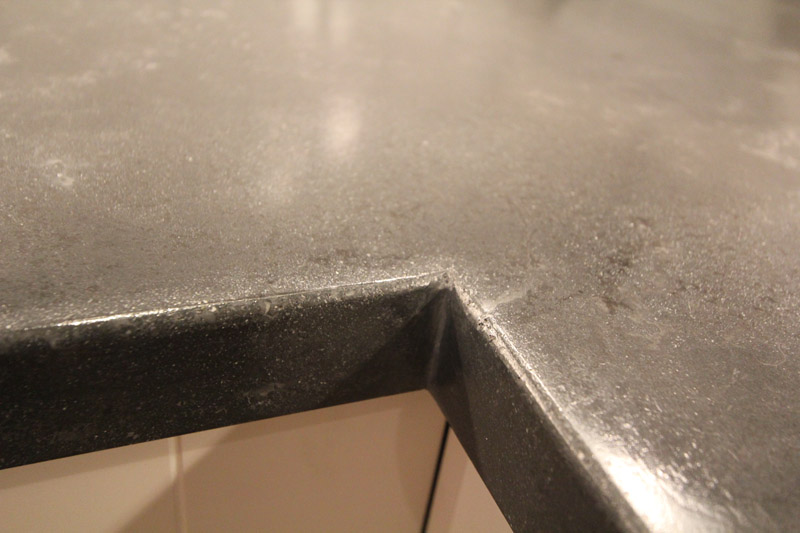
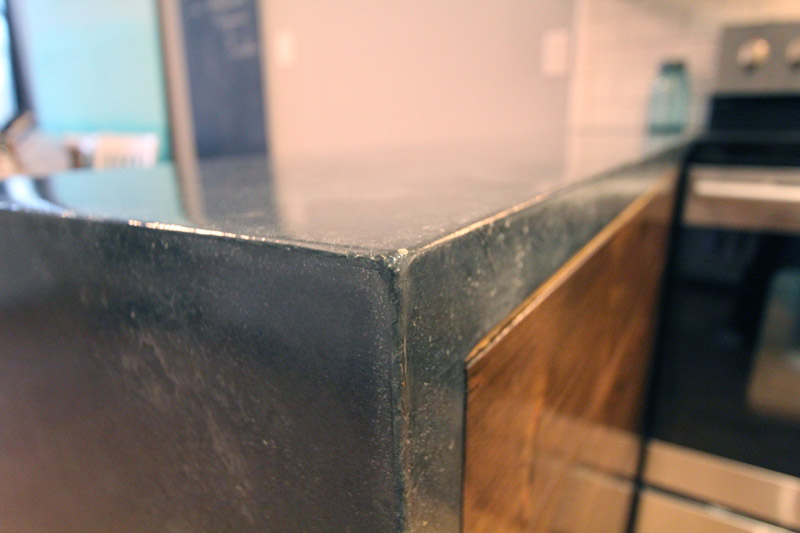
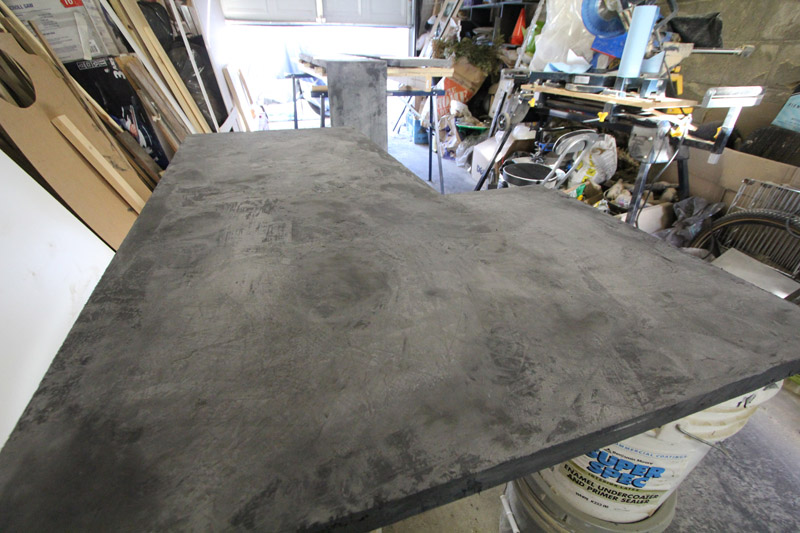
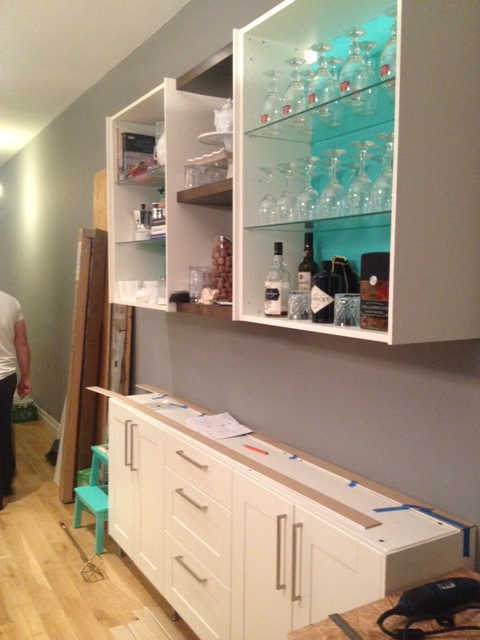
The counters were done in four pieces, including the single piece waterfall, which is by far my favorite piece! The color we used is “coal” but the color of the concrete can look very different at different times of the day. From a medium gray when the light is hitting it to a deep charcoal in the shadows. The color has so much texture and movement. I just love it! We paired the white cabinets with a pop of bright teal, and black and white accents.
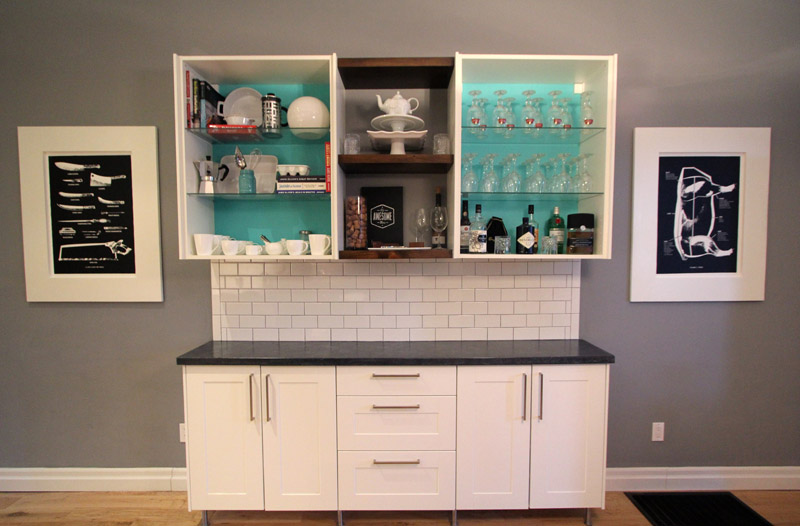
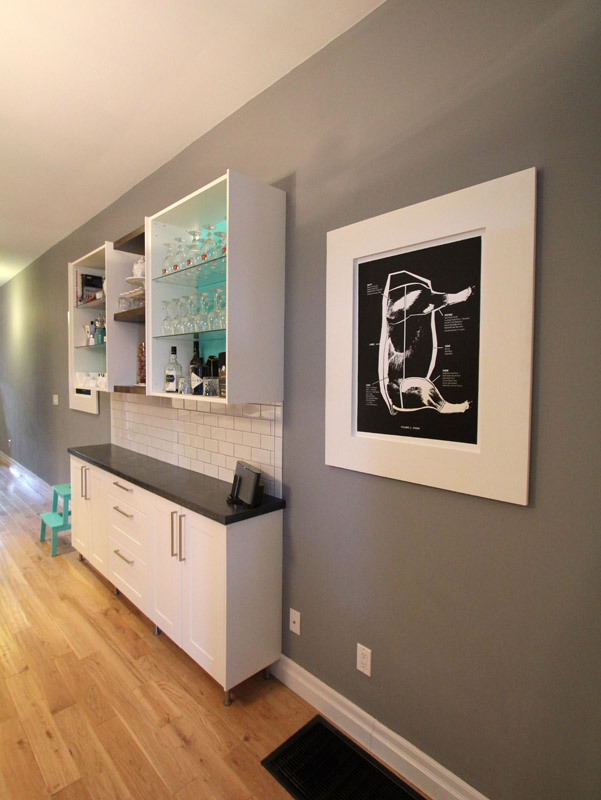
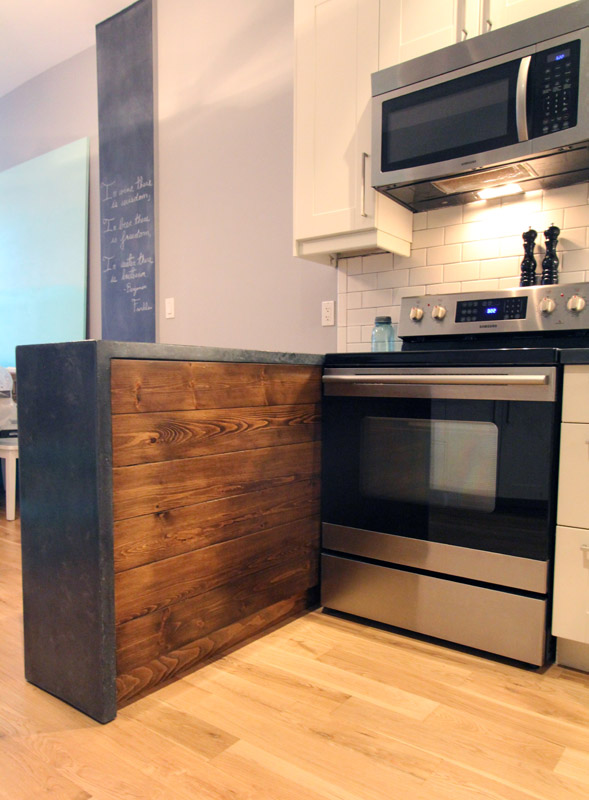
For the back of the peninsula we opted to add a pop of wood. The kitchen already had a lot of white, so adding wood really ties it into the dining room with its wood table & bench. It also matches the floating shelves on the coffee bar.
The waterfall is just sexy! I love how seamless it is. I would never have dreamed that we could do it in one piece. It is simply a work of art.
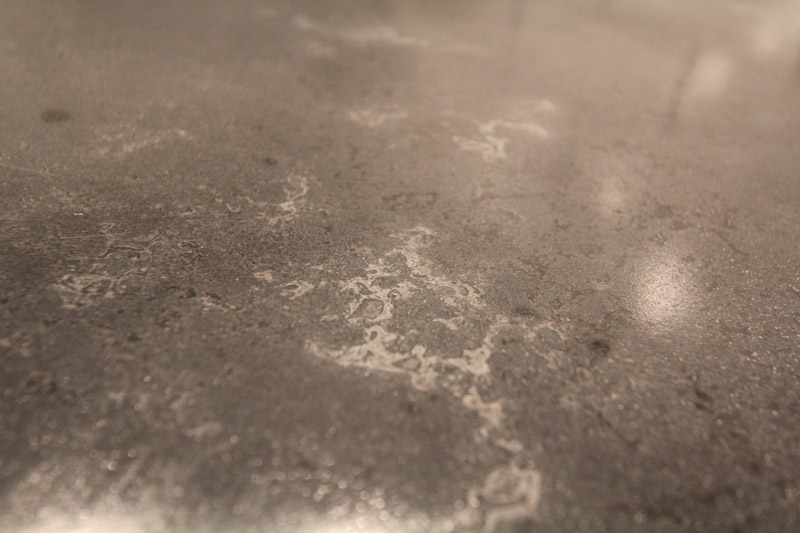
Speaking of the color varying. Here is one of my favorite spots with a lot of texture. This was produced by adding a slightly lighter color slurry for the middle slurry coat. I heart.
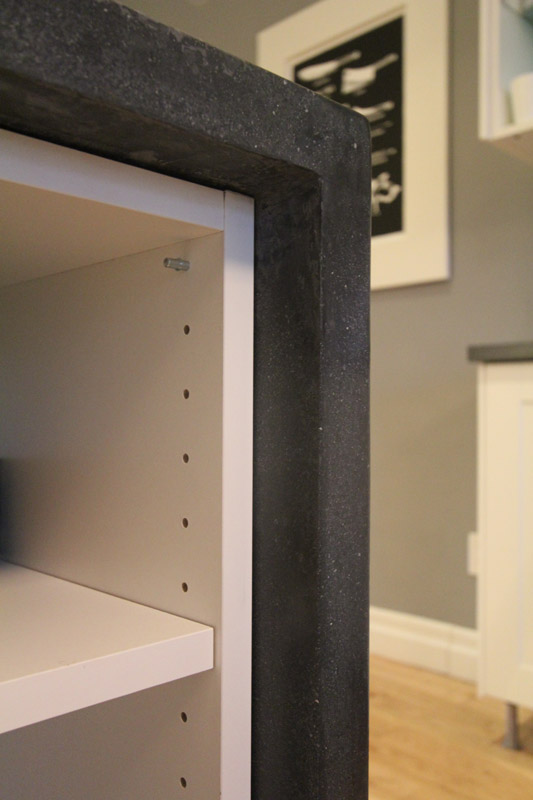
The front of the peninsula has cupboards, and when you open them you can see more of the exposed waterfall.
Sorry, had to throw one of Odin in. I can’t have my camera out and not take a photo (or ten) of him.
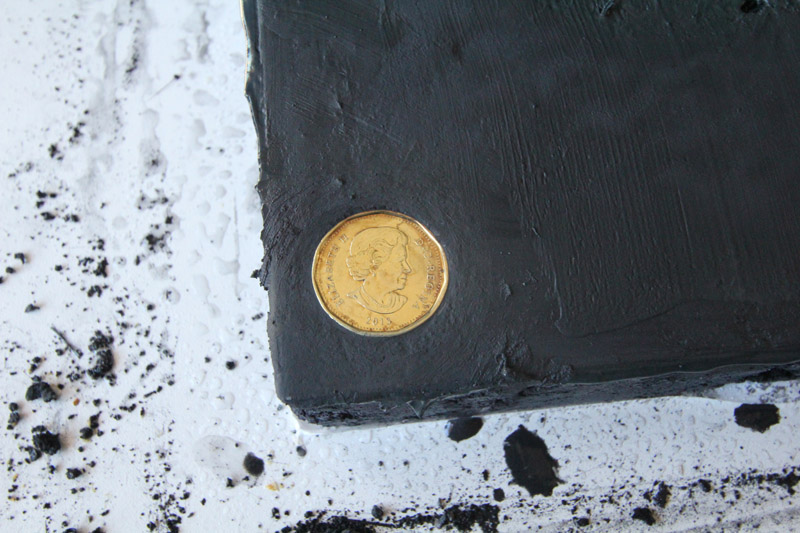
Do you remember when we hid a 2013 Loonie? Here’s the Queen peeking out from under the coffee bar counter.
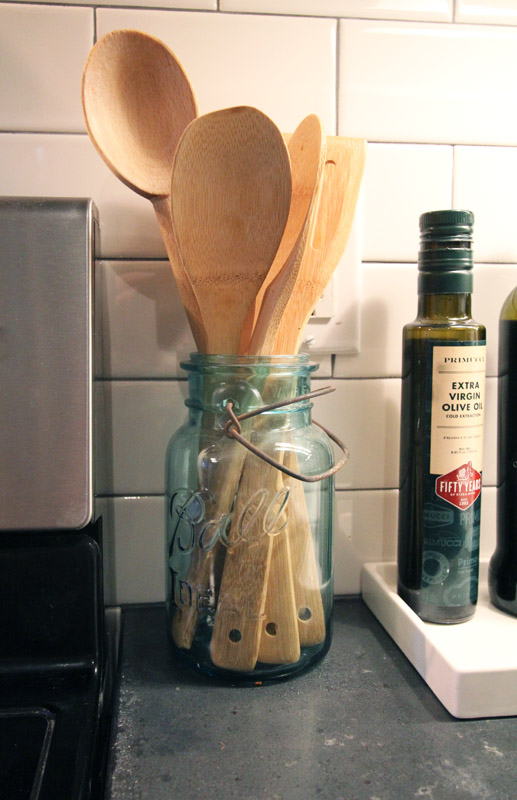
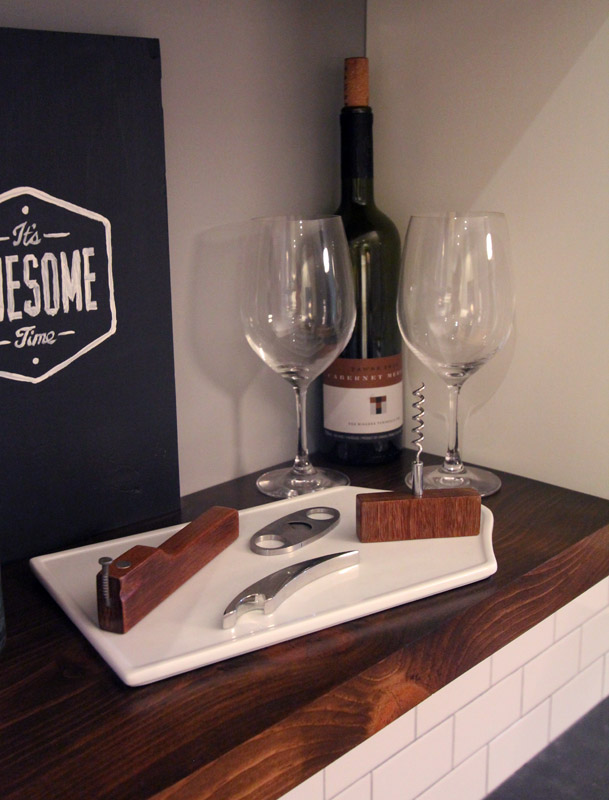
Now for a few of the other kitchen details. El Granto picked me up a couple vintage Bell jars one day at The Junction Flea. I love this one which holds my wooden spoons beside the stove. We also use a small ceramic tray to keep oil and vinegar off the counter (it would stain the tops).
I am still very happy with the wood shelves we added to the coffee bar. Now with the wood clad peninsula, it really pulls the coffee bar into the kitchen.
The inside counter was one piece I worried about a lot, but in the end its imperfectly perfect.
Okay, one more pic of the waterfall! We slightly rounded the counter edges. Littles and dogs wont poke their eyes out, and it makes me swear less when I bump into the counters.
So what do you think?! We’re super happy with them. They turned out better than we ever could have imagined!
I will be back later in the week with a few more kitchen items. Such as the source list, a few more project how to’s, as well as how we installed and sealed the counters. But for now, I am going to go and makeout with my counters. Wha? Uh. I mean stare at them lovingly, and maybe touch them a little. So smooth… and sexy…
We’re getting so close in finishing our concrete countertop project! I am so very very excited to show you the reveal, (next week!) but before the reveal we still have some work to do! When we left off we had “poured” the concrete into our forms, and left it covered, moist and warm.
Now it’s time to unmold the forms and see what we’re working with! We removed the blankets and plastic to reveal a nice moist concrete.
Removing Plastic
We then got started pulling away the forms. Using gentle pressure, and ensuring we were not prying against the (still pretty soft) concrete, we removed the form sides.
Removing the form sidesEl Granto removing coffee bar form sidesRemoving Waterfall Form
You will note a shiny gold object in the bottom of the coffee bar. We inserted a 2013 loonie into the form under one of the edges. I hope that if someone ever takes the coffee bar apart, or renos the kitchen in the future they will find the coin and know when we built it! It also never hurts to have the queen hanging out in your kitchen. She classes up the joint.
2013 Loonie (for all my Americans; this is our $1 coin)
Before we could flip everything over and see what we were workin’ with (remember we poured our counters upside down) we needed to do a bit of house keeping.
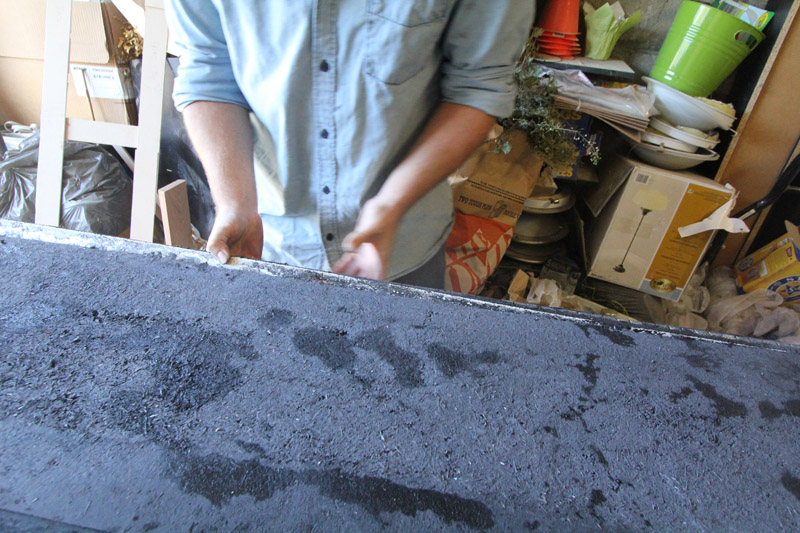
Our concrete mentor Jeremy made a very good point about how we interact with objects. When you go to touch and admire a countertop or a table, what so you do? You kind of grab the edge, placing your thumb on top and four fingers around the edge, touching the underside. If the underside of your table or counter is rough, everybody’s gonna know that you were a lazy sod who skimped on the finishing. Do you want to be the lazy sod? Exactly. So let’s sand the bottom edges of four counters so our friends don’t judge us.
Using buddy Rhodes hand sanding pads, we wet sanded the bottom edges and used a chisel to remove any errant blobs of concrete. A few minutes work, that we will certainly appreciate later!
Buddy Rhodes hand sanding padEl Granto wet sanding the undersides of the countertops
After an excruciating 20 minutes (I want to see my counters!) we were able to flip the countertops over.
El Granto seeing the waterfall counter for the first time
I really love that shot, as it is the first moment El Granto saw our waterfall countertop. I think this is the exact moment he realized how freaking awesome these counters were going to look!
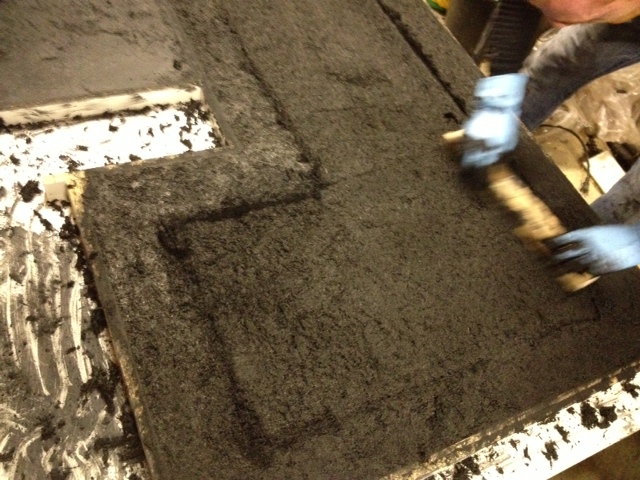
Remember from our last post how we hand packed the concrete in, and purposefully left voids? This is what the result looked like:
Close up of the hand pressed technique right after unmolding
I think it looks amazing (and I will definitely have to do some sort of project soon that looks like that) but obviously for countertops, we need to make them smooth.
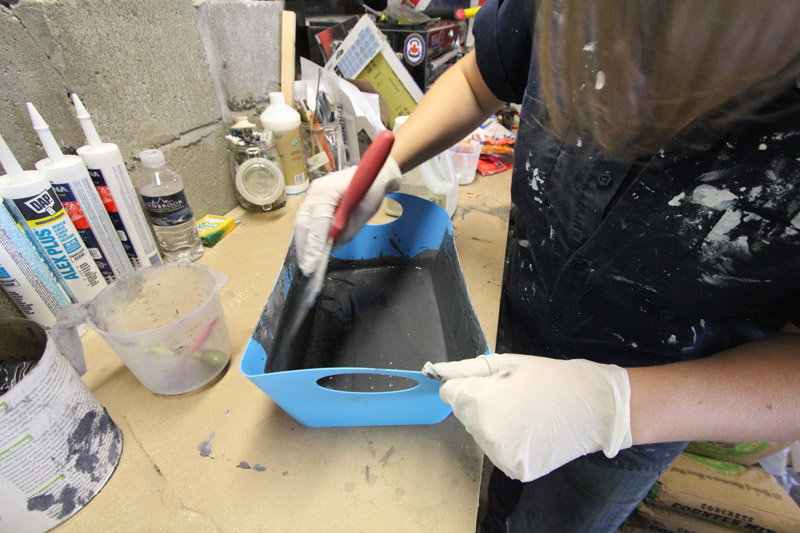
To do that, we mix up a slurry of bone paste (really fine concrete) and pigment and push it into the voids. It’s actually a lot like grouting tiles.
You can take this opportunity to add some colour, but in our case we wanted to stick with the same dark grey to keep with an industrial concrete look.
We mixed up a batch of slurry. (Two parts bone paste, one part acrylic additive & your color.)
Using a drywall mud knife & tray mix the slurry very well. Pressing out any clumps of pigment by pushing the knife against the tray. Now you will note that I’m not using a drywall mud tray. That’s because I forgot to buy one, and used some plastic bucket from the dollar store. Get a mud tray! We used a 5″ knife and it worked well.
Mixing up the bone paste slurry
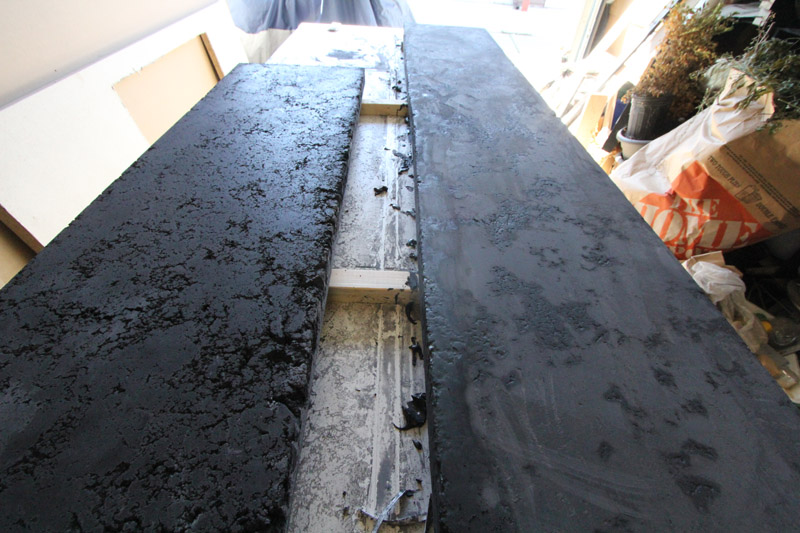
Once your slurry is mixed, start pushing it into the holes in your counter. Using a combination of your putty knife and a grout float. The grout float worked very well and shoving that slurry into the holes. You will need to do three coats of slurry, so don’t try to fill the voids entirely. They will get filled, don’t you worry. Thin coats are better, just give it a pass, scrape off any excess and let it dry.
The piece on the left has not yet been slurried, and the piece on the right has had one coat of slurry
After our first coat was dry, we mixed up a slightly lighter version of our color, and did a second (light) coat with that. Our third coat was back to our original darker color. This will result in a bit of a lighter highlight in our cracks and crevices, giving a lot of texture to the concrete.
Slurried Concrete (is slurried a word?! It is now. BAZINGA!)
After three coats of slurry were applied, we left it to dry overnight (and ate some shawarmas.) Hey, hard work deserves delicious shawarmas, and maybe a samosa or two for good measure.
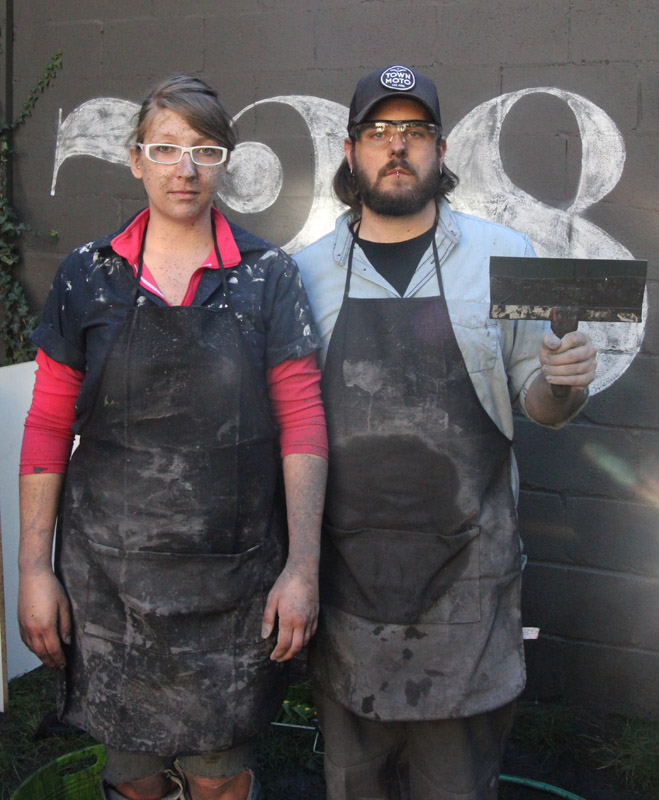
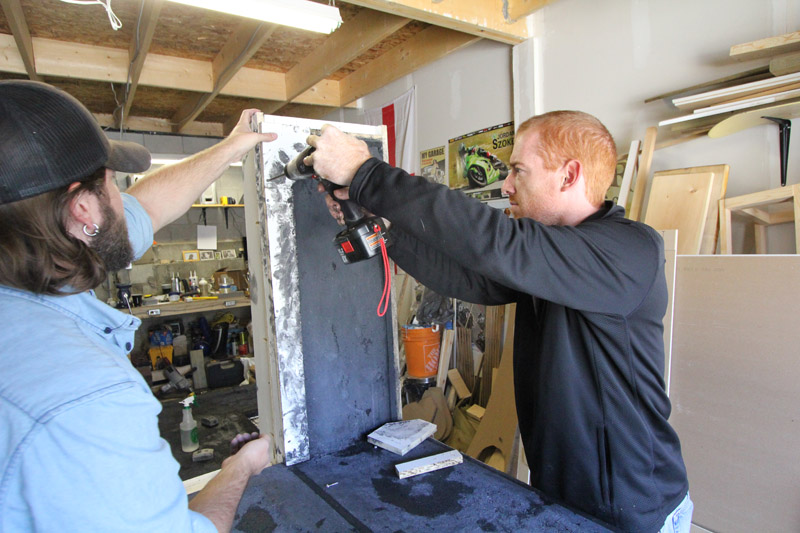
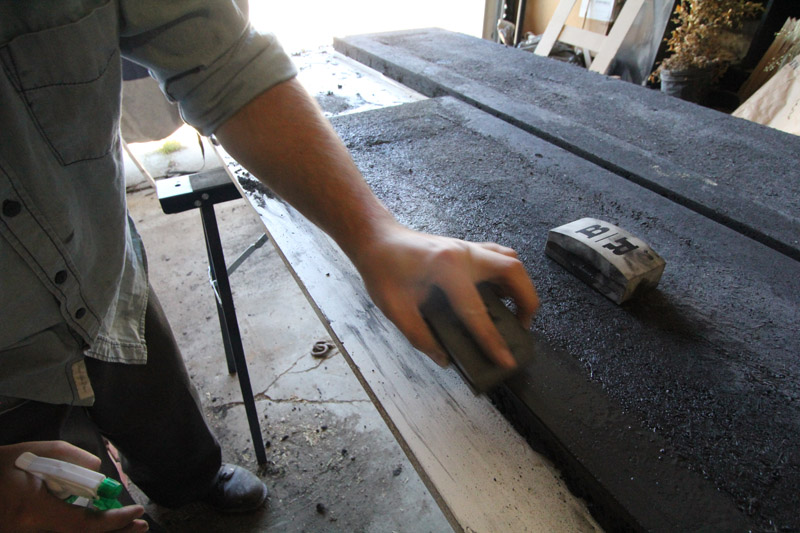
The next day we set to wet sanding everything. We covered the garage in plastic, donned aprons (and in Jeremy’s case, a drop cloth toga, cause we forgot to get him an apron, oops) and got to work. Ideally you would have a wet sander/polisher for this step, but we didn’t, so we used inexpensive orbital sanders and wet sanded away with the Buddy Rhodes diamond orbital sanding pads. We used the hand pads for the edges and areas that were hard to get to with the orbital.
It was a messy mess day, and we didn’t take many photos. However we did make a super awesome time lapse video for you of all our slurring & sanding fun. Here’s two days hard work in two minutes of video.
I leave you with an American Gothic version of exhausted Kristen & El Granto. Covered in concrete splatter and soaking wet.
The title of this post lies. Such a dirty little liar.
The concrete product we are using; Buddy RhodesCraftsman Mix and the way were mixing it: “Buddy’s hand pressed technique” is not poured at all. However “DIY Concrete Countertops – The Day We Made Mud Pies” doesn’t have the same ring to it, or credibility.
All joking aside, I want you guys to take me seriously now, because things are about to go down. It’s getting hot in here, and someone may have let the dogs out (oops!).
It’s time to make the countertops!
Like really truly put stuff in molds!
If you’re new (hi!), and haven’t yet read my previous posts on this project, well then get to it! You’ve got a lot to catch up on before this sh%t goes down!
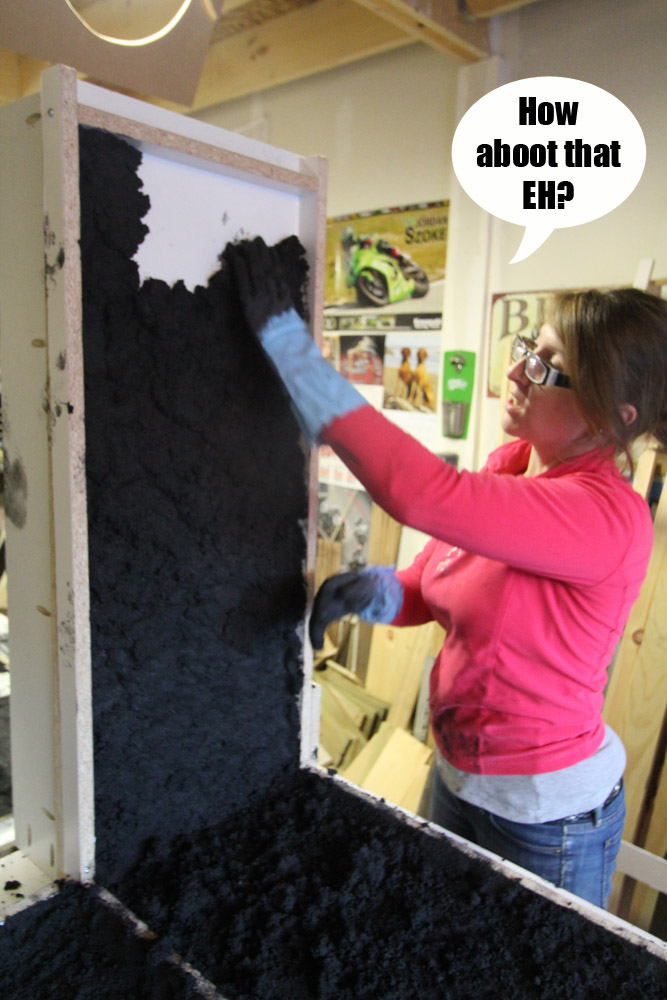
Jeremy from Buddy Rhodes flew into Toronto, all the way from the Southern US to help us Canucks “pour”. You will note a continuing theme throughout our time with Jeremy. He was convinced all Canadians said nothing but “aboot” and “eh”. While El Granto & I had a good laugh every time he said “y’all”. While I tried very very hard not to let an “Eh!” drop. They regrettably slipped out, and I will never ever live it down.
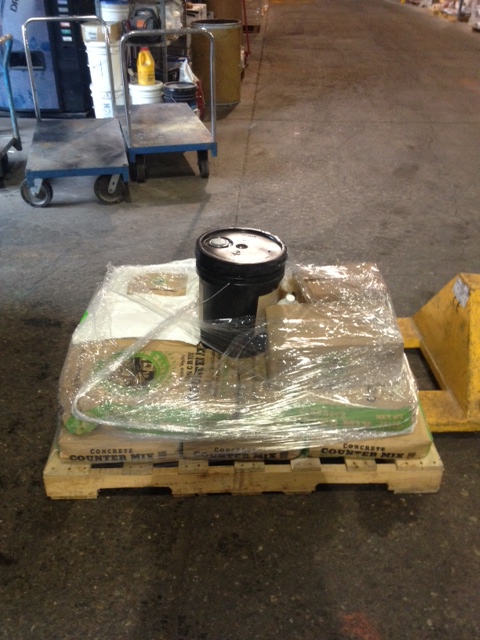
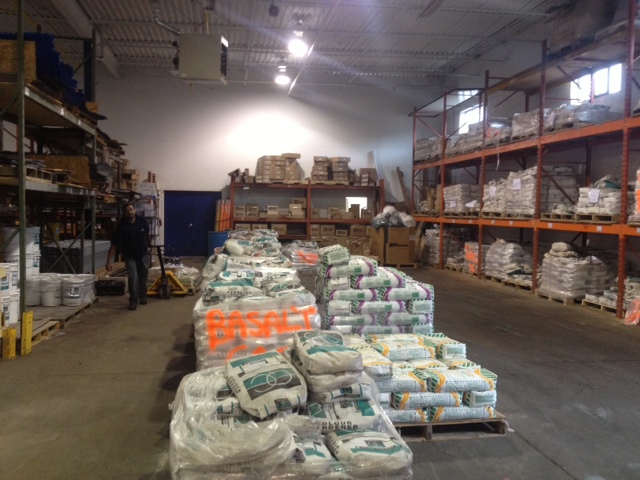
While Jeremy was making his way to Canada, EL Granto’s Mum and I headed to Form & Build in Mississauga to pick up our supplies. After much humorous banter with the Form & Build guys (including them playing a trick on the new kids, telling us the SUV wouldn’t hold the weight of everything!) we had all our supplies loaded and ready to go. (Thanks Form & Build warehouse guys, that stuff is HEAVY!)
The pallet full of our supplies at Form & BuildForm & Build Warehouse – it’s like a concrete candy storeWhat do you think, is it all gonna fit? It did (and the CRV was fine!)All the Buddy Rhodes supplies safe and sound back at the Storefront Garage
Back at the Storefront we laid out our previously built forms on perfectly flat sturdy surfaces (you CAN put them on the ground, but it’s much much easier if you’re working at waist height and our garage floor is anything but flat). We used saw horses for one of the forms, and we made a work surface out of 5 gallon buckets and some 2×4’s for the other.
Jeremy building a work platform for our forms
This was all happening in our 240 square foot garage. (Which is full of tools eh!) This is urban DIYing at its finest! You gotta make do with what you’ve got.
Once we had everything ready to go, we started mixing. Jeremy had previously suggested we get a mortar mixer like this:
Harbor Freight Tools Mortar Mixer
They are readily available in the US but apparently in Canada they are hard to find. Home Depot carries one for sale online only, but unfortunately we didn’t have enough time for the shipping before Jeremy got into town. I called every tool rental place in the city, and alas no one rented them.
We settled for a rental mixing drill, and this thing was a beast. It was HEAVY, unwieldy, mixed too much air into the mix, and took forever to mix. Not ideal, but in the end it did get the job done. We all struggled with it, ended up cutting our mixing paddle shorter, and took turns. Next time, I am buying the right tool for the job! If you are thinking of doing this project, get a mortar mixer!!
We were mixing the Buddy Rhodes Craftsman Mix according to Buddy’s hand pressed recipe. This mix is not your normal concrete. It’s more the consistency of cookie dough, and truthfully mixing it is just like making cookie dough!
“Pouring” this mixture is a two stage process, you put a first coat of hand pressed craftsman mix in to your forms about a half inch thick, then you fill in the form with a backer coat of fiber reinforced craftsman mix. Use the Buddy Rhodes project calculator to determine how much of each product you will need.
Here are the quantities we used for Stage One:
2 bags Buddy Rhodes Craftsman Mix
8 quarts water
2 quarts polymer
1 can pigment (coal in our case)
Water reducer to get the consistency we are after (only a little, about a cap full)
DIY TIP: Ever poured something out of a 5 gallon pail? Sucks right? It’s heavy and hard to control and slops all over the place! Here’s a tip, place the pail on its side on a work surface. Start with the spout facing up, and remove lid. Place your container below the spout, and slowly roll the pail. It will start gently pouring out of the spout into your container, and you wont spill anything! When you’re done, roll the pail back and put the lid back on. No heavy lifting and spilling required!
Easy Peasy Lemon Squeezy
Just like baking, we mixed all the liquids together first, and added in the pigment to get it evenly dispersed.
Add liquids first, then mix
Then we slowly added one bag of craftsman mix. If you’re doing this project, wear a dust mask, you do not wanna breathe in that dust!
Mixing everything together
Lifting the mixer up and down, and round and round helped everything mix more evenly.
Everyone pulled together to mix. This was hard work! Especially me with my girly muscles.
Everything is ready once the mixture reaches cookie dough consistency. It’s like play-dough for big kids who want new kitchens!
Now it’s time for the fun!
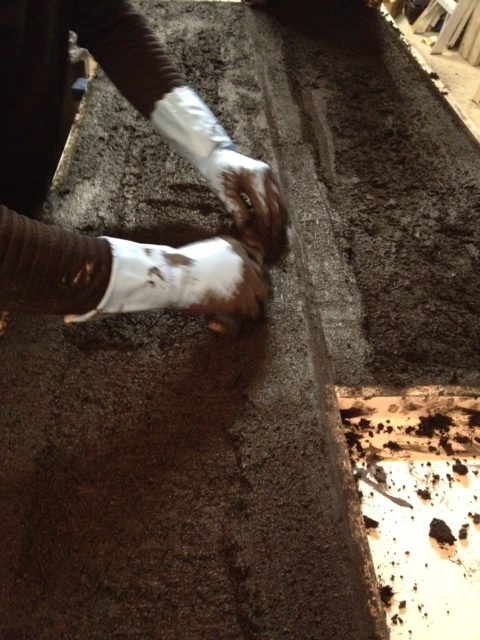
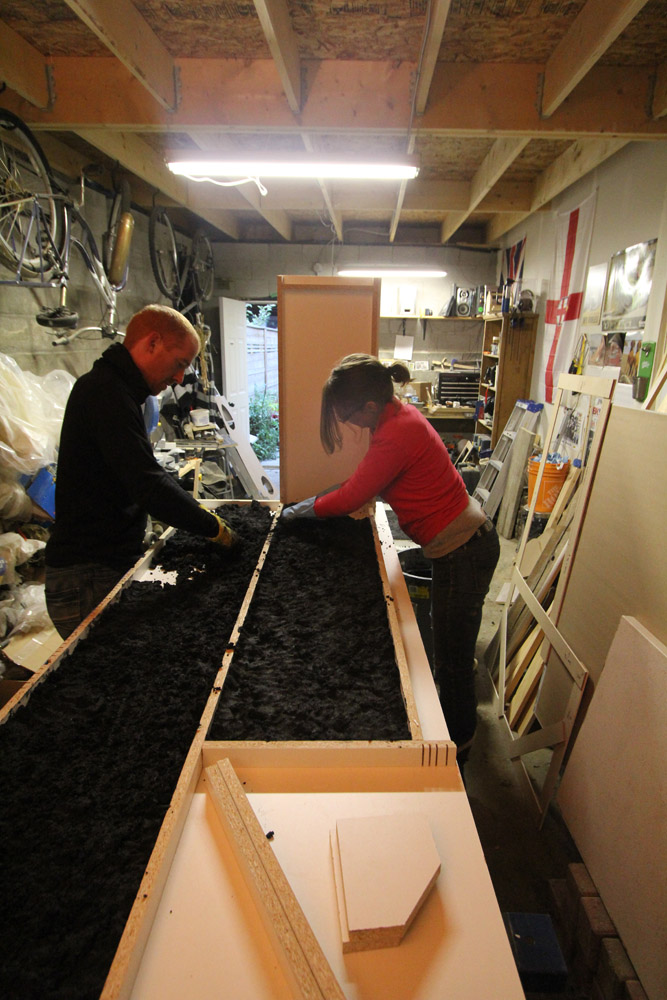
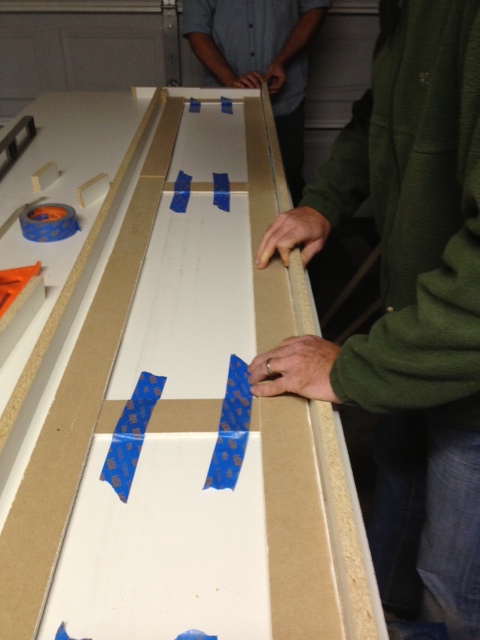
We donned gloves, and took handfuls of the mix and packed it (gently) into the forms. With this technique we actually want to leave some voids, so that the concrete will have a more organic look to it. If you pack it too hard you’ll squish out all the air and have no voids to fill later. We want voids because we will fill the voids with a bone paste colored slurry, which will give some character and depth to the finish. So this task meant that we were to do a bit of a crappy job in order to make it awesome.
We made handfulls of what I lovingly called mud pies, and placed them in the forms, making sure we got up the sides and all along the flat parts about 1/2″ thick.
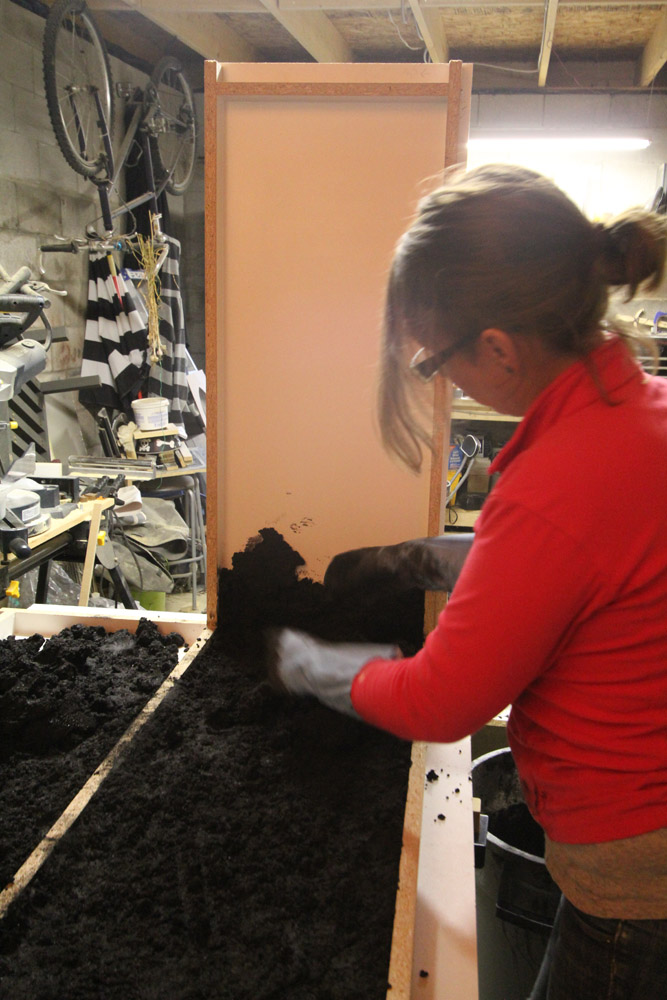
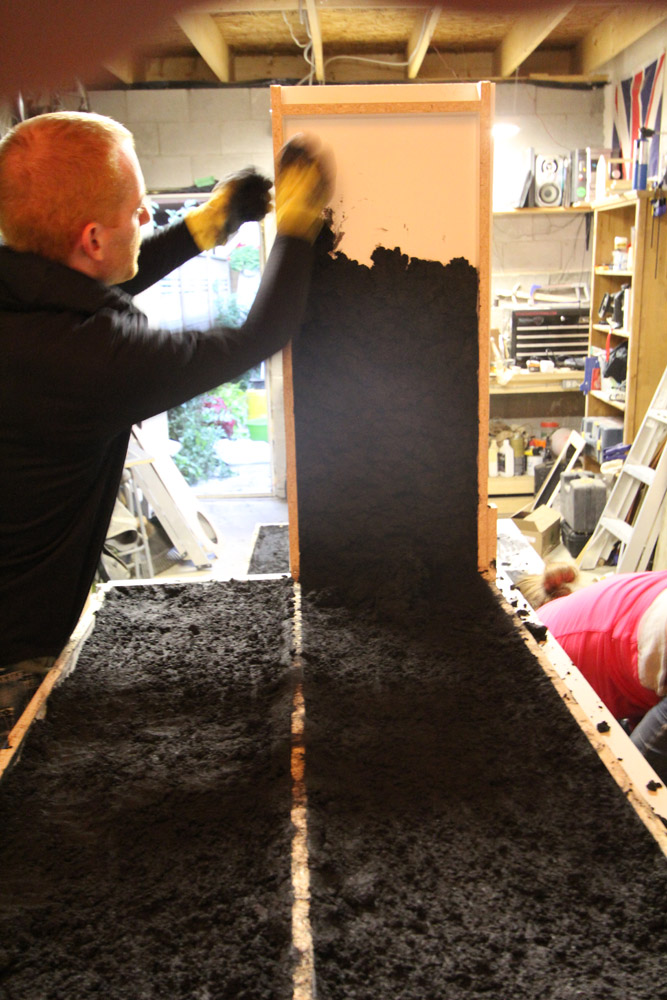
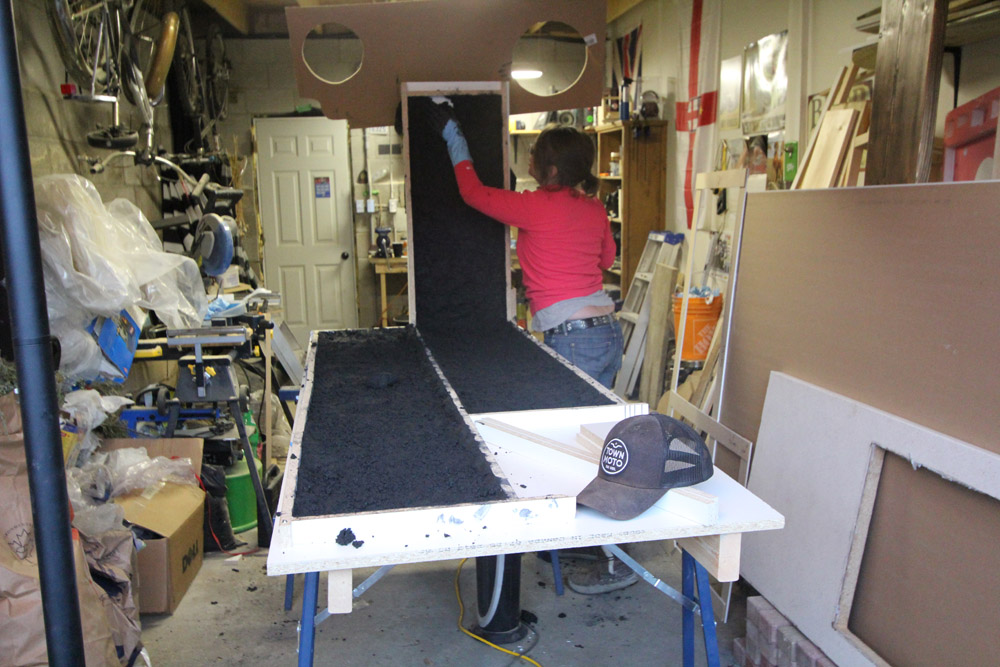
When we got to the waterfall countertop form, we did the flat part first, then started up the vertical. As the mix is nice and thick, it stuck to the form no problem.
Packing the bottom of the formsBuilding the mix up the vertical form
Up and up the form we went.
Build that wall y’all!Am I doing it right?Almost there!
After the forms had their 1/2″ of Stage One mix, we gently raked everything with our fingers making sure things were pretty well evenly dispersed and there weren’t any huge voids. Next up is Stage Two, the reinforced backer.
Here are the quantities for Stage Two – The Backer:
2 bags Buddy Rhodes Craftsman Mix
8 quarts water
2 quarts polymer
1 can pigment (coal in our case)
Water reducer to get the consistency we are after (a little bit more than Stage One)
2 1/2 lbs of glass fibers
Stage Two gets mixed exactly the same way as stage one, except the glass fibers are added (and mixed in gently) right at the very end. It’s important not to break all the fibers or they wont do their job. You don’t want lazy slacking fibers.
After the backer was all mixed up, we added it to the molds, filling it up entirely near the edges, and leaving it a bit less full in the middle of the forms (you don’t need to fill them all the way up in the middle, its just wasting concrete!). You want the forms completely full where they are going to touch the front and the back of your cabinets (so that everything lies nice and flat). You also want it to ensure your overhang is completely full.
We then used a small piece of wood to screed the parts of the countertop that will touch the cabinets & the overhangs making everything nice and flat.
Jeremy using a piece of wood to screed and make flat the bottom of the countertopJeremy hollowing out the center of the large countertop piece. You dont need the form to be full in the middle. This way you can cut down on material and weight
On our waterfall, we made some smaller pieces to act as the backs of the mold where our toe kicks and overhangs were. This will ensure we get a nice pretty back side of our counter (as it will be visible.)
Check out the small pieces of melamine on the vertical of the waterfall mold. Also note the exhausted look on El Granto’s face and the sheer amount of mess everywhere.
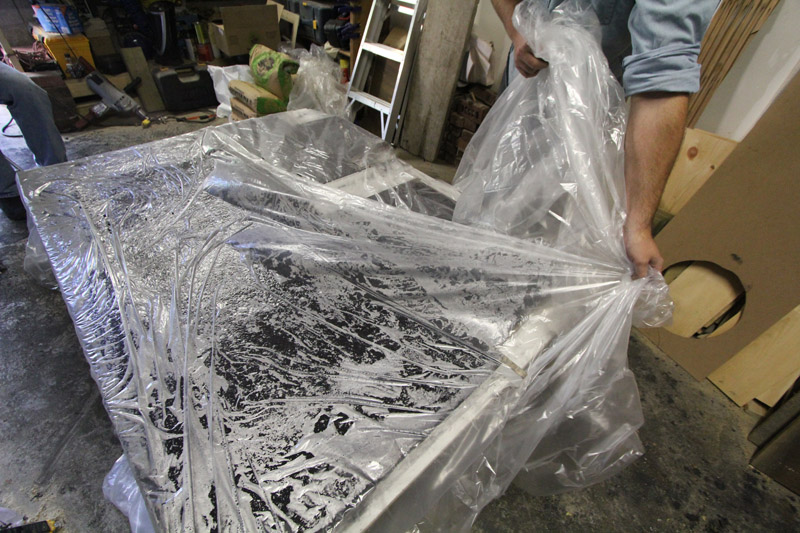
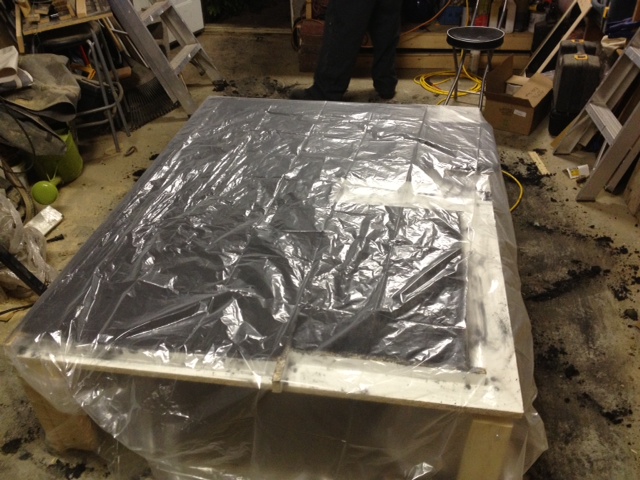
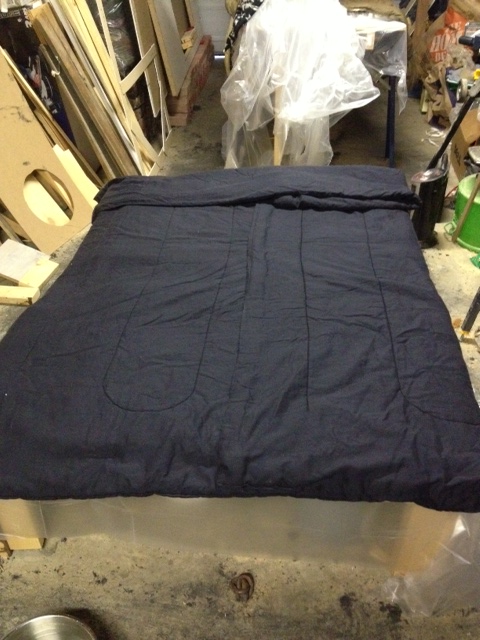
Once we were done, we covered our counters with plastic sheeting, then blankets to keep them warm. Heat is important to the curing process (in his shop Jeremy puts industrial heating blankets on his forms while they cure to keep them as hot as possible), and as it was fall in Canada, it was even more important to keep everything warm. We put all the concrete to bed with blankets and left the heat on high in the garage overnight.
Covering forms with plastic to keep in moistureWe covered the concrete with blankets and tucked it in for the night.
We occasionally went out and wet down the concrete with warm water and a cloth, then recovered. If you are doing this yourself, I would recommend doing your pour one weekend, then keep your concrete damp and warm for a week (this will ensure the strongest concrete possible), and unmold the next weekend. We were on a tighter timeline, and unmolded the next day.
It was a hard days work, but we actually made countertops! Next step is to unmold everything, make a bone paste colored slurry to fill any voids, and then sand. We’re getting closer!!
***UPDATE – Check out the next stage in the project here ***
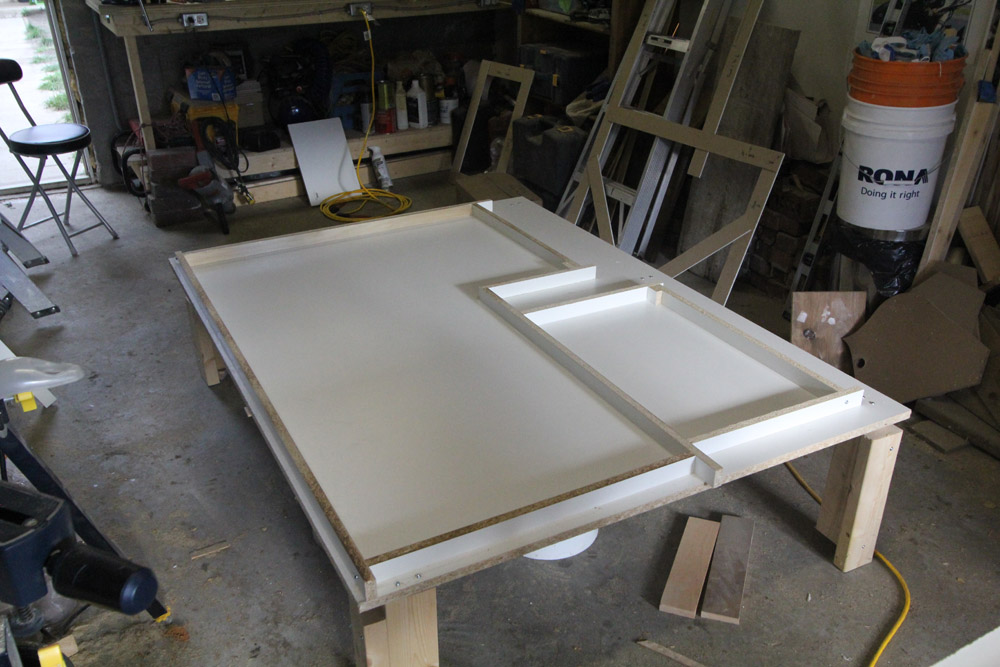
If you’re making DIY concrete countertops, one of the most important parts of the process is the forms. Your forms are your molds, and if they’re not done right, your end product won’t look professional and you’ll constantly be bothered by those little bits that are “off” (or just straight up wrong).
Before taking on this project, I researched a LOT about the forms, and got a bit freaked out. Most of the things I’d read about the forms involved making a completely level work surface for the forms, (which would be a problem in our tiny unlevel garage) and a whole lot of pre-drilling, countersinking and screws screws screws. Then comes the stressful part about making your perfect edges with caulking.
Then Jeremy from Buddy Rhodes Concrete Products entered our life, and told me to chill out about the forms. They really weren’t that hard. We should build them with tape instead of screws, and not to worry cause if we mess something up it doesn’t matter, as we can just pull the tape up and do it again. They also don’t have to be level, just flat. Because OUR Buddy Rhodes concrete wouldn’t be poured, and therefore didn’t have to fill the forms completely, and thus no need for level.
As for the edges, Jeremy told us to pick up some Vaseline and Popsicle sticks, and he’d show us how to do the edges the easy way.
So Jeremy took a stressful, detail orientated task and made it a whole lot simpler.
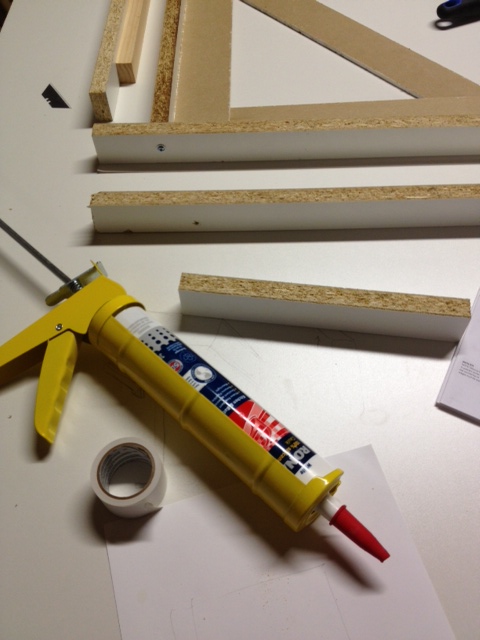
So here’s what you need to make your forms:
Concrete Form Materials (motorcycle optional)
3/4″ 4×8 melamine sheets (we used 2) $38/each
Strips of melamine cut to the desired depth of your countertop. In our case we were building a 1 1/2″ thick countertop, and therefore got our strips cut to 1 1/2″. You CAN do this yourself on a table saw, however it is a hard task to push 4×8 sheets onto a table saw getting perfectly straight strips. It is much easier to have Home Depot or Lowes cut them down with their panel saw. Get more strips cut than you think you’ll need. We got 4. Not enough.
Double Sided Duct Tape (*This can be hard to find. In the US check Walmart or Lowes. In Canada we did not find it anywhere, and resorted to double sided Scotch carpet tape (which did work). We ended up using 5 rolls of carpet tape, so make sure you have a bunch on hand. We started with 3 and had to make a trip back to HD.)
Off cuts of your 3/4″ thick melamine to use as spacers for your countertop overhang
100% white silicone caulking. The white dries harder than the clear, so go for white. Again get more than you think you need.
Caulking gun
Disposable rubber gloves
Shop Towel (or heavy duty paper towel)
Vaseline
Popsicle Sticks
Miter saw
Flat work surface (we used saw horses with 2×4 vertical stretchers between to stop sagging for one work surface, and a bunch of 5 gallon paint buckets for the other.)
Form Supplies: 1 1/2″ strips of melamine, double sided tape, silicone caulkDouble Sided Tape
HOW TO MAKE CONCRETE COUNTERTOP FORMS
Step One:
Make your flat work surface, ensuring you can get to all sides of the work surface, and you’re not going to trip over anything. Place a 4×8 sheet of melamine on your work surface, ensuring the melamine is in good condition. The surface has to be flat because you’re making your countertops upside-down. If there’s sag your countertops won’t be flat!
Step Two:
FLIP YOUR TEMPLATES UPSIDE DOWN, and transfer any imperative markings such as overlaps and sink holes to the bottom. The flipping your templates upside down is CRITICAL! (Yes, we did learn this one from making a BIG mistake. We got so excited to start building the forms that we forgot to flip them and had to start all over again.)
Place your (upside down) templates onto your melamine and lay them out to maximize your space. (a.k.a. don’t put one big template smack dab in the middle, fit them around like a puzzle so that you’re not wasting space)
Step Three:
Start building the edges of your forms using your template as a guide. Now you don’t have to measure each piece exactly to build your frame, its actually easier if you cut your sides a bit long, and build the sides of your form like this:
Cut your pieces longer then they need to be and have one end overhanging the next. (sorry for my terrible drawing, I really did go art school…)
Follow your templates, and where its indicated to add an overhang of 3/4″ inch, place a few offcuts of your melamine between the template edge and your melamine side to create the perfect spacing. Once you have everything laid out, attach the form sides to the melamine sheet base using the double sided tape. For added strength, use a self tapping screw (such as a pocket hole screw) to screw through the corners of your form, attaching the side pieces together. No need to screw into your 4×8 melamine sheet base though, the double sided tape will hold everything good enough. Also if you don’t screw in to your base sheet you can reuse it later on for another project!
Jeremy applying double sided tape to one of the form sides.
Step Four:
If you have any really wavy/crooked walls, and you needed to make a curved template (like we did for the coffee bar). Now it is time to make your curved form. To make the curve, we made kerf cuts on the back of one of our melamine strips. We first applied the double sided tape to the bottom of the piece, then set our miter saw to only cut through half the material, then kerfed all along where the curve needed to be.
Making the kerf cutsTesting the kerf cut piece to see if it would curve to our template
Once it was kerfed, we checked to see if it would curve to the form, then stuck it down, and added a few screws to keep it in place. A pretty big feat of engineering.
Curving the back piece of the coffee bar mold in place to form to our template (the coffee bar wall is very crooked, and has a hump right in the middle)Jeremy adding a few screws to the coffee bar form, and a sneak peek of our special form for the peninsula.
Step Five:
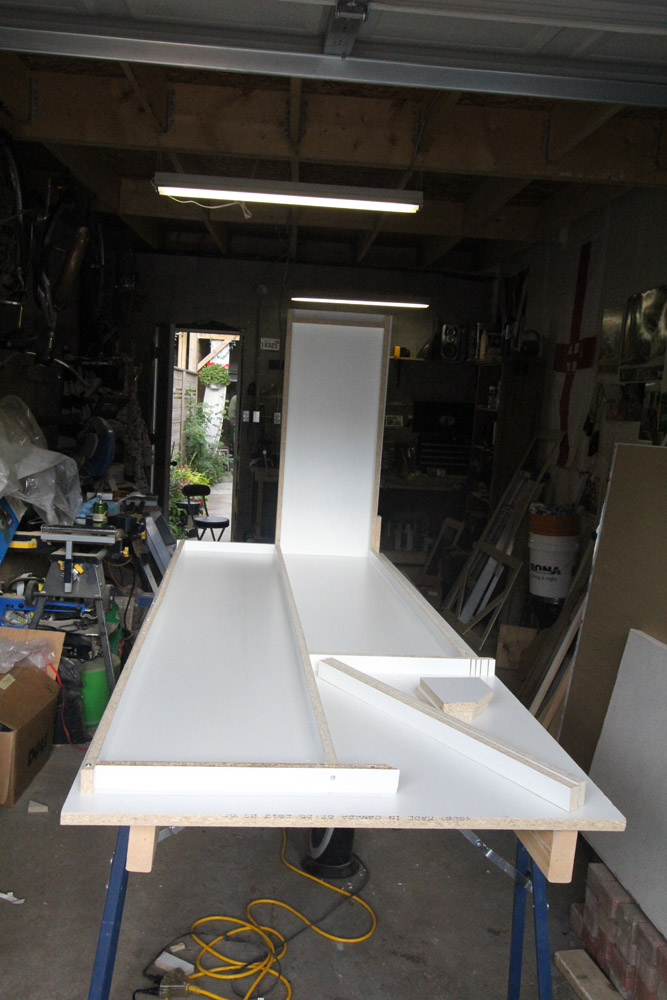
Make any special forms. This will include sink cutouts, and in our case a WATERFALL. Yep that’s right, my dream of a waterfall countertop was happening! Whats a waterfall counter you ask? It’s when the countertop appears to drop off the side of a counter to the floor. Like this:
Waterfall Countertop – Apartment Therapy
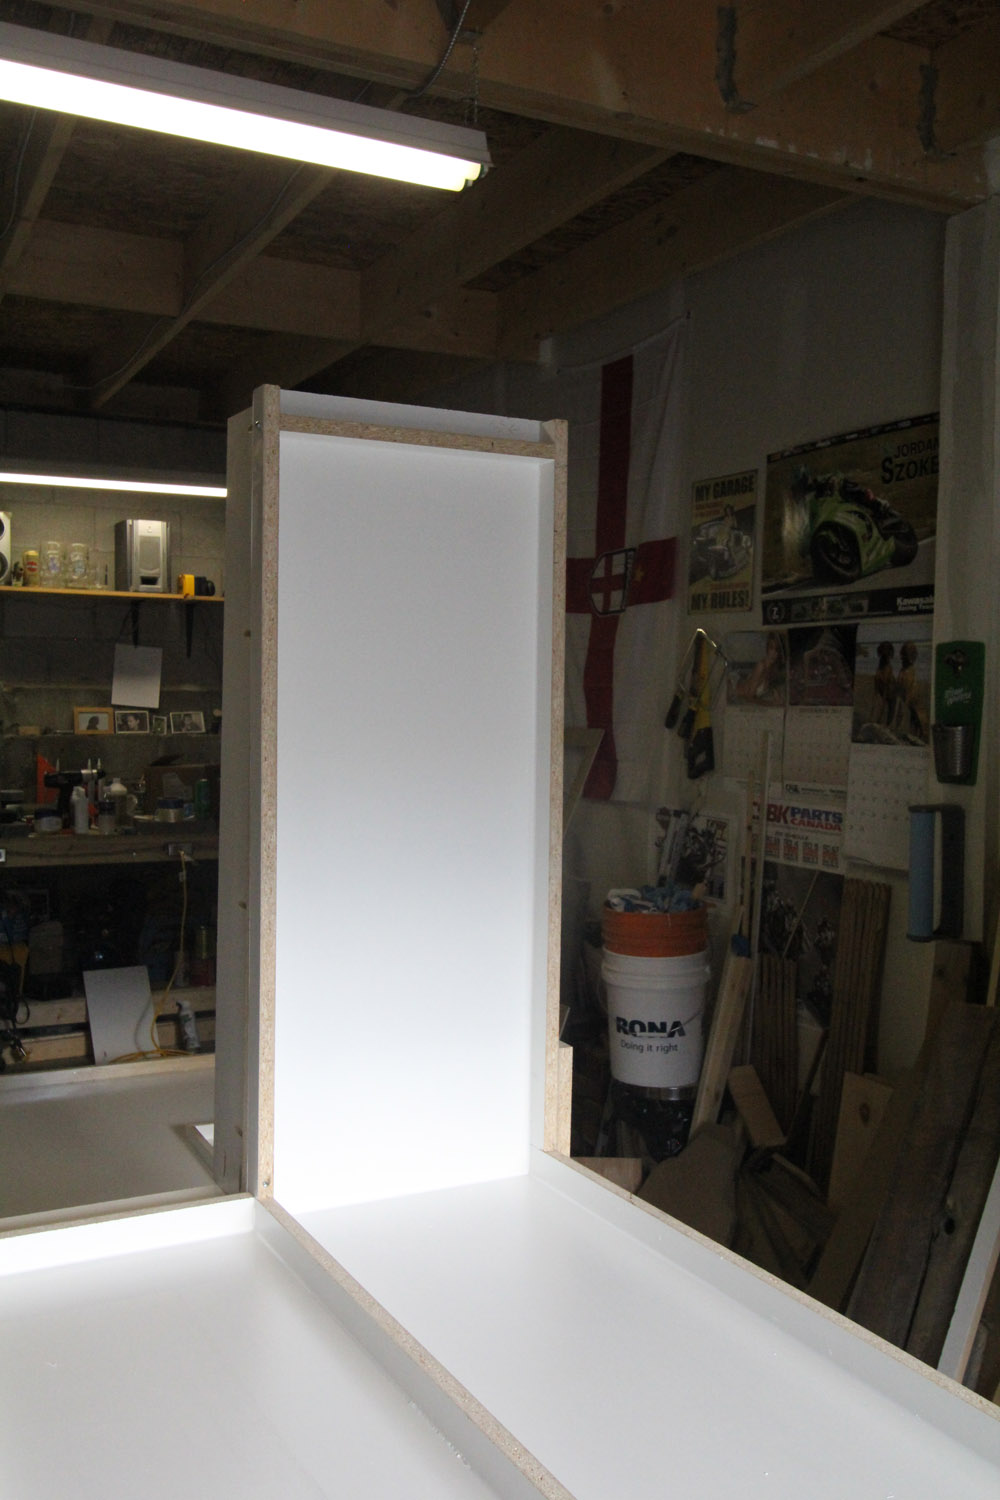
I really wanted the countertop on the peninsula to have a waterfall, and Jeremy said it was not only possible, but that we could do it in ONE PIECE. Yeah. Mind blown, right? As we are using the Buddy Rhodes Craftsman Mix in his traditional hand formed technique, we could literally make the concrete go VERTICAL! PSHEEEEEWWW! (That’s the sound of your mind blowing.)
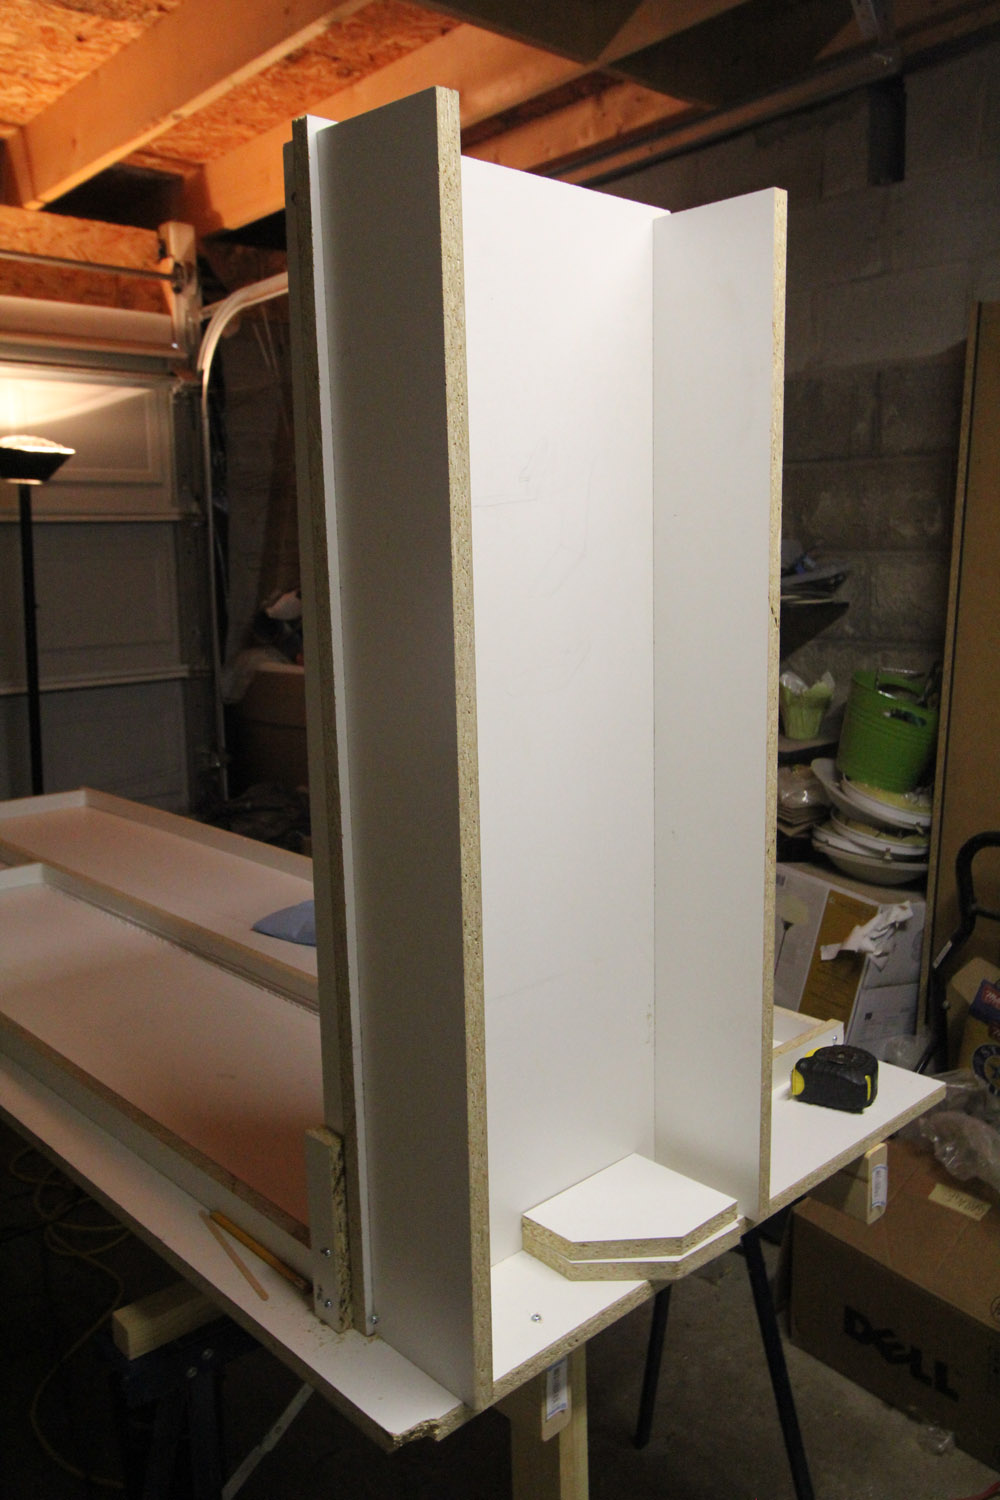
So it was time to make our waterfall mold, and that meant making our upside down form go vertical. We created the form the same way we did the other forms, but instead of a short side we ran another piece of melamine vertical, and then gave it sides. We supported the back with extra pieces of melamine attached with pocket holes (so that it would support the weight of the wet vertical concrete).
Waterfall Countertop FormSupport pieces on the back of the waterfall countertop form
Step Six:
Once all your forms are built, its time to caulk the edges of your form to make it all purdy for your exposed corners. *Note that this step isn’t super essential when making hand pressed countertops using the Buddy Rhodes Craftsman Mix. Edges can easily be rounded and smoothed in the finishing steps, but it doesn’t hurt to have a nice finished edge right off the bat.
If you have ever used silicone caulking, you will know that its a sticky mess, and doesn’t clean up half as nice as latex caulk. I happen to not like silicone caulk much at all. Its unforgiving and finikity. So when Jeremy told us he had a fool proof way to caulk the edges I was in 100%.
Jeremy’s fool proof way to get a perfect round edge:
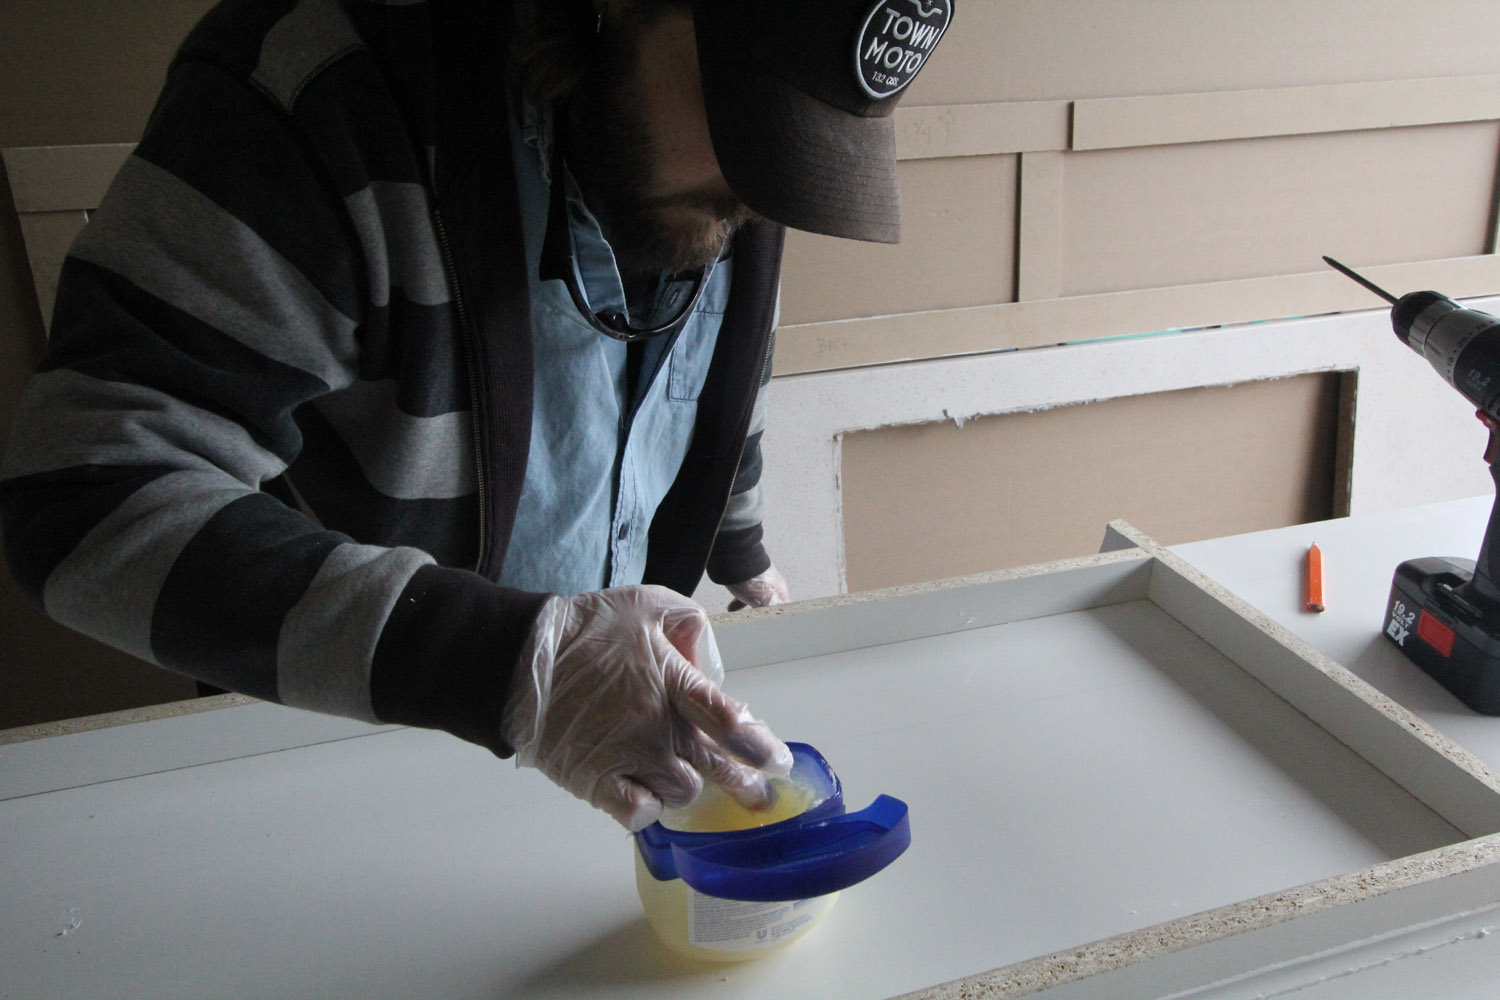
Lay down a very thin layer of Vaseline close to (but not in) your corners and seams. If you have mineral spirits (which we don’t have in Canada) thin your Vaseline down a bit to make it even easier to apply. Cover from right near the seams up the sides and on the base of your form about 1″ away from the seams. You only need a thin film, and ensure you wipe off any excess.
El Granto Applying the Vaseline
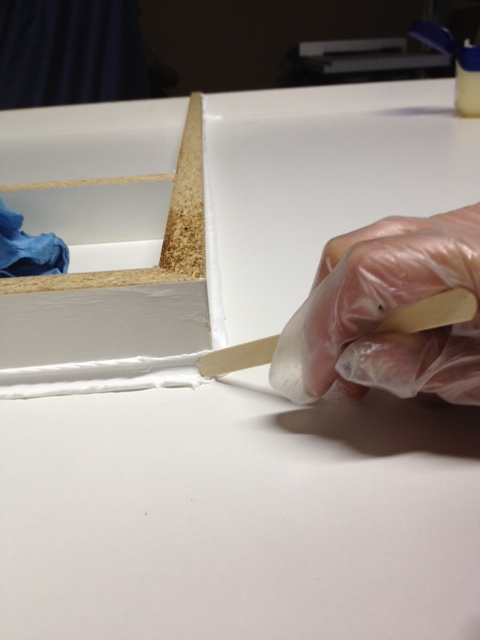
Lay down a bead of white silicone caulking into the seams.
Take a Popsicle stick and push it into the seam and draw it along the seam to make a nice rounded corner. Ignore the excess caulking that is being pushed out to the sides. (no really, don’t even look at it, just let it be.)
Using a Popsicle stick to make a nice rounded corner
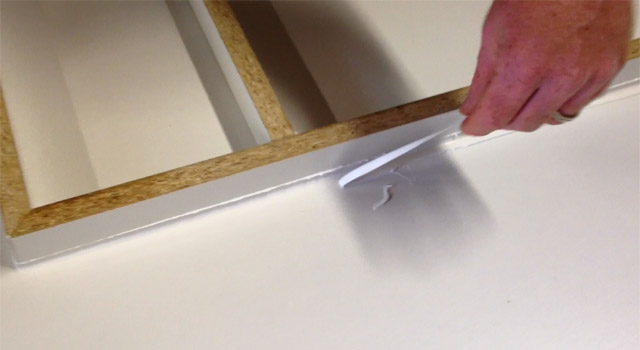
Wipe off your Popsicle stick frequently and don’t let excess caulk build up. It is important to push your Popsicle stick against both sides of the form and get a nice clean rounded corner. Now walk away and let it dry. Really. Leave all that gooped over the sides caulking and go get a coffee. Let it dry (ideally overnight) but a couple hours will do.
Then just pull off the excess caulking to reveal a perfect edge. (it comes off so easily because of the Vaseline!)
Pull off excess (dried) caulking to reveal the perfect edge
Awesome, right?!
Step Seven:
Pat yourself on the back, cause now you have some awesome Concrete Countertop Forms!
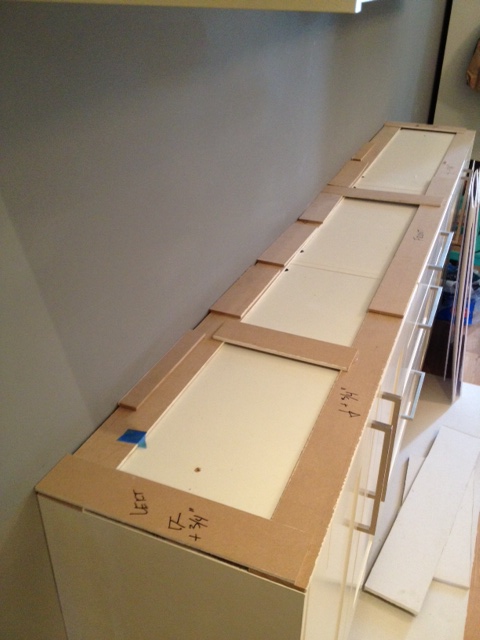
Finished forms (coffee bar form on right, and peninsula form on left)Finished forms (L shaped form for main kitchen, and smaller form for between sink and stove)
The forms are built, everything is ready to go! Next up we POUR!
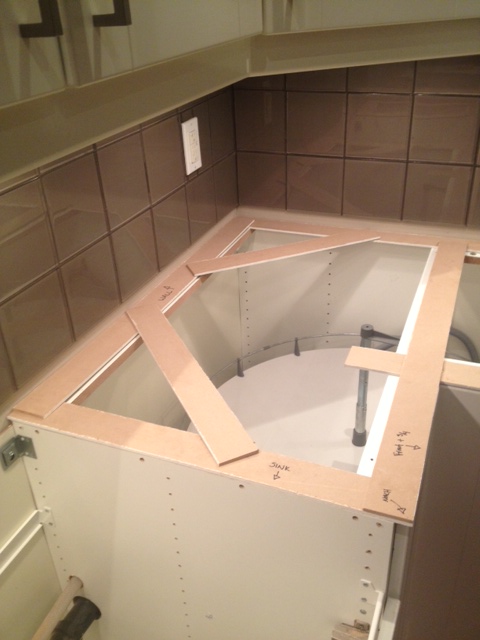
One of the most important parts of making a new concrete kitchen countertop is the templates. When starting to tackle our DIY Concrete Countertop project, we thought we would just measure our space, and make the forms from our measurements. Our kitchen looked square and true, but once the old counters were out we realized pretty quick that there was nothing square about our kitchen. Thats where templates come in. They are quick and easy to make, and will ensure your counters fit perfectly.
Your templates will recreate your cabinets and wall shape exactly, and ensure your countertops fit your space. It also makes sure your sink, faucet cut outs and anything else special is done in exactly the right spots. How terrible would it be to completely make your counters and realize your faucet hole is 2″ off. Ouch.
So here’s what you need to make your countertop templates:
1/8″ luan or other easily cuttable material cut into straight strips about 2″ wide. Get your hardware store to cut the strips for you on their panel saw. (We had some 1/4″ mdf strips left over from the guest room board & batten, so we used that. Although it wasn’t ideal, as we had to make a trip to the garage for all our cuts.)
Glue gun & glue sticks
Sharpie
Measuring tape
Bare cabinets free of counters and any imperfections. Ensure your cabinets are secured to the wall and level. Once you make the templates, you cant change your cabinets at all, or your countertops may not fit right.
Sink & any integral items to the counters
We removed our old countertops & sink, and ensured everything was ready for the templates. We had purchased our new sink, and had it as well as its installation instructions ready.
Cabinets ready for templating
To start the templates lay a long piece of your template material along the backs of the cabinets. Then lay strips along the front of the cabinets cutting them to exactly the same length as your cabinet.
Laying out the first pieces of the template and marking how long they need to be
Join the front and the back strips with shorter strips cut to the depth of your cabinet. Make your way around your counters outlining them with your template strips. Once you have everything laid out, go back and hot glue it all together.
Label all pieces with “front”, “back” and descriptions such where all your appliances are. Mark any areas that will require an overhang. The standard overhang is 3/4″ from the front of your cabinet doors. The back of your counters and areas where it hits walls or appliances will not need an overhang.
Template for small portion of the counter between the sink and stove
Read the installation instructions for your faucet & sink, and mark any special requirements on the template. Your sink may come with a template of its own, if so attach that to your template in the proper place.
Dry fit your sink & faucet in place around the templates (and make sure everything is going to fit!)
Dry Fitting our sink in place to build the templates around it
Our Ikea Domsjo sink required two notches on the front of our counters to fit the apron front sink. We marked the areas for the notch.
Note the markings for the sink edge and where the notch needs to goMain kitchen templates
For the coffee bar our counter is 7 feet long and the wall has quite a bow right in the middle. This caused problems for us when installing the coffee bar (it’s actually spaced out from the wall about 1/2″) and we knew a straight countertop wouldn’t be perfect.
To template for the bow in the wall, we cut a bunch of short pieces and laid them against the wall where the curve was. This outlined the curve for us perfectly, and we were able to recreate the bow within the form.
Coffee Bar template. Note all the small pieces forming to the curve in the wall
The entire template process only took us about a half hour, and produced perfect templates to make our forms with. A simple step, but definitely worth the effort for a professional result! You can also use this form of template making for your laminate or butcherblock countertops.
Next up we will be building the forms, and getting one step closer to pouring our concrete!
When planning for concrete countertops, the biggest thing we needed to decide on was the concrete mix.
Not all mixes are created equal, and for a countertop you need a high strength mix. Why? So your countertop doesn’t crack and fall to pieces. Simple enough.
Will the big box store mixes work? Maybe. But it’s a crap shoot. There are a LOT of variables that could send you into a tough place. First up, the big box store mixes aren’t meant for countertops (well except for the Quikrete countertop mix but more on that later).
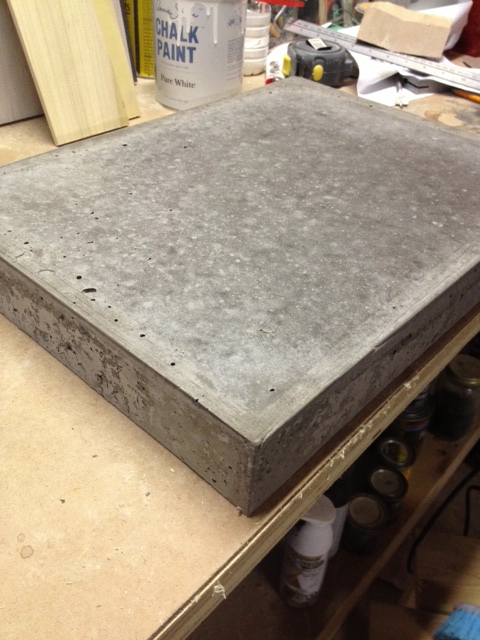
A few weeks ago I made a test piece knowing that I wasn’t using the right mix, but I just wanted to TRY, see if my mold would work, see if the whole scenario was even plausible. Turns out it is, but I had a lot of room to improve.
Concrete Test
So my test piece came out full of holes, and with a lot of aggregate visible on the sides, a blotchy colour, gouges from my caulking job it and it was HEAVY. It turns out that little test piece was a behemoth. Not only did it change my mind about doing 2″ thick surfaces (gonna stick with 1 1/2″) but it also had me looking at alternatives to traditional concrete mixes.
So I started calling concrete countertop mix manufacturers, and checking my local hardware stores. Not only was there only one mix option at the big box stores, but there were no sealing and finishing products to complete the project, nor where there any direction on how best to build the molds, pour, sand & finish. I am not really one for experimenting on 2000 lbs of concrete. I want a product that I can do myself, have confidence in, and get professional results.
That’s when fate interjected, and I received a comment on my countertop test project from Buddy Rhodes Concrete Products suggesting I check out their product line. After a quick look around their site, and a few YouTube videos later, I had to know more.
Buddy Rhodes has flipped concrete on it’s head. It’s hard to explain, but his product & hand pressed technique isn’t poured like traditional concrete. It’s a thicker product that’s more the consistency of clay, that you don’t pour into a mold, you pick up handfuls of it, and pack it into the mold. Really. Then you don’t vibrate it, or worry about bubbles, and screeding, or even filling the entire mold to the brim.
It’s reinforced not with clunky (and heavy) re-bar or chicken wire, but with glass fibers. It doesn’t require a concrete mixer or 45 of your closest friends to pour, in fact you could do it in a couple weekends with a friend or two. But get this, its JUST as strong (if not stronger) and it’s way easier (and lighter). You can replicate finishes, and get professional results, every single time. Its incredibly DIY friendly and versatile.
They made concrete doable, and replicable, and almost idiot proof. Not only that, but their process makes concrete able to go vertical! Their product can be worked up a vertical surface. So my dream for a waterfall counter wasn’t going to be a feat of engineering and a two piece project. I could build a waterfall countertop in ONE PIECE. Mind blown.
I emailed the person at Buddy Rhodes who had commented on my post, and said I needed to know more! Where can I get this, will it work for my project?! They may have been shocked at my exuberance, or just too nice to say no to a crazy lady, but one of their artisan concrete experts Jeremy emailed me back in a few short hours asking about my project. A few emails later, and we were having a video conference call where Jeremy was convincing me we could pour my whole kitchen in four pieces when I had planned on doing it in 6, and not only that, but anything else I could dream up was essentially plausible.
Jeremy talked us through how their product differs from the big box bagged mix which was my only other option at this point. He pointed out the analogy of baking. You want to bake some bread. Do you just start out throwing things into a bowl and hope for the best, or do you use a tried and true recipe and high quality ingredients?
First off let’s get to know concrete a little more. There’s essentially two parts. Aggregate and cement. Think of a slab of concrete as a slice of raisin bread (gluten free of course). The cement is the bread and the aggregate is the raisins. Together they make toasted buttery goodness… Wait. I think I might be hungry… The bag mixes are short on cement. So they’re like a fruitcake. Lots of aggregate and not a lot holding it together. They are short on cement because it is the most expensive component it is also the reason for the strengths that concrete exhibits. But, it is also the glue that holds everything together, our mix is like proper raisin bread. Lots of cement and not too much aggregate.
The prebagged concrete countertop mix available at your local hardware store is essentially the same mix used in your backyard to set a post, mixed with more cement and less aggregate. Will it make you a concrete countertop? Probably. Will it be the perfect counter you were dreaming of? Umm..maybe. There are a lot of variables that could set things in a tail spin. It may be concrete, but it may not be the best option, especially for a DIY’er. Other possible pitfalls are that you can only make solid surfaces, its a very heavy and unwieldy product, and it has a long cure time. If poured or cured improperly it can crack, be brittle, has a limited color range, and is a mess to pour. It will also require some heavy duty forms, a lot of heavy mixing, some favors called into your buddies, and a lot of headache and hoping and you still haven’t figured out how to seal or protect it either.
I was a bit freaked out, as I’m sure you might be too right about now. Why would I risk a bunch of cash in materials, truck rentals, concrete mixer rentals and forms to possibly have a very large heap of junk that I would actually need to pay someone to take away if this didn’t go right?
So big box mix was out of the running, and Buddy Rhodes mix was the clear best choice.
Jeremy worked with us suggesting the best technique for us to use, how to build our molds, and make it as simple as possible to get a kick ass product. We were over the moon excited, and a lot more confident. I think some of my excitement rubbed off on Jeremy, as he surprised us with saying he might come to Canada to see us do our project. (That and for the maple syrup and poutine of course.)
Now, I assure you I warned this Southerner that fall in Canada isn’t quite the paradise he’s used to. But he booked a ticket, and gave us three weeks to get all our prep done, so he could see us “pour” when he got here. Talk about a deadline. But we did not want to fail our new concrete hero!
So we started measuring, and prepping, and calculating everything we needed and started checking things off our to-do list.
Next up, I will give you a detailed list of absolutely everything you need to buy, rent, procure, beg or borrow to make your project go (relatively) smoothly, and get a great result!