I thought I’d keep things green around here in honor of St. Paddy’s day. I hope you’re enjoying a pint of beer and pretending to be Irish for a day. (I know…I know…you’re Grandmother was 1/8 Irish…sure.)
I’ve got a story for you about a tree plant.
Last week we had my mother in law’s car while she was on vacation. It was great! We bought so many large things, and forayed to places usually inaccessible to those without cars. We went to an outlet mall people! Urbanites don’t get to experience such things.
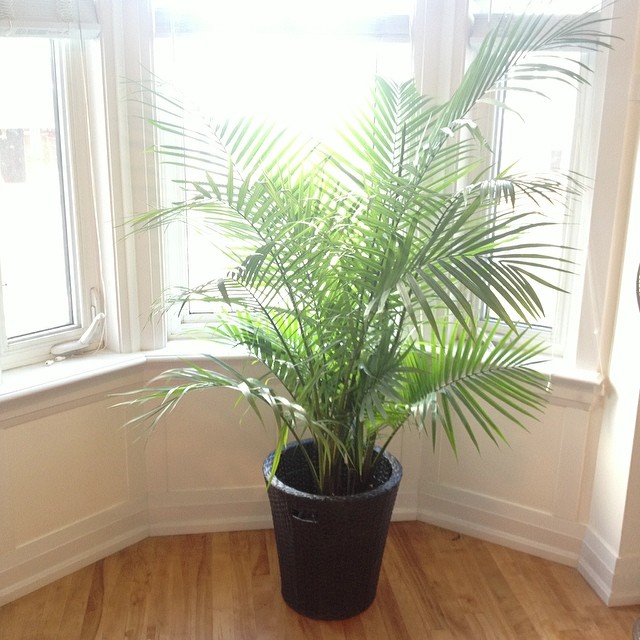
While we had a car I wanted to get a new plant. Odin is finally over his “eat all the plants!” obsession, so I went in search of a plant. I wanted a fiddle leaf fig tree. They’re beautiful and fancy and people on the web say they’re cool, so I needed one. Problem is, they can be expensive. However my main squeeze Ikea carries them. So off to Ikea I went in search of froyo and a fiddle leaf fig.
I get to Ikea, waited in line for my froyo and wandered the store eating my yogurty goodness and ended up in the plant department. I looked around and…NO FIDDLE LEAF FIGS.
Sad yet determined, I picked the prettiest palm I could find, grabbed a basket and headed to the car.
First problem: Plant is too big for car. That’s okay, I can put the seats flat and lay down the plant. Huzza!
I drive it home willing it to not roll around and get dirt all over my MIL’s car.
Get it home, and wrangle it out of the car. I’m starting to get the feeling that this plant is a bit big. I get it into the house and carry it upstairs.
Oh wow, this plant is really big…I have to squish it through the hallway.
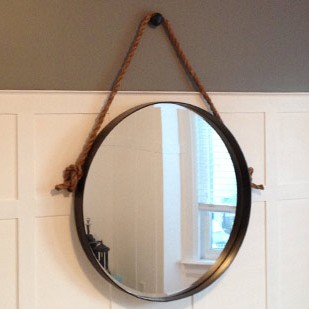
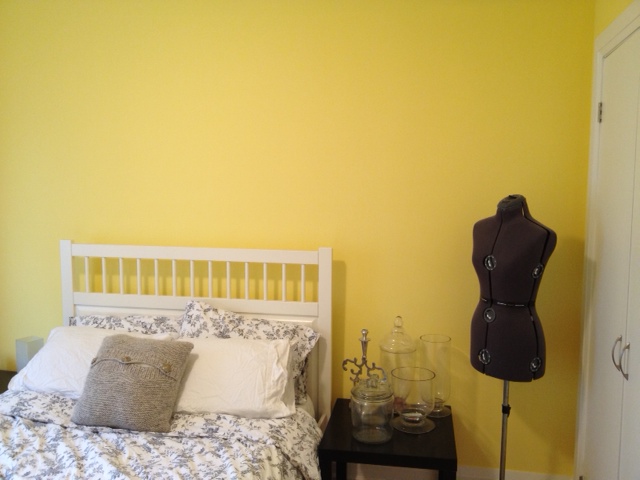
I place the plant in it’s intended destination, the alcove outside our master bedroom beside a full length mirror.
Oh…the plant completely hides the mirror and it sticks out blocking our bedroom doorway and the hall. Sh$t. Now what?
Oh! We have a big guest room (big in comparison to the rest of our house) I’ll put it in there!
*Squishes plant down long tiny hallway.
In front if the bay widow maybe?
Umm…no.
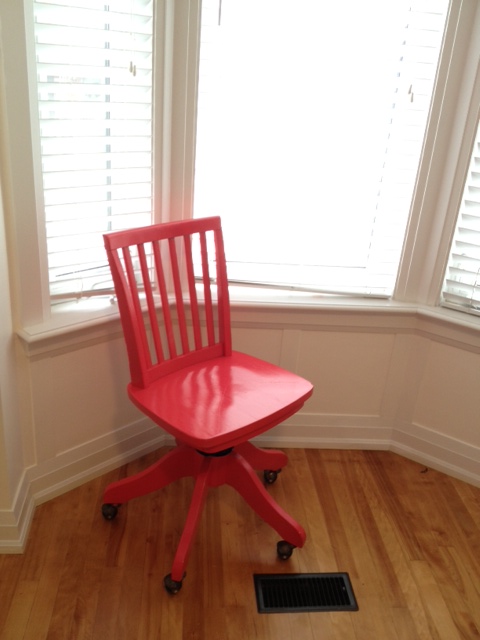
Well crap. I don’t have anywhere else to put it. The only other place is in the corner where the hot pink chair lives.
So I move out the chair, and slide in the plant, shoving his leaves against the
Wall and forcing him in. Ta-da! It fits(ish).
Uhhh…
What about the chair?
One can only do so many things with a hot pink bankers chair.
I know, I’ll shove it in front of the closet. No one needs to go in the guest room closet. The only thing in there is extra duvets and old clothes.
And. like. if you need to open the closet, the chair totally can be moved. Right? RIGHT?
We’re not dumpster divers, we don’t go out LOOKING for garbage to bring home, it just so happens that we have come across some good finds on the side of the road. We dragged home the rocking chair for the office a few months ago, repaired and refinished it with a coat of glossy black spray paint.
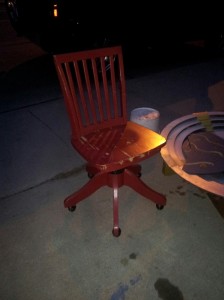
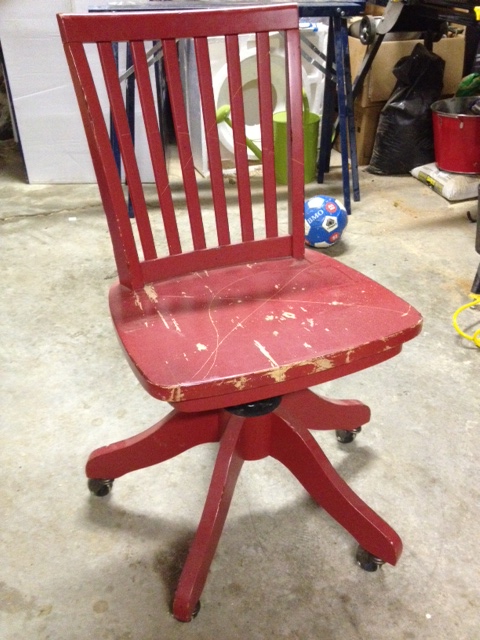
Just before Christmas El Granto happened to come across this guy, a red bankers chair with some nicks and scratches and a large X slashed across the seat and back.
El Granto snapped this pic with his phone of the chair on the curb
El Granto immediately spied the chairs potential and rolled it home and tossed it in the garage. We knew that we would not be able to refinish it untill the weather was warm enough to spray paint in the unheated garage.
Chair Before
I flipped it over to discover it was a Pottery Barn Kids chair. In fact it’s this $250 chair, but in red (guessing red was a seasonal colour). Have I mentioned lately how much I love my husband and his ability to spot fine craftsmanship?
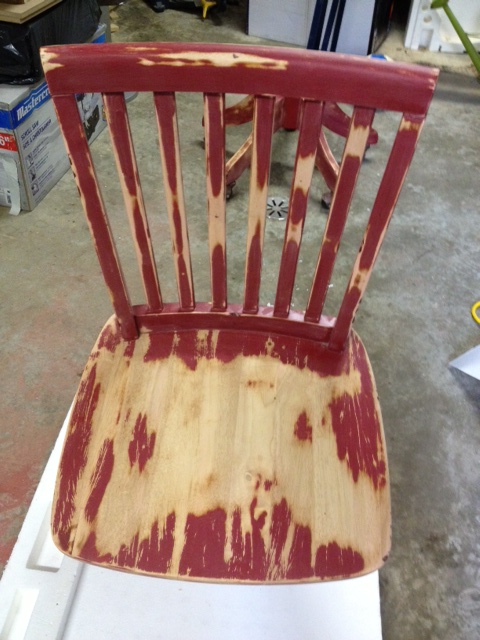
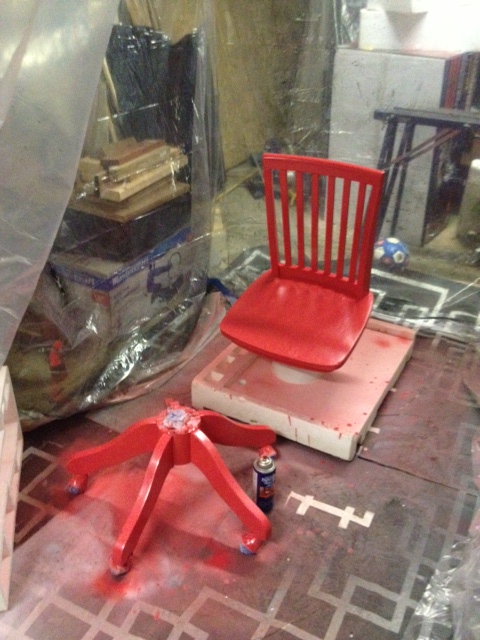
We got to sanding the nicks out and prepping the surface for primer, and man the paint finish on this chair was strong. It took both of us hand sanding the first layer of finish off with a rough grit sandpaper, then using a palm sander and a oscillating multi tool with a sanding attachment to finally get the paint sanded down.
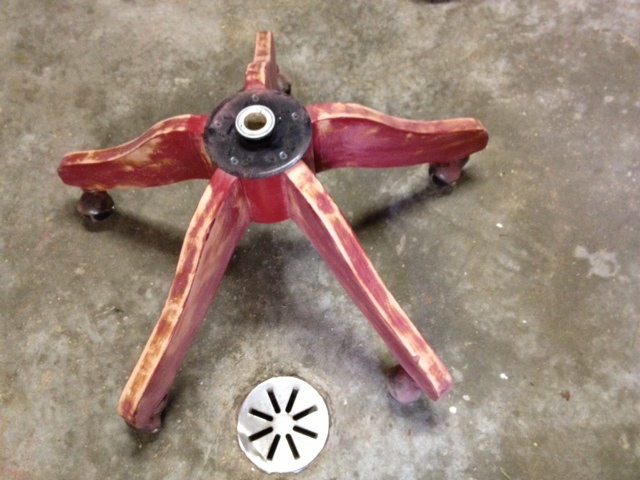
Chair Seat SandedChair Base Sanded
The X slashed in the seat of the chair was super problematic. We sanded and sanded and just couldn’t get it to disappear completely. When we had enough of sanding, we gave up and prepped for paint. We cleaned the chair of all the sanding dust with a damp cloth then a tack cloth, and masked off all the metal parts such as the wheels and the seat adjustment.
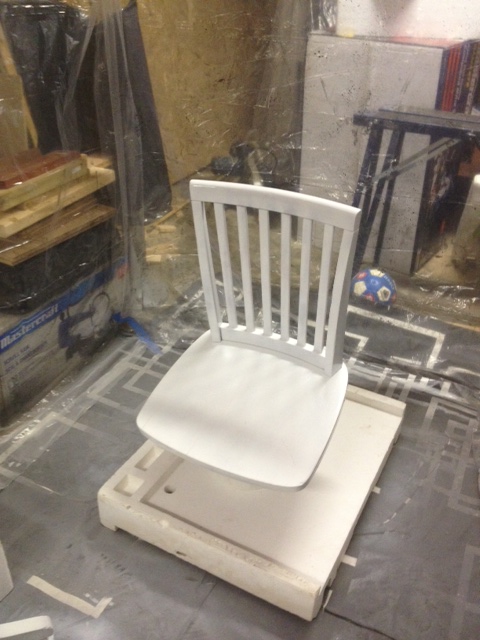
We took the legs off so that we could paint them easier, and we stuck the top of the chair into a bucket and styrofoam so that it would stand up (kinda) straight. We gave it two coats of primer in our spray booth.
Chair Primed
We let it dry, then painted two coats of RustOleum Watermelon spray paint. We usually use the RustOleum Universal paint, but their colour selection is limited, and we wanted a pinky-red-coral colour, so we went with the regular RustOleum primer + paint. I forgot how terrible regular spray can nozzles are. I got paint all over my hands, the nozzle dripped like crazy, and the round spray pattern doesn’t cover as effectively as the more linear spray of the Universal paint. So RustOleum, I beg of you, make more colours in your Universal line! xxo love Kristen
Chair Sprayed
After I swore a bit, and gave the chair two coats of paint this is what we have.
Chair After
She will live in the guest room, and enable guests a place to sit and read, get dressed, or stash all the stupid pretty throw pillows. Not bad for trash on the side of the road!
SOURCE LIST:
Materials:
Rustoleum Spray Paint in Watermelon – Rona
Rustoleum Spray Primer – Rona
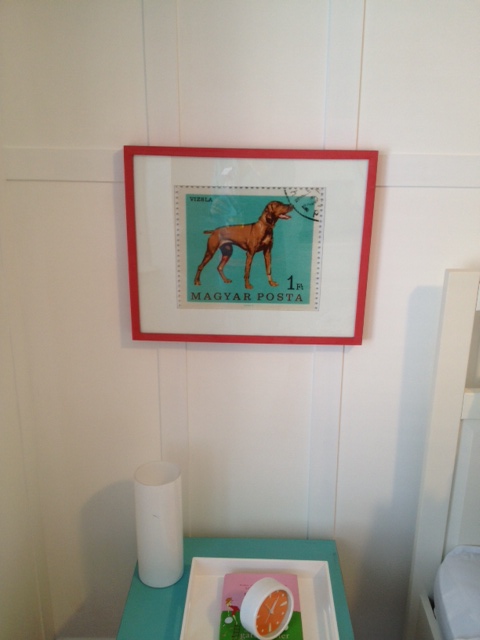
We needed some art to flank the bed in the guest room. I wanted something fun and lighthearted, and to bring a bit of colour to our now grey and white guest room. I rummaged through my box-o-frames and found a couple black gallery frames that had seen better days. They were a bit bashed and mangled and were not looking their best. I decided to give them a bit of a facelift. I painted them a shade of pinky coral (although in hindsight I wish they were a bit more red). Then I set out to find some prints. As you may know we have a crazy Vizsla named Odin who I love to bits and have tons of photos of, but I didn’t want the guestroom to be a creepy shrine to my dog. Instead I set to look for Vizsla themed prints, that were not shots of Odin. I found a great print of a vintage stamp from Hungary (where Vizsla’s are from) as well as a fun “Obey the Vizsla” propaganda style poster. I cut new mats for the frames with my mat cutter (a handy tool if you frame a lot!)
Here they are in the space. I like how they add a bit of colour to the space.
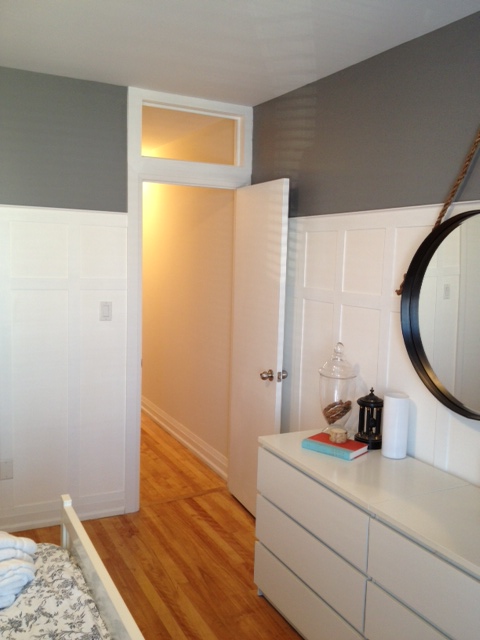
The guest room still needs a few more things. Accent pillows, some sort of art above the bed, a chair for reading or putting on your shoes, bedside lamps, a new light fixture, and some closet organization.
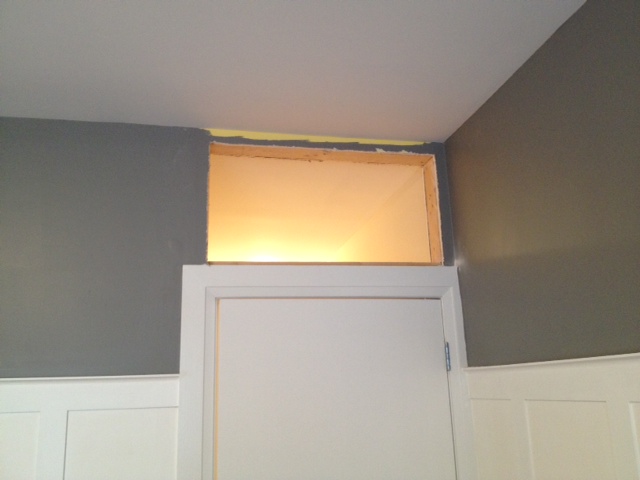
As you may remember I went buck wild a few weeks ago and cut a hole above our guest room door to make a transom window. I really need to get out more if thats I what I called buck wild…eep.
So I cut a hole in the wall, and then 4 days later my in-laws were set be rolling into my house for Thanksgiving. I know…who starts a project days before company is due to arrive and sleep IN the room where the project is happening… Dont worry, it wasnt such an epic fail. I may not have finished the transom in time, but it was presentable. Now after a few more days work, and some custom cut glass, I am pleased to reveal our new transom.
How how’d we do it?
We used a stud finder to generally figure out what was behind the wall above the door. We found studs on either side of the door, and one right in the middle above it.
We did our research, and found that building code in our area has doors framed with King Studs and Jack Studs and a Header, and that the cripple stud above the door was nothing structural. (which means we can take it out without having to reinforce anything else)
Using the markings of our stud finder, we drew straight lines on the insides of the studs to use as a guide for cutting.
We cut our hole using a drywall hand saw (or should I say I cut 1/4 of it, then wussed out and El Granto cut the rest…there are you happy you got your due Mr. Granto?)
We removed the cripple stud with a combination of a reciprocating saw and a hammer.
We cleaned up our drywall ensuring there wasn’t any in our way for when we put casing on the transom hole.
We cased the window using 5/8″ mdf that we had laying around the house. It also happened to be the same thickness as our current door trim. We measured the depth of our transom hole and ripped some mdf with our circular saw to fit. We then brad nailed it in place.
We trimmed the transom frame with more of our 5/8″ mdf.
We made a little frame inside the casings to hold the window. Filled, caulked and sanded.
We painted two coats of our trim paint.
We measured our hole and got a piece of glass cut at an awesome local glass shop Snap Services.
We installed the glass with some silicone caulking and a couple glazing points. Now if you’re home owner with an old home you’re probably asking why we didn’t use glazing compound? Well it’s an interior window, and it wont be subject to direct sunlight or weather of any kind. SO, silicone will hold it in just fine (and keep it from moving rattling around when a truck drives by.) The glazing points combined with the mini frame we built for it will ensure the glass never moves.
Transom PaintedSee how much light it brings to the hallway?!Ta Da Transom!
SOURCE LIST:
Materials:
5/8″ MDF – Home Depot (scraps from our bedside table project)
CIL Trim Paint – Home Depot
Caulking
Custom Cut Glass – Snap Services
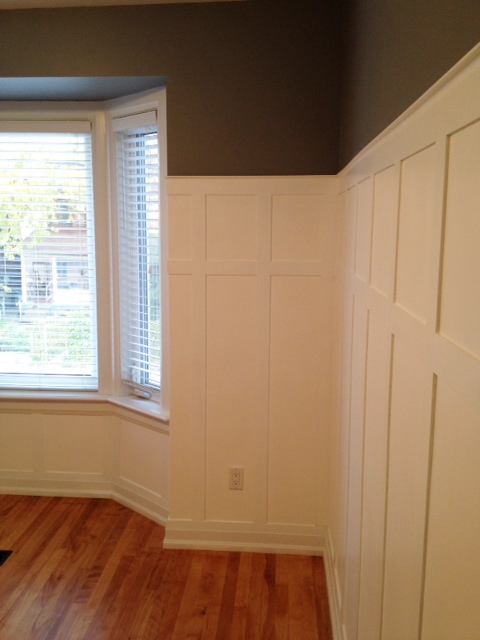
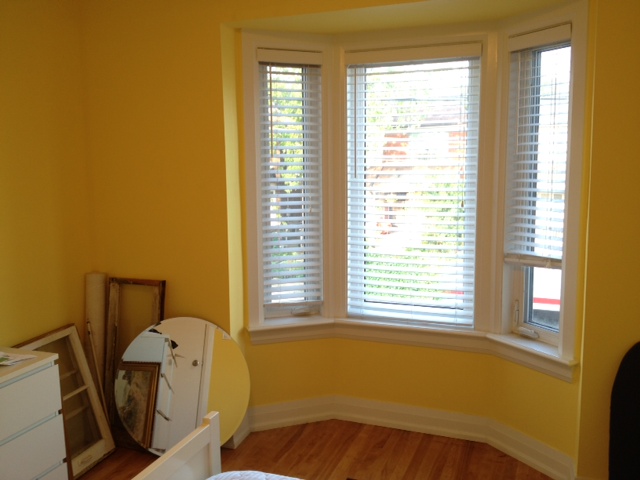
It was time to add some charm to our guest bedroom in the form of board & batten on the walls & some new (not yellow) paint. The room is big in the scope of our house at 12’x12′. It has a lovely bay window, double closet and original 100 year old ash floors. It also has amazing baseboards & trim (as does most of our house). When starting the board & batten the last thing I wanted to do was change, futz or in anyway do anything to the trim work. I wanted it to stay where it was, and do the board & batten up to it. Problem is, the baseboards are sloped and hit the wall with only 1/4″ space from the wall. This means that the material for my battens could only be 1/4″ thick, or else I’d have an unsightly overhang.Eeep…that doesn’t leave a lot of options.
BeforeBefore
These were the possibilities that I could find:
1/4″ x 4 foot long poplar lattice at almost $5 each…hurmph
1/4″ x 8 foot vynal trim pieces at almost $6 each…ack
1/4″ thick 4×8 sheet of hardboard for $17
The hardboard was looking to be the best option, but we don’t have a table saw yet (it’s still on my wish list). So we’d have to get the Home Depot guys to cut it down for us at $1 a cut, then somehow get it home. It could work, but it also wasn’t the best case scenario…I needed to think this one out.
I then called my local lumber yard Downtown Lumber. They’re always really helpful and I thought they may have some ideas. Turns out Downtown Lumber carries 1/4″ MDF in 4×8 sheets for $15, and they make custom cuts for 50 cents each. I like using mdf much better than hardboard (as it doesn’t have that glossy surface), and the lumber store is waaay closer to our house, and easier to walk home with big lumber.
So better + cheaper + less work = happy Kristen.
So I did my math, settled on 2.5″ battens, and placed the order to have 2 mdf sheets cut into 2.5″ strips. We headed over after work to pick it up and lugged it all home along with some trim. The getting it home was an epic fail (I’m talking all of it almost falling off a dolly, practically killing a cyclist and an epic argument) dammit we should just get a car already…
So after we got the wood home, and had a few drinks to forget the ordeal, I set out sanding the edges of the mdf for a nice smooth finish, and putting a coat of Behr Premium Plus Ultra in pure white on the edges. I didn’t paint the flat part of the battens for one main reason; I was going to have to fill & touch them up anyways, and to get a smooth finish I would really need to re-paint them entirely. Rather than make myself more work. I decided to paint them once they were on the wall with a small foam roller.
I did however paint the bottom of the wall so it would save me trying to paint in between the battens (yuck). Deciding where the paint would stop (where the top rail would go) was the hardest part. The storefront is not the least bit straight or level, and when I drew a level line on the wall it looked like I had done it drunk. So we fudged it, and made it kinda sorta parallel to the ceiling and floors. We used a chalk line to line it up, then used tape to mark the line, and to keep me from painting willy nilly everywhere.
Bottom of Wall Painted White
After the paint had dried (the next day) we installed the top rail out of the 2.5″ mdf battens on the nice line we’d made with the tape the day before.
Top Rail Installed
Then the vertical battens got added. We had to custom cut each and every one, as they were all different heights. I would measure a few, and head out to the garage to do the cutting, then lug them all back upstairs, over a baby gate (that was keeping the dog from free roaming and destroying the house) and then back into the guestroom. I made countless trips up and down those stairs.
Vertical Stiles Installed
We went with 12″ of space between battens, cause, well it looked good. The front wall under the bay window the spacing is fudged so that battens framed the windows (technically they should have not two battens touching eachother, but it looks correct once its all painted).
Under the Bay Window the Spacing is “Fudged”
We did have one instance where hitting an electrical outlet was unavoidable. It was on a small wall that had 2 switches, an outlet and an a/v outlet. The battens were almost the same size as the outlets, so we placed one batten directly centered on the outlet, so we could make flush cuts against it. We then measured out our 12″ on either side. The wall is not perfectly symmetrical, but you wouldn’t second guess it.
Where we couldn’t avoid hitting an electrical outlet, we changed the spacing so that a batten would hit it square so that our cuts would be easier
To make the spacing easier, we made a spacing jig out of some old lumber, and spaced & leveled then brad nailed each batten.
Our Spacing Guide (sorry for the out of focus shot, I was trying to shoot and hold)
It went very quick, the most time consuming part being the measuring and cutting (especially if I’d measured wrong, and had to go re-cut). We labeled each batten corresponding to what wall the were working on (Left, Right, Front, Back) and gave them a letter (i.e. Left-A was the first board on the left side, whereas Right-I was the last board on the right). This made it so much easier as you couldn’t loose track of what board went where.
After we fished installing all the vertical battens, we also decided to add some horizontal battens about a foot from the top to add a bit more visual appeal, and it matches the shaker paneling on the front of the storefront. We had lots of off cuts from the vertical battens, so we cut down a bunch of 12″ battens and brad nailed them in place. (and of course custom cut ones for the odd places.)
All the Rails & Stiles Installed
Next up was to fill all the damn holes from the brad nails. I filled the nail holes with spackle, and the cracks and seams with paintable caulking. I used the spackle this time so that we could easily sand to get a perfect finish on the flat battens.
Spacking
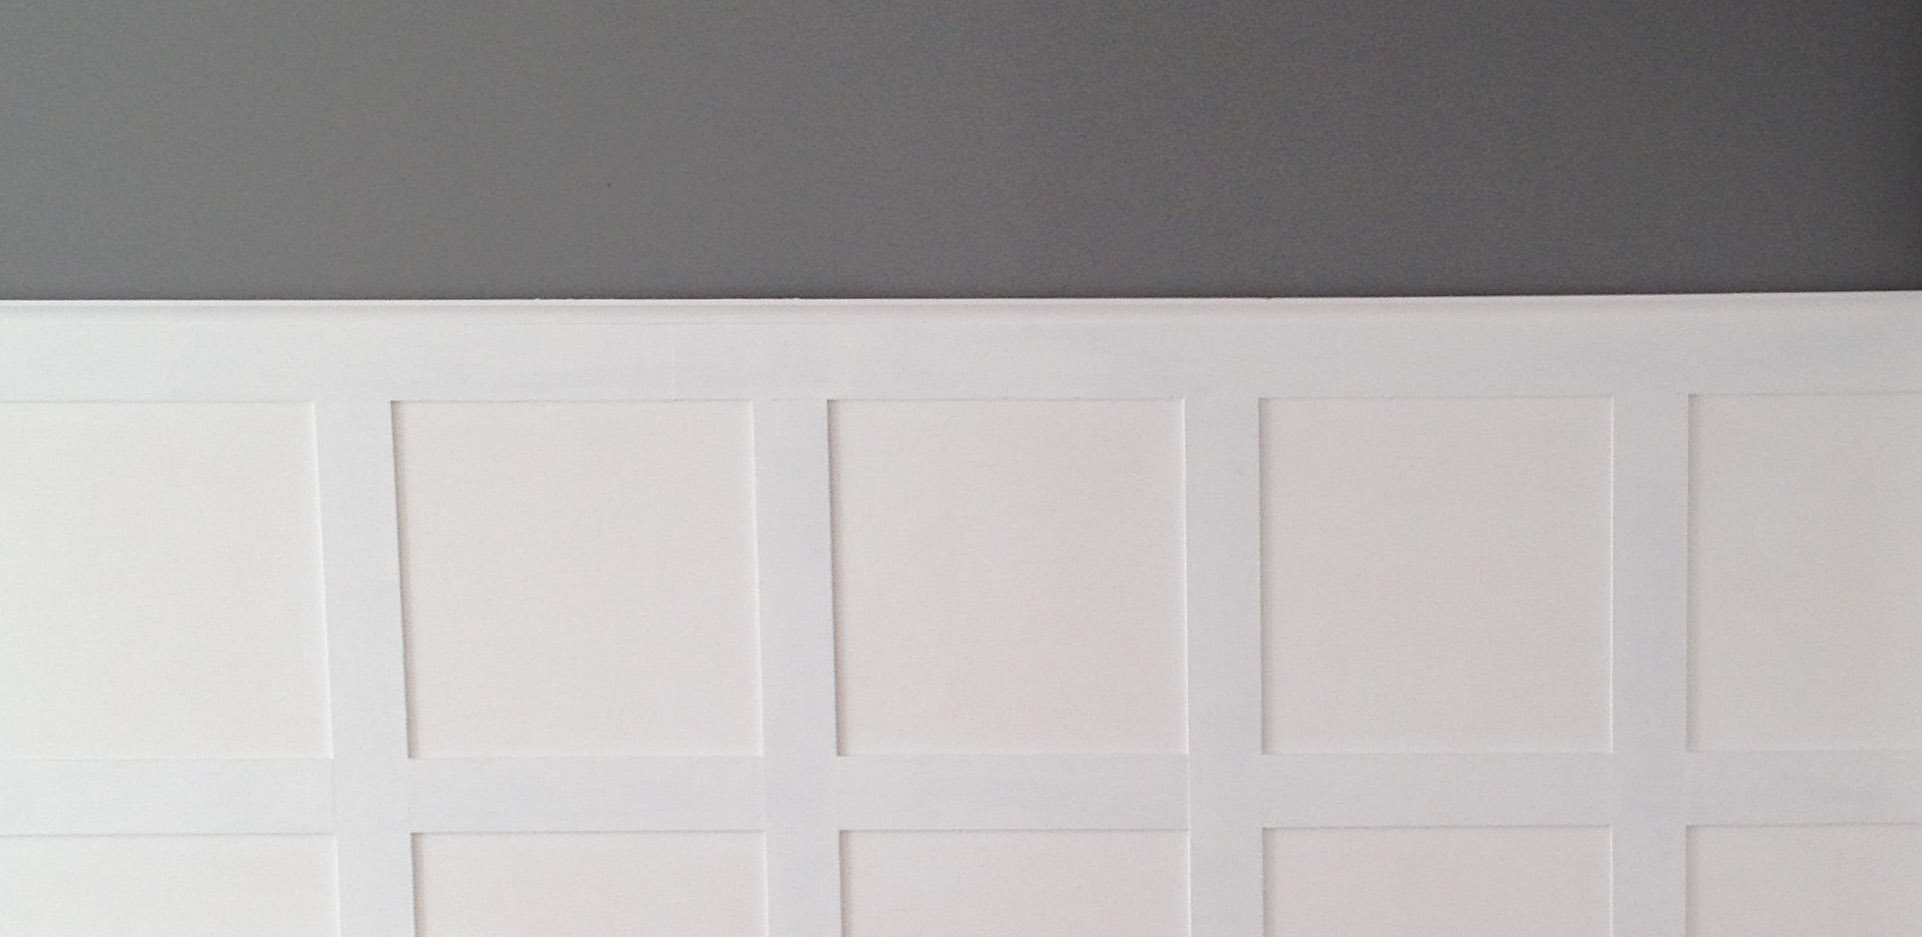
We then added some cove moulding on top of the top rail. I was going to add a small plate rail above that as well, but that proved to be too difficult with our wonky walls. Our walls just bowed and dipped so much that there were huge gaps at points. So we decided to call it done with the cove moulding.
After all that filling, sanding and caulking, I got to painting. I cut in the edges of the battens where they met the wall. I had given one coat of paint to the battens before I had installed them, but this second coat covered all the caulking and finished the sides beautiful. I painted the flat part of the battens using a small foam roller. I made sure not to use too much paint so that it didn’t overflow into the “board” part, and it went quite quickly. I was running extremely low on paint (had only bought one gallon) and decided to brush on my second coat. The foam roller gives a beautiful finish, but it was looking like it was going to take three coats (which I did not have enough paint for) So I switched it up and painted the entire second coat with a brush. The trick to painting a flat surface with a brush without leaving brush marks is a light touch. You want to evenly distribute the paint without pulling any back up. I paint the whole piece, and then go back over it quickly with a light brush. When the paint dries this should leave you with a nice smooth finish.
Board & Batten Painted (wall still yellow)
After it dried for a day, I went back and painted the rest of the wall with a nice medium grey, which really made the board & batten pop!
Materials:
2 – 1/4″ 4×8 sheets of mdf cut into 2.5″ strips: Downtown Lumber
1/2″ cove moulding: Downtown Lumber
DAP Spackle : Home Hardware
DAP Alex Plus Paintable Caulking: Home Depot
Paint (Board & Batten)- Behr Premium Plus Ultra Pure White in Satin: Home Depot
Paint (Wall) – Behr Premium Plus Ultra in Anonymous in Eggshell: Home Depot
After measuring and planning, and cutting and nailing, and caulking and painting, its finally done. Our guest room now has a board & batten wall treatment (althou I think its more shaker paneling…but tomato tomato)
Without further adieu, here is our completed Board & Batten treatment in our Guest Room.
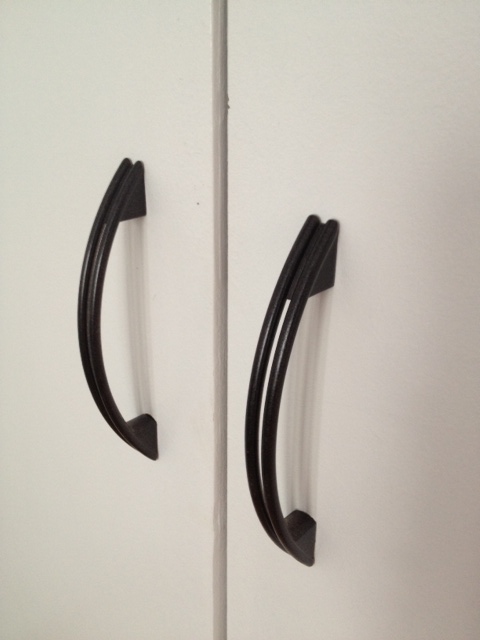
The guest room has one entry door and two closet doors. I have been trying to convince El Granto to let me paint all the door knobs and hinges in the house with Oil Rubbed Bronze Spray paint (like I used on my DIY “Cast Iron” Heat Registers) but it’s been a tough sell. The problem is all our door knobs are almost brand new brushed metal. So they are in fine shape…they’re not super dated, and they look fine…I just want them oil rubbed bronze. But what if I paint a house load of perfectly fine knobs only to have them peel or chip or look like crap? Then it would be death to wife.
So untill I am able to convince El Granto that oil rubbed bronze is the way to go, I will have to satisfy myself with change all the other hardware in the guestroom. For the closet we have two brushed stainless pull handles. They are a strange size, and until I find some oober nice handles, I figured I’d give them a coat of paint of my favourite paint; RustOleum Universal in Oil Rubbed Bronze.
Handles BeforeHandles After
Then we added a cast iron coat hook to the back of the door for guest robes or wet towels. This I think is a necessary in all guestroom, else your guests put sopping wet towels on the floor and/or furniture.
I had just bought some cast iron hooks for the front entry coat rack. They cost around $6 a hook. So when El Granto found this hook at our local dollar store for $1.50 I jumped and got him to buy two.
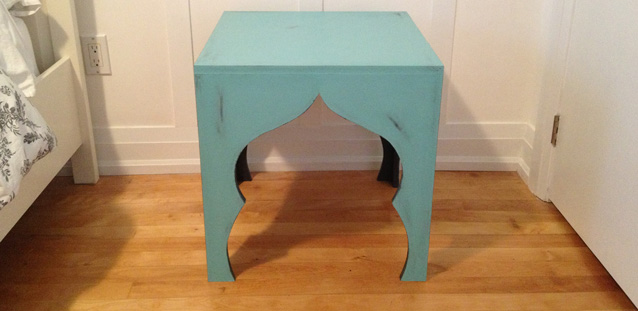
I have been scoping around Craigslist and local antique stores for the last couple weeks trying to find some tables to turn into bedside tables for the guest room. We were using two (well worn) Ikea $10 Lack tables that we’ve had since the dawn of time, but they really needed to go. I searched and searched, but couldn’t find anything I loved. I didn’t have the budget to spend a couple hundred on new bedside tables, so I decided to make some. I headed over to The Design Confidential to look at some of their furniture plans. (They have some amazing DIY furniture plans!). I took a look through their end table/bedside table collections and spotted this plan. I instantly saw it and thought I could do a more Moroccan version of it.
The plan calls for the tables to be 18″ high, but that was a bit short for my application. I wanted to make them as tall as possible using one 4×8 sheet of lumber to make two square tables. So I did some math and figured out that I could (just) get ten 19″ squares out of one sheet, so I headed to my local Home Depot and got a 5/8 sheet of MDF cut down to 19″ squares.
After getting my wood home I drew out a pattern for the table legs on a piece of scrap paper. I only did one side of the pattern (as its easier to just do one side, trace it onto your wood, and then flip it and trace the other side.)
Making the table patternTracing the pattern onto the wood
After I traced my pattern, I cut it out of the MDF using my jig saw, sanded any rough bits, and then used that one as a pattern for the rest of my pieces. (for two tables you need a total of 8 leg/side pieces, whatever you do, don’t cut all 10 of your pieces into the leg pattern, you need tabletops too! duh!)
One table leg cut
Now follow the rest of the Design Confidential’s instructions here. Essentially you have to cut down the width of two of your table legs so that they overlap nicely. Then you stand it all up, and nail it all together. I found that using some masking tape to hold the legs together temporarily helped a lot. I just dont have enough hands to hold everything and nail it all!
Attaching table legsThe Table Assembled
After you’ve assembled everything, if you’re using MDF as your wood, I HIGHLY advise going and getting yourself some spackle. Sand all your edges so everything is nice and pretty, and then take that spackle and rub in into the mdf edges. HUH? MDF edges are rough and not as nice as the flat parts, so if you want everything to look perfect, you need to spackle those edges. Once they’re dry, sand them to a nice smooth finish, then get ready to paint. (yes I know it looks like utter crap before you’ve sanded, but just trust me.)
The rough edges of mdf covered in a thin layer of spackle
I painted the tables (inside and out) with a coat of dark grey Behr Premium Plus Ultra Paint + Primer I had laying around. Now if I hadn’t been using paint+primer, I would have put a coat of stand alone primer on first.
Tables painted a base coat of charcoal gray
After my paint dried, I mixed up a batch of DIY Chalk Paint (come back tomorrow for my DIY on this). I painted 2 coats of chalk paint in robins egg blue on the front and top of the tables. I left the inside of the legs the base colour so you got a bit more contrast with the blue.
Tables painted with two coats of chalk paint (leaving the insides of the legs the base color)
Then I sanded and slightly distressed using sandpaper and a damp cloth (to see more on my distressing chalk paint using a wet cloth check out this post). After I was happy with the distressing and smoothness of the finish, I gave it a coat of furniture wax and polished it.
Materials:
1 – 4×8 sheet of 5/8″ MDF – Home Depot (cut into 19″ squares by HD’s cutting staff)
DAP Spackle: Home Hardware
Behr Premium Plus Ultra paint in Cracked Pepper – Home Depot
Chalk Paint – DIY
I cut a hole in the wall and I liked it. (There really are too many commercials for the Katy Perry DVD on TV right now). Back to the hole. YEP, there’s a hole in my wall, on purpose. Nothing was leaking, there were no fires and nothing had burst. I just wanted a hole.
You see, my upstairs hallway is a dark sad cave (see it with your own eyes here).
Our guestroom however is bombarded with natural light from a lovely big bay window. So I thought I would steal some of the guest room’s natural light, and give it to the hallway…by cutting a hole in the wall. Now now, I’m not gonna leave it as a big gaping hole. It will be turned into a transom. Transom’s are something that an Edwardian home would have had. We do have one operating transom above our front door.
So after cutting a great big ole hole in the wall, I will case it, trim it, paint it, get some custom glass cut, install it, and I will have a pretty transom.


")
")


")
")
")