Door Bling

You know when you buy a house there’s a ton of expenses. Mortgage, down payment, closing, moving and all the stuff you need for the house.

What do you mean, the house doesn’t come with any closet rods, curtains or door mats? Crap. You can almost see the money evaporating out of your bank account right before your eyes.

So when it comes to things like buying new locks for the house (cause really you trust that the old owner gave you ALL the keys to the house? Even the one the dog walker had, or grandma stashed in the bottom of her purse? Yeah right.) Having someone you don’t know possibly having a key to your house? Ummm no thanks.

So new locks were a necessity, but dude locks are expensive. So you leave the hardware store with a combo set of 5 locks for $69 for the whole house. Great idea right? All the same key, easy peasy lemon squeezy.

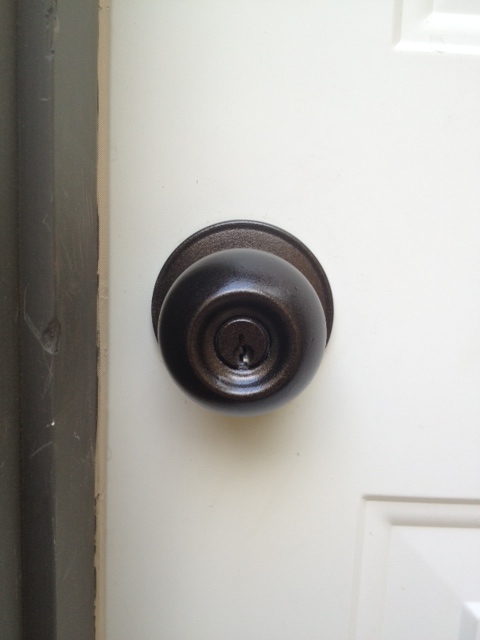
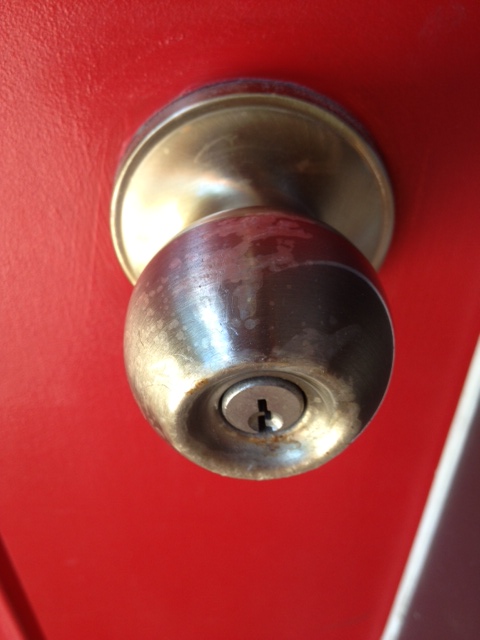
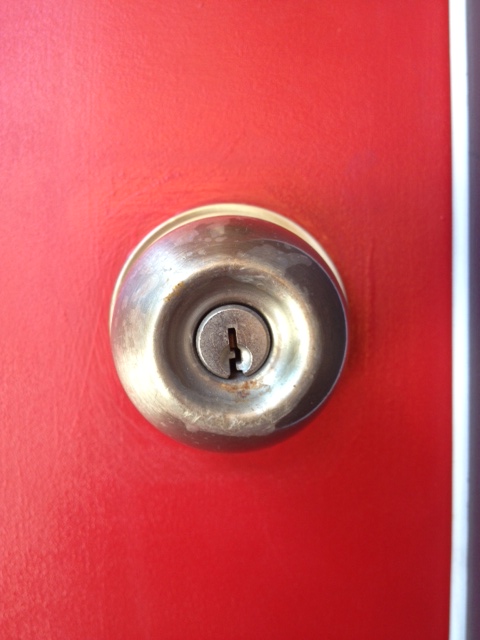
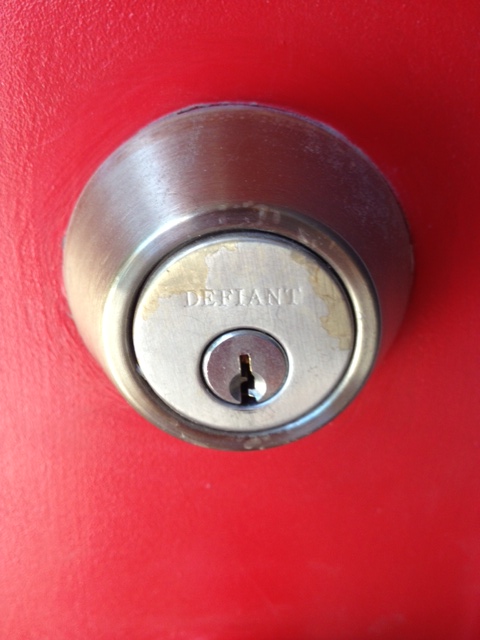
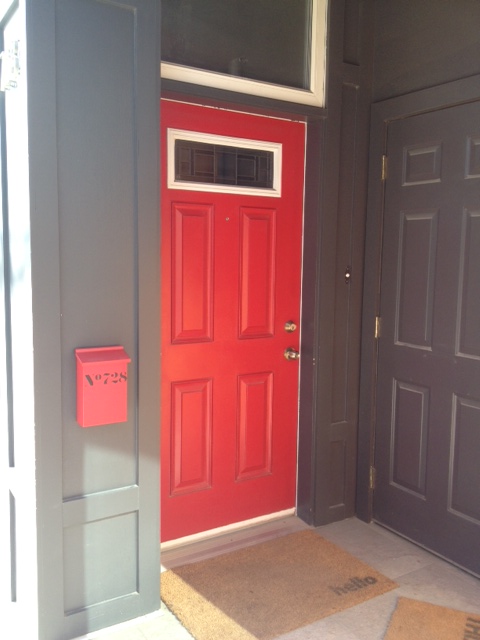
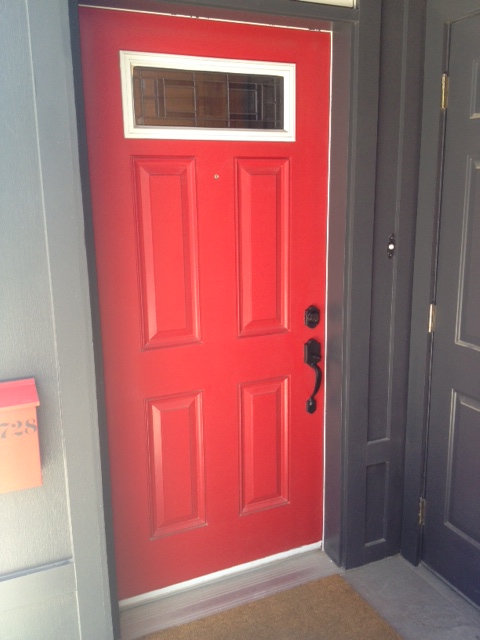
Then two years later, this is what your front door handle looks like.

Door handle
Look closely. See all the peeling covering? Nice.
door handle 2
Here’s another view showing the really sweet rust action going on.
The deadbolt
The deadbolt wasn’t much better. Remember these are outdoor lock sets protected by our covered entryway. So snow & rain don’t even touch them. That’s what it looked like after two years use. Quality product eh?

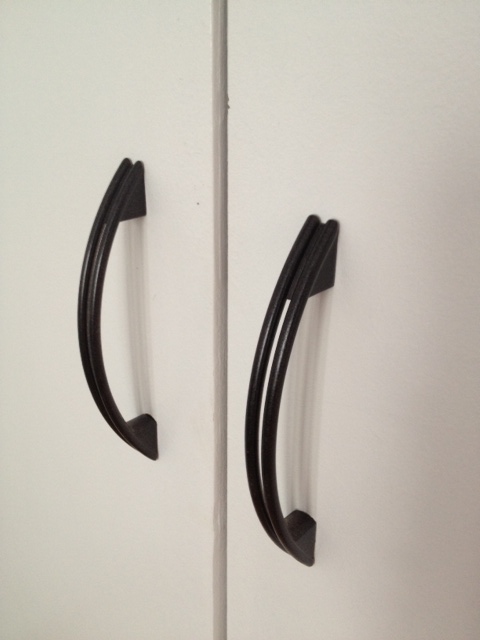
The other thing was that they didn’t look very stately. Not that our house is “stately” but these things weren’t really doin anything for the door. They were like chinos, or flip flops. Nice enough but no ones gonna complement you on them.

See, they're OKAY but not awesome.
See, they’re OKAY but not awesome.

This past weekend we were window shopping in Rona. Yes I said window shopping. Really it’s not THAT weird. They have a Tim Hortons and they let the dog come in, so its a good place to spend an hour perusing the isles. What, you don’t window shop at the hardware store? Well then you my friend need to get out more.

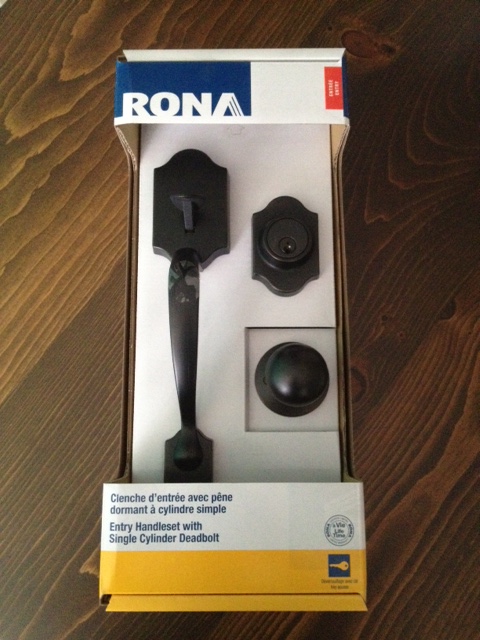
While wandering down the door hardware isle I spotted my favorite thing. A clearance sticker. I can see one a mile away. They call to me. “Look over here, you may not need me but I’m on SALE and that makes me so much more attractive.” The thing was this clearance item happened to be awesome. A “grandish” entry door set for the price of $39.

New lock set
Yes, I said $39!

That thing went in the shopping cart faster than a Kim K marriage.

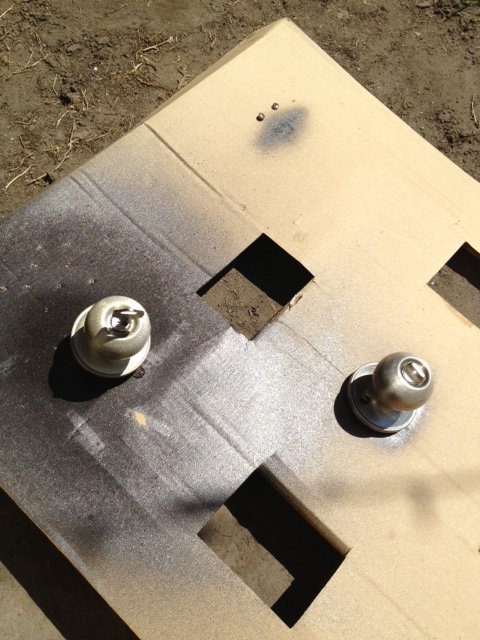
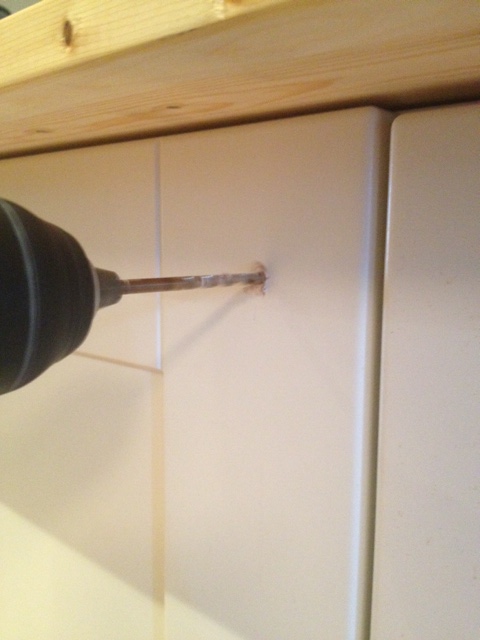
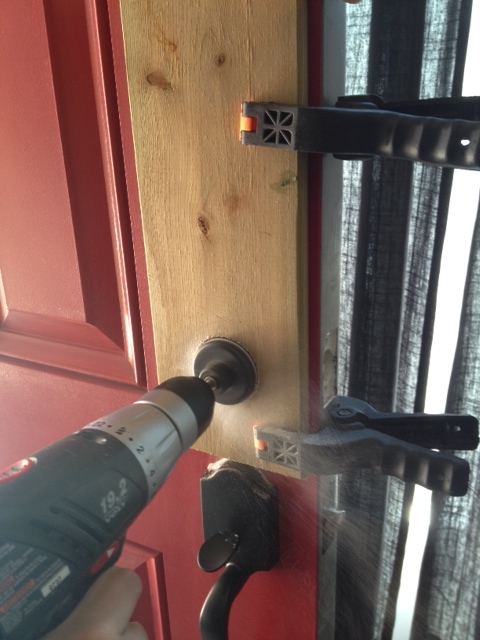
Once home El Granto set out to installing it. This ended up being a shade more complex than expected as our old dead bolt was one of those “little hole” deadbolts, whereas our new one was full size. That meant that a new hole had to be drilled in the door. Sure we have hole saw bits, but a hole saw works well because it has a little drill bit in  the middle to start the hole and keep the big hole blade steady. With there already being a hole in the door, there was nothing for the little starter bit to hold onto, making a hole saw very inaccurate and rather unsafe as it would try to fly around willy nilly instead of cutting a nice hole.

So El Granto being the ingenious man I married, made himself a little guide out of a piece of old deck board. He cut a hole (with the hole saw) in the deck board, then clamped it to our door as a template to drill the new hole. The template would keep the hole saw where it should be (instead of trying to cut off El Granto’s arms and massacring my door.)

Hole Template
Hole template clamped to door

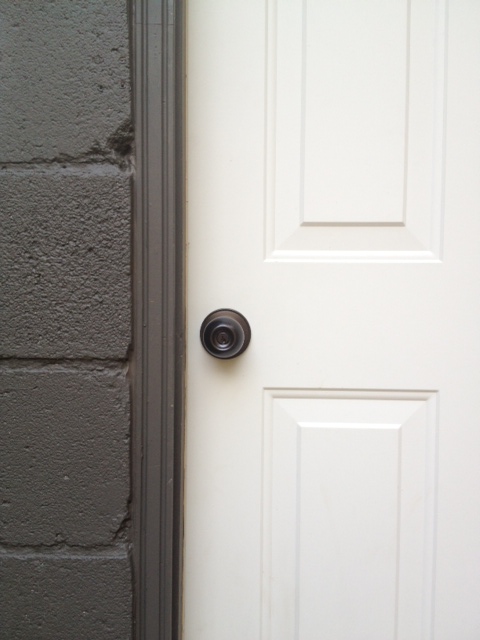
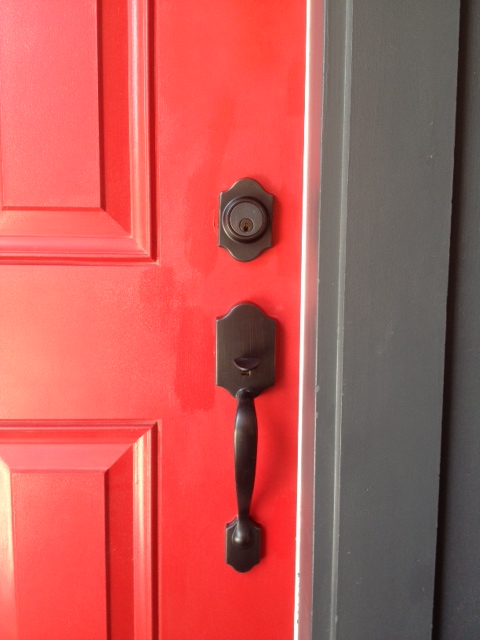
After the hole was drilled, the new hardware was installed, I touched up the paint, and voila! Grown up door hardware.

New door handle
I just couldn’t wait for the paint to dry, so ignore the touch ups
door hardware
Yay new door hardware!

So what do you think of our $39 purchase? The front of the storefront just keeps looking better. Now if only I could keep people from stealing my plants, and we’d be golden.

Paint those Knobs

When we bought the Storefront there was an overwhelmingly large amount of stuff that needed purchasing. The house came without closet rods, window coverings, shower curtain or rod, or even a bathtub plug. So when we moved in, we took a big trip to Ikea and Home Depot and bought the things we needed. It all started to add up very quickly. We tried to save money anywhere we could, and new locking door sets was one place we saw the ability to save a lot of coin. We needed four locking doors. Two dead bolts & two locking handles for our exterior doors (front door, back door, garage & our master balcony). We spied a 4 pack of deadbolts & handles for a great price in stainless steel, brought it home and installed.

s door knob
Stainless door knob

Two years later, and they’re looking shabby. They were covered in some sort of protective covering, which is peeling and looking pretty haggard. Something needed to be done. So what would it be, buy new ones, or try to refurb the ones we have? Time for some spray paint.

Practically everyone on the entire internet has painted doorknobs (don’t believe me? Do a google search for “spray painting door knobs”, or look on Pinterest.) See? The whole internet. Some with better results than others.

So I decided to jump on the bandwagon. I had previously spray painted closet handles with RustOleum Universal Oil Rubbed Bronze, and they are still in perfect condition, so I figured that was the way to go.

The problem is, (as most know) we live in a very urban environment. We live in a converted Storefront, on a very busy street, steps from the subway. While we have plenty of lovely neighbors, there is still a bit of crime, drugs, prostitution, and generally we try to be very aware of our surroundings, and try to keep our house (and us!) as safe as possible. SO, taking off all the door handles and locks for two days while we spray painted them, was not an option. Each of our doors has both a deadbolt and a locking handle. Overkill I know, but it came in handy for this project, as we were able to take off either the handle or the deadbolt and paint it, while the other stayed on the door keeping the ability to lock it.

door knob
Doorknob removed, prepped and waiting for paint

So off came the locks, one at a time. They got lightly sanded (using 320 sandpaper), cleaned with a degreaser and dried. I then placed an old key in the lock and sprayed with several thin coats of spray paint. They dried for 24 hours, and then were re-installed.

Painted door knob
Painted door knob
Painted door knob
Painted door knob

We still have a few remaining knobs around the house, but so far the garage and back doors are looking snappy in their new ORB clothes.


Hardware Shopping

To me, hardware on cabinets is like jewelry. The finishing touch, a hint of sparkle, a bit of shine. Shopping for hardware is like buying the final accessories to go with a fab outfit.

So, I am very excited that we’re at a point where we need some hardware for the Printmakers Media Cabinet project.

The plans call for the following hardware:

  • 3 pair of  inset or concealed hinges
  • 3 cabinet clips (to keep the doors closed)
  • 6 lid stops (3 – right, 3 – left)
  • 3 sets 14” drawer slides
  • 15 – drawer pulls

That’s a lot of hardware… As the cabinet is a faux printmakers cabinet, it looks like it has 15 little drawers (printmakers cabinets used to have tons of shallow drawers to hold metal and wood type and plates). So we need 15 drawer pulls, and traditionally for a printmakers cabinet they should be cup pulls.

If anyone has done a kitchen reno lately, you’ll know that pulls are expensive. From the big box stores, you’re looking to pay between $5-$15 per pull. From a high end hardware shoppe, you can pay in excess of $25 each.  Ouch, that’s not in our budget. As much as I love the hardware from Gingers or Restoration Hardware, I was not about to drop that kind of cash.

So where can you get nice, inexpensive hardware?

There are a ton of cheap online shops. However, Canadians beware. Most of the time the online knobs/pull companies will ship UPS or other courier from the US to Canada. UPS is a carrier that charges brokerage to cross the border. Brokerage SUCKS. It’s an unknown fee that the delivery guy will charge you before he will hand over your package. We have been charged upwards of $40-100 in brokerage on things that didn’t even cost that much. So by the time you’ve paid for the purchase, paid for cross border shipping, and paid for the brokerage, you’ve negated any savings from purchasing online. If you’re going to purchase online, try to buy from a Canadian supplier, or where they ship USPS or FedEx, both of which (normally) have the brokerage covered.

Your other option is purchase locally. Often local business can offer you the same or even better rate than buying online. Check out your local hardware store, and ask if they have a catalog of special order pulls. Also take a look at the special order hardware displays at your local big box stores.

My go-to spot for hardware is Lee Valley Tools. Even if you don’t have a Lee Valley in your town, they have an awesome hardware catalog and online store and they will ship to you.

So here’s what I’ve found from Lee Valley for our cabinet:

Drawer Slides:

Drawer Slides
Drawer Slides

Cup Pulls:

Cup Pulls
Cup Pulls

Hinges:

Hinges
Hinges

Stays:

Stays
Stays

Lee Valley carries everything in stock at their warehouses, and yep, we even have a location in downtown Toronto  (King Street between Bathurst & Spadina). The best part of Lee Valley is their volume discount. Most of their items have a 10+ or even a 25+ volume discount (the price goes down if you buy more than 10 etc.) So for the 15 cup pulls we need, they will only cost us $2.55 each. (excuse me while I do a little crazy Elaine dancing.)

Do you have any go-to hardware stores? Grabbed any great deals lately?

*In case you’re wondering, no one paid me in anyway for my views. I just to pass on my recommendations for places I like to shop.


Installing Ikea Kitchen Hardware

We needed to add hardware to the coffee bar that matches the rest of the kitchen. We found the hardware easily enough. The previous owners bought everything for the kitchen at Ikea, so its been super easy to add new cabinets etc. When we picked up the new hardware, we also purchased the Ikea Fixa Drill template. The template is supposed to make the placement and hole drilling of your cabinet hardware super simple. (I am all for making tasks simpler!) For the $3 price tag, we decided to give it a try.

Fixa Drill Template
Fixa Drill Template

We brought it home and checked the template against the current hardware in our kitchen to find that the old owners used the same template. Score! We marked on the template where the current hardware is hung, then transferred the template over to our new cabinets.

Template on Cabinet Door

Using a small sharpie, El Granto marked the holes.

Holes marked with a Sharpie

Then drilled them with a bit just slightly larger than the screws.

Drilling Holes
Drilling Holes

After El Granto drilled all the holes, he attached the handles in record time. For $3 Fixa Drill Template was well worth it, and we will definitely be using it next time we need to install hardware!

Yay. Handles!
Yay! Handles!

For more Ikea Kitchen tips, check out our posts on filling shelf holes, and how we installed our upper cabinets.


Guest Bedroom Hardware

The guest room has one entry door and two closet doors. I have been trying to convince El Granto to let me paint all the door knobs and hinges in the house with Oil Rubbed Bronze Spray paint (like I used on my DIY “Cast Iron” Heat Registers) but it’s been a tough sell. The problem is all our door knobs are almost brand new brushed metal. So they are in fine shape…they’re not super dated, and they look fine…I just want them oil rubbed bronze. But what if I paint a house load of perfectly fine knobs only to have them peel or chip or look like crap? Then it would be death to wife.

So untill I am able to convince El Granto that oil rubbed bronze is the way to go, I will have to satisfy myself with change all the other hardware in the guestroom. For the closet we have two brushed stainless pull handles. They are a strange size, and until I find some oober nice handles, I figured I’d give them a coat of paint of my favourite paint; RustOleum Universal in Oil Rubbed Bronze.

Handles Before
Handles After

Then we added a cast iron coat hook to the back of the door for guest robes or wet towels.  This I think is a necessary in all guestroom, else your guests put sopping wet towels on the floor and/or furniture.

I had just bought some cast iron hooks for the front entry coat rack. They cost around $6 a hook. So when El Granto found this hook at our local dollar store for $1.50 I jumped and got him to buy two.

Doesn’t it look good for a $1.50 hook?