I have been scoping around Craigslist and local antique stores for the last couple weeks trying to find some tables to turn into bedside tables for the guest room. We were using two (well worn) Ikea $10 Lack tables that we’ve had since the dawn of time, but they really needed to go. I searched and searched, but couldn’t find anything I loved. I didn’t have the budget to spend a couple hundred on new bedside tables, so I decided to make some. I headed over to The Design Confidential to look at some of their furniture plans. (They have some amazing DIY furniture plans!). I took a look through their end table/bedside table collections and spotted this plan. I instantly saw it and thought I could do a more Moroccan version of it.

The plan calls for the tables to be 18″ high, but that was a bit short for my application. I wanted to make them as tall as possible using one 4×8 sheet of lumber to make two square tables. So I did some math and figured out that I could (just) get ten 19″ squares out of one sheet, so I headed to my local Home Depot and got a 5/8 sheet of MDF cut down to 19″ squares.
After getting my wood home I drew out a pattern for the table legs on a piece of scrap paper. I only did one side of the pattern (as its easier to just do one side, trace it onto your wood, and then flip it and trace the other side.)


After I traced my pattern, I cut it out of the MDF using my jig saw, sanded any rough bits, and then used that one as a pattern for the rest of my pieces. (for two tables you need a total of 8 leg/side pieces, whatever you do, don’t cut all 10 of your pieces into the leg pattern, you need tabletops too! duh!)

Now follow the rest of the Design Confidential’s instructions here. Essentially you have to cut down the width of two of your table legs so that they overlap nicely. Then you stand it all up, and nail it all together. I found that using some masking tape to hold the legs together temporarily helped a lot. I just dont have enough hands to hold everything and nail it all!


After you’ve assembled everything, if you’re using MDF as your wood, I HIGHLY advise going and getting yourself some spackle. Sand all your edges so everything is nice and pretty, and then take that spackle and rub in into the mdf edges. HUH? MDF edges are rough and not as nice as the flat parts, so if you want everything to look perfect, you need to spackle those edges. Once they’re dry, sand them to a nice smooth finish, then get ready to paint. (yes I know it looks like utter crap before you’ve sanded, but just trust me.)

I painted the tables (inside and out) with a coat of dark grey Behr Premium Plus Ultra Paint + Primer I had laying around. Now if I hadn’t been using paint+primer, I would have put a coat of stand alone primer on first.

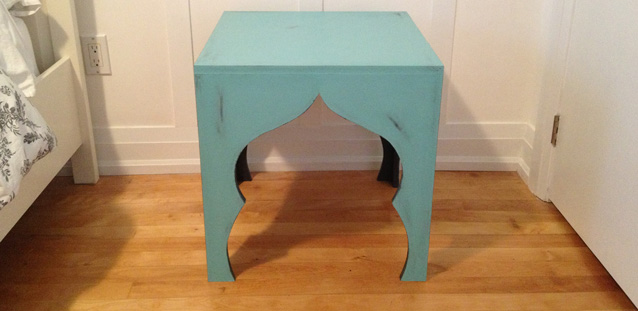
After my paint dried, I mixed up a batch of DIY Chalk Paint (come back tomorrow for my DIY on this). I painted 2 coats of chalk paint in robins egg blue on the front and top of the tables. I left the inside of the legs the base colour so you got a bit more contrast with the blue.

Then I sanded and slightly distressed using sandpaper and a damp cloth (to see more on my distressing chalk paint using a wet cloth check out this post). After I was happy with the distressing and smoothness of the finish, I gave it a coat of furniture wax and polished it.

**UPDATE** Check out this post on how to DIY your own chalk paint
SOURCE LIST:
Materials:
1 – 4×8 sheet of 5/8″ MDF – Home Depot (cut into 19″ squares by HD’s cutting staff)
DAP Spackle: Home Hardware
Behr Premium Plus Ultra paint in Cracked Pepper – Home Depot
Chalk Paint – DIY
Tools Used:
Jig saw, sand paper, compressor & brad nailer, circular saw, paper & pencil, paint brush, wet rag
Difficulty Level (on a scale of 1-5):
Total Cost: $30 (already owned the spackle & paint)