Printmakers Media Cabinet – The Reveal

Its been six weekends of hard work, but we finally reached the final stretch of the printmakers media cabinet project.

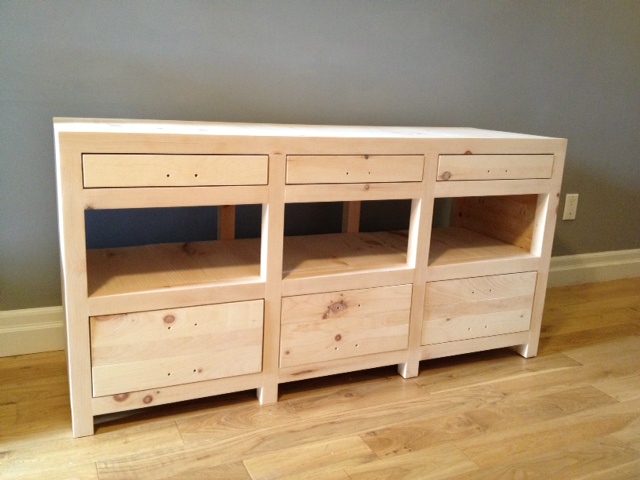
This is where we left off. The cabinet was built and sanded and ready for finishing. If you missed it, check out part one, two, three, four, and five of the project.)

Cabinet built
Cabinet built and ready for stain & hardware

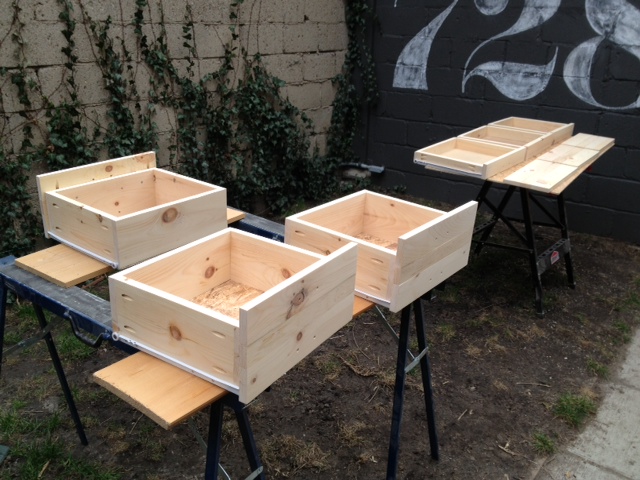
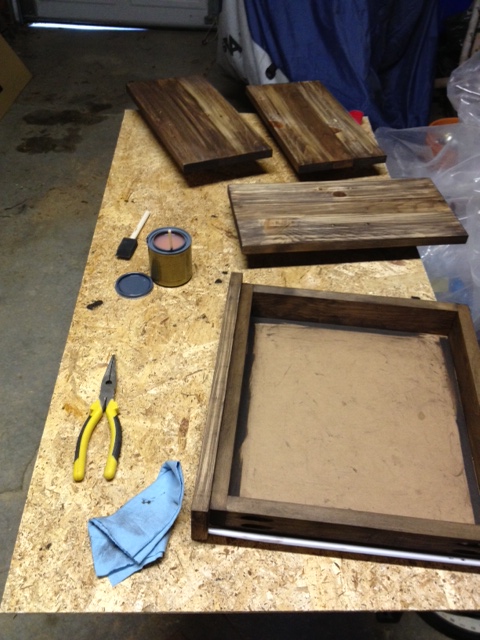
Next up we took all the drawers outside, and set up a staining station, and gave everything a coat of wood conditioner.

Wood Conditioner
The drawers & doors ready for wood conditioner
DIY Tip: Put your cabinet on scrap wood to make it easier to stain the bottoms of the legs

After letting the wood conditioner sit for half an hour, we set out to staining. We had done many a test on stain, and came across a cool technique we wanted to try on the cabinet. It involved wetting the wood, then putting on oil based stain on top of the water, then quickly wiping away. It left an almost zebra like effect. We knew it was going to be a risk, but decided to give it a try none the less. It involved several hours staining, many a swear word, lots of teamwork, and a whole lot of second guessing.

Cabinet stained
Cabinet stained

We took two days to stain everything, the first day we did the cabinet and all the drawer & door fronts. The next day we stained the interior of the cabinet and the drawer boxes. For the interior, we didn’t bother doing our stain technique, and instead just used the stain traditionally.

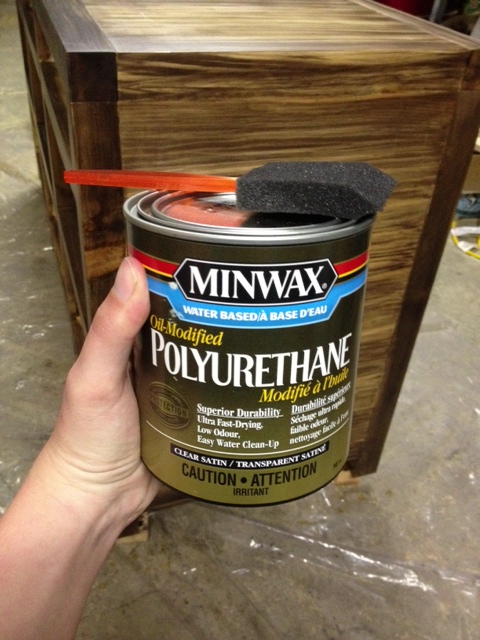
After the stain dried, we applied several coats of polyurethane, sanding with a 320 grit sandpaper in between coats. We put a total of 5 coats on the top of the cabinet, and three everywhere else.

We use Oil-Modified Polyurethane with a foam brush
Drawers & doors mid-polyurthaning
Drawers & Doors mid-poly

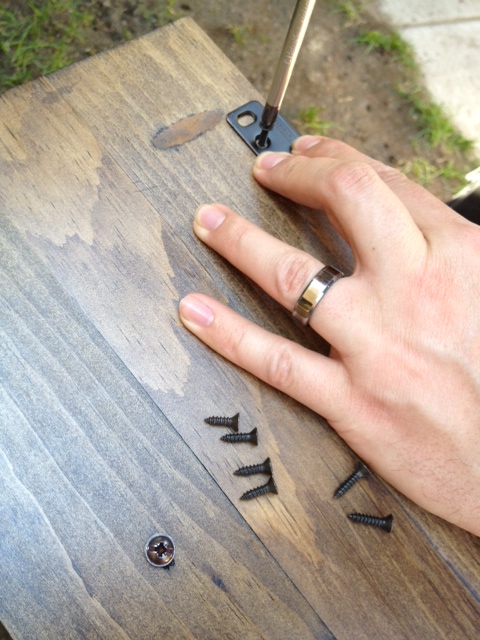
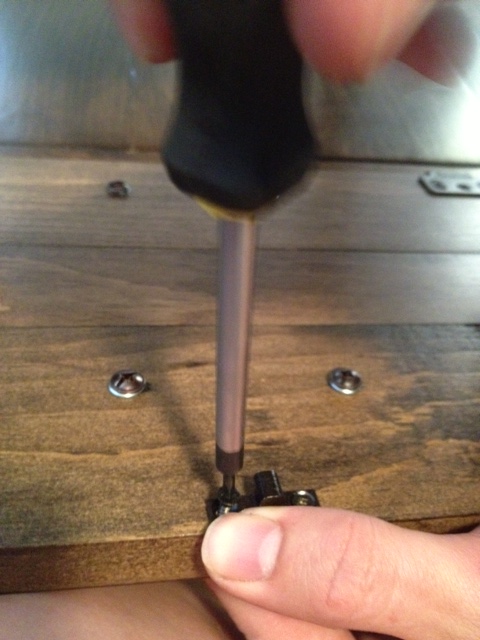
Once the poly had dried, we set to installing hardware. The screws that came with our cup pulls were too short for the double thick drawers, and too long for the single thickness doors. So we headed to the hardware store and picked up longer screws for the drawers, and El Granto cut down the screws with the dremel for the doors.

Ready for Hinges
Pulls attached to door fronts, and ready for hinge installation

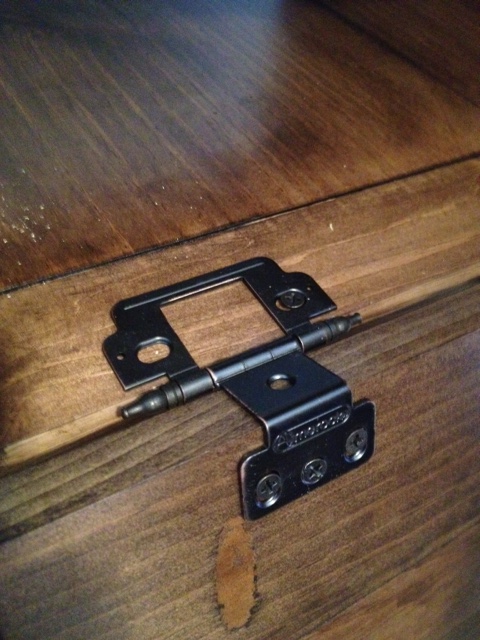
After the handles were installed, we set to installing the hinges, stays and clasps for the doors.

Installing hinges on the doors

This involved a whole load of finikity work, lots of tiny screws, and stubby little screw drivers to fit into the cabinet.

Attaching hinges to the cabinet
Attaching claps to keep the doors closed

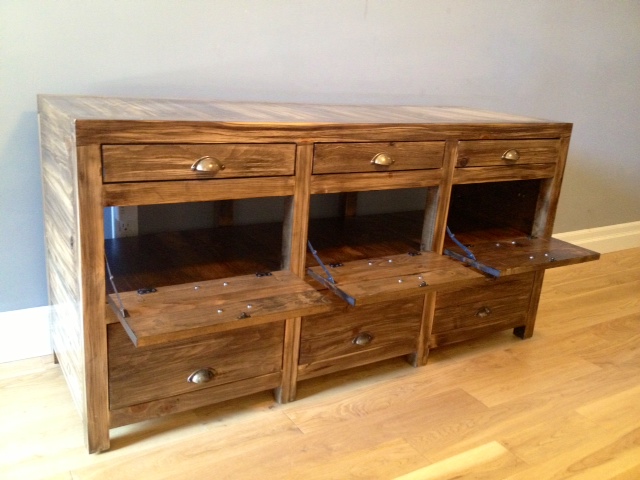
Next up, we needed to add the lid stays to make sure the doors dont open too far. We wanted them to stop at 90 degrees.

Installing lid stays

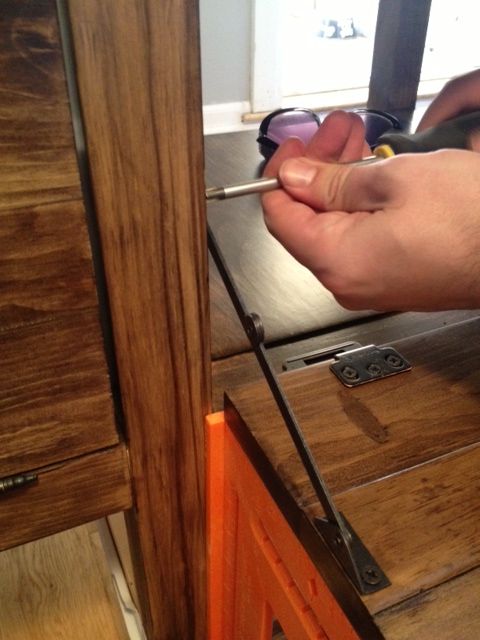
We used a square to hold the door at 90 degrees and attached the stays with small screws.

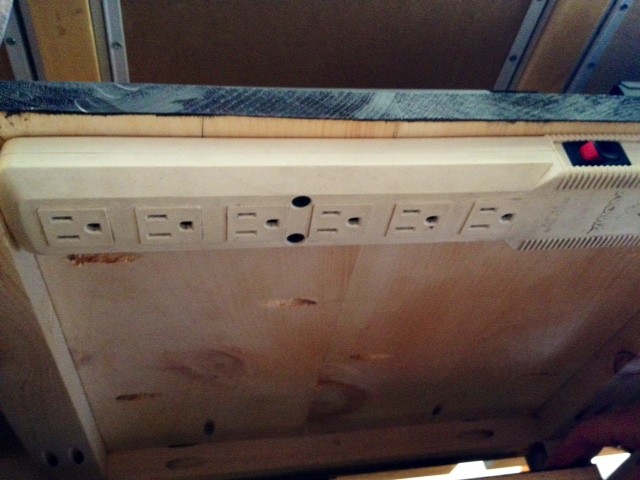
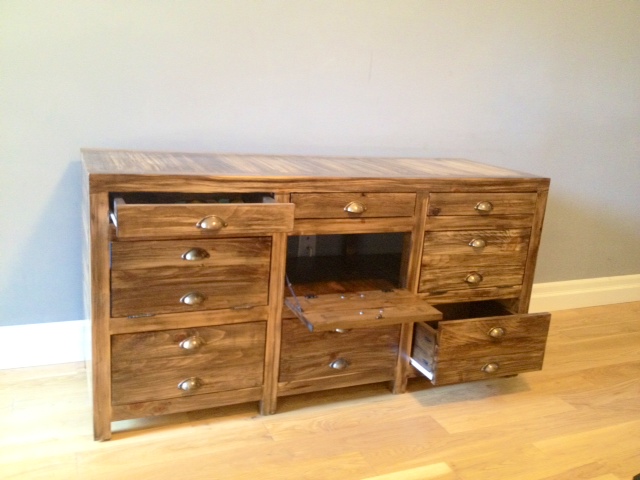
Now we could set to putting all our electronics into the cabinet. To keep things neat, we installed power bars to underneith the back of the shelves. This keeps the cords off the ground, and makes it so that the cabinet can sit flush with the wall.

The view of underneath the shelf in the cabinet showing the power bar.

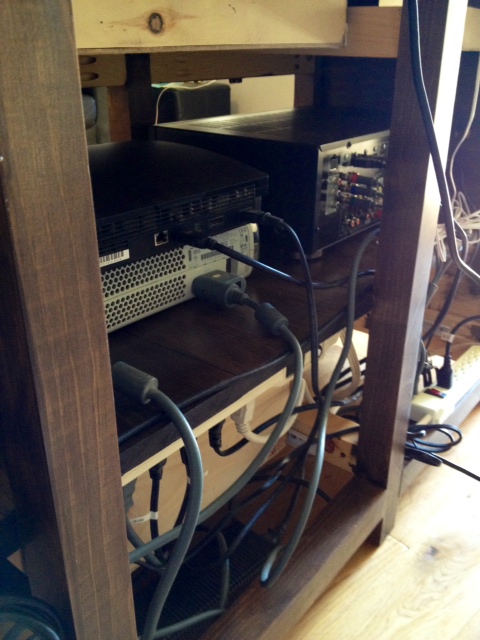
We routed all the cables and electronics as best we could through the cabinet, and its so much more organized than our old media center!

The electronics all tucked into the cabinet

Enough with the technical stuff, are you ready to see what it looks like all finished?

DRUMROLL PLEASE

photo 3(6)

photo 5(2)

Drawer

photo 1(4)

photo 2(3)

photo 5(4)

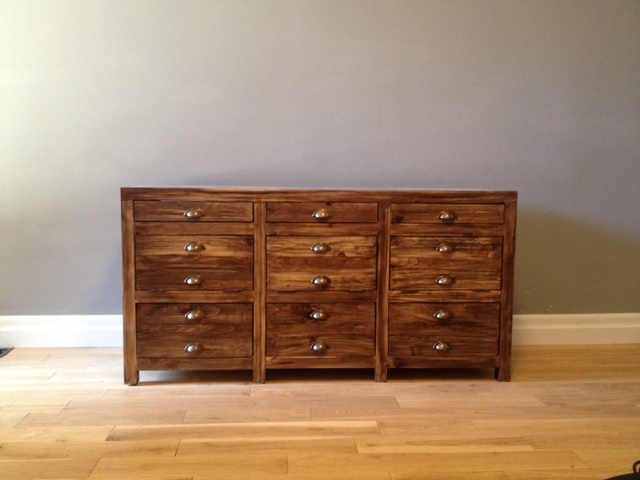
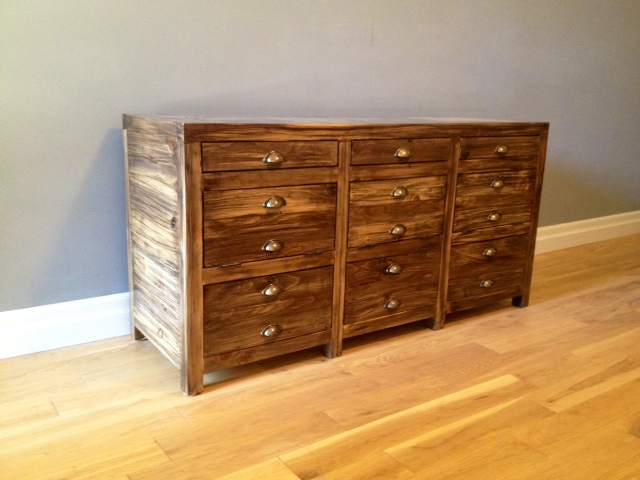
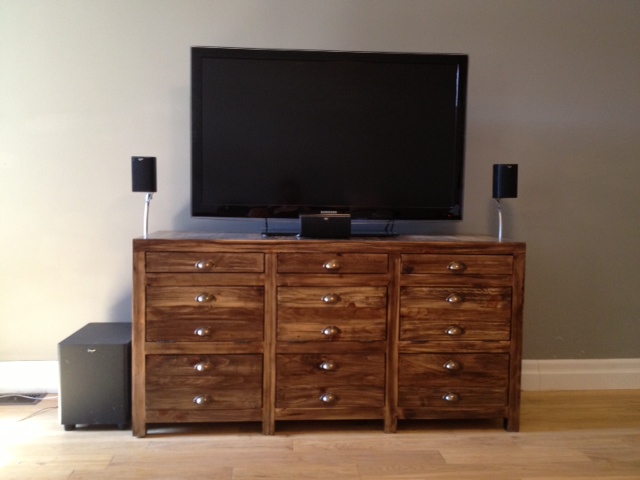
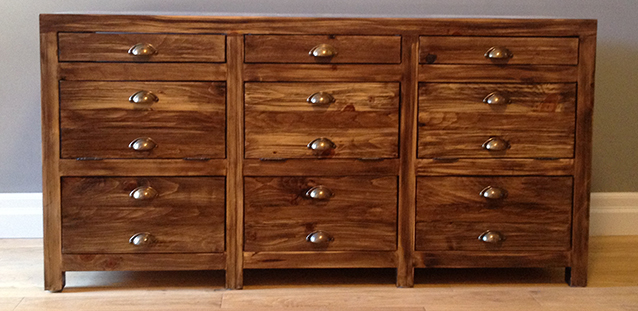
Now a little comparison between our cabinet and our inspiration: the Restoration Hardware Printmakers Media Cabinet. (ours on top, the RH cabinet below)

image

What do you think?!

SOURCE LIST:

Plans:
DIY Plans for an RH Inspired Printmakers Media Console – Design Confidential *(a BIG Thanks to Rayan @ Design Confidential! Her plans are awesome!)

Materials:

Hardware: ($130)
15 cup pulls – Lee Valley
6 inset hinges – Lee Valley
6 sets drawer slides – Lee Valley
3 lid stays – Lee Valley
3 cabinet clips – Lee Valley
8 1 1/2″ felt furniture pads – Dollarama

Lumber: ($100)
8 – 2x2x8 – Downtown Lumber
2 – 1x6x8 – Downtown Lumber
5 – 1x10x6 pine shelves – Home Depot
3 – 1x2x8 Downtown Lumber
6 – 1x4x8 – Downtown Lumber

Finishing/Misc: ($50)
Wood conditioner (already owned)
Stain – Varathane “Kona” – Home Depot
Polyurethane – Minwax Oil Modified in Satin
Minwax Stainable wood filler – Home Depot
Kreg Screws – Lee Valley & Home Depot
Foam brushes – Dollarama
Shop rags
Sand paper

Tools Used:
Kreg Jig
Drill
Mitre saw
Table saw
Palm sander
Square
Level
Wood clamps
Corner clamps
Short Kreg drill bit
Stubby screw drivers

Stats:

Trips to lumber yard -4
Trips to hardware stores -10+
Coats of polyurethane – 5 on the top, 3 everywhere else
Stain samples made before deciding on one – 11
Time involved – 6 weekends, 70-80 hours total
Number of electronics in the cabinet – 11
Number of screw-ups – 3
Number of arguments – 2
Total pieces of wood – 119
Screws – about 300
Injuries – 0!
Swear words – more than I’m proud of

Difficulty Level (on a scale of 1-5):

five out of five

Total Cost: $280

Tin Ceiling Part 3 – The Reveal

Three weekends of sore muscles and standing on ladders are over, and we are now the proud (and tired) owners of a reclaimed tin ceiling. We first showed you how we prepped the ceiling, then how we prepped the tiles, today you finally get to see the finished product.

It was a bigger project than we anticipated. Anything where you’re working on the ceiling is exponentially harder. If we were to do it again, we would rent some scaffolding, as moving ladders around was a pain. We did borrow a work light from our neighbours, which was a necessity.

Work Light & Brad Nailer, our tools for the day

This is what the ceiling looked like before.

Ceiling Before
Ceiling Before

This is what we started with on installation day.

Ceiling Sheeted Ready for Tiles

When installing the tiles you need to decide where you enter the room the most. The tiles overlap, so you want to make sure the edges overlap away from where you see the ceiling from most. We enter the living room from the hallway so we started the tiles at the corner farthest from the entryway (kitty-corner to the hallway).

The tiles overlap and have little notches where they fit in together. We figured this was enough to be able to line up the tiles properly, but once you’re standing on the ladder with the tile over your head, it’s much harder. We wish we had laid out a chalk line grid, it would have made the installation quicker and preventing one crooked tile that moved when I was nailing it. (arg)

After the first tile is up, we continued along that row to the end, then started the next now. Your arms get very tired, so this process ended up taking us two weekends to get done.

First Tile Up!
First Tile Up!

When we got to the middle of the ceiling we needed to deal with the electrical box. We had planned the tiles so that the light  ended up in the middle of two tiles. We just needed to cut a half circle out of each tile around the light, and it should work perfectly. We traced the shape of the electrical box onto the tiles that needed to be cut.

Tracing for Electrical Box Cut-Out

Then headed out to the garage and El Granto cut the tiles with a metal cutting blade on his Dremel. (We could have used tin snips, but the curve is a bit tricky and the Dremel is waaaay easier.)

Cutting the Tile
Cutting the Tile

After the tiles were cut, we added an extension box onto our ceiling electrical box so that it would allow us room for the plywood and the tin tile. The box is easy to install (again the power is still OFF to this room!)

El Granto Intsalling Box Extension
El Granto Installing Box Extension
Box Extender Installed

After the box was up we installed the cut tiles around it.

Cut Tiles Installed
Cut Tiles Installed

Then re-installed the light fixture.

Light Intsalled
Light Installed

We then installed the remainder of the tiles. The result is a very eclectic ceiling, but we love it. Some of the tiles are much more worn than others. We tried to make the layout look random, but still balanced. We would like to add some panel molding around the edges, but that will have to wait until we have access to a truck or van.

Without further adieu, here is the finished product.

ceilingcomplete

ceilingcomplete5

ceilingcomplete4

ceilingcomplete3

ceilingcomplete2

The living room is starting to come along now. Next up, we need to trim out the tin ceiling, and swap out the light fixture for a more elaborate chandelier. A few more big projects and it will hopefully start looking more like the period building it once was.

SOURCE LIST:

Materials:
20 2′ Square Reclaimed Tin Ceiling Tiles – Aberfoyle Antique Market
3 4×8 Sheets of 3/8″ chipboard – Rona
Round Electrical Box Extender – Home Depot
Screws – Home Depot
Brad Nails – Home Depot
Clear Coat – Canadian Tire

Tools Used:

Drill
Compressor & Brad Nailer
Ladder(s)
Work Light
Chalk Line
Dremel

Difficulty Level (on a scale of 1-5):

four out of five

(Really it deserves about a 3.5 it was just a pain as you are standing on a ladder working over your head)
Total Cost: $430

Light Fixture Facelift

Do you have something in your house that works perfectly well, it looks fine, and you have no justification what so ever to replace it, but you HATE IT? Yeah…that was my living room light fixture. It was fine…I just didn’t like it. It was also big, and costly to replace with anything I like. So it had no hope of getting replaced anytime soon. I had come to terms that our whole living room is in fact an epic fail (sofas don’t fit the space, the tv console is hideous, the dogs crate lives in the living room, and there’s no place to set down a drink.) So you think I would just concede the light failure and learn to live with it. Like the way hoarders seem to have come to terms with crawling over their belongings to get to the bathroom. Not so. I my friend am what you would call anal retentive, and if I can possibly change something I hate; I will.

This weekend I had enough of that light fixture, so I got El Granto to take it down, and I marched it outside and I spray painted that light. Take that heinous light. Now you are the same heinous light with a prettier color! Nah, I’m not giving it enough credit, I think it looks much better, and definitely good enough to get it off my hit list for a few months.


So here’s what we did.

Took the light apart (the bowl came attached from the rods, and the rods from the light fixture). It’s hard to see the lights terrible color from my before pic. It was white with gold brush strokes and a hint of green. Waaaay to country for this city house.

Close up of strange gold faux finish

I cleaned everything, then dragged a few saw horses outside, and made myself a little work station. I hung the rods and the hoop that the bowl sits in from an old piece of wood with some nails in it. I sat the light on some cardboard. In hindsight I should have hung the light as well as it would have been easier to paint. I made sure to mask off the light socket with tape. I painted with my favorite spray paint; Rustoleum Universal. This time with some left over Oil Rubbed Bronze. I painted with several light coats, ensuring I got into the nooks and crannies of the light.  Sorry grass, you were collateral damage in this project.

Painting the light in the backyard

After it dried we took it back inside and re-hung. Easy peasy lemon squeezy.

SOURCE LIST:

Materials:
Rustoleum Universal Spray Paint in Oil Rubbed Bronze – Home Depot

Tools Used:
Screw Driver, Ladder, Husband

Difficulty Level (on a scale of 1-5):

One out of five

Total Cost: $0 (already owned the paint, $10 if you needed paint)