Pinterest Challenge – Restoration Hardware Shelf

We had so much fun doing the Fall Pinterest Challenge, that we jumped at the opportunity to do it again this time. The jist of the Pinterest Challenge is to stop just pinning ideas, and start creating. You’re supposed to DIY something from Pinterest. Whether it be a recipe, craft, home project etc.

Pinterest winter-challenge

I have a few pins over on Pinterest (only 2,555 or so…) so I had a good amount of things to choose from! I figured this was a good opportunity to knock something off the to-do list as well.

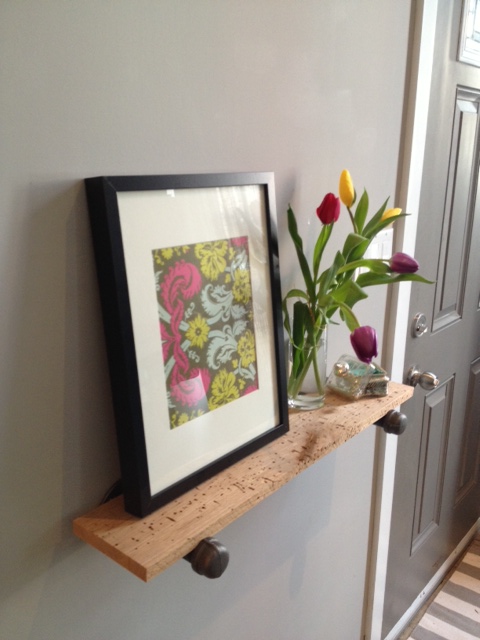
Our front door opens onto the dining room. We have built a coat rack, installed an Ikea wardrobe and we have a nice bench and mirror. The only thing lacking in the entry was somewhere to put your keys and mail, or to keep a coffee away from the dog while you’re tying your shoes pre-puppy walk. We don’t have a lot of space, so a traditional console table was going to be too big.

Entry Before. Isn't that wall crying out for a table/shelf for keys & mail?
Entry Before. Isn’t that wall crying out for a table/shelf for keys & mail?

Here is our inspiration:

Restoration Hardware’s Reclaimed Wood Shelf


If we love the shelf so much, why didn’t we just go buy one? errrr… The price for shelf + brackets was $240. Yep, for one lil shelf. Ouch. We just don’t roll like that.

So we made it (with our spin on it of course)

Storefront Life's Take on Restoration Hardware's Reclaimed Wood Shelf
Storefront Life’s Take on Restoration Hardware’s Reclaimed Wood Shelf

So how’d we do it?

Bought some 1″ gas line pipe (it matches our dining table!) from Home Depot.

Supply List:

  • 2 – Floor Flanges
  • 2 – 6″ Nipples (teehee)
  • 2 – End Caps
Flange + Nipple + End Cap

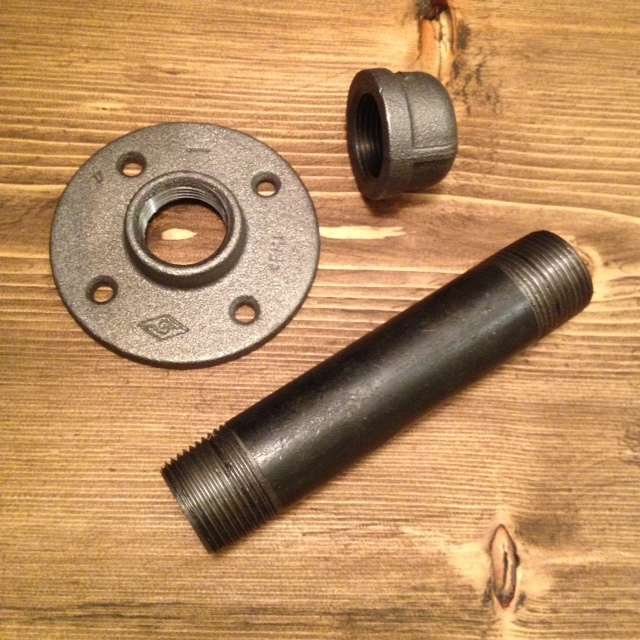
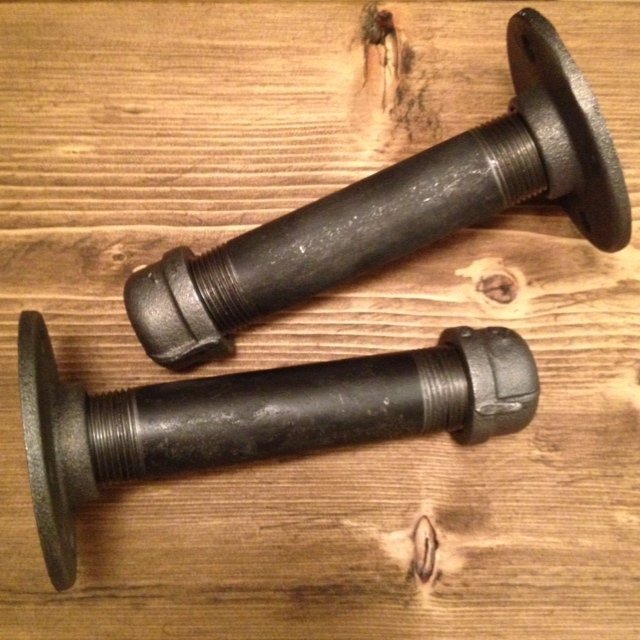
Assemble them all together and this is what you get:

Shelf Brackets
Shelf Brackets

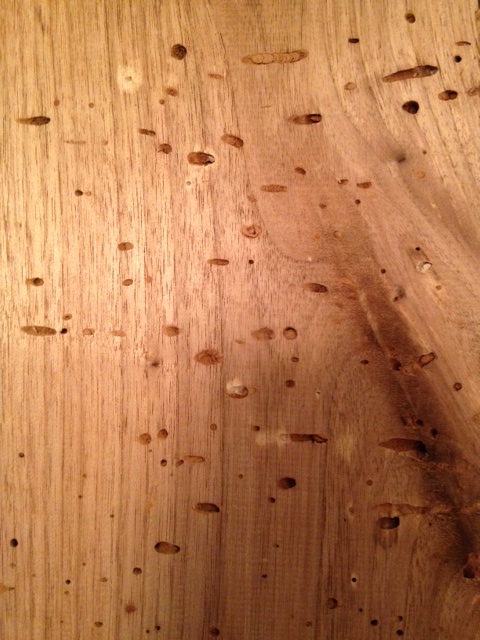
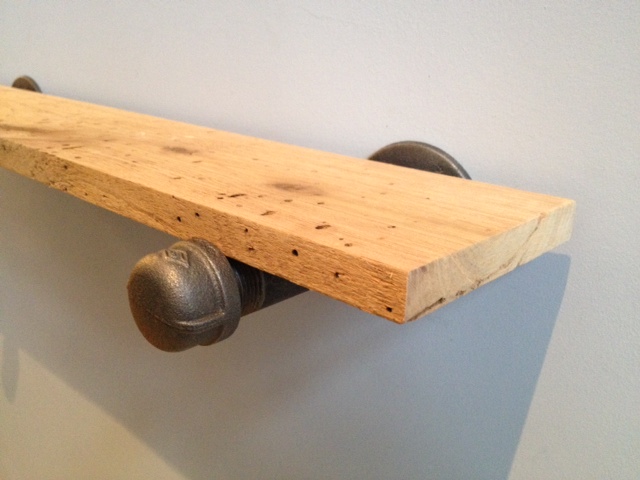
Now you need a shelf. We headed to the garage to check out what cool wood we had. We found some awesome worm eaten Butternut that El Granto had gotten for Christmas (yep we ask for building materials for Christmas). We loved the character of the butternut and decided it was the way to go.

Butternut Wood. Check out all those awesome worm holes!

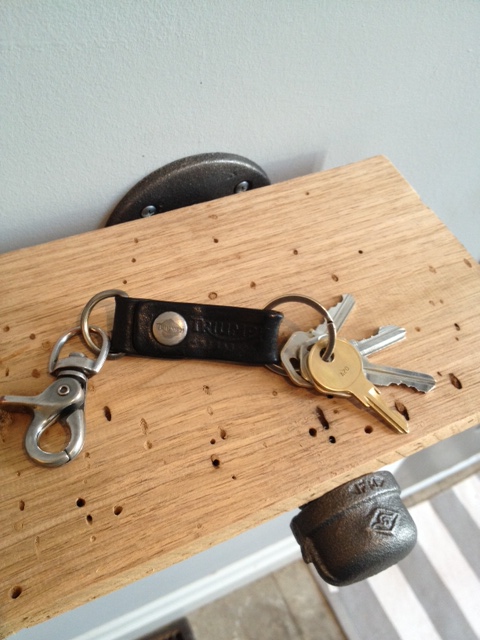
We cut the piece of wood 28″ long, and trimmed the width to 5.5″. This would enable the wood to sit on the pipe, but inside the edges of the end cap and flange. We wanted to be able to see the cool bracket.  You can easily make the shelf wider by resting it on top instead of inset.

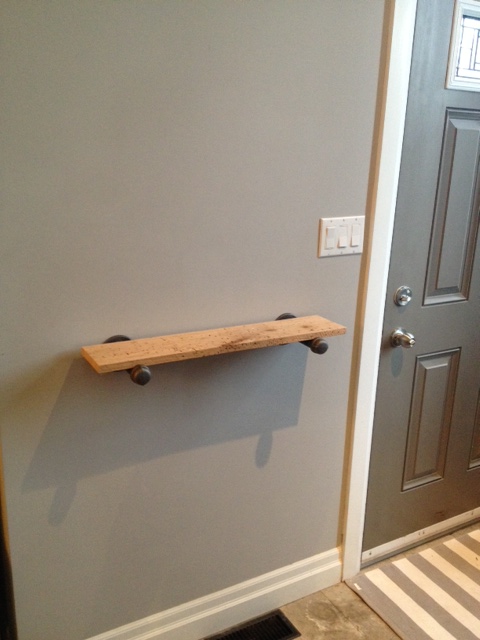
Next up, after deciding on placement and height (centered on the wall and 40″ off the floor) we went stud hunting, and found that we could hit one of our brackets into a stud. So we marked out the placement.

Marking the shelf bracket holes

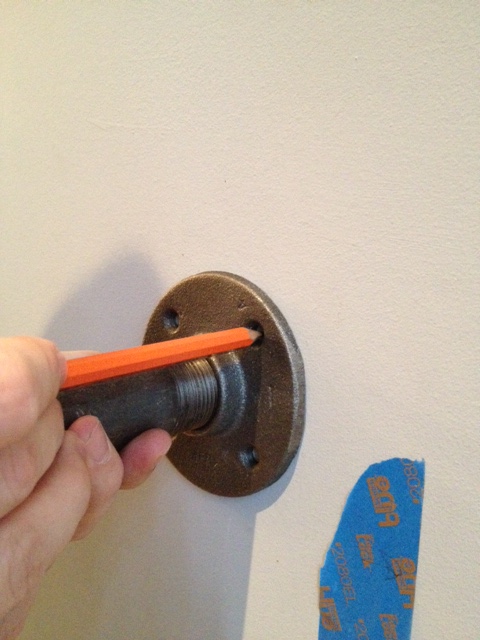
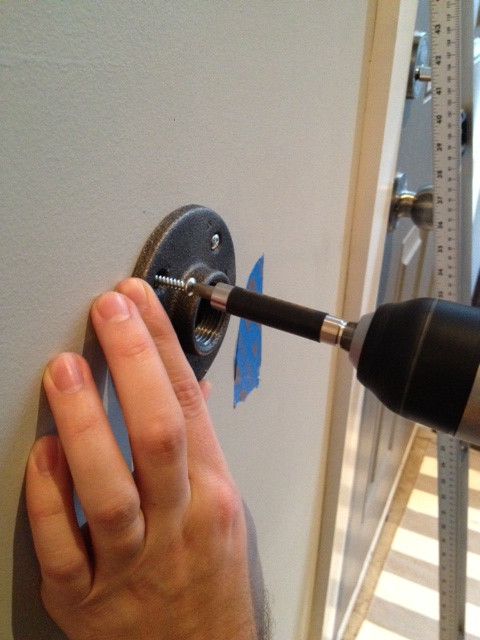
After the holes were marked, El Granto screwed the bracket into the studs.

Attaching the Bracket to the Wall

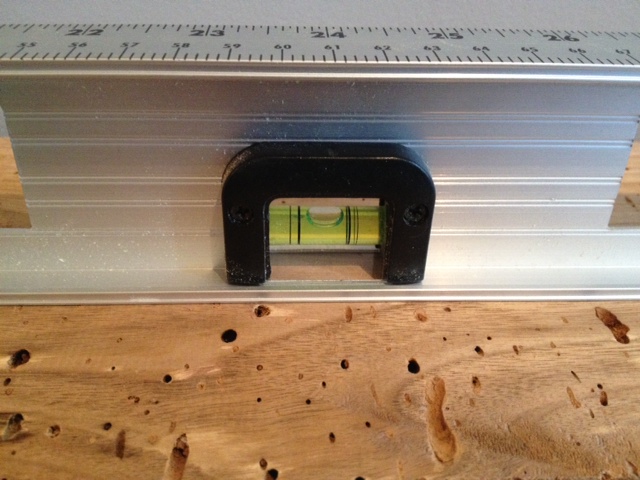
After the first bracket was attached, we attached the pipe nipple and used it to help us level the second bracket.

Ensuring the Brackets are Level

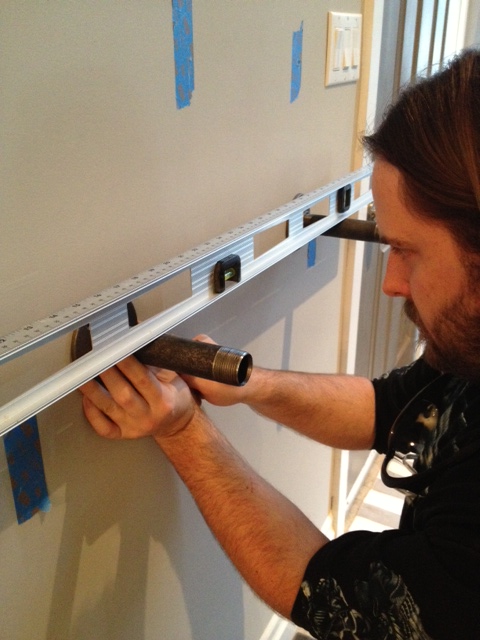
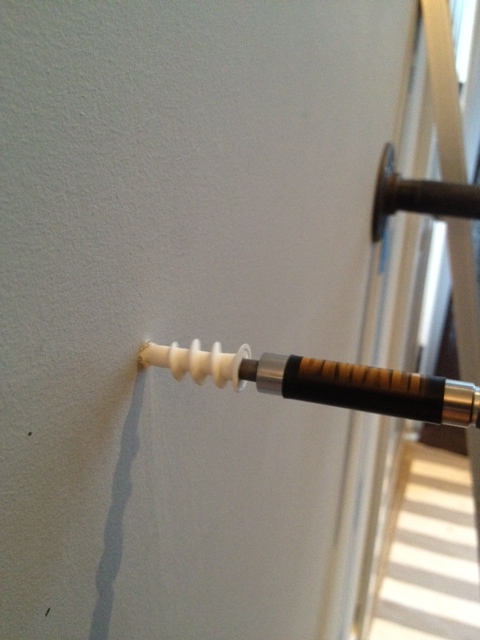
Next up we marked the second bracket, and used EZ Ancors to ensure the shelf would be attached to the drywall nice and sturdy.

Installing the EZ Ancor`s

We then attached the other flange to the wall with screws into the wall anchors, and then screwed on the pipe nipple and end cap.

We gave our wood two coats of furniture wax and laid it on top of the pipe, screwing the end caps against the wood to hold it steady. Oh and it’s nice and level!

Level Shelf

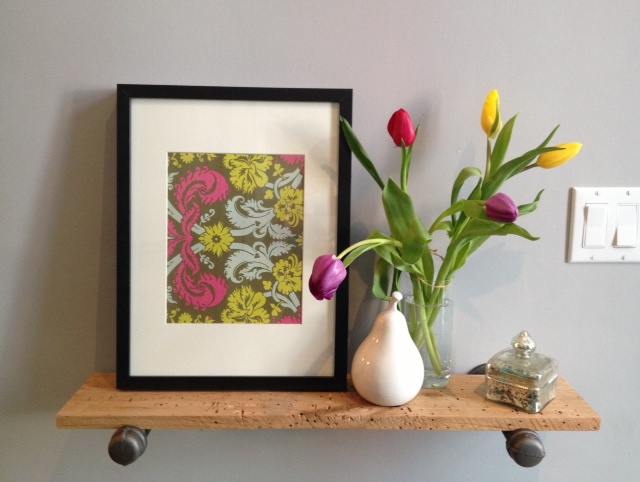
TA DA! What do you think of our DIY Restoration Hardware Shelf & Bracket?

shelf (2) shelf (3) shelf (1)

photo 4

Storefront Life's Take on Restoration Hardware's Reclaimed Wood Shelf

photo 3

Make sure you check out all the other awesome Pinterest Challenge projects, check out the hosts blogs too!

Sherry @ Young House Love
Katie @ Bower Power
Megan @ The Remodeled Life
Michelle @ Decor and The Dog

SOURCE LIST:

Materials:

1″ Gas Line Pipe (2 flanges, 2 end caps & 2 6″ pipe nipples) – Home Depot
Butternut Wood – Gift
Furniture Wax – Home Depot
EZ Ancors – Home Depot

Tools Used:

Miter Saw
Sandpaper
Dish Soap (to wash the pipes)
Drill
Level
Pencil

Difficulty Level (on a scale of 1-5):

one out of five

Total Cost: $16

Pinterest Challenge – Painted Wallpaper

I love Pinterest. I have used it for organizing my wedding ideas, dreaming and planning our home renos, and even a recipe or two.

Most of all it inspires me. It’s like looking through magazine after magazine of gorgeous ideas. A few minutes of Pinteresting and my head is full of great ideas and projects, much to the chagrin of my husband!

So when Sherry @ Young House Love was discussing this years fall edition of their Pinterest Challenge, I decided to jump in with both feet.

I have been obsessed as of late with paintable wallpaper. I just love the texture and depth of it. Take for instance my inspiration shot from Emma @ The Marion House Book. Her use of the paintable wallpaper with a dark dramatic colour in her office is just stunning!

Check out her whole office here.

I already have a wallpapered wall in my Master Bedroom, but I have been thinking about adding some drama to my master closet. It’s not a walk-in closet, nor does it have room for a chandelier or an ottoman or any sort of art. Its just a standard double closet, but why should that stop it from being awesome?!

So I set out to add some drama to my closet by wallpapering & painting the insides of my closet doors! Yeah that’s right, the insides of my closet doors, so that when you open the doors they will scream TA-DA! It will be like having your own sexy magicians assistant hidden inside your closet.

Closet Before

So to put inspiration to fruition. We picked up a roll of (0n sale!) Martha Stewart paintable wallpaper in a pressed tin design, as well as a tester jar of dark purple paint.

We removed the doors from their hinges, then set them up on some saw horses in the guest room. The doors were a bit wider than the roll of wallpaper, and I could have taken the easy way out and just done a paneled insert for the door, but I decided to do it right and cover the entire door. So I laid out my first sheet of paper, wet & booked it, then applied it to the straight edge of the door. We smoothed out the bubbles and ensured the edges were well pressed down.

One Sheet of Wallpaper Applied to Door

We then lined up a second 1/2 sheet of paper (split lengthwise, so I could use the other half for the second door). Matched the pattern, wet & booked and applied the wallpaper. We then did the same thing on the other door.

Wallpaper Applied to Doors

I left the wallpaper overhanging the edges until it all dried. At that point I flipped the doors over. Placed a piece of scrap wood underneath to use as a cutting board. I then cut along the edges of the door with a sharp blade, cutting off the excess wallpaper and leaving a smooth edge.

We then gave the wallpaper two coats of purple paint with a brush. It was a pain to get the paint into all the little crevices! The second coat went much faster than the first.

Painting the Wallpaper
Doors Wallpapered & Painted

While the doors were drying, we gave a coat of dark grey paint to the closet, and prepped for new rods & organizers. We re-hung the doors, and this is what we have now! (sorry about the pic quality, we haven’t had an ounce of decent natural light in days with this storm!) I will take better pics once some sunshine decides to come out and play.


SOURCE LIST:

Materials:
Martha Stewart Paintable Wallpaper in Pressed Tin – Canadian Tire
Behr Sample paint – Home Depot

Tools Used:
Wallpapering kit (wetting container, smoother, sponge, edge roller etc.)
Sharp Blade
Hammer & flat head screwdriver (for removing doors)
Paint Brushes & Trays

Difficulty Level (on a scale of 1-5):

Two out of five

Total Cost: $20