On our list of 2013 DIY Goals we noted one big project being the coffee bar. The coffee bar will be placed in our open concept kitchen/dining room. It will be on the opposite wall from our U shaped kitchen, and will be placed half way between the kitchen and dining room.
")
We decided to build a coffee bar there for several reasons. A.) We wanted more counterspace to house our prolific array of coffee paraphania. B.) We needed more storage for kitchen dishes and barware, and C.) we wanted more space to lay dishes during parties. We decided instead of getting a freestanding buffet, we would build in the coffee bar using cabinets that match our kitchen. I set to planning the coffee bar about a year ago, but it hasn’t been on the top of our DIY priority list, and to be honest its also a bit of a big ticket item. We decided to do it in stages to alleviate the financial burden. Thanks to some Ikea gift cards for my last birthday and Christmas, we were able to use our time off between Christmas and New Years to get started!
The first stage was buying and installing the cabinet bases, then making a temporary countertop. Stage two will be wiring in new electrical outlets, pouring a DIY concrete countertop, adding some reclaimed wood open shelving and getting a few doors for the bottom cabinets. The last stage will be adding glass doors to the uppers, and a three drawer unit to the middle base cabinet.
So here’s part 1 (aka the manual labour):
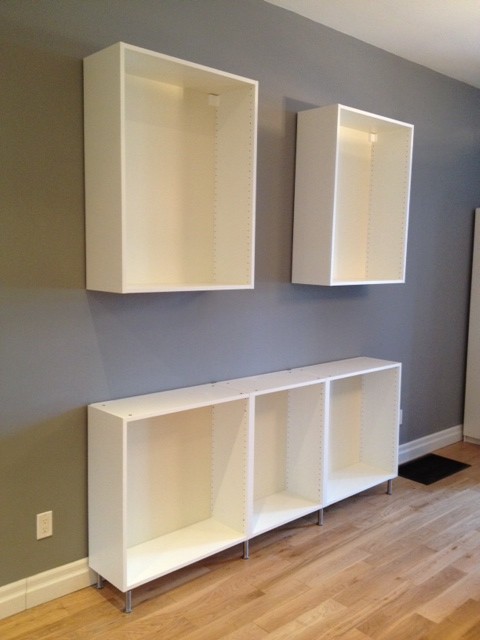
We headed to Ikea with plans in hand and had the friendly kitchen department write us up a purchase order for the cabinet bases. We went with two 12″ deep, 30″ wide lower cabinets as as well as a 12″ deep 24″ wide lower (which will have a drawer unit in it). For the uppers we went with two extra tall 12″ deep 30″ wide cabinets which will eventually have glass doors. We also purchased some feet and the hanging rail for the upper cabinets. What we forgot to purchase were any shelves for said cabinets. Oops, looks like another trip to Ikea is in our future! After our purchase order was made up, we headed down to the checkout to pay and then off to full serve pickup to get our order. It was fast and easy and we were outta there in no time.

We got home and set to assembling and installing. We had previously assembled and hung an Ikea kitchen for a friends reno, and having assembled our fair share of Ikea we were fairly proficient in our assembly.

We averaged about 12-15 minutes per cabinet, and with the help of a brad nailer to nail on the back panels, we were ready to install!

We started with the lower cabinets which we attached together by clamping them, drilling out the hole and attaching with the accompanying screws.

We then attached the stainless steel feet we had purchased. We decided to go with the feet so that it looked more like a piece of furniture, rather than the rest of our kitchen which has a toe kick panel. It also made the unit look a little less domineering from the hallway.

8 feet later and we had ourselves a fully assembled base unit.
")
We flipped it over, decided on the position on the wall, we leveled it using the level-able feet (thank you Ikea, you are awesome for owners of an old crooked house!).
")
Once everything was correctly positioned we attached it to the wall. Our biggest issue was that we were attaching to a firewall which has 1 1/2″ thick drywall and our stud finder was having a hell of a time finding anything! After a few curse words and a couple heavy duty EZ Ancors we were in business.
")
After the lowers were done, we set to hanging the uppers. They were to be placed one cabinet on either end with a stretch of open wall 24″ wide in the middle. We want to put some reclaimed wood open shelving in there, so we left the space open for now.
Hanging the uppers was also super simple, as Ikea’s system is amazeballs. You hang a track on the wall all level and nice, screw it into the studs, then your uppers float on the track!
")
It’s super simple for a long row of cabinets, and makes it so that you don’t have to worry about finding studs to attached each cabinet to. We only needed to hang two smaller individual cabinets. So we cut the rail into two pieces slightly smaller than the cabinets, and following Ikea’s instructions installed them in short order. All in all it took the two of us one evening and one morning to have everything hung.

The next steps to stage 1 will be getting the shelves we forgot at Ikea, adding a temporary countertop and some filler panels. This should all be complete by the end of January 2013.
Stage 2 will involve a DIY concrete countertop, some electrical outlets, open shelving between the two upper cabinets and hopefully a few doors and hardware. (ETA Summer 2013)
Stage 3 will complete the coffee bar with all the cabinet doors, drawers, and hardware. (ETA Fall/Winter 2013)