DIY Cutting Boards

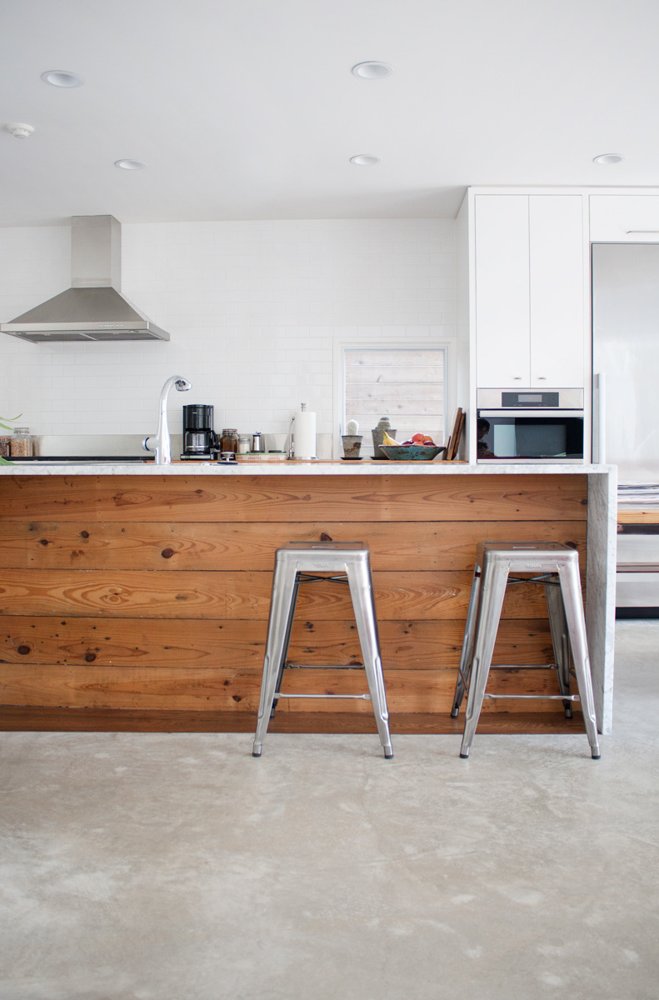
As the kitchen is starting to become functional again, we are starting to think about decor and other kitchen accessories. One of the biggest changes in the kitchen will be our new DIY concrete countertops. As concrete is rather hard and unforgiving, we will need to use cutting boards for all our chopping. I love a good cutting board, but they can be expensive, and often are not the size you need for your space.

DIY Cutting Boards

We did a bit of research, and set out to make some easy & inexpensive cutting boards for our kitchen.

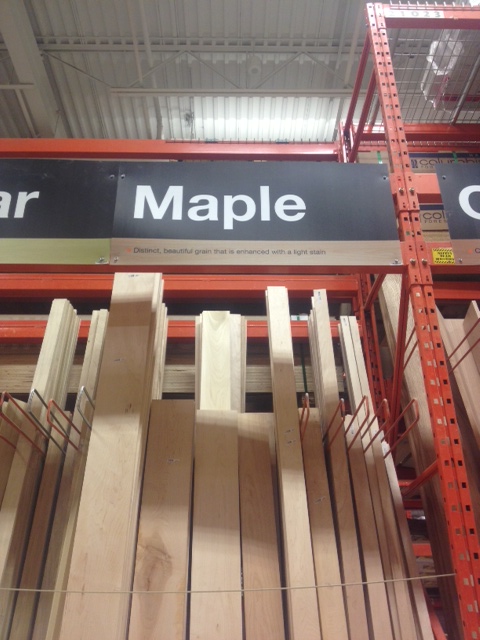
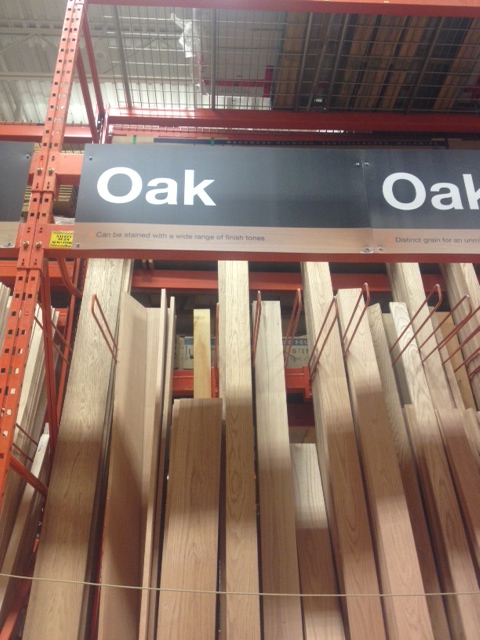
Selecting Material: Hardwood is preferred for a cutting board. Maple or Ash is the perfect material, as it has a nice tight grain. Oak is also usable, but not ideal as it is more of an open pore wood.

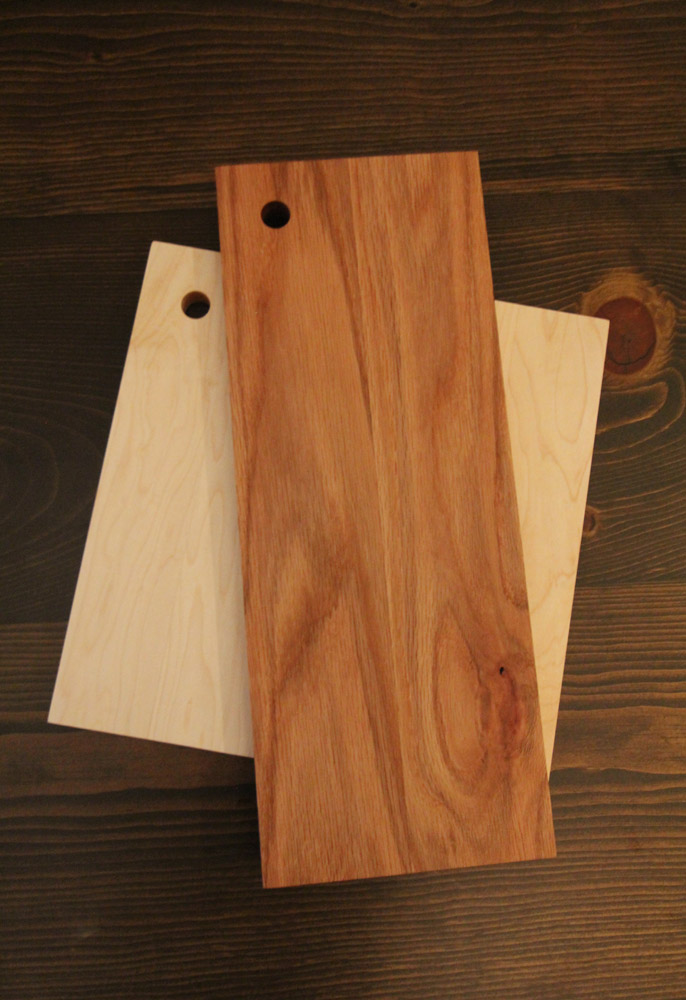
We decided to make one maple cutting board for everyday use as well as a red oak board more suitable for serving & veggie cutting (we wont be cutting raw meat on the oak).

We headed to the Hardware Store for some simple materials.

Here is what you need:

  • 1 – 1×3 piece of Maple (6′ long)
  • 1 – 1×4 piece of Oak (6′ long)
  • Saw – Table saw preferred, but a Miter or circular saw will work
  • Drill bit – We used a 3/4″ spade drill bit
  • Drill – Cordless or in our case we used a drill press (but that’s not necessary)
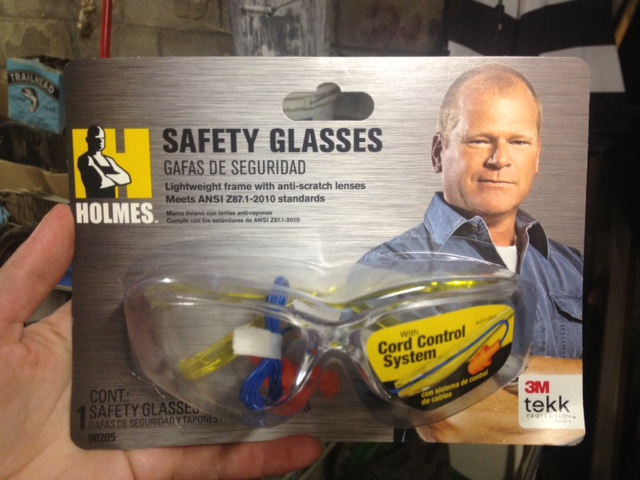
  • 3M™ Safety Products – Digital WorkTunes™ Hearing Protector, Holmes Workwear™ Premium Safety Eyewear & 3M tekk Paint Sanding Valved Respirator
  • Bar Clamps (optional, but really worth the purchase)
  • Measuring Tape & Square
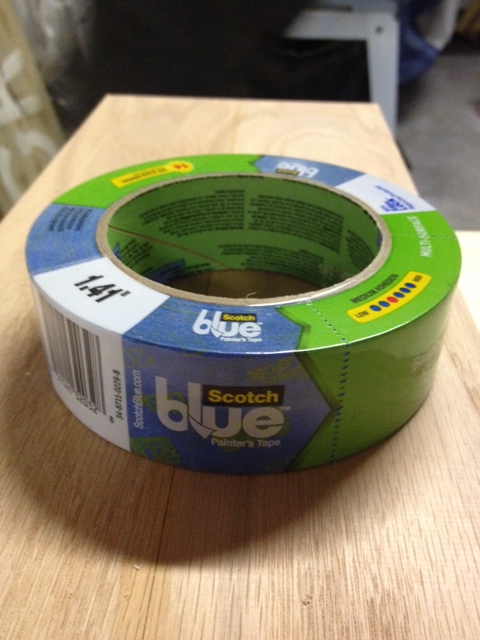
  • ScotchBlue™™ Painter’s Tape
  • 3M Advanced Abrasives sandpaper in 80, 120 & 220 grits (palm or orbital sander optional)
  • Wood Glue
  • Mineral Oil

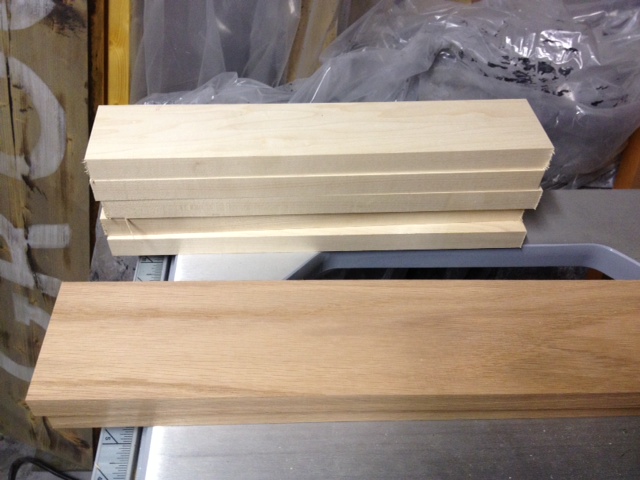
We headed to our local lumber store and picked up a piece of 3″ wide Maple, and 4″ wide red Oak.

Maple
Maple
Oak
Oak

I also made a stop at my local drug store for some Mineral Oil. Mineral oil is used to protect your cutting board. You can find Mineral Oil at Kitchen Supply stores, Ikea, and your drug store. Mineral Oil is (apparently) used as a laxative, and can be found in the digestive aid section of your drug store. Yep, it’s true!

Mineral Oil - Three bottles to the right of the rectal syringe
Mineral Oil – Three bottles to the right of the rectal syringe…eeep

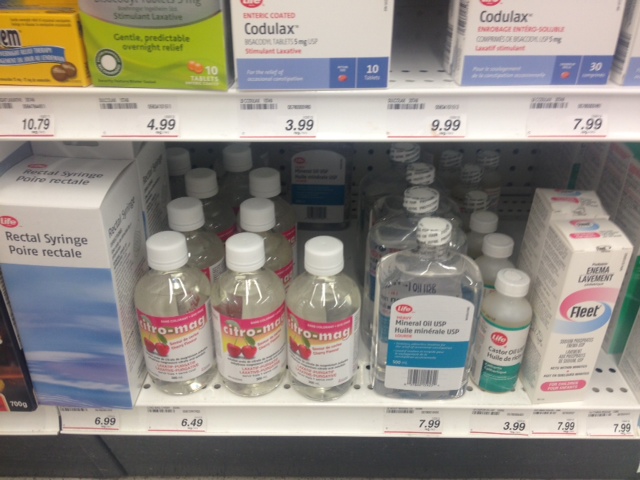
Ignore the strange look the cashier gives you when you purchase your mineral oil while carrying two pieces of lumber.

*It is important to use Mineral Oil or an oil specifically marked as a cutting board/butcher block oil. Do NOT use olive or vegetable oil, as those will go rancid. Mineral Oil is food safe and will not spoil.

Now its time to make some cutting boards!

El Granto cutting the wood to length

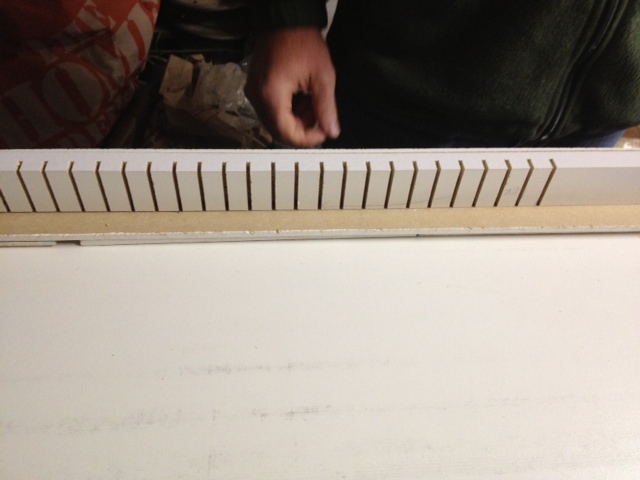
Cut your maple into 5, 13″ long strips (does not need to be exact)

Cut your oak into 2, 20″ long strips (again doesn’t have to be perfect, we will be trimming the boards later.)

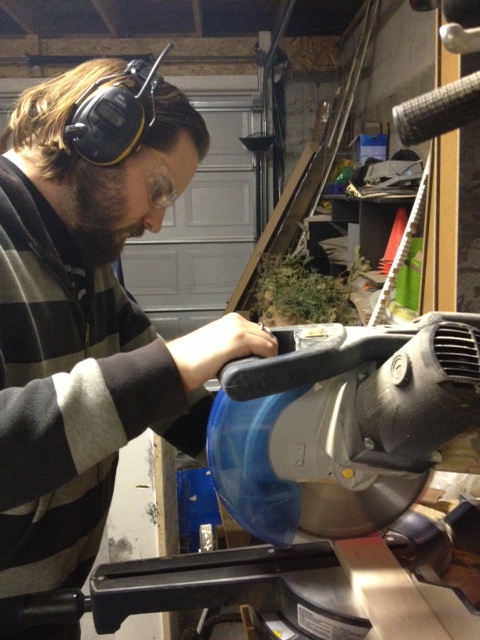
Make sure to use safety equipment! Eye & ear protection are a must. Cutting hardwood can get very loud.

Hearing Protection
Hearing Protection
Safety Glasses
Safety Glasses

Once all your wood is cut, sand off any imperfections and get ready for gluing.

Wood cut to length
Wood cut to length

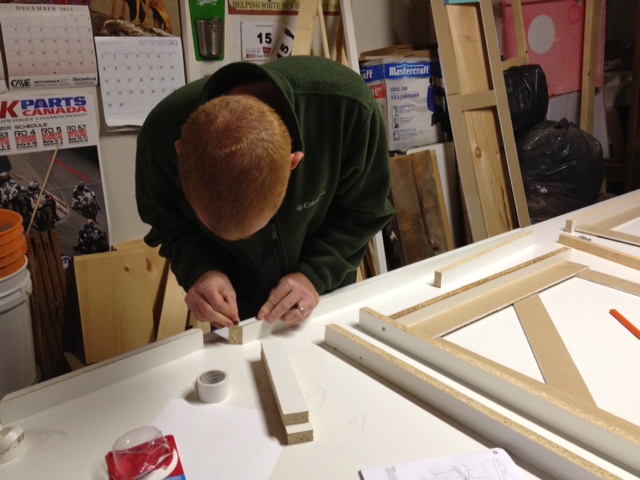
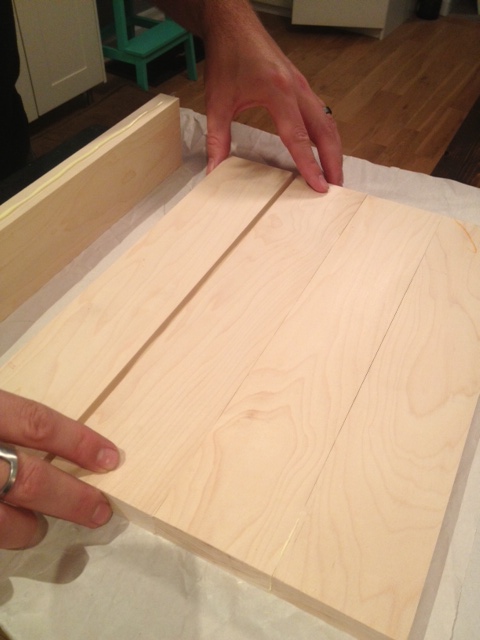
Make sure you have a nice flat surface to glue your boards together. We went inside and laid all our boards out deciding how we wanted them to look. Grain is important in the outcome of your piece. Make sure you take it in to account and lay out your boards to maximize the visual appeal of the grain markings in your wood.

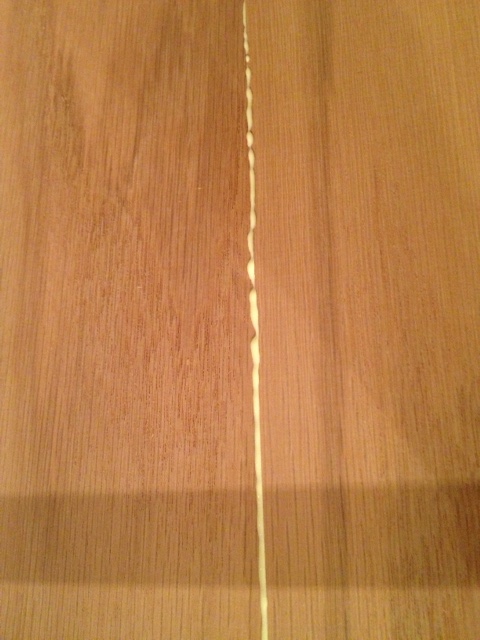
Next up, run a bead of wood glue on the edges of your boards (one board at a time) and glue them all together. When you’re pressing your boards together wiggle them lengthwise to spread the glue and work out any air bubbles.

Applying Glue
Applying Glue
Attaching boards together

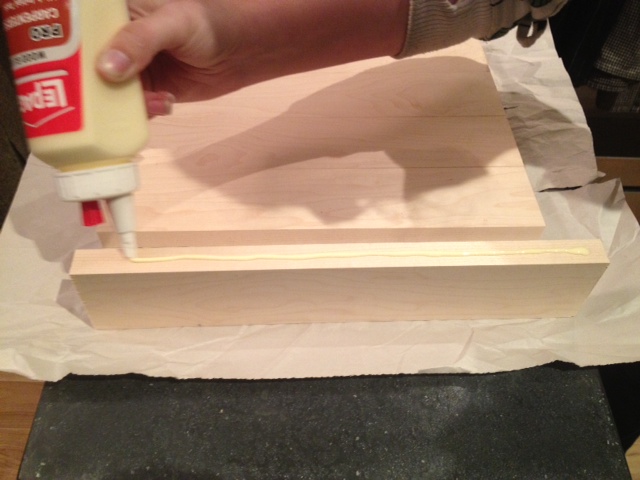
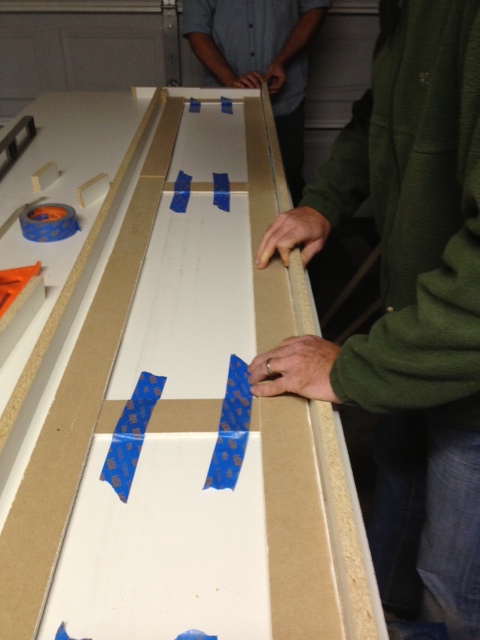
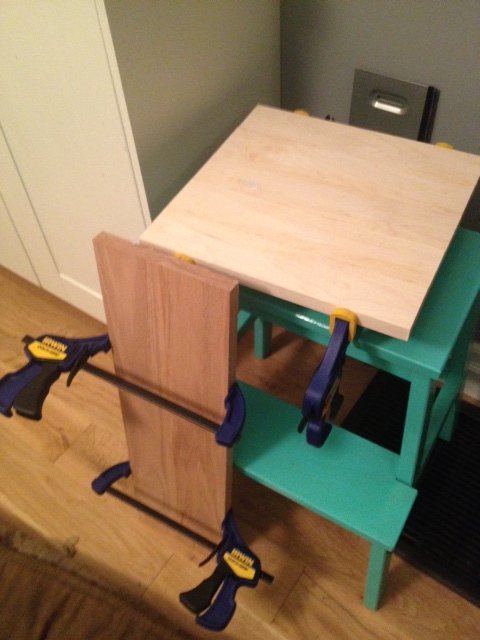
Once all your boards are glued together, clamp them, and wipe off any excess glue.

When you clamp the boards together, sometimes excess glue seeps out. Quickly clean this off before it dries (it is a pain to sand off)

After your boards are clamped, leave them to dry overnight.

Clamped & Drying
Clamped & Drying

The next day, un-clamp your boards, and it’s time to drill & sand!

I like my cutting boards to have a handle or a hole to hold onto. It makes it easier to grip and to store (they can be hung up.)

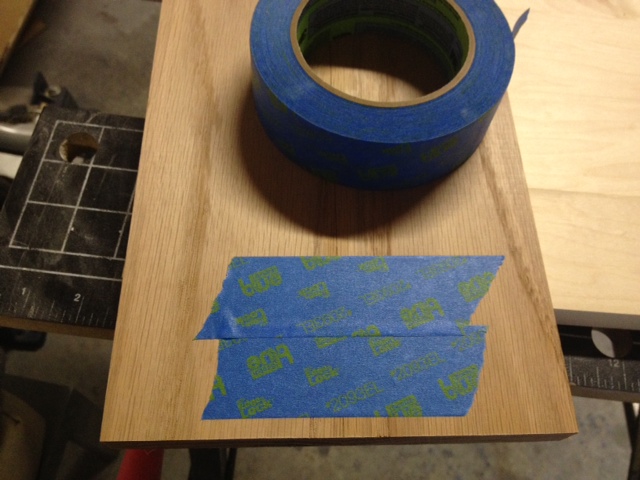
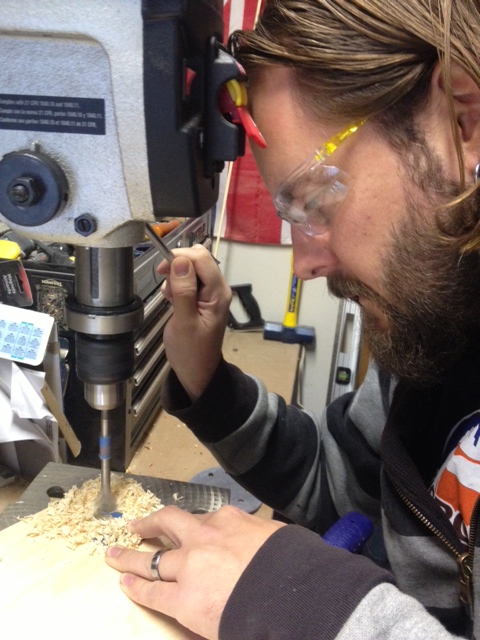
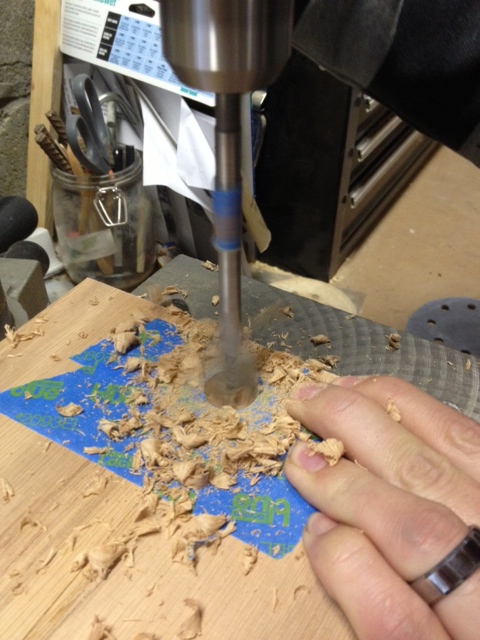
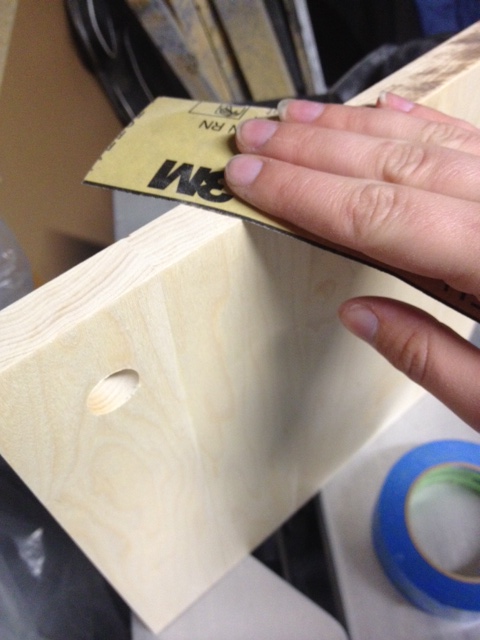
We added a 3/4″ hole to the corner of each board. To do this we taped off both sides of the board using ScotchBlue Painter’s tape. Applying tape before drilling reduces the amount of tear out (when the wood chips and splinters). Applying the tape also makes a great surface to mark your drilling location. We measured in a 1 1/2″ from either side for our holes.

Scotch Blue Painters Tape
ScotchBlue Painter’s Tape
Scotch Blue Painters Tape
ScotchBlue Painter’s Tape

Next up, ready your drill with a 3/4″ bit, and drill your hole. We have a drill press, so we used that for an even more precise hole, but you can use your cordless drill. Just take the time to ensure you’re drilling straight. Place a piece of scrap wood under your cutting board  so you don’t drill into your table! (It also makes the cut cleaner.)

El Granto drilling the holes

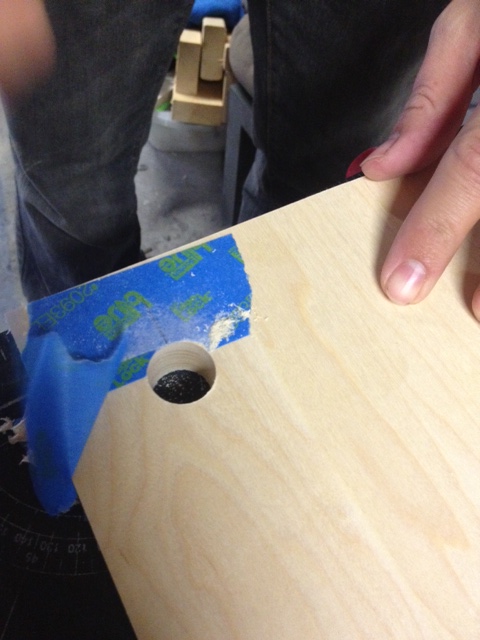
After your holes are drilled, remove the tape and check out your perfect hole!

Perfectly drilled hole

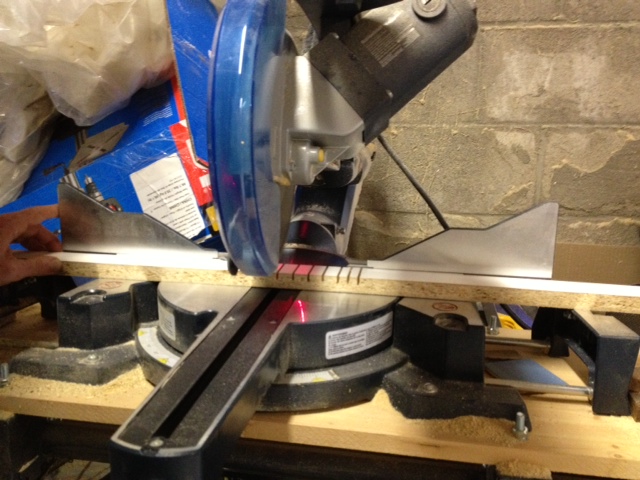
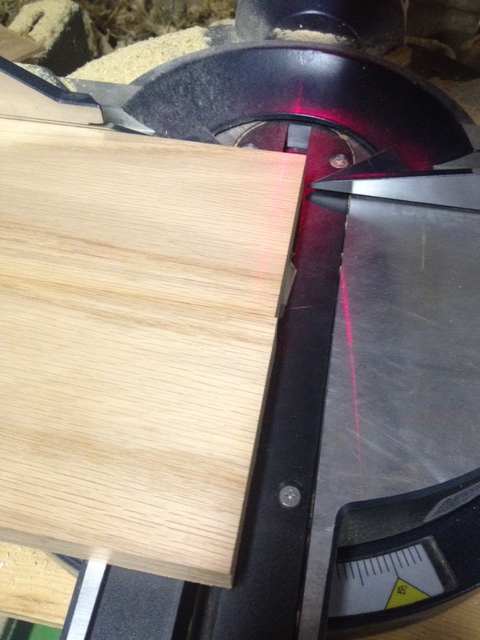
You may notice that the ends of your cutting board are not perfectly straight. You could spend hours trying to sand them, or the easy way is to head over to your sliding miter saw and trim up the ends. A couple quick cuts and your boards are nice and square and true. (If you don’t have a sliding miter saw, you can use your circular saw.)

See how the ends are uneven? No problem, a quick run through the saw will have everything perfect

Now its time to sand. Using a palm sander or an orbital sander will make this process a lot quicker, but you can do it by hand.

Remember to wear a dust mask while sanding. Aint nobody got time for sawdust in the lungs!

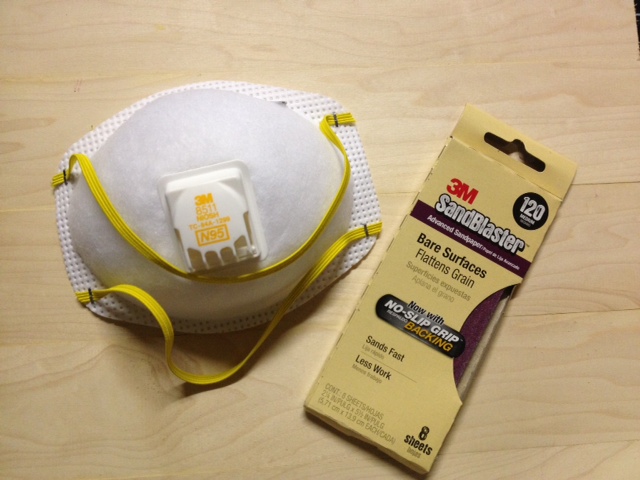
Starting with 80 grit sandpaper, sand off any imperfections, and make sure your board is nice and flat. Once you are happy with how flat everything is, step up to 120 grit and sand the whole piece making everything smooth.

Lastly, take a pass with the 220 grit to make everything perfectly smooth and buttery soft.

Sand the edges by hand, and gently round the corners ever so slightly so that they are not sharp.

Hand sanding the edges

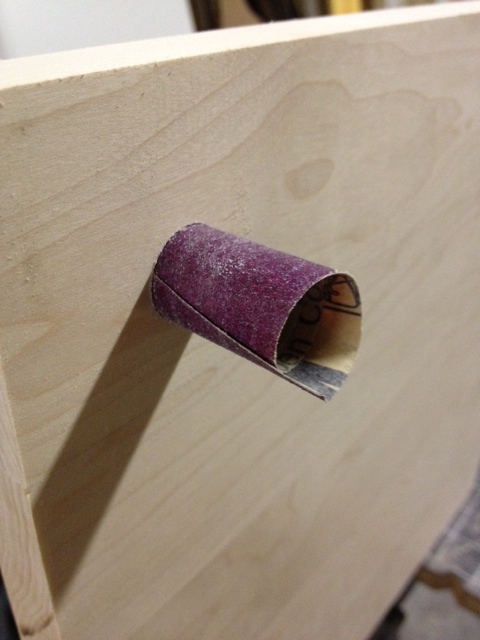
Roll your sandpaper into a tube shape, and insert it into the hole. Rotate it around sanding the inside of the hole.

Roll sandpaper
Roll sandpaper into a tube to sand the hole

Once everything is sanded, wipe your boards off with a dry cloth.

Now the next part may sound counter intuitive, but take a damp cloth and wet your cutting board (don’t saturate it, but get the whole surface damp.) Let it dry, and rub your hand along the wood. You will notice that it feels rough again. The water has raised the grain (better now then after you wash it for the first time!) Take your sandpaper and knock down the grain until it is smooth again, wipe your board again and get ready to oil!

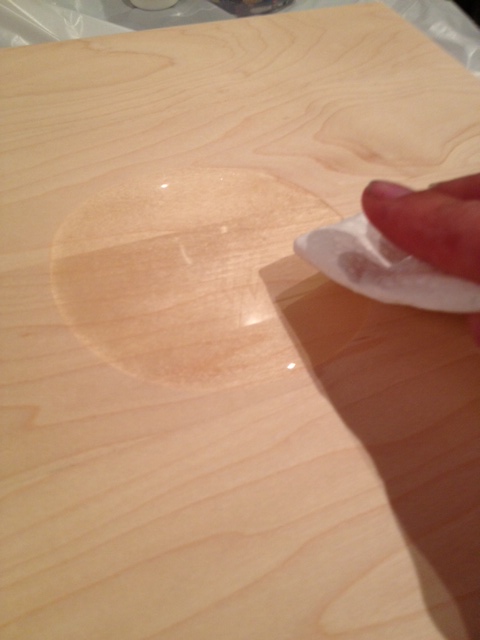
Using a lint free rag or paper towel, apply a generous amount of mineral oil to your cutting boards. Rub it in, and let it sit for an hour or so. Come back and wipe off any excess. Repeat this 2-3 times until you notice your board stops absorbing oil. Let dry.

Applying Mineral Oil

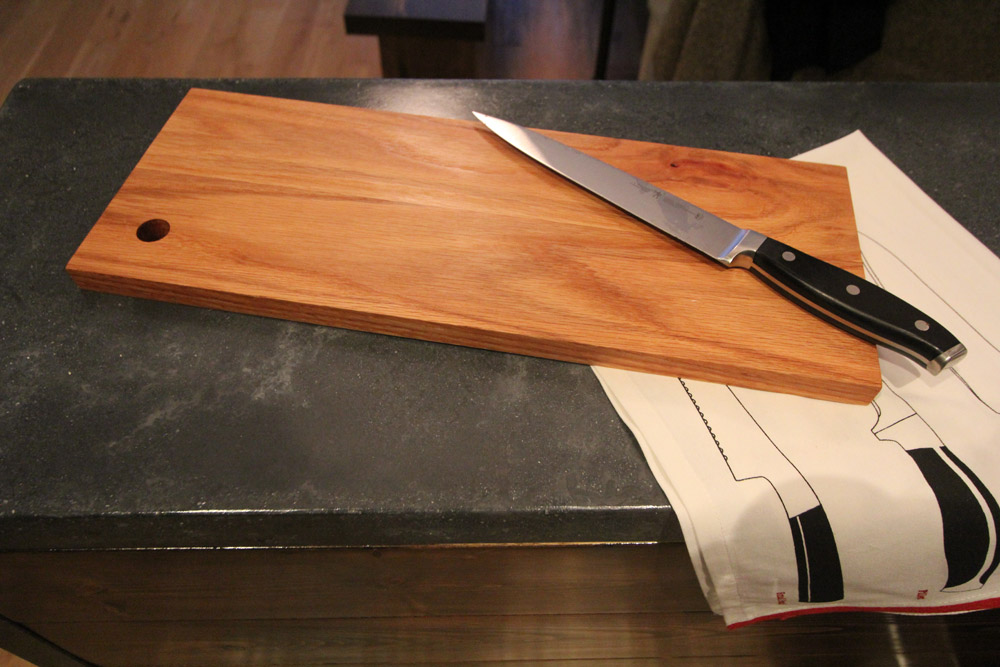
AND YOU’RE DONE! Enjoy your gorgeous new cutting boards!

DIY Cutting Boards
12 1/2″ x 12 1/2″ Maple Cutting Board & 7″ x 19″ Oak Cutting Board
DIY Cutting Boards
Detail of Cutting Board Holes
DIY Cutting Boards
Oak Cutting Board

Make sure to re-oil your boards when you notice them looking a bit dry. Never put boards in a dishwasher, or let them sit in water. You can also use a mixture of 5 parts mineral oil to one part all natural beeswax, heated over low on the stove, then rubbed into your board for added protection.

***UPDATE: Check out our post on Wood Oil/Wax here***

What do you think? Wouldn’t these make perfect holiday gifts?


SOURCE LIST:

Materials & Cut List:
Lumber – See Above
ScotchBlue Painter’s Tape
3M Advanced Abrasives sandpaper
Mineral Oil
Wood Glue

Tools Used:
Miter Saw
Sander
Drill
Clamps

Difficulty Level (on a scale of 1-5):

one out of five

Total Cost: $30

This post is a collaboration with 3M DIY. To keep up-to-date on projects, products and sampling visit 3MDIY.com.

Check out 3M DIY on social media!

3M Pinterest, 3M Facebook, 3M Twitter

Note: I have been compensated by 3M for this post, but all opinions are my own!

Concrete Countertop Forms

We picked out our mix, we demo’d our kitchen, and made new countertop templates. Next up in Project Concrete Countertops is the forms.

If you’re making DIY concrete countertops, one of the most important parts of the process is the forms. Your forms are your molds, and if they’re not done right, your end product won’t look professional and you’ll constantly be bothered by those little bits that are “off” (or just straight up wrong).

Before taking on this project, I researched a LOT about the forms, and got a bit freaked out. Most of the things I’d read about the forms involved making a completely level work surface for the forms, (which would be a problem in our tiny unlevel garage) and a whole lot of pre-drilling, countersinking and screws screws screws. Then comes the stressful part about making your perfect edges with caulking.

Then Jeremy from Buddy Rhodes Concrete Products entered our life, and told me to chill out about the forms. They really weren’t that hard. We should build them with tape instead of screws, and not to worry cause if we mess something up it doesn’t matter, as we can just pull the tape up and do it again. They also don’t have to be level, just flat. Because OUR Buddy Rhodes concrete wouldn’t be poured, and therefore didn’t have to fill the forms completely, and thus no need for level.

As for the edges, Jeremy told us to pick up some Vaseline and Popsicle sticks, and he’d show us how to do the edges the easy way.

So Jeremy took a stressful, detail orientated task and made it a whole lot simpler.

So here’s what you need to make your forms:

Concrete Form Materials
Concrete Form Materials (motorcycle optional)
  • 3/4″ 4×8 melamine sheets (we used 2) $38/each
  • Strips of melamine cut to the desired depth of your countertop. In our case we were building a 1 1/2″ thick countertop, and therefore got our strips cut to 1 1/2″. You CAN do this yourself on a table saw, however it is a hard task to push 4×8 sheets onto a table saw getting perfectly straight strips. It is much easier to have Home Depot or Lowes cut them down with their panel saw. Get more strips cut than you think you’ll need. We got 4. Not enough.
  • Double Sided Duct Tape (*This can be hard to find. In the US check Walmart or Lowes. In Canada we did not find it anywhere, and resorted to double sided Scotch carpet tape (which did work). We ended up using 5 rolls of carpet tape, so make sure you have a bunch on hand. We started with 3 and had to make a trip back to HD.)
  • Off cuts of your 3/4″ thick melamine to use as spacers for your countertop overhang
  • 100% white silicone caulking. The white dries harder than the clear, so go for white. Again get more than you think you need.
  • Caulking gun
  • Disposable rubber gloves
  • Shop Towel (or heavy duty paper towel)
  • Vaseline
  • Popsicle Sticks
  • Miter saw
  • Flat work surface (we used saw horses with 2×4 vertical stretchers between to stop sagging for one work surface, and a bunch of 5 gallon paint buckets for the other.)
Form Supplies: 1 1/2" strips of meamine, double sided tape, silicone caulk
Form Supplies: 1 1/2″ strips of melamine, double sided tape, silicone caulk
Double Sided Tape
Double Sided Tape

HOW TO MAKE CONCRETE COUNTERTOP FORMS

Step One:

Make your flat work surface, ensuring you can get to all sides of the work surface, and you’re not going to trip over anything. Place a 4×8 sheet of melamine on your work surface, ensuring the melamine is in good condition. The surface has to be flat because you’re making your countertops upside-down. If there’s sag your countertops won’t be flat!

Step Two:

FLIP YOUR TEMPLATES UPSIDE DOWN, and transfer any imperative markings such as overlaps and sink holes to the bottom. The flipping your templates upside down is CRITICAL! (Yes, we did learn this one from making a BIG mistake. We got so excited to start building the forms that we forgot to flip them and had to start all over again.)

Place your (upside down) templates onto your melamine and lay them out to maximize your space. (a.k.a. don’t put one big template smack dab in the middle, fit them around like a puzzle so that you’re not wasting space)

Step Three:

Start building the edges of your forms using your template as a guide. Now you don’t have to measure each piece exactly to build your frame, its actually easier if you cut your sides a bit long, and build the sides of your form like this:

Cut your pieces longer then they need to be and have one end overhanging the next. (sorry for my terrible drawing, I really did go art school...)
Cut your pieces longer then they need to be and have one end overhanging the next. (sorry for my terrible drawing, I really did go art school…)

Follow your templates, and where its indicated to add an overhang of 3/4″ inch, place a few offcuts of your melamine between the template edge and your melamine side to create the perfect spacing. Once you have everything laid out, attach the form sides to the melamine sheet base using the double sided tape. For added strength, use a self tapping screw (such as a pocket hole screw) to screw through the corners of your form, attaching the side pieces together. No need to screw into your 4×8 melamine sheet base though, the double sided tape will hold everything good enough. Also if you don’t screw in to your base sheet you can reuse it later on for another project!

Jeremy applying double sided tape to one of the form sides.

Step Four:

If you have any really wavy/crooked walls, and you needed to make a curved template (like we did for the coffee bar). Now it is time to make your curved form. To make the curve, we made kerf cuts on the back of one of our melamine strips. We first applied the double sided tape to the bottom of the piece, then set our miter saw to only cut through half the material, then kerfed all along where the curve needed to be.

Making the kerf cuts
Testing the kerf cut piece to see if it would curve to our template

Once it was kerfed, we checked to see if it would curve to the form, then stuck it down, and added a few screws to keep it in place. A pretty big feat of engineering.

Curving the back piece of the coffee bar mold in place.
Curving the back piece of the coffee bar mold in place to form to our template (the coffee bar wall is very crooked, and has a hump right in the middle)
Jeremy adding a few screws to the coffee bar form, and a sneak peek of our special form for the peninsula in the background (more on that later this week!)
Jeremy adding a few screws to the coffee bar form, and a sneak peek of our special form for the peninsula.

Step Five:

Make any special forms. This will include sink cutouts, and in our case a WATERFALL. Yep that’s right, my dream of a waterfall countertop was happening! Whats a waterfall counter you ask? It’s when the countertop appears to drop off the side of a counter to the floor. Like this:

Waterfall Countertop - Apartment Therapy
Waterfall Countertop – Apartment Therapy

I really wanted the countertop on the peninsula to have a waterfall, and Jeremy said it was not only possible, but that we could do it in ONE PIECE. Yeah. Mind blown, right? As we are using the Buddy Rhodes Craftsman Mix in his traditional hand formed technique, we could literally make the concrete go VERTICAL! PSHEEEEEWWW! (That’s the sound of your mind blowing.)

So it was time to make our waterfall mold, and that meant making our upside down form go vertical. We created the form the same way we did the other forms, but instead of a short side we ran another piece of melamine vertical, and then gave it sides. We supported the back with extra pieces of melamine attached with pocket holes (so that it would support the weight of the wet vertical concrete).

Waterfall Countertop Form
Support pieces on the back of the waterfall countertop form

Step Six:

Once all your forms are built, its time to caulk the edges of your form to make it all purdy for your exposed corners. *Note that this step isn’t super essential when making hand pressed countertops using the Buddy Rhodes Craftsman Mix. Edges can easily be rounded and smoothed in the finishing steps, but it doesn’t hurt to have a nice finished edge right off the bat.

If you have ever used silicone caulking, you will know that its a sticky mess, and doesn’t clean up half as nice as latex caulk. I happen to not like silicone caulk much at all. Its unforgiving and finikity. So when Jeremy told us he had a fool proof way to caulk the edges I was in 100%.

Jeremy’s fool proof way to get a perfect round edge:

Lay down a very thin layer of Vaseline close to (but not in) your corners and seams. If you have mineral spirits (which we don’t have in Canada) thin your Vaseline down a bit to make it even easier to apply. Cover from right near the seams up the sides and on the base of your form about 1″ away from the seams. You only need a thin film, and ensure you wipe off any excess.

El Granto Applying the Vaseline

Lay down a bead of white silicone caulking into the seams.

Take a Popsicle stick and push it into the seam and draw it along the seam to make a nice rounded corner. Ignore the excess caulking that is being pushed out to the sides. (no really, don’t even look at it, just let it be.)

Using a Popsicle stick to make a nice rounded corner

Wipe off your Popsicle stick frequently and don’t let excess caulk build up. It is important to push your Popsicle stick against both sides of the form and get a nice clean rounded corner. Now walk away and let it dry. Really. Leave all that gooped over the sides caulking and go get a coffee. Let it dry (ideally overnight) but a couple hours will do.

Then just pull off the excess caulking to reveal a perfect edge. (it comes off so easily because of the Vaseline!)

Pull off excess (dried) caulking to reveal the perfect edge

Awesome, right?!

Step Seven:

Pat yourself on the back, cause now you have some awesome  Concrete Countertop Forms!

Finished forms (coffee bar form on right, and peninsula form on right)
Finished forms (coffee bar form on right, and peninsula form on left)
Finished forms (L shaped form for main kitchen, and smaller form for between sink and stove)

The forms are built, everything is ready to go! Next up we POUR!

This project is part of Project Concrete Countertops. Make sure you check out the rest of the series starting with Concrete Countertops – The Mix, The Templates, The Forms, The Pour, Fill & Sand,The Reveal and Finishing Touches.

Buddy Rhodes

*We were gifted some (awesome) Buddy Rhodes Concrete Products, but all opinions are our own!

Concrete Countertop Templates

One of the most important parts of making a new concrete kitchen countertop is the templates. When starting to tackle our DIY Concrete Countertop project, we thought we would just measure our space, and make the forms from our measurements. Our kitchen looked square and true, but once the old counters were out we realized pretty quick that there was nothing square about our kitchen. Thats where templates come in. They are quick and easy to make, and will ensure your counters fit perfectly.

Your templates will recreate your cabinets and wall shape exactly, and ensure your countertops fit your space. It also makes sure your sink, faucet cut outs and anything else special is done in exactly the right spots. How terrible would it be to completely make your counters and realize your faucet hole is 2″ off. Ouch.

So here’s what you need to make your countertop templates:

  • 1/8″ luan or other easily cuttable material cut into straight strips about 2″ wide. Get your hardware store to cut the strips for you on their panel saw.  (We had some 1/4″ mdf strips left over from the guest room board & batten, so we used that. Although it wasn’t ideal, as we had to make a trip to the garage for all our cuts.)
  • Glue gun & glue sticks
  • Sharpie
  • Measuring tape
  • Bare cabinets free of counters and any imperfections. Ensure your cabinets are secured to the wall and level. Once you make the templates, you cant change your cabinets at all, or your countertops may not fit right.
  • Sink & any integral items to the counters

We removed our old countertops & sink, and ensured everything was ready for the templates. We had purchased our new sink, and had it as well as its installation instructions ready.

Cabinets ready for templating

To start the templates lay a long piece of  your template material along the backs of the cabinets. Then lay strips along the front of the cabinets cutting them to exactly the same length as your cabinet.

Laying out the first pieces of the template and marking how long they need to be

Join the front and the back strips with shorter strips cut to the depth of your cabinet. Make your way around your counters outlining them with your template strips. Once you have everything laid out, go back and hot glue it all together.

Label all pieces with “front”, “back” and descriptions such where all your appliances are. Mark any areas that will require an overhang. The standard overhang is 3/4″ from the front of your cabinet doors. The back of your counters and areas where it hits walls or appliances will not need an overhang.

Template for small portion of the counter between the sink and stove

Read the installation instructions for your faucet & sink, and mark any special requirements on the template. Your sink may come with a template of its own, if so attach that to your template in the proper place.

Dry fit your sink & faucet in place around the templates (and make sure everything is going to fit!)

Dry Fitting our sink in place to build the templates around it

Our Ikea Domsjo sink required two notches on the front of our counters to fit the apron front sink. We marked the areas for the notch.

Note the markings for the sink edge and where the notch needs to go
Main kitchen templates

For the coffee bar our counter is 7 feet long and the wall has quite a bow right in the middle. This caused problems for us when installing the coffee bar (it’s actually spaced out from the wall about 1/2″) and we knew a straight countertop wouldn’t be perfect.

To template for the bow in the wall, we cut a bunch of short pieces and laid them against the wall where the curve was. This outlined the curve for us perfectly, and we were able to recreate the bow within the form.

Coffee Bar template. Note all the small pieces forming to the curve in the wall

The entire template process only took us about a half hour, and produced perfect templates to make our forms with. A simple step, but definitely worth the effort for a professional result! You can also use this form of template making for your laminate or butcherblock countertops.

Next up we will be building the forms, and getting one step closer to pouring our concrete!

This project is part of Project Concrete Countertops. Make sure you check out the rest of the series starting with Concrete Countertops – The Mix, The Templates, The Forms, The Pour, Fill & Sand,The Reveal and Finishing Touches.

Buddy Rhodes

*We were gifted some (awesome) Buddy Rhodes Concrete Products, but all opinions are our own!

Concrete Countertops – The Mix

When planning for concrete countertops, the biggest thing we needed to decide on was the concrete mix.

Not all mixes are created equal, and for a countertop you need a high strength mix. Why? So your countertop doesn’t crack and fall to pieces. Simple enough.

Will the big box store mixes work? Maybe. But it’s a crap shoot. There are a LOT of variables that could send you into a tough place. First up, the big box store mixes aren’t meant for countertops (well except for the Quikrete countertop mix but more on that later).

A few weeks ago I made a test piece knowing that I wasn’t using the right mix, but I just wanted to TRY, see if my mold would work, see if the whole scenario was even plausible. Turns out it is, but I had a lot of room to improve.

Concrete cuttingboard
Concrete Test

So my test piece came out full of holes, and with a lot of aggregate visible on the sides, a blotchy colour, gouges from my caulking job it and it was HEAVY. It turns out that little test piece was a behemoth. Not only did it change my mind about doing 2″ thick surfaces (gonna stick with 1 1/2″) but it also had me looking at alternatives to traditional concrete mixes.

So I started calling concrete countertop mix manufacturers, and checking my local hardware stores. Not only was there only one mix option at the big box stores, but there were no sealing and finishing products to complete the project, nor where there any direction on how best to build the molds, pour, sand & finish. I am not really one for experimenting on 2000 lbs of concrete. I want a product that I can do myself, have confidence in, and get professional results.

That’s when fate interjected, and I received a comment on my countertop test project from Buddy Rhodes Concrete Products suggesting I check out their product line. After a quick look around their site, and a few YouTube videos later, I had to know more.

Buddy Rhodes has flipped concrete on it’s head. It’s hard to explain, but his product & hand pressed technique isn’t poured like traditional concrete. It’s a thicker product that’s more the consistency of clay, that you don’t pour into a mold, you pick up handfuls of it, and pack it into the mold. Really. Then you don’t vibrate it, or worry about bubbles, and screeding, or even filling the entire mold to the brim.

It’s reinforced not with clunky (and heavy) re-bar or chicken wire, but with glass fibers. It doesn’t require a concrete mixer or 45 of your closest friends to pour, in fact you could do it in a couple weekends with a friend or two. But get this, its JUST as strong (if not stronger) and it’s way easier (and lighter). You can replicate finishes, and get professional results, every single time. Its incredibly DIY friendly and versatile.

It’s base is a bone white color that looks amazing on its own, or you can choose one of their 15 colors.

Buddy Rhodes Craftsman Countertop Mix
Buddy Rhodes Craftsman Counter Mix
Buddy Rhodes Colors
Buddy Rhodes Colors

They made concrete doable, and replicable, and almost idiot proof. Not only that, but their process makes concrete able to go vertical! Their product can be worked up a vertical surface. So my dream for a waterfall counter wasn’t going to be a feat of engineering and a two piece project. I could build a waterfall countertop in ONE PIECE. Mind blown.

I emailed the person at Buddy Rhodes who had commented on my post, and said I needed to know more! Where can I get this, will it work for my project?! They may have been shocked at my exuberance, or just too nice to say no to a crazy lady, but one of their artisan concrete experts Jeremy emailed me back in a few short hours asking about my project. A few emails later, and we were having a video conference call where Jeremy was convincing me we could pour my whole kitchen in four pieces when I had planned on doing it in 6, and not only that, but anything else I could dream up was essentially plausible.

Jeremy talked us through how their product differs from the big box bagged mix which was my only other option at this point. He pointed out the analogy of baking. You want to bake some bread. Do you just start out throwing things into a bowl and hope for the best, or do you use a tried and true recipe and high quality ingredients?

First off let’s get to know concrete a little more. There’s essentially two parts. Aggregate and cement. Think of a slab of concrete as a slice of raisin bread (gluten free of course). The cement is the bread and the aggregate is the raisins. Together they make toasted buttery goodness… Wait. I think I might be hungry… The bag mixes are short on cement. So they’re like a fruitcake. Lots of aggregate and not a lot holding it together. They are short on cement because it is the most expensive component it is also the reason for the strengths that concrete exhibits. But, it is also the glue that holds everything together, our mix is like proper raisin bread. Lots of cement and not too much aggregate.

The prebagged concrete countertop mix available at your local hardware store is essentially the same mix used in your backyard to set a post, mixed with more cement and less aggregate. Will it make you a concrete countertop? Probably. Will it be the perfect counter you were dreaming of? Umm..maybe. There are a lot of variables that could set things in a tail spin. It may be concrete, but it may not be the best option, especially for a DIY’er. Other possible pitfalls are that you can only make solid surfaces, its a very heavy and unwieldy product, and it has a long cure time. If poured or cured improperly it can crack, be brittle,  has a limited color range, and is a mess to pour. It will also require some heavy duty forms, a lot of heavy mixing,  some favors called into your buddies, and a lot of headache and hoping and you still haven’t figured out how to seal or protect it either.

I was a bit freaked out, as I’m sure you might be too right about now. Why would I risk a bunch of cash in materials, truck rentals, concrete mixer rentals and forms to possibly have a very large heap of junk that I would actually need to pay someone to take away if this didn’t go right?

So big box mix was out of the running, and Buddy Rhodes mix was the clear best choice.

Jeremy worked with us suggesting the best technique for us to use, how to build our molds, and make it as simple as possible to get a kick ass product. We were over the moon excited, and a lot more confident. I think some of my excitement rubbed off on Jeremy, as he surprised us with saying he might come to Canada to see us do our project. (That and for the maple syrup and poutine of course.)

Now, I assure you I warned this Southerner that fall in Canada isn’t quite the paradise he’s used to. But he booked a ticket, and gave us three weeks to get all our prep done, so he could see us “pour” when he got here. Talk about a deadline. But we did not want to fail our new concrete hero!

So we started measuring, and prepping, and calculating everything we needed and started checking things off our to-do list.

Next up, I will give you a detailed list of absolutely everything you need to buy, rent, procure, beg or borrow to make your project go (relatively) smoothly, and get a great result!

This project is part of Project Concrete Countertops. Make sure you check out the rest of the series starting with Concrete Countertops – The Mix, The Templates, The Forms, The Pour, Fill & Sand,The Reveal and Finishing Touches.

Buddy Rhodes

*We were gifted some (awesome) Buddy Rhodes Concrete Products, but all opinions are our own!

Project Concrete Countertops

I had epic plans for a kitchen makeover this year. You can see my wish list here, and my “timeline” here. HA HA! Why do I make lists?

Well we  have been getting some things done in the kitchen/dining room. The coffee bar got drawers, we made a new dining table and bench, bought a sink, and I have finally made some progress in my plans for a DIY concrete countertops.

Kitchen Pre-Move In
Kitchen Pre-Move In

As you can see from the photo above we have laminate counters. They look okay in the pic right? White-ish and nondescript? Yeah except they’re this flecked beige design (bleh), and during the move & renos they got two bashes in them, as well as the laminate started to peel up after I ran the self cleaning cycle on my oven. There’s also a seam that I’m not the biggest fan of.

Countertop
Bashed corner of our peninsula countertop
Dent in corner of counter as well as the big evil seam
Dent in corner of counter as well as the seam

Awesome, right?

So DIY  concrete countertops are high on my want list. Now you may also know that I am a planner. I’m not just gonna head to the hardware store, fill up a rental van with bags of concrete and start making things. I have to research, and plan. Cause if you don’t, projects go astray, money gets wasted, things take way longer than they should, and you may end up with some really heavy junk.

So it was time to research, plan and make some lists.


Project Concrete Countertops TO DO LIST:

We  have started to prep and calculate, and get our proverbial sh$t together, and THIS WEEKEND is the big pour. I am excited and scared all at the same time. My kitchen is about to get a whole lot less cracked and busted, and a whole lot more grown up!

Don’t worry, we will do the whole process from start to finish with you including a planning guide, all the prep and template making, the mold fabrication, mixing and “pouring”, finishing, installing and sealing. I know its a complex project, so I think we’ll break out some video to help you re-create your own project at home.

In the meantime, make sure to check in on our progress on our Facebook and my Instagram, we will be posting some status update shots and outtakes until we have enough time to post everything here in detail.

A Step Up

I’m not a short girl. My Danish heritage has afforded a rather large frame of 5’10” however I am still completely unable to reach the top cabinet in our kitchen without standing on something. We have tall ceilings, and 39″ upper cabinets and those things are tall! For two years I have dragged over a kitchen chair, or straight up hopped up on the countertop to reach that top shelf.

I know what you’re thinking, why on earth have I not bought a kitchen step stool yet? You know those things MEANT for standing on to reach a cupboard?! Well, I just never thought about it when I was someplace that sold step stools.

That was until last week, when I was stuck at the Ikea kichen lineup, and noticed their basic Bekvam step stools situated behind the counter. For a whopping $16.99 I decided then and there that I would cure my inability to reach the top shelf! I wrote down the isle and bin number and when I (finally) reached the warehouse I added the stool to my cart, and was on my way to being able to reach whatever I wanted, whenever I wanted it. (It’s the small things people.)

I brought home my new prize, named him Sultan* and assembled it.

Stool
Sultan the Stool

Hrm, its okay, but its a bit boring right?

So I got out the cabinet paint, and gave Sultan a couple coats of Thai Teal, then a couple coats of poly.

Teal Sultan
Teal Sultan

Isn’t he more handsome now?

Stool & Cabinet
Stool & Cabinet

He matches the cabinet backs, so he fits right in. For now I have made beside the coffee bar his new home, where he can quickly be accessed to reach a cookbook or a casserole dish.

Completed Stool
Completed Stool

Not bad for a $17 stool and a bit of sample paint, eh?

* For those of you who don’t get the Sultan reference, clearly you didn’t watch enough Beauty and the Beast in your childhood. Sultan is the pet pooch who was turned into a foot stool. Now I am off to watch Beauty and the Beast, and maybe a bit of Aladdin…

Concrete Countertop Test Run

I really want to build concrete countertops for my kitchen. My laminate counters suck, and the coffee bar is curremtly covered in a $20 wood shelf from Home Depot.

I had a bag of concrete hanging around the garage (don’t you?!) and decided it was high time to put all my researching to the test and pour some concrete. I decided to make a “cutting board” as my test run, and grabbed some spare melamine (I’m not a hoarder, I just have stuff in the garage…collecting dust…that might some day get used.) SO the melamine… I had El Granto rip down a few pieces into 2″ strips and then built a little form with some spare screws.

Building the mold (and making sure it's square
Building the mold (and making sure it’s square)

Next up, sealing the cracks in the form with silicone caulking. I conveniently had a new tube of silicone caulking. I inconveniently could not find my caulk gun. Cause it’s an easy thing to lose. You know, giant red tube thingy that looks like a weapon. Yep, missing. Hardware store? Closed. Dollar store? I may be able to find paint brushes, and tie downs, but a caulk gun was not to be had at Dollarama. My neighbours had been outside working on project as well, and we had passed an air compressor over the fence earlier in the day (true story) so I figured I’d ask if maybe they had one. BINGO! Caulk gun. Except theirs was contractor grade and made for big tubes of caulking, and my wee bitty tube of silicone was too small. So now what? I shoved a piece of wood into the bottom of the caulking tube and hoped for the best.

I started caulking, and I got silicone EVERYWHERE. All over me and the mold.

DIY TIP. Tape your mold or you’ll get silicone everywhere. After about 10 minutes I was covered and sticky and I had done the WORST job of caulking anything in my life. I threw in the towel (this was a test after all!) and left it to dry.

Mold Made (with crappy silicone job)
Mold Made (before crappy silicone job)

Next day we moved the mold outside on worktable covered in a plastic drop cloth, and I (with my girly muscles, a shovel and a piece of wood) mixed up a half bag of concrete. In hindsight, it could have used a bit more water, and I could have used a trowel (rather than a piece of wood) to get it well into the mold.

Pour area prepped. Drop cloth & screeding board ready
Filling the mold
Filling the mold. Don’t you just love my work outfit? Paint covered work shirt and track pants. I really should buy an attractive set of work clothes.

I then (smartly) took the sandpaper off my palm sander, and covered it in a bag, and vibrated the crap out of the mold.

sander
Sander covered in a bag
Vibrating the mold
Vibrating the mold

Then we screeded the top (which also didn’t go so well, as it started pulling gravel out of the mold, but again I think my mix was too thick.)

Screeding the mold
Screeding the mold

Then I let it dry, covered with plastic for a day. I didn’t put a wire mesh in it, cause A.) it was a test and B.) I didn’t have any in my garage…

I un-molded, and voila.

Concrete cuttingboard
Concrete just after de-molding
Concrete cuttingboard
It worked!

Things I learned:

  • Concrete is heavy.
  • 2″ is too thick for our countertop. It just looked too big (that’s what she said). In all seriousness, 1 1/2″ is a much more reasonable size, 2″ was just overkill. Like a Hummer H2.
  • My mix needed a bit more water.
  • Counter sink the screws! Or else you can screed it very well.
  • I will not mix up all the countertops in a bucket. Concrete mixer rental is imperative.
  • I needed a better concrete mix than the $4 bag of all purpose. It was too rocky and rough. The top of my cutting board was great, but the sides showed too much aggregate.

Next up, I will be filling the holes, adding some feet to my “cutting board” test driving some concrete sealers and waxes, and then putting it to the test in my kitchen. Wish me luck!

Have you ever played with concrete? Any tips to pass on?