Our entryway, dining room and kitchen are all one great big open concept room. As soon as you walk in the front door you can see straight to the back of my kitchen. Its nice because the storefront window allows in a lot of natural light, and the open concept high ceiling space makes everything look a lot bigger than it actually is. Since moving into the house we have done very little to the main floor. The main reason being that anything we did would either cost a lot, or impact the whole main floor (i.e. we have one 60 foot long wall that runs from the front door to the back door, going through every room on the main floor except the powder room. So you cant just paint the kitchen or the dining room, you literally are painting the whole first floor.)
We have big plans for the space, we want to create a coffee bar in the dining room, replace the sink, faucet and countertop in the kitchen (and backsplash if I get my way). We just made a new dining table and bench. I have some art projects in the design stage, and a lot of projects for the livingroom.
In the interim I wanted to get the dining room ready for my holiday guests and for Christmas dinner. There is a chimney wall that juts out in the kitchen (see it behind the table in this shot).
See the small wall that juts out right behind the middle of the table?
I decided to give it a bit of a focal point, and paint it with black chalkboard paint. That way I can feature a menu board for dinner parties etc.
To start out I sanded down the wall to remove any imperfections and to make it as smooth as possible. Then I coated in one coat of primer.
PrimingWall Primed
I sanded the primer than applied one coat of chalkboard paint. I started to get a bit worried at this point as it didn’t cover well at all…
One coat of PaintDetail shot of one coat of the chalkboard paint
After a second coat it was started to look much better, but it still needed at least one more coat. I sanded at this point to try to make it as smooth as possible (chalkboards work best when they super smooth!)
So after sanding and a third coat of chalkboard paint I was starting to get the result I was looking for.
Several coats of chalkboard paint
After this I gave it one more sand and what I thought would be the final (4th) coat. However after it dried it was even rougher than before. Eep! So once again I sanded and sanded and sanded some more then I painted a coat sideways instead of up and down. After that, I sanded and painted two more coats. Yes that’s right, if you’ve been counting you’ll know that we’re up to seven coats of paint. At this point I still wasn’t convinced it was smooth enough, but gave up because I had had enough of this project…and i deemed it “good enough”. Having never worked with chalkboard paint before I am not sure if I was just being anal retentive, or if you can actually get a perfectly smooth effect on a wall.
Once it had dried for three days, we covered the whole wall in a coat of chalk (rub the side of a piece of chalk over the whole wall.) Consider this like seasoning a cast iron pan. Then rub off with a dry cloth, and you can use your chalkboard wall. Just don’t wipe it with a wet cloth for at least a week.
Chalk Rubbed on WallDetail of ChalkChalkboard Done!
Check back tomorrow to see how I designed my Holiday Chalkboard Menu!
***UPDATE*** Here’s the Menu
Chalkboard Menu Done
SOURCE LIST:
Materials:
Rust-oleum Chalkboard Paint in Black – Canadian Tire
CIL Primer – Home Depot
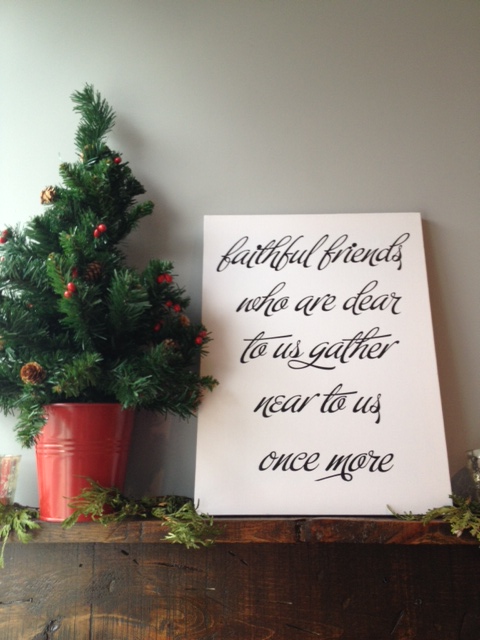
I have taken to decorating the little shelf over our front hall coat rack as a would-be mantle. It got decorated for Halloween, Thanksgiving and now its getting a little Christmas cheer. My local dollar store sells 12×16 stretched artist canvases for the low price of $2. They also sell $1 acrylic paint. I figured this was an excellent excuse to make some inexpensive holiday art.
The Coat Rack Mantle without any decoration
While singing Christmas carols at my desk one day (yep I’m one of those holiday spirit kinda people) I decided that my art project should revolve around Christmas carols. I promptly went home and laid down some type in Illustrator of the lyrics “Faithful friends who are dear to us, gather near to us once more”. Hopefully our visiting friends and family will feel welcome this holiday season!
Type laid out in Adobe Illustrator
After I was happy with my type layout and font selection, I cut out the type using my Silhouette SD onto adhesive vinyl. If you don’t have a silhouette, you can pick up alphabet stickers from craft stores, or you can cut your own out of adhesive material. After my stickers were cut, I removed the excess vinyl (called weeding) and transferred my stickers using transfer paper (it’s sticky paper which pulls off the vinyl from their backing, then you place it where you want your stickers and apply using a credit card.)
Half the words adhered to the canvas
After my stickers were adhered I took a look and loved it just the way it was! I know, lazy me! If you want to do it right, paint around the edges of the stickers with some white acrylic paint. You do this so that if any of the paint bleeds under the stickers, its white like the canvas so it wont be visible. After it dries, coat the whole canvas in 2 coats of black, red or green paint.
After the paint dries, remove your stickers, and reveal the white canvas below. Or be lazy like me and just put stickers on canvas, then go drink some rum laced eggnog instead.
Where was I? Eggnog? Oops. Right. Project…
Then I placed it up on my mini mantle with a small artificial tree, candles, fresh greenery and a ceramic pear.
SOURCE LIST:
Materials:
12×16 Art Canvas
Adhesive Vinyl White & Black Acrylic Paint Eggnog for extra holiday cheer
I don’t typically think of myself as an old man. There’s only a few times that I do. One was just the other day when I told a kid (twenty-something) to get-the-f off my garage roof (He was fetching a football. It’s a silly expletive filled story). After doing so I felt so old I had to do something to calm my nerves. Some old man stuff. “Why not some wood working” I thought.
I have a pintrest board (yeah I know I know. Not typically a place for guys like me. It doesn’t see a lot of use.) that is absolutely FULL of things I want to make. I won’t link to it because I think a lot of it will end up being posted here at some point. Probably even before Christmas as I really enjoy making gifts for family and friends. It’s cheaper and it really shows you care when you can make something for someone that’s genuinely cool.
So my first adventure in woodworking was to create something functional and not too hard to make. I checked out my pin board and found the perfect item. The Nail Head Bottle Opener.
Wood… I need some nice wood… all I have is pine. Hmmm. The next door neighbors have LOTS of wood! And nice wood! Ipê Iron Wood.
I ended up securing a piece of wood from my neighbor Dietrich (on his birthday. Happy birthday! Can you give me a gift instead?!).
Enough story time. Let’s get to it.
I started by drawing the outline for the bottle opener on a piece of card paper that I had laying around in the garage. I modeled it somewhat off of a wire brush that I liked the handle shape of and modernized it a tad to fit with the feeling I wanted from the piece.
I then traced the outline on to a small piece of wood that I cut down to size with the miter saw and cut the general shape out with a jigsaw being careful to cut just outside the lines so that I had room to sand down in to the final shape I wanted.
Once the shape was cut it was time to sand. I started with a rough 60 grit paper on a palm sander and got the exact shape I wanted. This was also when I found out that our jigsaw doesn’t quite cut on a 90°. Darn. Sand away the angle. Once that was done I switched to a 100, 150 then 220 grit paper and sanded by hand. To get the curve near the top to feel just right I took the sand paper and wrapped it around some spare pipe so that I would get a consistent groove without too much hassle. Sand sand sand sand sand. Now sand more. Sand till your fingers are raw and the wood is buttery smooth.
Notice the lack of a 90° cut
I took the finished wood inside to the warm and applied and buffed 5 coats of finishing wax. Man did it pop after the wax!
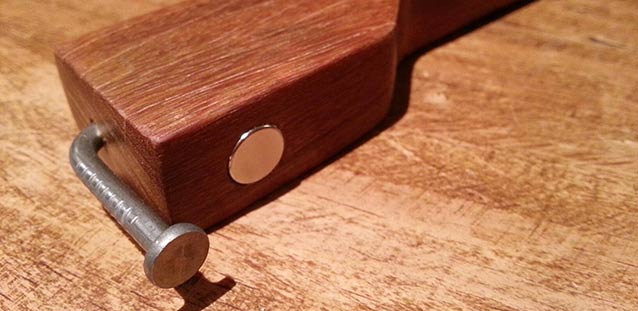
With the wood all sanded and shiny I then set to bending nails. Kristen picked me up some special nails for this project specifically. I wanted nails with a large flat head that still looked nice. Luckily the rep for the nail company was visiting HD that day and was able to show her to the absolute perfect ones. I bent 4 nails in the bench vice using a hammer and a rag wrapped around the bottom of the nail before I got the result I wanted.
I had a magnet laying around that I wanted to put in to the opener to catch the bottle cap so I carefully drilled a hole that was purposely a little too small for the magnet to fit in to then I hammered it in to place using more rags to protect the piece from getting marred by the hammer. The magnet will stay in place strictly through friction.
I then clamped the opener in the vice (more rag protection) and drilled a hole in the top just big enough for the nail to slip in to easily. I didn’t want to force the nail in by just driving it in as it could split the wood OR mar the nail leaving the whole piece useless. I applied a generous amount of wood glue to the nail and slipped it in place cleaning up any that splooged out with a wet cloth.
Applied and buffed one more coat of wax and I’m ready to pop bottles!
Easy as 1…2…3!!!
Making this bottle opener was actually quite simple. I will however drill the holes for the nail and magnet BEFORE waxing next time as drilling requires more sanding.
Working with a strange wood was a great learning experience. Hard woods take longer to cut and work with and you have to be careful of burning or scorching the wood. During the drilling of the nail hole I was glad I don’t have a smoke detector in the garage (on the to do list for sure) but there was a lot of smoke.
SOURCE LIST:
Materials:
Ipê Iron Wood – Dietrich the friendly neighbor
3″ Common Framing Nails – Bright Finish – Home Depot – $4.00
Pretty magnet – Repurposed (I have since picked more up at Lee Valley – 3/8″ diameter 1/10″ thickness – $0.46 each)
Minwax Paste Finishing Wax – Home Depot – $9.99
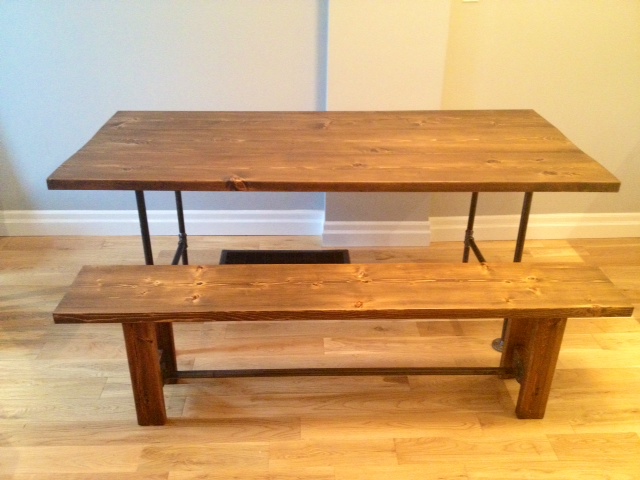
Left over from our table offcuts, was a 2×12 piece of wood just about 6′ long. El Granto decided to surprise me and make a matching bench to go along with our table. The bench will add a lot more seating (you can squeeze a truck load of people around a bench when necessary.) It also reduces the amount of chairs we have to have, and a bench can be tucked close into the table and not take up a ton of room.
Here’s the shopping and cut list for what you need to make a 68″ long, 11 1/2″ wide and 18″ high wood & pipe bench.
Shopping List
(leftover 2x12x6′ from the table project)
2 – Premium 2×4’s
2 – 3/4″ Flanges
1 – 48″ precut piece of 3/4″ black pipe
8 – 1″ wood screws
Cast Iron Square Nails (Optional)
Pipe Cut List
You don’t need any custom cut pipe. Use your 48″ precut piece as is. Woot!
Assembly
Pre-sand your pieces of 2×4 (these will be the bench legs, and once assembled are a bit more of a pain in the ass to sand.) While you’re at it, sand the bench top as well. Start at a 60 grit or so, then work your way up to 220.
Assemble bench legs using your attachment method of choice. We decided to go with the Kreg Jig pocket hole system, but you can easily use dowels & glue. El Granto got a bit carried away in the assembly process, and forgot to take any pics until it was all done (oops!).
Here’s a shot of one set of legs, where El Granto is adding some decorative square nails. You can see how we used the pocket holes to attach the top support piece, we also used pocket holes below the bottom vertical support piece. The bottom support piece is vertical because we are going to attach our pipe cross beam there.
El Granto adding some decorative square nails to one set of bench legsSquare nails are awesome!
After the legs are assembled, attach the flange to one set of the legs, then attach the pipe and the second flange and screw the other flange to the other set of legs.
Attaching the legs to the pipe (excuse the constant garage clutter/sawdust)
Flip the bench top upside down, and place your upside down legs on top, and screw legs into bench top using 2 1/2″ screws.
Attaching bench legs (and yes that is a half naked woman posing with a motorcycle on the wall. The garage is El Granto’s domain, and wouldn’t be complete without a calendar full of bikini clad women posing with motorcycles.) And of course another photo bomb by the dog.Bench Assembled
After the legs were attached, we took the bench inside to start the finishing process. We stained and oiled it to match the table.
The BenchBench leg detaillegs legs legsTable & benchTable & Bench
We now really need some new chairs. In the interim, I think I will give the ones I have a coat of paint. I am leaning towards turquoise or red. Eventually I would really love some Tolix chairs or some Emeco navy chairs. The dining room also desperately needs some high impact art, as does the area over my kitchen cupboards.
SOURCE LIST:
Materials:
2 – Premium 2×4’s – Home Depot
1 – 3/4″x4′ black pipe – Home Depot
2 – 3/4″ Floor Flange – Home Depot
2×12 spruce – Rona
1″ wood screws – Home Depot
Varathane stain in Chocolate – Home Depot
Varathane wood conditioner – Home Depot
Pure Tung Oil – Lee Valley
Square Nails – Lee Valley
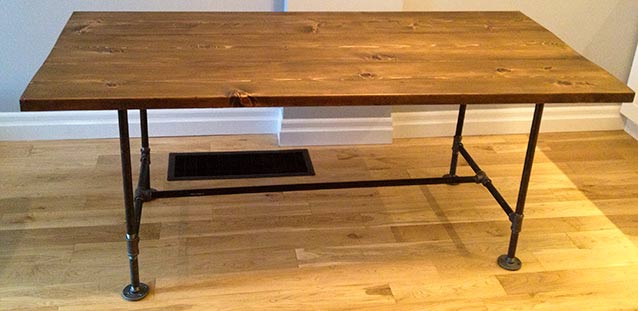
We are hosting my family’s Christmas at our house this year. We currently have a 4 person dining table. No way could we all perch around that table no matter how many chairs we pushed against it. We needed to scrap the kids table, and nut up and get a grown up table.
INSPIRATION:
Restoration Hardware’s Flatiron Dining Table
We put pen to paper and designed a simple tabletop with industrial black pipe legs. I had taken inspiration from this Restoration Hardware Flatiron table. Except we went with a basic “H” leg construction with a cross beam near the bottom of the legs.
We had originally wanted a nice thick reclaimed wood top, and had sourced a supplier, however that fell through and everything else we could lay our hands on was “city priced” (you know when you go to an antique store in the city and a simple item is priced 10 times higher that you ‘d find it at a flea market in the country? That’s “City Priced”.) So the cheap ass me wasn’t gonna pay city price for wood, so I nixed that idea and instead we decided to use 2×12″ construction lumber. We don’t have much invested in the tabletop, so if we get our hands on some nice reclaimed wood in the future, it won’t hurt our pocketbooks to swap it out. The legs are hardware store “black pipe” gas line pipe and fittings. These can be sourced at any large hardware store (orange & blue) and as they can cut and thread the pipe for you at the store, its super easy to work with.
We made a 72″ x 34.5″ table that is 30″ high. This is a standard 6 person table, but 8 can easily be squeezed around it.
Shopping List
1 – 3/4″x10′ black pipe $18.99
1 – 3/4″x6′ black pipe $13.80
4 – 3/4″x6″ nipple (heehee) $1.64/each
8 – 3/4″ Floor Flange $3.99/each
6 – 3/4″ Tee $1.64/each
1pkg 3″ felt furniture pads $4
2 – 2x12x12 spruce $17.50/each
Wood finishing materials (to be discussed in pt. 2)
Wood Cut list
3 – 2x12x6′
(Cut 2x12x12’s in half to make 4 – 6′ long pieces, and you can use the left over piece to make a bench.)
Pipe Cut list
The hardware store will cut and thread your pipe for you. There is a (substantial) fee for this. At our home depot it was $1 per cut and $2 per thread. We ended up having about $40 in cutting fees, which was actually more expensive that the pipe itself, but a necessary evil.)
1 – 3/4″ pipe 51″ long
4 – 3/4″ pipe 20″ long
4 – 3/4″ pipe 10″ long
The crazy machine that cuts and threads your pipe!
We got our pipe and wood cut, gathered all the rest of our supplies and like a strange hardware store parade, headed to the checkout. A word to the wise, the pipe is greasy and dirty and yucky. Make sure you put your nice wood on a separate cart, and bring a tarp to protect your car. Also have some dish soap and goo gone ready at home to thoroughly clean and de-sticker your pipe when you get it back. Be prepared to get little metal splinters that will hurt. A lot.
Pipe, and flanges, and wood stain oh my!
We decided to use the Kreg Jig for attaching our boards together to make the tabletop. This is quick and oh so very easy, and all the screws are under the table where no one other than the dog or a crawling child will ever see them. We laid out our three best boards on saw horses in the garage.
best three boards laid upside down ready to be Kreg jigged together
We decided on placement making sure to alternate the crown of the wood (the crown is the way the grain curves, look at the end of a piece of lumber and you’ll see the grain pattern). Once we were happy with how our board would be arranged, we flipped them over and aligned them, making sure they were square. Our saw guy at the local hardware store didn’t fare so well with making all the boards the same length, so we lined up one end, and let the other end overhang knowing we’d trim it down later. Then we marked our kreg jig screw placements.
We put two screws in 8″ from the edge of the boards, and about every foot for the rest of the table. We alternated which side the screws came from so that we would get a more stable and solid tabletop.
The Kreg Jig is super easy to use. We set the jig and drill bit to 1.5″ thick wood, clamped out the jig (with protection on the “good side” so the clamp wouldn’t mar the table top) and drilled. Easy-peasy lemon-squeezey.
Kreg Jig Clamped
After all the holes were drilled, we re-aligned everything, and got to screwin!
Screwing together boards using Kreg pocket hole system
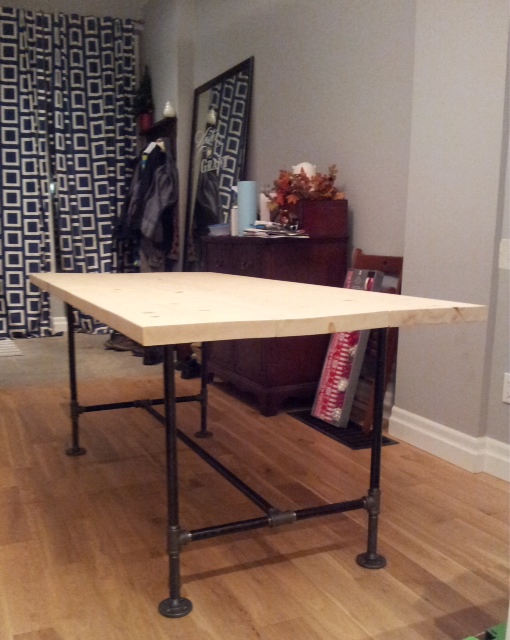
After the tabletop was screwed together we trimmed off the scraggily cut edges using a circular saw. Then we gave the table a good sand with the palm sander. We wanted to leave a few of the rough wood’s imperfections, but ensure everything was nice and smooth.
After it had been sanded, we took it inside and got working on the legs. We thoroughly cleaned the pipes using a combination of citrus grease cutting cleaner, dish soap and goo gone. There was a lot of errant stickers and tape on the pipes along with the grease, so all these tools were needed. Be careful for any sharp metal or burrs, definitely wear protective gloves and eye protection.
To start out, attach each the 6″ pieces of pipe to flange. Next up attach a T to each of the 6″ pipes.
Flange + 6″ Nipple + T
Screw a 10″ pipe into the side of each T. Attach another T to 2 of the 10″ pipes. Attach two legs together by the middle T, then do the same to the other set.
Attach two feet together by 10″ pipes and a T
Now attach the 20″ pipe to the top of the T’s and another flange while the dog enjoys a peanut butter filled bone.
Forgot to take a good pic of this step! Oops, but you get the point.
Make sure all your legs are exactly the same height. You may need to tighten or loosen a few joints to get everything equal.
Here’s the tricky part. Grab a friend and attach the long 51″ piece to the two open T’s. One of you will have to spin a set of legs around to get this done. You will look like an absolute fool doing this, but its the only way to get it done. Once everything is screwed together, you’re ready to attach your legs to the table.
Legs AssembledLegs + Tabletop
Flip your tabletop over, and set the legs on top. Make sure everything is square, straight and level, and screw in your flanges using 1″ screws.
Apply your felt furniture pads to the bottom of the feet flanges, and flip your table back over. Now you’re ready for finishing! (we will be finishing the table inside due to the cold cold cold temperatures of our unheated garage.)
So here it with its legs attached and waiting for its finish work. Whatcha think?
Ta Da! Tabletable table table
One great thing we quickly found about this table is that if you have an uneven floor like we do you can unscrew certain parts to even the table out so it won’t wobble!
Promise, we’ll be back soon with how we finished the table, and a cost breakdown.
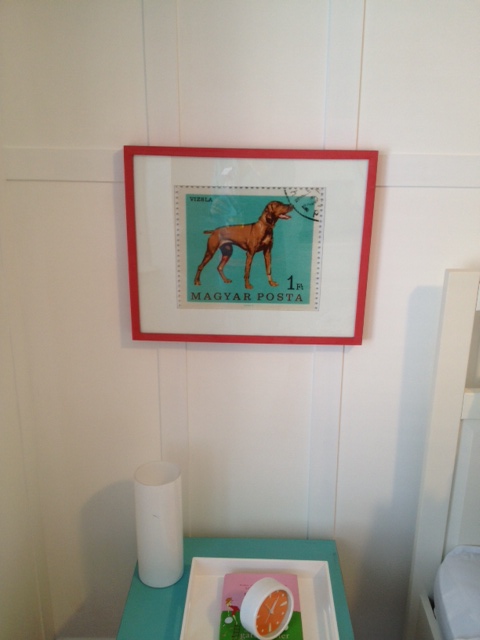
We needed some art to flank the bed in the guest room. I wanted something fun and lighthearted, and to bring a bit of colour to our now grey and white guest room. I rummaged through my box-o-frames and found a couple black gallery frames that had seen better days. They were a bit bashed and mangled and were not looking their best. I decided to give them a bit of a facelift. I painted them a shade of pinky coral (although in hindsight I wish they were a bit more red). Then I set out to find some prints. As you may know we have a crazy Vizsla named Odin who I love to bits and have tons of photos of, but I didn’t want the guestroom to be a creepy shrine to my dog. Instead I set to look for Vizsla themed prints, that were not shots of Odin. I found a great print of a vintage stamp from Hungary (where Vizsla’s are from) as well as a fun “Obey the Vizsla” propaganda style poster. I cut new mats for the frames with my mat cutter (a handy tool if you frame a lot!)
Here they are in the space. I like how they add a bit of colour to the space.
The guest room still needs a few more things. Accent pillows, some sort of art above the bed, a chair for reading or putting on your shoes, bedside lamps, a new light fixture, and some closet organization.
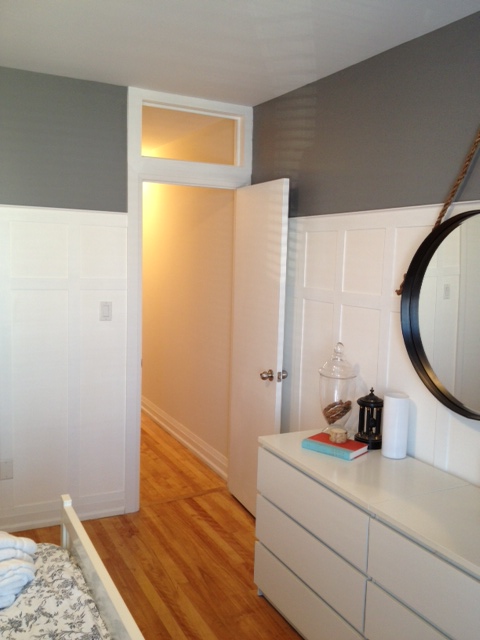
As you may remember I went buck wild a few weeks ago and cut a hole above our guest room door to make a transom window. I really need to get out more if thats I what I called buck wild…eep.
So I cut a hole in the wall, and then 4 days later my in-laws were set be rolling into my house for Thanksgiving. I know…who starts a project days before company is due to arrive and sleep IN the room where the project is happening… Dont worry, it wasnt such an epic fail. I may not have finished the transom in time, but it was presentable. Now after a few more days work, and some custom cut glass, I am pleased to reveal our new transom.
How how’d we do it?
We used a stud finder to generally figure out what was behind the wall above the door. We found studs on either side of the door, and one right in the middle above it.
We did our research, and found that building code in our area has doors framed with King Studs and Jack Studs and a Header, and that the cripple stud above the door was nothing structural. (which means we can take it out without having to reinforce anything else)
Using the markings of our stud finder, we drew straight lines on the insides of the studs to use as a guide for cutting.
We cut our hole using a drywall hand saw (or should I say I cut 1/4 of it, then wussed out and El Granto cut the rest…there are you happy you got your due Mr. Granto?)
We removed the cripple stud with a combination of a reciprocating saw and a hammer.
We cleaned up our drywall ensuring there wasn’t any in our way for when we put casing on the transom hole.
We cased the window using 5/8″ mdf that we had laying around the house. It also happened to be the same thickness as our current door trim. We measured the depth of our transom hole and ripped some mdf with our circular saw to fit. We then brad nailed it in place.
We trimmed the transom frame with more of our 5/8″ mdf.
We made a little frame inside the casings to hold the window. Filled, caulked and sanded.
We painted two coats of our trim paint.
We measured our hole and got a piece of glass cut at an awesome local glass shop Snap Services.
We installed the glass with some silicone caulking and a couple glazing points. Now if you’re home owner with an old home you’re probably asking why we didn’t use glazing compound? Well it’s an interior window, and it wont be subject to direct sunlight or weather of any kind. SO, silicone will hold it in just fine (and keep it from moving rattling around when a truck drives by.) The glazing points combined with the mini frame we built for it will ensure the glass never moves.
Transom PaintedSee how much light it brings to the hallway?!Ta Da Transom!
SOURCE LIST:
Materials:
5/8″ MDF – Home Depot (scraps from our bedside table project)
CIL Trim Paint – Home Depot
Caulking
Custom Cut Glass – Snap Services
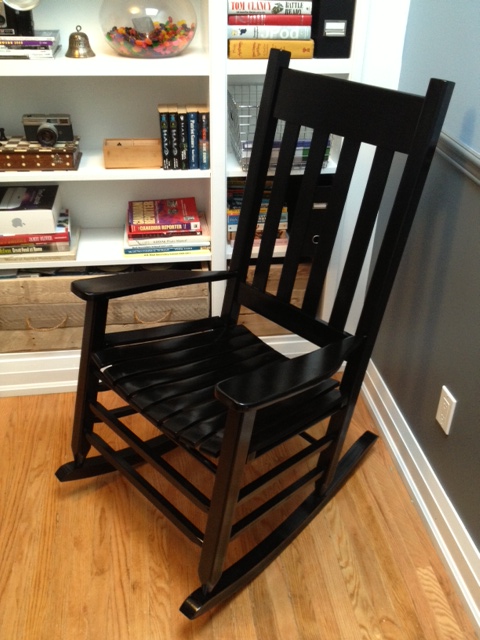
When I need to spray paint a small item (knob, handle or vent cover) I usually put it on some cardboard and head out into the alleyway behind our house to paint. I then bring it inside our garage to dry. However when the weather turns cold, or when you’re painting a big item, that may not be an option. Such was the case this past weekend when we needed to spray paint a rocking chair we were working on. It was BIG and I needed a lot of space to paint, which mean a lot of over spray. We decided to set up a temporary spray booth in our garage. Which El Granto proceeded to call my Dexter Kill Room for the entire weekend. He even posted this pic on facebook with the caption “Built Kristen her own Kill Room”. No wonder no one wants to come over for dinner…
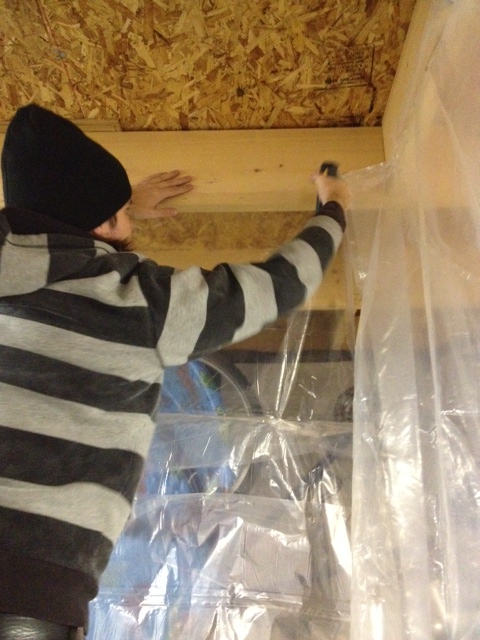
So here’s how we did it. I bought some heavy weight plastic drop sheets. We stapled them to the ceiling rafters in our garage in a 6’x6′ square.
El Granto Stapling up Drop SheetsInside the Spray Booth
We laid down a canvas drop cloth on the ground (which was an old wall hanging in our loft!) And using plastic clamps, shut the sides.
Clamp Holding Sides Shut
I left one side open for easy entry to the spray booth. We moved in our project.
Ready to Paint
After I finished painting (wearing a mask of course!), I opened up the sides of the spray booth and let the paint dry (note the garage was getting a bit cool by then, so to ensure my paint dried right I put a heater on to warm up the garage a bit.)
Chair Painted
The next day after everything had dried, we took down the plastic, folded it up and its ready to go for next time.
SOURCE LIST:
Materials:
10×25′ Heavy Weight Plastic Drop Cloth – Home Depot (note, the so called 25′ drop cloth was less than 20 feet long! We didnt have enough plastic, and had to use an old drop sheet we had laying around… insert grumpy face here.)
Tools Used:
Scissors for Cutting Drop Cloth
Staple Gun
If you follow us over on the new fangled thing called facebook you may have noticed a photo El Granto uploaded the other day of a busted rocking chair that followed him home. Continue reading “Repairing a Broken Chair”

")
")
")
")
")


")
")


")
")
")
")
")


")

")
")
")
")
")
")
")
")
")
")
")


")


")