I don’t typically think of myself as an old man. There’s only a few times that I do. One was just the other day when I told a kid (twenty-something) to get-the-f off my garage roof (He was fetching a football. It’s a silly expletive filled story). After doing so I felt so old I had to do something to calm my nerves. Some old man stuff. “Why not some wood working” I thought.
I have a pintrest board (yeah I know I know. Not typically a place for guys like me. It doesn’t see a lot of use.) that is absolutely FULL of things I want to make. I won’t link to it because I think a lot of it will end up being posted here at some point. Probably even before Christmas as I really enjoy making gifts for family and friends. It’s cheaper and it really shows you care when you can make something for someone that’s genuinely cool.
So my first adventure in woodworking was to create something functional and not too hard to make. I checked out my pin board and found the perfect item. The Nail Head Bottle Opener.
Wood… I need some nice wood… all I have is pine. Hmmm. The next door neighbors have LOTS of wood! And nice wood! Ipê Iron Wood.
I ended up securing a piece of wood from my neighbor Dietrich (on his birthday. Happy birthday! Can you give me a gift instead?!).
Enough story time. Let’s get to it.
I started by drawing the outline for the bottle opener on a piece of card paper that I had laying around in the garage. I modeled it somewhat off of a wire brush that I liked the handle shape of and modernized it a tad to fit with the feeling I wanted from the piece.

I then traced the outline on to a small piece of wood that I cut down to size with the miter saw and cut the general shape out with a jigsaw being careful to cut just outside the lines so that I had room to sand down in to the final shape I wanted.


Once the shape was cut it was time to sand. I started with a rough 60 grit paper on a palm sander and got the exact shape I wanted. This was also when I found out that our jigsaw doesn’t quite cut on a 90°. Darn. Sand away the angle. Once that was done I switched to a 100, 150 then 220 grit paper and sanded by hand. To get the curve near the top to feel just right I took the sand paper and wrapped it around some spare pipe so that I would get a consistent groove without too much hassle. Sand sand sand sand sand. Now sand more. Sand till your fingers are raw and the wood is buttery smooth.

I took the finished wood inside to the warm and applied and buffed 5 coats of finishing wax. Man did it pop after the wax!
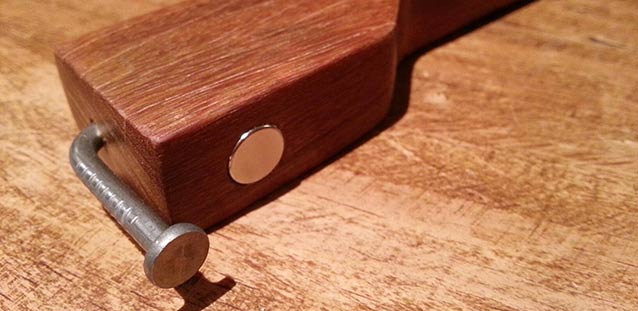
With the wood all sanded and shiny I then set to bending nails. Kristen picked me up some special nails for this project specifically. I wanted nails with a large flat head that still looked nice. Luckily the rep for the nail company was visiting HD that day and was able to show her to the absolute perfect ones. I bent 4 nails in the bench vice using a hammer and a rag wrapped around the bottom of the nail before I got the result I wanted.


I had a magnet laying around that I wanted to put in to the opener to catch the bottle cap so I carefully drilled a hole that was purposely a little too small for the magnet to fit in to then I hammered it in to place using more rags to protect the piece from getting marred by the hammer. The magnet will stay in place strictly through friction.

I then clamped the opener in the vice (more rag protection) and drilled a hole in the top just big enough for the nail to slip in to easily. I didn’t want to force the nail in by just driving it in as it could split the wood OR mar the nail leaving the whole piece useless. I applied a generous amount of wood glue to the nail and slipped it in place cleaning up any that splooged out with a wet cloth.

Applied and buffed one more coat of wax and I’m ready to pop bottles!


Making this bottle opener was actually quite simple. I will however drill the holes for the nail and magnet BEFORE waxing next time as drilling requires more sanding.
Working with a strange wood was a great learning experience. Hard woods take longer to cut and work with and you have to be careful of burning or scorching the wood. During the drilling of the nail hole I was glad I don’t have a smoke detector in the garage (on the to do list for sure) but there was a lot of smoke.


SOURCE LIST:
Materials:
Ipê Iron Wood – Dietrich the friendly neighbor
3″ Common Framing Nails – Bright Finish – Home Depot – $4.00
Pretty magnet – Repurposed (I have since picked more up at Lee Valley – 3/8″ diameter 1/10″ thickness – $0.46 each)
Minwax Paste Finishing Wax – Home Depot – $9.99
Tools Used:
Drill
Jigsaw
Miter Saw
Palm Sander
Sand Paper
Bench Vice
Hammer
Difficulty Level (on a scale of 1-5):
Due to time and patience.
Total Cost: $4 Only bought the nails!