Upholstering a Custom Headboard

When we moved into our house, we bought our first big kid bed. By that, I mean one that had a boxspring, had an actual frame, and that was big enough that hubby & I didn’t need to sleep like sardines. The problem with owning a big kid bed is that we didn’t own a headboard. Our bed looked giant and sad sitting in the middle of our master bedroom.

We needed to do something about it, but we didn’t have tons of coin to drop on it, and I wanted something specific. At this point in time, I called the only person I knew who could help me; Mom. Mom you see is an expert at all things Home Ec related. Cooking? Shes a pro. Sewing? She could sew a life sized stuffed moose in her sleep. Crafting? She is the Danish Martha Stewart. So you can see why I called in the big guns.

Mom rolled into town, accompanied with upholstery foam, tacks, and a shopping list. The only thing I brought to the table was the purple ultrasuede I had purchased the week before. Mom scrutinized my choice of fabrics, and although it wouldn’t be her first choice, she conceded to give it a try. We quickly measured up how tall we thought the headboard should be, and headed to HD to get some supplies. We had ¾” plywood cut to the width and height of our headboard by the nice fellow in the wood department.

We also picked up some 2×4’s to brace the headboard, and to connect it to the frame. Some staples, spray glue and a new jig saw later, and we were off to the races.

Back at home, we got out some large pieces of newsprint and taped them together to make a big piece of paper the same size as half the headboard (it’s always easier to draw half of your design, then when its time to trace your pattern, just trace one side of the pattern, flip it over and do the other side. It will be a perfectly symmetrical design). We then drew out the design we wanted. We futzed a bit with it, used a pencil and some string to make the curves, and when we were happy with it, we cut out the design to use as a pattern.

The Headboard Pattern

We then traced the pattern onto the plywood, and cut it out with a jig saw. We attached 2×4’s to the back of the wood as legs and braces. * Note if you are going to attach it directly to the wall, at this point in time instead of adding legs, you would need to purchase a flush mount bracket set from a hardware store, and follow the instructions on how to install (or check out this tutorial on eHow)

After the wood was cut, we took the pattern and cut it down one inch smaller on the outsides. We then traced this new smaller pattern onto our 1” foam, and cut out the foam with a sharp knife. We sprayed the back of the foam with spray glue, and placed it centered on the plywood.

The Foam Cut to Size/Shape
Foam Attached to Headboard Wood

Then came covering the headboard with cotton batting, folding it over the back of the plywood and stapling using a staple gun. I have this  great backwards staple gun, that allows you to push the trigger forward instead of backwards, it’s much easier on your hand muscles.

Wrapping the Headboard in Cotton Batting
Headboard Wrapped in Batting

Next up, we laid our fabric face down on a clean surface (we used our kitchen floor covered in a sheet.)

Headboard Laid on Fabric Ready for Upholstering

We then wrapped the fabric around the back of the headboard. This is where it gets tricky, and requires as many hands as you can recruit. Starting with the bottom of the headboard, fold the fabric around to the back, make taut (but don’t over pull and stretch it) and staple to the back of the board. Do this all along the bottom every 4” or so. Then move to the top of the headboard, and starting at the center do the same thing, making sure that the fabric is nice and smooth and flat on the front of the headboard. If your headboard is square, this will all be pretty easy. We of course made a fancy-dancy curved headboard, so it’s a bit trickier.  With a curved design, you will have to make relief cuts to get the curves nice and smooth. You will be using a LOT more staples on the curves, making sure you get all the fabric pulled taut and smooth. You may find that cutting some of the excess fabric off helps, but make sure you leave yourself enough fabric to get a good grip.

Stapling Fabric to Headboard

Work your way around the whole top of the headboard, one side at a time then move to the sides of the headboard.

You will probably want to go over and add a few more staples in places that you may have missed, and cut off some of the flaps of fabric to tidy everything up. Now flip it over, and admire your handy work!

Headboard Upholstered

You still probably want to know why we cut the foam one inch smaller that the wood? We did this as we wanted to add a decorative nail head trim, and we didn’t want it to get buried in the foam. By cutting the foam short, it left us a nice space to lay the trim. We used nail head strips from Lee Valley Tools. They were much quicker and easier to lay straight than using individual nails. You only actually have a nail once every 6 nail heads or so. This was great for the straight parts, but around the curves I wished for more nails. The trim just isn’t as smooth as I would like it. Make your way around the headboard nailing in as you go, and curving the strips to meet the curve of your headboard. We used a small hammer and it didn’t damage the nail heads, but a rubber mallet is recommended.

Headboard With Nailhead Trim
Nailhead Trim Detail

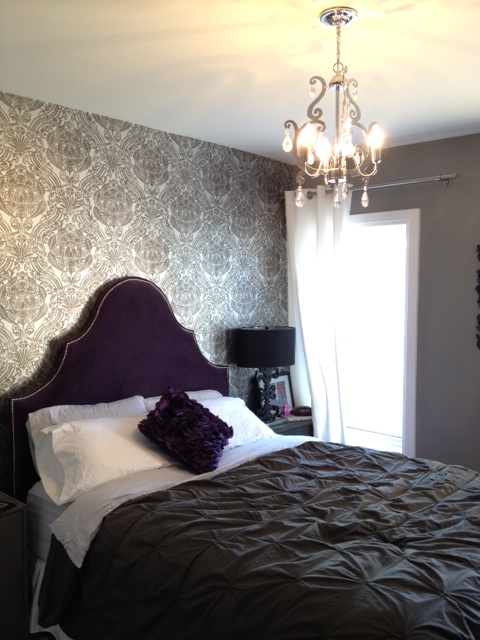
Now quickly rush your headboard up to your bedroom and place it behind your bed and pat yourself on the back. The get out the drill and some bolts, and bolt it to your bed frame, or attach it to the wall.

Headboard Complete & Installed

SOURCE LIST:

Materials:
Plywood- 3/4″ 4×8 sheet cut to size at the store – Home Depot
1″ Foam – Len’s Mill Store
Cotton Batting – Len’s Mill Store
Purple Ultrasuede Fabric – Designer Fabrics
Nailhead Trim – Lee Valley Tools
Spray Glue – Home Depot
Staples – Home Depot

Tools Used:
Jig Saw
Staple Gun
Knife & Scissors
String
Pencil & Paper
Mom

Difficulty Level (on a scale of 1-5):

Three out of five

Total Cost: $70

Guest Room Board & Batten Reveal

After measuring and planning, and cutting and nailing, and caulking and painting, its finally done. Our guest room now has a board & batten wall treatment (althou I think its more shaker paneling…but tomato tomato)

Without further adieu, here is our completed Board & Batten treatment in our Guest Room.

Whatcha think?

(Come back tomorrow for a how to!)

*UPDATE* Check out the how to here:

Guest Room Board & Batten How To


DIY “Leaded” Glass

I love leaded glass, especially in exterior transom windows of old storefronts. The transom above our front door is a leaded glass window (albeit new) and I love it. I WISH our house had some original leaded glass, but alas all we have are energy efficient double pane windows. I know, I am the only person on earth who complains about how energy efficient her house is…

The Storefront Window

We looked into getting some real leaded glass for the storefront window transoms, but it was darn near impossible, and pretty much a huge waste of money as our current windows are perfectly fine. The problem is however, that once I get an idea into my head I am not easily dissuaded. So I started researching for a solution and came across this:

Pebeo Vitrail lead adhesive strips. It’s used for faking your own stained glass. They have a line of glass paints, and you literally make your design out of this tape, then fill it in with the glass paint.

I didn’t want the stained glass look, but the lead looked like a pretty cool idea. So I popped into every art store I came across, and on my third try I managed to find a package. It was $24 for 33 feet. I thought that would be plenty for my project and headed home.

I then did some research for leaded glass patterns.

We narrowed it down to either a Diamond pattern, or  a Regent pattern. I drew both out to the size of our transom windows, and once drawn out, we liked the Regent the best.

I headed outside and thoroughly cleaned the windows and then taped my drawn out pattern on the inside of the window. I then set to re-create the pattern on the outside of the window. It was a bit tricky due to the space between the front pane of glass and the back one where the pattern was. If I change the angle I was looking at the window it changed the pattern. I tried hard to keep it straight and true but alas its a bit crooked. Shh don’t tell.

The adhesive leaded glass was very easy to cut, but the backing wasn’t that sticky. You really need to burnish it in place with the provided application tool to make sure it stays where its supposed to. Once I got into the swing of things my lines became straighter and my cuts more precise. Just as I was fining the first of two windows I noticed that I was dangerously low on adhesive lead! Eeep. Apparently 33 feet doesn’t go that far when you have an intricate pattern. So I was unable to finish both windows, so for now I have one leaded glass transom window. What do you think?

“Leaded” Glass Window (view from outside)
“Leaded” Glass Window (view from inside)

DIY Chalk Paint

I played around with Annie Sloan Chalk Paint for the Backyard Mural and loved it. It is like painting with artist paint.

I built a few bedside tables for our guest room and it struck me that I would love to use chalk paint on them. Problem is, that I am a very impatient person, and when I get an idea in my head, I need to do it NOW. My closest stocklist for Annie Sloan paint is 2 hours away, and I don’t own a car…harrumph.

So I did the next best thing, and started googling. Hoping magically that in the last month a Toronto AS stocklist had opened up…no such luck. But then I found a bunch of recipes for DIY chalk paint.  I am a bit of a disbeliever, but thought I had nothing to loose, so I set out to try to make some chalk paint of my own. I picked up a $3 container of plaster of paris from the hardware store, eyeballed some into an old jar, added the same amount of water as plaster, gave it a stir and then added about 1.5 times as much latex wall paint. I played with the color mixing some turquoise and some blue that I had laying around. I gave it all a stir, then paint it on some scrap wood. IT LOOKED JUST LIKE CHALK PAINT. No, seriously. It went on the same way, covered the same way, and cleaned up the same way. I let it dry overnight thinking I would come back to it spontaneously combusting in the morning, or that it would all peel off or do something terrible. But… It did. just. fine.

Still looking at it rather speculatively, I put on a coat on my newly fabricated bedside tables, and it looked just like chalk paint. Again I waited for the other shoe to drop, only to put on a second coat, and distress it, and wax it and have it behave exactly the same way as the Annie Sloan chalk paint…

So here’s the game changer folks:

DIY CHALK PAINT

  • 1 part plaster of paris

  • 1 part hot water

  • 3 parts paint

Mix plaster & water together until all the plaster is incorporated. Add paint. Stir.

(I put my chalk paint in a mason jar and added a label.)

NOW GO PAINT SOMETHING!

DIY Bedside Tables

I have been scoping around Craigslist and local antique stores for the last couple weeks trying to find some tables to turn into bedside tables for the guest room. We were using two (well worn) Ikea $10 Lack tables that we’ve had since the dawn of time, but they really needed to go. I searched and searched, but couldn’t find anything I loved. I didn’t have the budget to spend a couple hundred on new bedside tables, so I decided to make some. I headed over to The Design Confidential to look at some of their furniture plans. (They have some amazing DIY furniture plans!). I took a look through their end table/bedside table collections and spotted this plan. I instantly saw it and thought I could do a more Moroccan version of it.

The plan calls for the tables to be 18″ high, but that was a bit short for my application. I wanted to make them as tall as possible using one 4×8 sheet of lumber to make two square tables.  So I did some math and figured out that I could (just) get ten 19″ squares out of one sheet, so I headed to my local Home Depot and got a 5/8 sheet of MDF cut down to 19″ squares.

After getting my wood home I drew out a pattern for the table legs on a piece of scrap paper. I only did one side of the pattern (as its easier to just do one side, trace it onto your wood, and then flip it and trace the other side.)

Making the table pattern
Tracing the pattern onto the wood

After I traced my pattern, I cut it out of the MDF using my jig saw, sanded any rough bits, and then used that one as a pattern for the rest of my pieces. (for two tables you need a total of 8 leg/side pieces, whatever you do, don’t cut all 10 of your pieces into the leg pattern, you need tabletops too! duh!)

One table leg cut

Now follow the rest of the Design Confidential’s instructions here. Essentially you have to cut down the width of two of your table legs so that they overlap nicely. Then you stand it all up, and nail it all together. I found that using some masking tape to hold the legs together temporarily helped a lot. I just dont have enough hands to hold everything and nail it all!

Attaching table legs
The Table Assembled

After you’ve assembled everything, if you’re using MDF as your wood, I HIGHLY advise going and getting yourself some spackle. Sand all your edges so everything is nice and pretty, and then take that spackle and rub in into the mdf edges. HUH? MDF edges are rough and not as nice as the flat parts, so if you want everything to look perfect, you need to spackle those edges. Once they’re dry, sand them to a nice smooth finish, then get ready to paint. (yes I know it looks like utter crap before you’ve sanded, but just trust me.)

The rough edges of mdf covered in a thin layer of spackle

I painted the tables (inside and out) with a coat of dark grey Behr Premium Plus Ultra Paint + Primer I had laying around. Now if I hadn’t been using paint+primer, I would have put a coat of stand alone primer on first.

Tables painted a base coat of charcoal gray

After my paint dried, I mixed up a batch of DIY Chalk Paint (come back tomorrow for my DIY on this). I painted 2 coats of chalk paint in robins egg blue on the front and top of the tables. I left the inside of the legs the base colour so you got a bit more contrast with the blue.

Tables painted with two coats of chalk paint (leaving the insides of the legs the base color)

Then I sanded and slightly distressed using sandpaper and a damp cloth (to see more on my distressing chalk paint using a wet cloth check out this post). After I was happy with the distressing and smoothness of the finish, I gave it a coat of furniture wax and polished it.

Table Complete

**UPDATE** Check out this post on how to DIY your own chalk paint

SOURCE LIST:

Materials:
1 – 4×8 sheet of 5/8″ MDF – Home Depot (cut into 19″ squares by HD’s cutting staff)
DAP Spackle: Home Hardware
Behr Premium Plus Ultra paint in Cracked Pepper – Home Depot
Chalk Paint – DIY

Tools Used:
Jig saw, sand paper, compressor & brad nailer, circular saw, paper & pencil, paint brush, wet rag

Difficulty Level (on a scale of 1-5):

Three out of five

Total Cost: $30 (already owned the spackle & paint)

Wedding Week – Save the Dates

El Granto & I knew we wanted nice wedding invitations. We had dreams of 5 piece letterpress, lined envelopes, cotton paper and luxury. Then we priced those out. EEEP!

So we started to do some research. In the middle of doing research The Wedding Co. announced that there would be letterpress workshops available at the Spring Wedding Show at the Drake Hotel. We jumped, and booked a workshop with Tanya @ Snap & Tumble.  One hour with Tanya and her press, and we were hooked. The heavy cotton paper, the crisp text, the tactile feeling of the deep impression.  Love at first sight! Check out some pics of our workshop.

So now we knew we wanted to letterpress our invites, and I immersed myself in learning about letterpress. At first I thought I would print at home using an L Letterpress kit that I picked up at a local craft store. After spending an entire afternoon trying to print, I knew that the L Letterpress plates were terrible as was the provided roller, and that under no circumstances could I ever be persuaded to print an entire invitation suite on this thing. It had one saving grace, it did do blind impressions very well. (more on that later)

So I started to hunt for a tabletop letterpress, but all I could find were wildly priced, or required tons of work. I visited Don Black’s shop, and lusted over many a machine, but none were in the budget. Finally I contacted Tanya and asked if there was any way she would let us fools come to her studio and rent PIY (print it yourself) time on her press. She agreed! YAY!

El Granto & I then designed our save the dates (2 different versions) as well as our envelopes. Our first version was a double sided with “Save the Date ” on one side, and the info on the other. El Granto also wanted to make a more gorilla marketing version for his advertising/web friends. For that version we simply put the wedding webside address in the middle of a blank card. Hopefully the recipients of that Save the Date would know enough to visit the website! We had custom polymer plates made at Boxcar Press in New York  and went to Coast Paper’s Cash & Carry store in Vaughn (now called Spicers) to purchase paper. We bought our envelopes online at LetterPressPaper.com (and paid a hefty brokerage fee with UPS.) We purchased a large paper cutter from Costco, and proceeded to cut all the paper down to size. This was a big mistake. We should have had the paper custom cut. It took so much time, and the paper wasn’t perfect.

We ordered a wax seal and black sealing wax online from letterseals.com and purchased Lotka paper to use as envelope liners from The Paper Place  in Toronto.

We rolled up to Tanya’s studio with all that in hand, and printed away!

The save the dates all laid out after printing

At home we printed the mailing info on to each and every envelope using Illustrator and a ink jet printer. We cut, stuffed and glued (handcut) liners into the envelopes, stuffed the Save the Dates, sealed with a wax seal, stamped and then almost got the entire project shut down by the guy at the post office. He said that the wax seals were too big, and that we had to put oversize postage on all the save the dates. It wasn’t even double or triple the postage, it was over $3 an envelope. El Granto got into a war of wills with the post office guy and decided to mail them as is anyways. It was a good call on El Granto’s part as not a single envelope was returned!

It was a labor intensive task, but so worth it.

Next up the Invitations!

DIY Custom Mailbox

We currently have a white plastic mailbox. It came with the house, there’s no way we would have installed such a monstrosity. The only reason it’s lasted so long was that we were trying to find something great to replace it. Problem is, it’s been a year since we updated the exterior of the storefront and we haven’t found anything yet. We wanted a vertical mailbox, that would be tucked in nicely in our entryway nook. We have searched without avail, and decided to take matters in our own hands.

White plastic mailbox

We purchased a basic black vertical mailbox from Rona for $14. We brought it home, and got to customizing it.

We took the mailbox out to the garage and gave it two coats of BIN primer (lightly sanding in between).

After the primer had dried overnight, we gave it two coats of the same paint as our front door.

You remember the “728” from the mural in the backyard? Well that 728 has become a sort of logo for the storefront if you will. We also have a vinyl sticker on the front window with our complete address. We also decided to bring our “logo” to our mailbox. So I broke out my Silhouette SD, and cut out a smaller version of the 728 onto some scrap vinyl.

I pulled away the excess pieces (called weeding), used adhesive transfer paper to pull away the stickers from the backing(you can also use masking tape), and then using a steady hand stuck it onto the mailbox. I then used a creditcard to smooth out any bubbles.

Ta-Da! New custom mailbox!

SOURCE LIST:

Materials:
Pouch Mailbox: Rona
Zinnser BIN Primer (spray can): Canadian Tire
Behr Premium Plus Ultra, Semi-Gloss in Bijou Red: Home Depot
Adhesive Vynal & Transfer Paper: www.expressionsvinyl.com

Tools Used:
Silhouette SD, paint tray & small foam roller, xacto knife for working with the vinyl

Difficulty Level (on a scale of 1-5):

Two out of five

Total Cost: $15 (already owned the primer, paint & vinyl)

Backyard Mural – How to Paint a “Faux” Ghost Sign

Sorry for the long post, I doubt many of you will ever want to paint a ghost sign of your own, but if I help one person, I will consider my life fulfilled.  Yeah sure…

There really is no info on how to do this on the web, and I did it all trial and error. So I am putting my wisdom blubbering nonsense into the world, and maybe somewhere I will inspire a DIY ghost sign.

Now lets get this party started. First up, I painted my cinderblock wall with a base color of dark grey exterior flat paint. Ideally I would have had a lovely brick wall, but instead I had an ugly beige cinder block wall, so I gotta deal with the hand I’ve been dealt. If you have a wonderful old brick wall, don’t paint a base color!

After my base had cured for a week(ish) I set out to project my design onto the wall. I used a digital projector and a design I laid out in Adobe Illustrator. I lucked out with this and was able to borrow a projector. However, if you are unable to. Check Craigslist for Artist Projectors. Like the Artograph Tracer Projector. Even new, it only retails for $100.

I projected the design onto the wall (at night), centered and leveled it, and got to tracing the outline with chalk. I used Crayola childrens sidewalk chalk in yellow, because that’s what the dollar store had. In hindsight, I would recommend regular white chalk, in the skinnier variety. My chalk came pre “sharpened” on one end, but quickly dulled and I was left with a large blunt blob of chalk to draw crisp lines with… so yeah, get the regular old chalk your school teacher used.

After you draw your outline, go to bed. It’s dark, and you cannot paint. No matter how excited you are to get started.

Then get yourself some Annie Sloan Chalk Paint. I got mine from Canadian distributer Diamonds & Toads in St. Thomas Ontario. If you’re doing a small mural like me, just get a sample pot. That stuff goes a loooooong way. I have a quart, and maybe used a 1/4″ worth of paint from the can. Seriously. Also get yourself an artist paint brush to do the outlining of your design, and a wider brush for filling in. Now, this is NOT chalkboard paint, it’s a variety of paint all it’s own. It’s great for furniture, adheres to most surfaces without any sanding or removing of old material, and is even durable outdoors with no extra finishing. (really). Now if you were putting it on furniture you would probably want to wax or seal it, however its important for outdoor uses NOT to wax. Wax will hold in moisture and wreck your shit. So paint it and leave it alone to age gracefully.

Once you’ve got your supplies, outline and fill in your design with one coat of chalk paint. It wont be even, it wont be perfect, but that doesn’t matter, you’re going to be removing most of the paint anyways. Now this stuff dries fast, so work quick. Try not to leave big ridges or globs of paint, but make a smooth even layer. Chalk paint is weird. It’s more like a really thick watercolour paint than a latex or acrylic. It blends and moves like an artist paint. You can also thin it down with water, or thicken it by leaving the lid open (really). You also don’t have to worry that much about screwing anything up, as its supposed to look old. As I said, it dries fast. So clean your brushes pronto after finishing.

After an hour you can start to distress the paint. It took me about an hour to do my one coat of paint, so as soon as I finished painting I went back to the areas I started first, and got to distressing. If you were painting on wood, you would probably want to try sanding for distressing. However, being on a cement wall, that’s not the best or easiest way to do it.  Instead, you can use another technique; a rag and warm water. But wait, I said that chalk paint was durable outdoors, but how can that be if it can be removed with water?! The thing is, when you wipe the dry paint with a wet cloth, the paint doesn’t wash off. However, when you SCRUB the paint with the wet cloth, the paint RUBS off. It doesn’t dilute and smear, it just comes off the areas you scrubbed. Leaving the base colour paint below intact, and not smearing paint into other areas of your mural. Say what?! Really, that’s how it works, I promise. I have no idea why, it just does. So needless to say, that’s perfect for an old looking weathered signs on walls.  So start scrubbing! I thought I’d try a cleaning sponge, but it was too. well. spongey. A white clean heavy duty rag worked best. Now the thing is, when you distress chalk paint with water, it’s kinda like working with grout. Huh?! You know how when you are washing away excess grout, your sponge is constantly covered in grout sludge, and you have to repeatedly wash it to get all the film off the tiles? Distressing chalk paint with water is the same way. Your rag will leave excess paint hanging about. So just make sure you have a different clean rag or sponge and are always cleaning up after yourself, or you will have a wishy washy paint sludge over everything.

Now distressing chalk paint with a wet rag isn’t easy per se. It requires massive amounts of scrubbing. And scrubbing and more scrubbing. BUT it rubs off beautifully. It sticks better to rough surfaces, and rubs off easier on smooth ones, making the distressing rather easy. It looks natural because its exactly how paint would naturally fade/age.

So grab an unsuspecting lacky and scrub scrub scrub. Now if you scrubbed off too much, don’t worry you can always layer more paint back on. I did notice that the areas where I had a nice even coat of paint were easier to distress then the more dry brushed thin areas. So I actually wished I had a more solid layer of paint to begin with.

And that’s it. After you finish distressing and cleaning up after yourself, it’s done. No sealer, no nothing. It will be fine out in all weather and will age nicely.


Nest: Day One: Install

El Granto here. My first post on Storefront Life and it’s about something really cool (and hot)!

We’re really consistent with our thermostat settings. We always have it on program and rarely change the settings (unless we’re in the yard enjoying our Friday libations with friends then we shut the AC off to have some quiet).

But when a friend showed me the Nest learning thermostat I saw real potential.

This thing learns your routine and sets it’s self accordingly. Cools or warms the house in the right amount of time before you get home and even takes outside weather and previous cooling/heating times in to account in getting to the right temperature in preparation for you to return. It even knows when you’ve left the house and switches its self to away mode if you’re gone long enough.

I fell in love. But the price was too rich for my blood. Poo.

Enter a good great friend who wanted to repay a favor (actually the same friend who introduced me to the Nest and knew how I felt about it).

All of a sudden I get an email stating that my Nest order has been received and to expect my new thermostat in a few days. I first had a moment… “WTF!? Waaaaaait a minute… Have I been shopping online in my sleep again?!” Then I realized what my buddy had done and I was ecstatic! There was definitely some man hugging and maybe a tear.

Fast forward a few anxious days and my (oops our) new Nest arrived!

OMGOMGOMG!

I couldn’t wait! As soon as Kristen got home I set her to dog watching and started the install.

I already knew that the Nest was compatible with our system because we have a newer HVAC installation (thanks in part to the Holmes crew). This is something you will have to check though. Last thing you want to do is dish out almost $300 to find out you bought a really fancy looking $300 paper weight.

Step One: TURN OFF THE BREAKER TO YOUR HEATING, AC, AND THERMOSTAT! Whenever you’re dealing with anything hard wired always turn off the breakers! Safety first! Now remove the old thermostat. It’s probably just screwed right in to the drywall without anchors or anything because no one expects you to be swinging on the thermostat like crazy monkeys save that for the light fixtures. Your new Nest comes with convenient little labels to stick to your old wires to ensure you don’t forget what goes where. They have strange code letters like Rh, W1 and, O/B. Use the included screwdriver to remove your old thermostat. This thing is handy and a great include to the Nest package. It’s so handy it’s earned its self a spot right beside my computer for future office related screwdriver needs (removing cases, drives and the occasional deep nasal scratching).

Our old and yucky and stupid thermostat.
Remove the old thermostat and use Nest’s nifty stickers.
The awesome Nest screwdriver (yes that’s Kristen’s hand not mine, mine are all calloused and hairy and manly not dainty like a princesses).

Step Two: Make preparations to patch the holes from your old thermostat and find out that your spackle has turned hard as stone.

This spackle is no good 🙁

Step Three: Mad dash to the hardware store with the dog in tow to get there before it closes to aquire new spackle. I picked up DAP spackle because we had such good results from the caulking. (As a side note: I love spackling. I find it so much fun and I get very excited when I get to do it. It’s the little things I know.) This stuff is cool because it goes on pink and turns white when it’s ready to sand and paint. Two applications and sands left the old holes invisible. (Also don’t forget to be so excited about getting to spackle something that you don’t take pictures of this part for your blog.)

Step Four: Pull the wires through the Nest base plate and screw it to the wall. As Kristen is the paint master we chose to paint around the Nest after install allowing the spackle to set a little longer. The base plate includes a handy built in spirit level so you can’t install it crooked! Ingenious! Last thing you want is for your thermostat to be unlevel as many depend on being so to do their job. Use your new screwdriver!

Step Five: Hook up your new Nest. Using your reference stickers just plug in your wires to their new homes and snap that sucker on to his/her base plate (his/her to be explained soon).

Nest base plate
Base plate, spirit level and screwdriver. A trifecta of awesome product design.
Wires hooked up! Ready to go!

Now just flip those breakers back on!

Your nest will run through a few seconds of boot up and then scan for WiFi. That’s right this little beauty hooks right up to your WiFi for everything from weather reporting to firmware updates. Yep Firmware updates! This means that the Nest team can add new features to your Nest without you having to do anything! Ladies and gentlemen it’s 2012!

Stick in your WiFi credentials and tell the nest where you live this allows the Nest to get weather updates so it knows if it’s hot or cold out. If it’s an abnormally hot day your nest will turn its self on earlier because it knows that it will take longer for your house to cool before you get home. So smart!

Got WiFi?

The setup will take you through several steps like setting your away margin (fancy terms!). This is the acceptable levels that your house can be at during your away time. Because our little red devil is home all day we set ours to between 16c and 25c. That’s not too cold in the winter and not too hot in the summer. We know that our house will never reach those temperatures though because of the awesome insulation job that the Holmes crew did. You also get to NAME your thermostat. It’s a little funny but the name shows up in the app (available for iPhone and Android. Sorry BlackBerry users!) and that’s just cool. Being that I was doing the setup I had to take the chance to put some nerd in to one of the coolest things in my house so I named my our Nest Jarvis after Tony Stark’s computer in the Iron Man movies (also real life butler in the comics but you’ve got to admit this thing looks like it’s straight out of Iron Man).

Welcome home Jarvis.

After this Jarvis went in to learning mode.

During learning mode I THINK it’s best to keep your temperature changes to a minimal and on a schedule. So when we wake up I go downstairs to feed the dog and turn the AC to 22c. Then when we leave we turn Jarvis to away. When I get home I turn Jarvis back on and set the temp to 22c. Then when we head up to bed we turn Jarvis down to 21c (we like it cold while we sleep). Jarvis learned quickly the first few days of having him and had a vague schedule right from day two. But then we messed it all up by going on vacation during his learning phase and setting him to away for seven days. We’ll be switching him back to learning mode so he can reset to a proper schedule on our next work day.

Now get your wife to paint around the unit and go have a beer.

This whole install (including emergency hardware store visit took about 45 minutes!)

The idea is that your Nest will learn when we’re coming and going and will think for us about our home temperature and we’ll only have to change it under circumstances that are different to our normal routine.

More to come about our adventures with Jarvis!

Nest thermostat installed
Jarvis awaiting instruction.

SOURCE LIST:

Nest Learning Thermostat: Nest.com

Tools Used:
Nest screwdriver, DAP Spackle, Spackling trowel, Sand paper, Paint

Difficulty Level (on a scale of 1-5):

One out of five

Total Cost: $0! ($250 USD + delivery in actuality)