Quick no Plan Project: Beer Can Carrier

Last weekend while Kristen was sanding a new project and I had little to do. Sure I could have helped. But why not whip together a quick project while she did all the boring work?

I have seen many beer/can carriers on the internet and decided to give it a try myself.

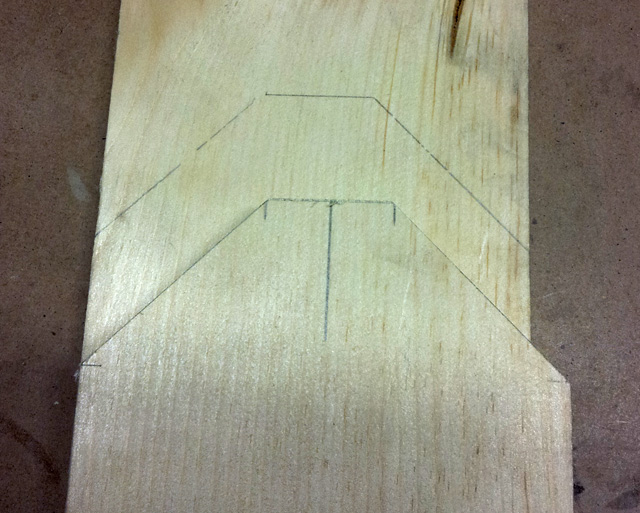
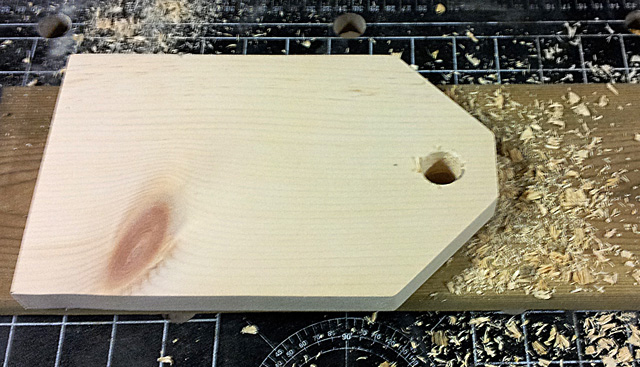
I started by measuring a can and adding some inches to the height to give some room for a handle (9 inches tall) and measured two cans beside each other for the width (giving a little breathing room for easy removal of frosty brews it came to 5 1/2 inches). Then I used a combination square to add 45 degree corners to the template (the flat top section is 1 3/8 inches).

IMG_20130629_161250
Scribble on pieces you know will be scrap as a reminder.

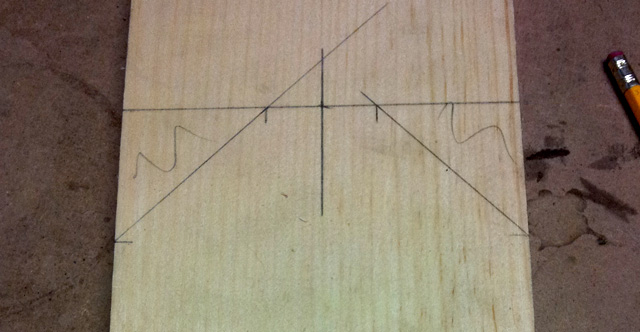
After cutting out the first side of the carrier with the miter saw I decided I was happy with the size and traced the outline to the 2nd side.

IMG_20130629_161706
Using the first side as a template for the second side
IMG_20130629_162045
Both sides cut and ready to go

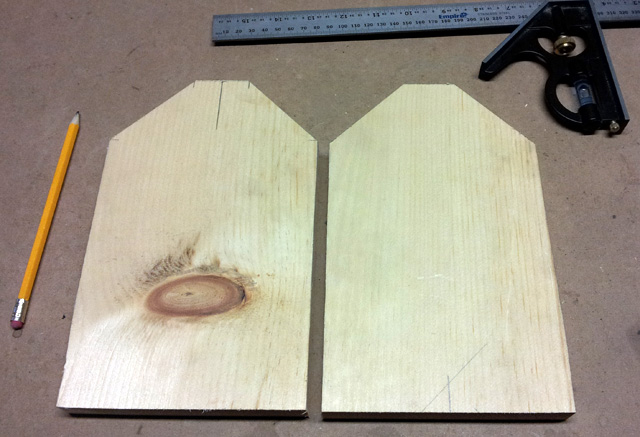
I measured and drilled a 3/4 inch hole in each side for the handle to pass though.

IMG_20130629_165941
Tiny markings to show me where to drill.

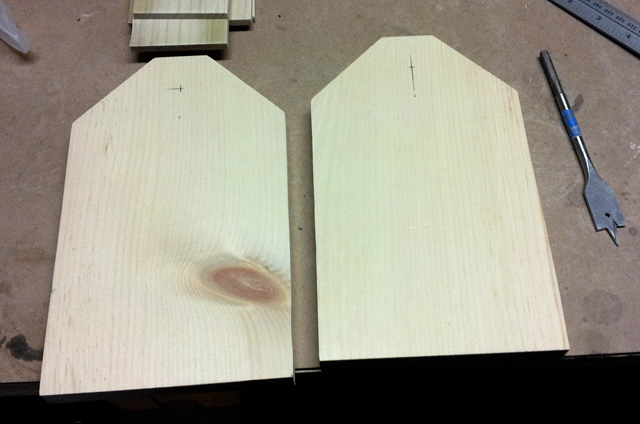
DIY Tip: place a scrap board beneath your piece to stop tearout when drilling holes that will be seen or are large

IMG_20130629_170311

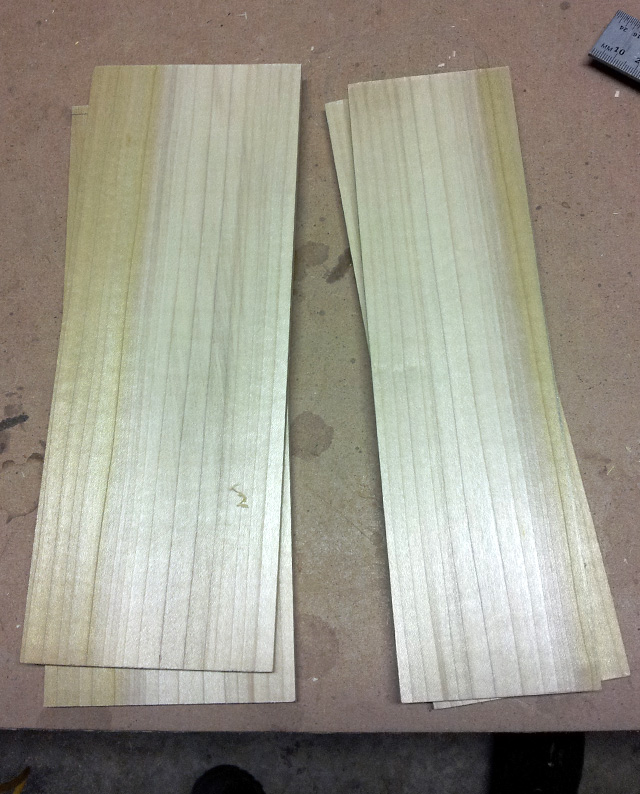
I then lined up three cans and and measured their width and found that with a little breathing room 9 1/2 inches suited three cans quite well.

I found some poplar that was laying around the garage and cut 4 strips to 9 1/2 inches long and ripped two of them down to 2 5/8 inches to make the bottom of the carrier with a little gap on either side for the escape of any condensation that may build up and drip down the sides of my nectar vessels during transport.

IMG_20130629_164616
Side pieces (left) and bottom pieces (right)

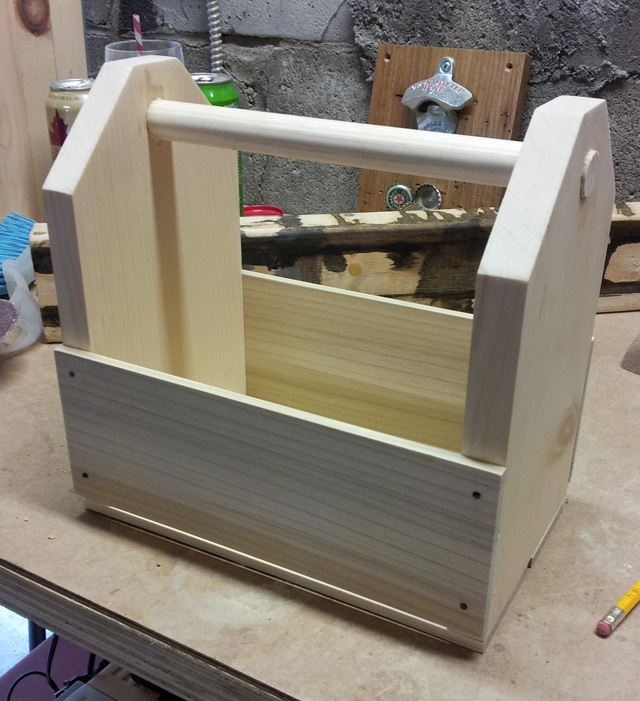
After all the pieces were cut they were sanded down to 220 grit and I attached them all together using some black finishing nails that were left over from ages ago when we made the Liquor Cabinet. Leaving a gap between the sides and the bottom (more condensation relief).

I then cut the handle (some 3/4 inch dowel left over from a project you’ll see in the future) to size leaving a little room for it to poke out just for looks and inserted it in to one side of the carrier. I then coated the inside end and the outside end of the handle with glue and slid the entire thing in to place so that no glue got where it shouldn’t be. (Wiping up any excess that squidged out.)

IMG_20130629_175251
Can Carrier Assembled

I picked a random jar of stain (Minwax Weathered Oak) and set to staining. Then I hated the stain.

IMG_20130629_201024
YUCKY!

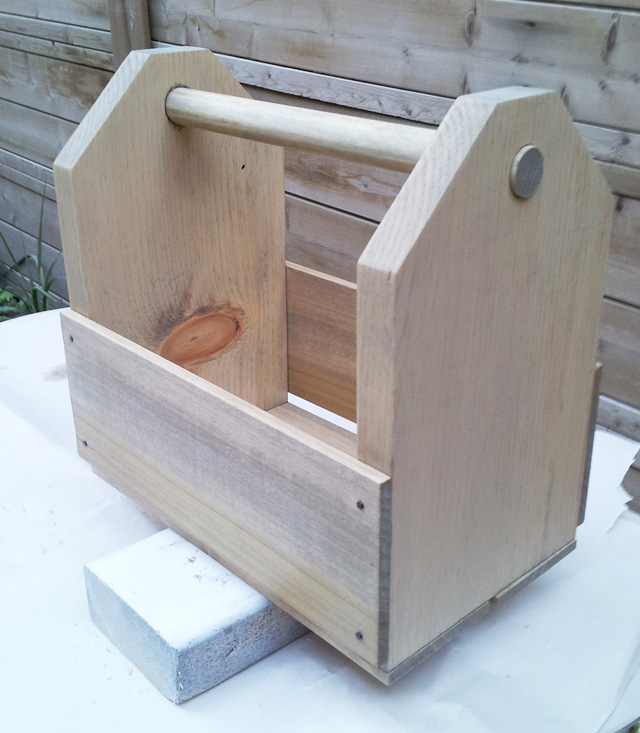
So I restained it darker using Minwax Jacobean.

IMG_20130630_182017
Niiiiiiiiiiiiiice!

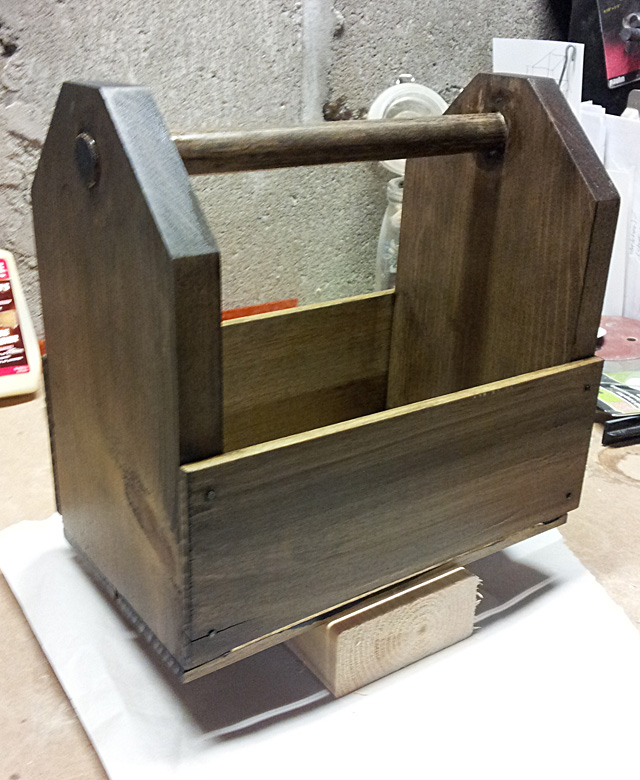
Happy with the stain I set to four coats of Varathane Oil Modified Polyurethane in Satin finish. Using the process outlined in the finishing post.

IMG_20130701_182813
Ta Da!

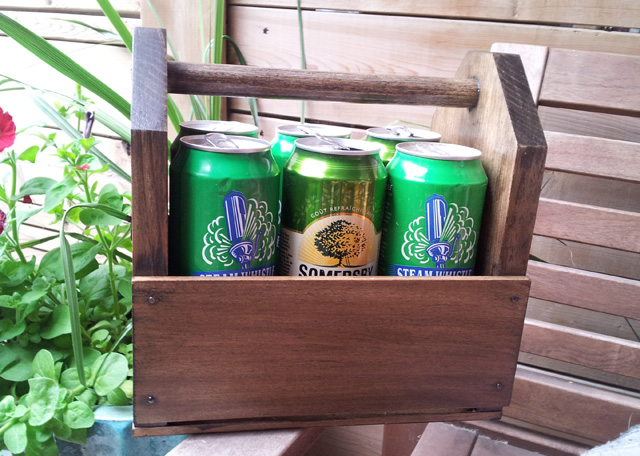
In all I think this probably took about an hour and a half including stain and finishing. The entire build only took about 45 minutes and was a great way to get me out of sanding other projects. AND now we have a great way to carry our Friday Libations out to the patio (or the park shhhhh).


SOURCE LIST: 

Materials:
Scrap Pine (1×6 x 2′)
Scrap Poplar (1/4″)
Scrap Dowel (3/4″)
Scrap Finishing Nails

Cut List:
2 – 9″x5 3/4″  – 1″ thick Pine
2 – 4″x 9 1/2″ – 1/4″ thick poplar (sides)
2 – 2 5/8″ x 9 1/2″ – 1/4″ thick poplar (bottom)
1 – 9 1/2″ dowel (handle)

Tools Used:
Miter saw
Combination Square
Drill
3/4″ Spade Drill Bit
Orbital sander
Measuring Tape

Difficulty Level (on a scale of 1-5):

one out of five

Total Cost: $0!!!

Friday Libation – The Turbo Shandy

Today marks the start of Toronto Beer Week. From beer tastings, pairings, a homebrewing competition and of course BEER QUEST (which we will be competing in this Sunday!).

So as the Storefront Life resident beer drinker and connoisseur and in the spirit of Toronto Beer Week I bring to you… Da–da-dada!

The Turbo Shandy

A typical Shandy (or Shandygaff) is beer mixed with citrus flavored pop (7-up, sprite, or lime-it-up). But let’s not be sissies here. Lets turbo this thing up. It’s time to get… Tur-blasted!

It’s super simple.

  • 3/4 beer
  • 1/4 Smirnoff Ice

Done.

Adjust for your taste. I prefer more beer flavor to my Turbo than Smirnoff flavor. I also prefer to use a Pilsener for my Shandies or my Turbos. I also don’t use expensive beer for these. Buck-a-beer will do. I usually use Lakeport.

Whatever you do don’t buy in to the corporate re-branding of this drink and call it a “Smirnoff Rocket”. That’s some BS right there. Taking an established drink and just renaming it for your marketing purposes. There are LOTS of variations on the shandy.

  • Beer + Cider = Snake Bite
  • Beer (stout) + Sparkling wine = Black Velvet
  • Beer (stout) + Cider = Poor-man’s Black Velvet
  • Beer + Amaretto = Dr. Pepper (sometimes beer + Cola + a drop shot)

There’s a small list of possible Shandies for you kids. As usual drink safe and never drink and drive.


Friday Libation – Spicy Jamaican Ginger Beer

This weeks libation is courtesy of El Granto. He has a mean love of all things ginger, and on our vacation he could be found sipping these dockside. Enjoy.

Spicy Jamaican Ginger Beer


Ingredients:
Jamaican Ginger Beer
2 oz Jamaican Spiced Rum
Ice

How To:
Place a handful of ice in a pint glass. Add 2oz of Jamaican Spiced Rum to the glass. Top up glass with Jamaican Ginger Beer, stir and enjoy

*Jamaican accent not included. You’re also damn lucky I didn’t name this drink Jamaican Me Crazy.

Friday Libation – Cuban Miami Vice

When I am on vacation I love sipping girly drinks pool or beach side under an umbrella wearing a floppy hat. A bit specific I know, but it’s the truth. On a vacation to Cuba a few years ago the bartender surprised me with a drink he thought I’d like. It ended up being my favorite drink that holiday and one I still love to this day. So on my summer vacation I thought I’d make something to remember Cuba by. So here it is:

Cuban Miami Vice


Ingredients:
Piña Colada mix (my fave is the frozen Bacardi mix available at any major grocery store)
Strawberry Daiquiri mix (again the Bacardi one is ok, I also like the Mott’s one)
Rum
Ice
Fresh strawberries and/or pineapple (optional)

How To:
Mix up a batch of Piña Colada and Strawberry Daiquiri following the package instructions. You will need a blender or food processor. (don’t worry about having extra, you can either make one for a friend or have extra for later). In a pint glass fill half way up with strawberry daiquiri. Then fill the remainder of the glass with Piña Colada. Garnish with fresh fruit and a straw. Find sexy Cuban man to deliver it to you poolside. Say gracias, tip generously and enjoy.

*Sexy Cuban man is optional, but suggested for authenticity.

Friday Libation – Irish Rose

I am not a beer drinker, much to El Granto’s dismay. You see El Granto is what you would call a bit of a beer fanatic. He loves lagers and stouts, ipa’s and porters, bitters and pilsners. He likes to bbq with them, cook with them, and he has even made ice cream with beer. He has probably tried every single craft beer the LCBO carries.

Me, I hate the stuff. A few years ago however I discovered something on tap that I did like; Cider! It comes in a pint glass, it looks like beer, and it doesn’t have an umbrella on it. I can hang with the boys while eating chicken wings at the bar and not get razzed. Since the day I discovered cider, I have also discovered that not all ciders are equal. Myself, I am not a big Strongbow fan, so I started asking bartenders for some grenadine in my Strongbow. It took the tartness down a notch and added a bit of sweetness. Since that day I learned that cider + syrup is called an Irish Rose. Here is my favorite version:

Kristen’s Irish Rose

Ingredients:

Can of Alcoholic Cider (my favourite is Sir Perry’s)
1 oz Lingonberry Drink Syrup (from Ikea, can also use Grenadine)
Ice

How to:

Place a handful of ice into a pint glass, fill the glass half way up with cider, then add the syrup (if you put the syrup in first it never mixes well). After you put the syrup in, add the remainder of the cider. It should mix all by itself, not needing a stir. However if it does settle, give it a stir and enjoy! Best served on a deck in the sunshine.

Friday Libation

Ahh…it’s Friday of the long weekend…time to relax. (well not yet, I still have to get through today’s workday unlike my slacker of a husband who took the day off today!) None the less…as soon as I get home today I am looking forward to a drink on the deck.

This summer with my vegetable garden in full swing, and cucumbers reproducing faster than the Duggar’s, my drink of choice has been:

El Granto’s Gin & Cucumber Caesar

For all the American’s our there, a Caesar is the Canadian version of a Bloody Mary, but BETTER cause it’s made with Clamato juice. What is Clamato you ask? Well really it’s a tomato cocktail that contains some clam juice. Don’t you go making a yucky face at me, it’s delicious. You would have no idea that it has clam juice in it, it’s just wonderful. Kinda like how Caesar salad dressing has anchovies in it. Yeah and you love it, so don’t you worry about Clamato, it’s delicious.

Ingredients:

2 oz Gin
Ice
Mott’s Clamato Juice
Lime
Celery Salt
Horshradish
Hot Sauce
3-5 slices of cucumber, peeled
Matt & Steve’s Extreme Beans (a spicy pickled green bean, you can find these at gourmet grocery stores or Costco)
Worcestershire Sauce

How to:

Run a wedge of lime around the rim of a pint glass, and then rim it with celery salt.
Place cucumber in bottom of glass, pour 2 oz of Gin over top and using some sort of implement (ideally a mojito muddler) bash up the cucumber into the Gin. Macerate it, and really get the cucumber flavour into the gin. Add a teaspoon or so of horseradish (less if you’re not a big horseradish fan.) A dash of hot sauce, and Worcestershire sauce. Give it a stir, then add a handful of ice, and top with Clamato juice. Give another stir and garnish with a wedge of lime, a slice of cucumber and an Extreme Bean or two. Enjoy!