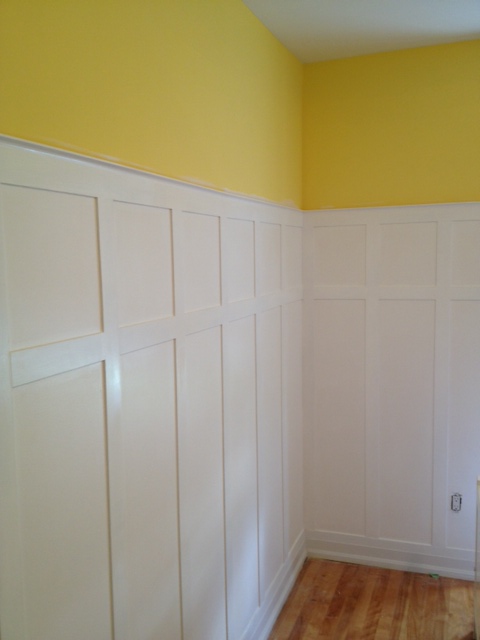
Yes…I am still talking about the guestroom paint colour. It did cause a little debate on facebook and amongst friends and family, with everyone taking different sides. If you will remember, the room started out yellow, VERY yellow. Continue reading “Guest Room Paint Colour Update”
Toronto Beer Quest
I’m exhausted! Yesterday we participated in Toronto Beer Quest 3, which was awesome. It just involved more athletic ability and less beer drinking ability than I expected… I actually RAN…lots. Running aside, it was a ton of fun.
We had 10 Prohibition beer related questions to figure out, leading us Amazing Race style to locations around the city. Once we found the locations, we needed to take a photo of our team in front of it to prove we’d been there.

We were allowed to use our feet, and TTC as our modes of transportation. They did however make it good and tricky by placing the locations away from the subway, so you did have to get out there and run or get lucky with buses and streetcars. We were allowed to use our smartphones to help in figuring out the clues, and I don’t know what we would have done without them. I had done some research on prohibition and Toronto beer history figuring I’d get a leg ahead. It did me no good! The questions usually involved a twist, heading us to find a specific item at a location and taking our photo with that. It was an urban adventure race at its best. We had a blast, managed not to freak out on each other like Amazing Race participants oft seem to do. The best part was than when we returned to the Charlotte Room (the start and finish line for the competition) we were rewarded with Mill Street Tank House Ale and pizzas and nacho’s. Running is worth it if its rewarded with beer & nachos. We will definitely be participating again next year, and bringing along some friends to join us. Now to check out more events for Toronto Beer Week!

Friday Libation – The Turbo Shandy
Today marks the start of Toronto Beer Week. From beer tastings, pairings, a homebrewing competition and of course BEER QUEST (which we will be competing in this Sunday!).
So as the Storefront Life resident beer drinker and connoisseur and in the spirit of Toronto Beer Week I bring to you… Da–da-dada!
The Turbo Shandy

A typical Shandy (or Shandygaff) is beer mixed with citrus flavored pop (7-up, sprite, or lime-it-up). But let’s not be sissies here. Lets turbo this thing up. It’s time to get… Tur-blasted!
It’s super simple.
- 3/4 beer
- 1/4 Smirnoff Ice
Done.
Adjust for your taste. I prefer more beer flavor to my Turbo than Smirnoff flavor. I also prefer to use a Pilsener for my Shandies or my Turbos. I also don’t use expensive beer for these. Buck-a-beer will do. I usually use Lakeport.
Whatever you do don’t buy in to the corporate re-branding of this drink and call it a “Smirnoff Rocket”. That’s some BS right there. Taking an established drink and just renaming it for your marketing purposes. There are LOTS of variations on the shandy.
- Beer + Cider = Snake Bite
- Beer (stout) + Sparkling wine = Black Velvet
- Beer (stout) + Cider = Poor-man’s Black Velvet
- Beer + Amaretto = Dr. Pepper (sometimes beer + Cola + a drop shot)
There’s a small list of possible Shandies for you kids. As usual drink safe and never drink and drive.
Weekend To-Do
It’s the weekend again. YAY. I am looking forward to having a nice weekend at home, getting some work done around the house, and competing in Beer Quest on Sunday.
Here’s my to-do list for these two days out of the office. Whats on your list this weekend?
Weekend To Do
- Paint guest room board & batten
- Paint guestroom walls, and put the room back to some semblance of order
- Convince El Granto to let me cut a hole in the wall (more on that later, I hope…)
- Do some small maintenance on the exterior of the Storefront in preparation for winter. WINTER IS COMING. Will also try to get a new mailbox and install that.
- Clean up the vegetable garden (or whats left of it)
- Oh and clean the house, cook, walk the dog, do laundry and all the regular stuff…
I am considering giving up sleeping…I hear its overrated anyways

Hallway Schoolhouse Light
You may have noticed that I have gushed about schoolhouse lights once or twice in the last few weeks. It’s true, I was in love. However my budget wasn’t allowing me to date any of those lights (sad face).
Not to be so easily broken, I set out to find a way to get my schoolhouse lights in my budget. I found schoolhouse glass at Home Depot for $7.50 (awesome!) I just needed to find an inexpensive fixture to use with the glass…not so awesome. I must have opened every box in Home Depot trying to find one that fit the glass. I didn’t even care about colour, as I could easily spray paint them. I struck out, hard. Nothing would work. In my depressed state, I wandered around Home Depot feeling sorry for myself. Then I spied on a bottom shelf, a clearance priced Hampton Bay Schoolhouse Semi-Flush pendant. Priced at…wait for it…$36. WTF? Where did this come from? I had never before seen this light (and I was SURE I knew of each and every schoolhouse light HD carried.) I took a pic, sent it to El Granto for approval. He gave me the thumbs up, so I promptly marched one over to the checkout.

Ideally I would have gotten three, so I could replace all the heinous hallway lights in the house, but they only had 2 left at my Home Depot (boo) and realistically I was already buying paint, so I really couldn’t carry them all. So I just took my one treasured light home, and vowed to check other Home Depot’s later.
I quickly roped El Granto into swaping out our main floor hallway light for the new schoolhouse light. So quickly in fact that I didn’t take a pic. So instead here is a pic of an identical spaceship light elsewhere in my house. (all told my teeny tiny house holds 6, yes six of these ugly little UFO’s.)


Ahhh…so much better. I have been loving gazing at my new light every time I pass it by. It’s true love I say.
SOURCE LIST:
Materials:
Hampton Bay Schoolhouse Light: Home Depot
Tools Used:
Screw Driver, Ladder
Difficulty Level (on a scale of 1-5):
One out of five
Total Cost: $36
Neighbourhood Walk Score
In reading a recent Toronto Life article “House Wars: true tales from the Toronto real estate market” I got to thinking about how the walkability of your home effects your life, and where exactly you live.
El Granto & I do not own a car, we commute via TTC to our jobs and walk pretty much everywhere else. I buy groceries 3 times a week (Monday, Wednesday and Friday) because I can only carry so much. I buy only the food we plan to eat for that week, and as such we don’t have a lot of pantry items, snack goods or the like hanging about. I buy milk from the corner store as it’s too heavy to schlep farther than that, and we buy all our bread and meats from a local bakery & butcher, and in the summers we frequent local farmers markets.
Living downtown sans car means a lot of things to your lifestyle. Our weekends are spent walking to local amenities, restaurants and parks. To the hardware store to procure items for our home projects, and grabbing a coffee and heading out for an adventure with the dog. So when the Toronto Life article touched on Walk Score it got me thinking. We knew that when we bought our house the location played an important role. We could get a much bigger house say north of St. Clair and west of Jane, but we would be stuck on a bus to get anywhere near the subway, and lacked a lot of the things we loved. (Evening drinks with friends, Thai takeout etc.) We set a goal of living south of Dupont, and luckily we found it. Truth be told, our house was one of only 3 houses that we even looked at south of Dupont. One of the three was a major fixer on Euclid that went several hundred thousand over asking, and the other was a hoarders house in the Junction, that again, went over asking. We looked at over 100 houses, and really felt that we lucked out finding a house in the location that we did.
So back to Walk Score, I checked out our score today and noted that our house gets an 82 (out of 100) on its Walk Score and a 94 on Transit Score. That’s not bad and pretty much what we thought. Our neighbourhood is transitional (drug dealers and hookers are moving out, and hipsters & young families are moving in.) As this transition moves forward more amenities move into the neighbourhood. We’ve got some great local restaurants (Starving Artist, Bloordale Pantry, Farmhouse Tavern to name a few) as well as great places to grab a pint (3 Speed, Bar Neon & Boo Radley’s) and lately coffee shops have been popping up like acne on teenage face. Café Neon and the Toronto Coffee Company among others. In contrast, when we moved into the house, Bloordale Pantry, Farmhouse Tavern, Bar Neon, Café Neon and Toronto Coffee Company didn’t exist. That’s a lot of new amenities moving in to the hood in the last year and a half. Hell, even the New York Times recently featured the neighbourhood in a Travel slideshow/article. Check it out here.
![]() Transit however has always been good. We’ve got Bloor/Danforth subway, the Bloor GO Station, a plethora of buses (Lansdowne, Dupont, Symington, Dufferin) and the 504 & 505 streetcars. We knew with good transit options that our neighbourhood had too much to offer to stay underutilized forever. Now as we grow together in our first home we keep seeing the building permits go up in the windows around us, the junkies disappearing and the neighbourhood seems to get better every day.
Transit however has always been good. We’ve got Bloor/Danforth subway, the Bloor GO Station, a plethora of buses (Lansdowne, Dupont, Symington, Dufferin) and the 504 & 505 streetcars. We knew with good transit options that our neighbourhood had too much to offer to stay underutilized forever. Now as we grow together in our first home we keep seeing the building permits go up in the windows around us, the junkies disappearing and the neighbourhood seems to get better every day.
So whats your Walk Score? Did you move into your neighbourhood before it was hip?

Guest Bedroom Progress Report
It’s day four of Project Guestroom and although lots of work has went on, there’s still a ton to do. Here’s an update in pictures:
The weekend got started by prepping for our big project; board & batten. Well truthfully its not really board and batten, its more like shaker style paneling.
We got 1/4″ mdf custom cut at our awesome local lumber yard Downtown Lumber and attempted to walk it all the way home on a dolly that didnt want to cooperate. But after an hour and a half of El Granto and I yelling at the lumber, each other, and strangers passing by, we got it all home.

We then laid out our paneling, which required math, engineering and thought. It took a long time and my head hurt. The end result was a line of tape on the wall…

Then we painted and stuff, and then it looked like this:

Then we started paneling


Then we sanded, spackled, spackled and more spackled and then cried some, cause spackling sucks

Next up, caulking, cause as if spackling didn’t suck enough…
(yes yes there will be a full board & batten post and a how-to after I complete it all, so hold your horses)
Project Guest Bedroom
When we purchased the house, we envisioned a cottagy guest room, and both of us instantly thought yellow. We picked out a sunny buttery yellow, and purchased the paint prior to moving in. Our first weekend in the house we painted, and it was….BRIGHT. We decided to try to live with it, see if we liked it any better. Then when Holmes Inspection renovated our house, they colour matched the room and re-painted, but the colour was even BRIGHTER. Now when the sun pours in the bay window every morning, it’s a bit…well…neon.

We did do a few things right, we bought a nice bed, linens, hung custom blinds, and re-used some dressers. It just needs a bit more “lipstick and mascara” (and maybe a pair of killer heels).
So here goes Project Guest Bedroom
Pinterest Guest Bedroom Inspiration Board

To Do List
- Install Board & Batten trim on walls (see the how to here)
- Build closet shelves and organization
- Paint Board & Batten
- Paint Walls
- Change out light fixture
- Hang reclaimed windows
ProcureMake bedside tables- Buy bedside lamps
- Hang art
BuyMake Mirror- Add robe & towel hooks
- Find old chair and give it a coat of paint
- Add transom above doorway
Really?! All that for a room I thought was almost finished? Eeep, what do I get myself into?
Backyard Mural – How to Paint a “Faux” Ghost Sign
Sorry for the long post, I doubt many of you will ever want to paint a ghost sign of your own, but if I help one person, I will consider my life fulfilled. Yeah sure…
There really is no info on how to do this on the web, and I did it all trial and error. So I am putting my wisdom blubbering nonsense into the world, and maybe somewhere I will inspire a DIY ghost sign.
Now lets get this party started. First up, I painted my cinderblock wall with a base color of dark grey exterior flat paint. Ideally I would have had a lovely brick wall, but instead I had an ugly beige cinder block wall, so I gotta deal with the hand I’ve been dealt. If you have a wonderful old brick wall, don’t paint a base color!
After my base had cured for a week(ish) I set out to project my design onto the wall. I used a digital projector and a design I laid out in Adobe Illustrator. I lucked out with this and was able to borrow a projector. However, if you are unable to. Check Craigslist for Artist Projectors. Like the Artograph Tracer Projector. Even new, it only retails for $100.
I projected the design onto the wall (at night), centered and leveled it, and got to tracing the outline with chalk. I used Crayola childrens sidewalk chalk in yellow, because that’s what the dollar store had. In hindsight, I would recommend regular white chalk, in the skinnier variety. My chalk came pre “sharpened” on one end, but quickly dulled and I was left with a large blunt blob of chalk to draw crisp lines with… so yeah, get the regular old chalk your school teacher used.
After you draw your outline, go to bed. It’s dark, and you cannot paint. No matter how excited you are to get started.
Then get yourself some Annie Sloan Chalk Paint. I got mine from Canadian distributer Diamonds & Toads in St. Thomas Ontario. If you’re doing a small mural like me, just get a sample pot. That stuff goes a loooooong way. I have a quart, and maybe used a 1/4″ worth of paint from the can. Seriously. Also get yourself an artist paint brush to do the outlining of your design, and a wider brush for filling in. Now, this is NOT chalkboard paint, it’s a variety of paint all it’s own. It’s great for furniture, adheres to most surfaces without any sanding or removing of old material, and is even durable outdoors with no extra finishing. (really). Now if you were putting it on furniture you would probably want to wax or seal it, however its important for outdoor uses NOT to wax. Wax will hold in moisture and wreck your shit. So paint it and leave it alone to age gracefully.
Once you’ve got your supplies, outline and fill in your design with one coat of chalk paint. It wont be even, it wont be perfect, but that doesn’t matter, you’re going to be removing most of the paint anyways. Now this stuff dries fast, so work quick. Try not to leave big ridges or globs of paint, but make a smooth even layer. Chalk paint is weird. It’s more like a really thick watercolour paint than a latex or acrylic. It blends and moves like an artist paint. You can also thin it down with water, or thicken it by leaving the lid open (really). You also don’t have to worry that much about screwing anything up, as its supposed to look old. As I said, it dries fast. So clean your brushes pronto after finishing.
After an hour you can start to distress the paint. It took me about an hour to do my one coat of paint, so as soon as I finished painting I went back to the areas I started first, and got to distressing. If you were painting on wood, you would probably want to try sanding for distressing. However, being on a cement wall, that’s not the best or easiest way to do it. Instead, you can use another technique; a rag and warm water. But wait, I said that chalk paint was durable outdoors, but how can that be if it can be removed with water?! The thing is, when you wipe the dry paint with a wet cloth, the paint doesn’t wash off. However, when you SCRUB the paint with the wet cloth, the paint RUBS off. It doesn’t dilute and smear, it just comes off the areas you scrubbed. Leaving the base colour paint below intact, and not smearing paint into other areas of your mural. Say what?! Really, that’s how it works, I promise. I have no idea why, it just does. So needless to say, that’s perfect for an old looking weathered signs on walls. So start scrubbing! I thought I’d try a cleaning sponge, but it was too. well. spongey. A white clean heavy duty rag worked best. Now the thing is, when you distress chalk paint with water, it’s kinda like working with grout. Huh?! You know how when you are washing away excess grout, your sponge is constantly covered in grout sludge, and you have to repeatedly wash it to get all the film off the tiles? Distressing chalk paint with water is the same way. Your rag will leave excess paint hanging about. So just make sure you have a different clean rag or sponge and are always cleaning up after yourself, or you will have a wishy washy paint sludge over everything.
Now distressing chalk paint with a wet rag isn’t easy per se. It requires massive amounts of scrubbing. And scrubbing and more scrubbing. BUT it rubs off beautifully. It sticks better to rough surfaces, and rubs off easier on smooth ones, making the distressing rather easy. It looks natural because its exactly how paint would naturally fade/age.
So grab an unsuspecting lacky and scrub scrub scrub. Now if you scrubbed off too much, don’t worry you can always layer more paint back on. I did notice that the areas where I had a nice even coat of paint were easier to distress then the more dry brushed thin areas. So I actually wished I had a more solid layer of paint to begin with.
And that’s it. After you finish distressing and cleaning up after yourself, it’s done. No sealer, no nothing. It will be fine out in all weather and will age nicely.

Backyard Mural – Ghost Sign Reveal
My backyard ghost sign mural is finally done. (there will be a how-to tomorrow, so check back if you want to know how we did it)
So here is some background. We had a boring beige cinderblock wall at the back of our yard. It was boring to look at, and well BEIGE. I cant leave anything beige in my wake, so I set out to ramp it up some. After we found a $9 ‘Oops’ can of paint at Home Depot, and my Mom picked up some chalk paint for us, we set out to create a faux Ghost Sign. What’s a ghost sign? Those old faded sign’s and ads on the sides of buildings! We live in an old storefront, so we wanted something that looked old and cool. What design did we end up going with? Inspired by this image of bold graphic beautiful type, we decided to do a typographic approach to our house number.
So here it is. The before and afters!
Before:

During:


After:

SOURCE LIST:
Materials:
Base Paint – Behr Premium Plus Ultra: Home Depot
Annie Sloan Chalk Paint in Bright White: Diamonds & Toads
Tools Used:
Paint brush, tray, roller, tape, rag, sponge, muscles
Difficulty Level (on a scale of 1-5):
Three out of five
Total Cost: $50