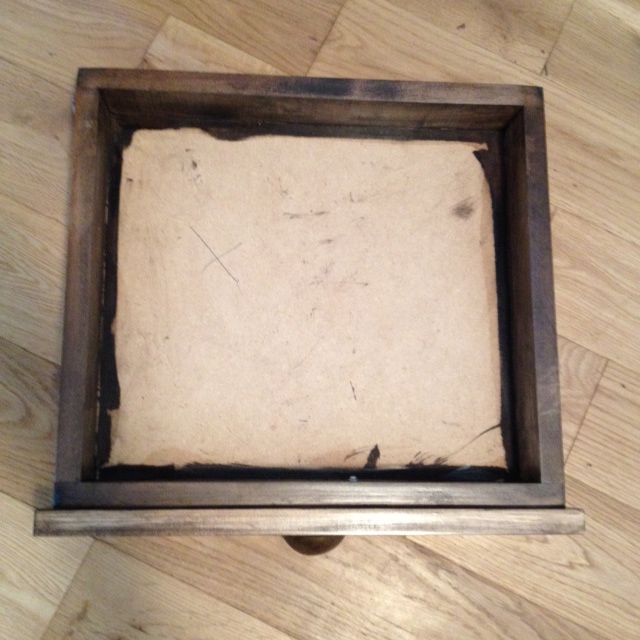
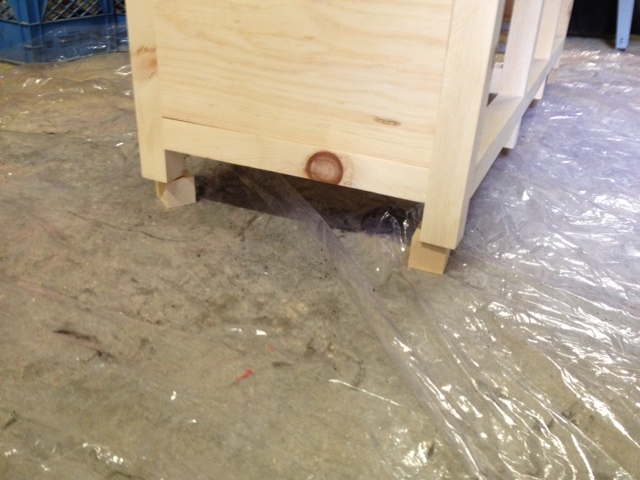
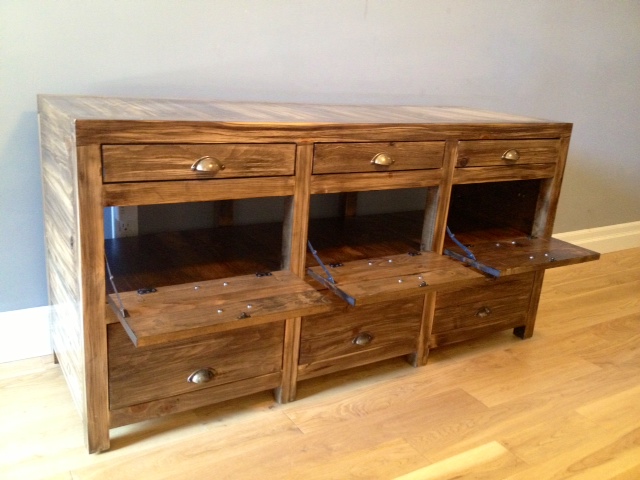
The bottoms of the drawers for our media cabinet were a bit, well…not living up to their potential. We used hardboard & chipboard as the drawer bottoms and compared to the stained wood on the rest of the piece, they look a bit shabby and out of place.
The poor shabby little drawer bottom, covered in stain and looking sad.
I knew all along that my anal retentive personality wouldn’t let the drawer bottoms live in such a state. Not only were they not up to par, but they were an excuse to add a bit of fun to an unexpected place. I love adding colour/drama where you least expect it (like my purple wallpapered closet doors.)
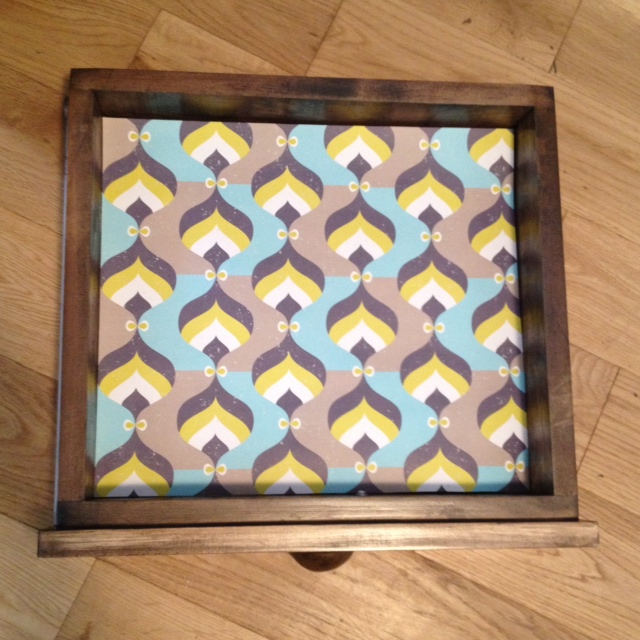
For the drawer bottoms, I narrowed it down to either paint or paper. While paint could be fun in a nice bright colour, I decided on paper in the end to add a bit of a graphic punch.
There is a newly opened store in my neighbourhood called TOWN that I knew would have some lovely papers. (They also have the best selection in cute cards!). The selection at TOWN did not disappoint, and we spent several minutes trying to decide on just one pattern (would have bought them all!) We took our sheets of heavy weight wrapping paper home, cut out squares to fit the drawer bottoms, and got to gluing. I used Elmer’s extra strong spray adhesive (the same spray adhesive I use to attach foam for upholstery projects). A few quick sprays of adhesive, and careful application onto the drawer bottom, and we had a much nicer looking drawer.
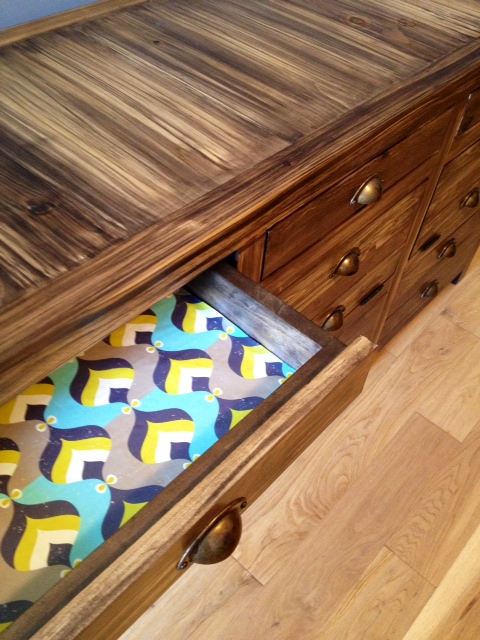
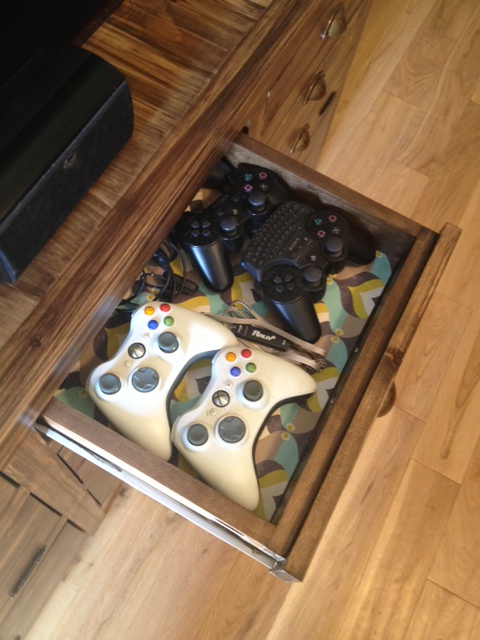
Drawer bottom lined with paperA little pop of sunshine every time you open one of the drawersAhhh, isn’t that much nicer?
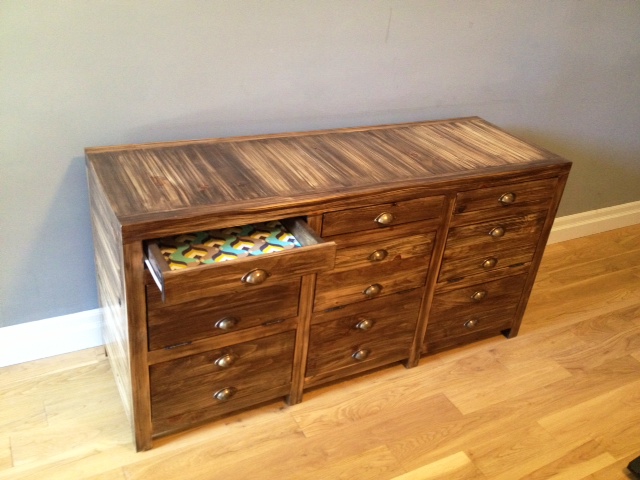
I bet you’re wondering how much use we get out of those skinny little drawers. LOTS, they hold remotes, video game controllers and all sorts of little things that you don’t want out all the time, but would get lost in the big drawers. I am LOVING not having the XBOX and PlayStation controllers hanging out on my end table!
Yay! Controllers and USB keys are happily hidden away.
The drawers are lined, now I can sleep again. (Isn’t everyone kept up at night by the thought of an unsightly drawer bottom. Wait, that’s not normal?)
SOURCE LIST:
Materials:
Wrapping Paper (3 sheets) – TOWN the Store
Elmer’s Spray Adhesive
Not long after we moved in, we built a large planter box out front of the Storefront. It makes it look a bit more homey, and keeps people from peeping into the storefront window. Last fall, we also added a black urn right underneath the mailbox.
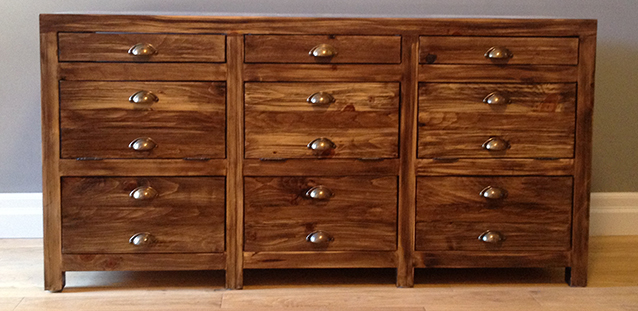
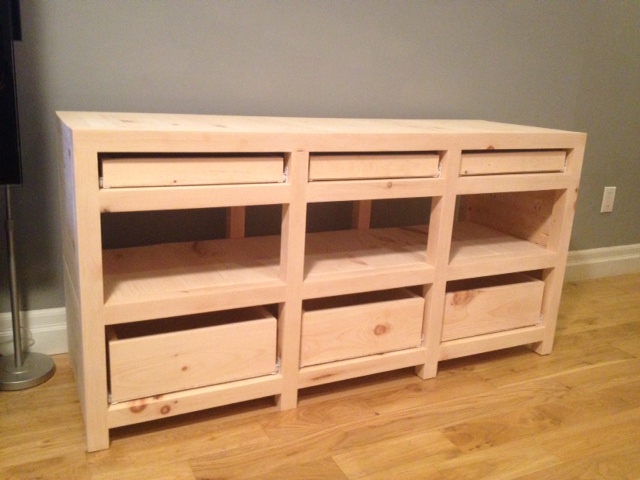
Its been six weekends of hard work, but we finally reached the final stretch of the printmakers media cabinet project.
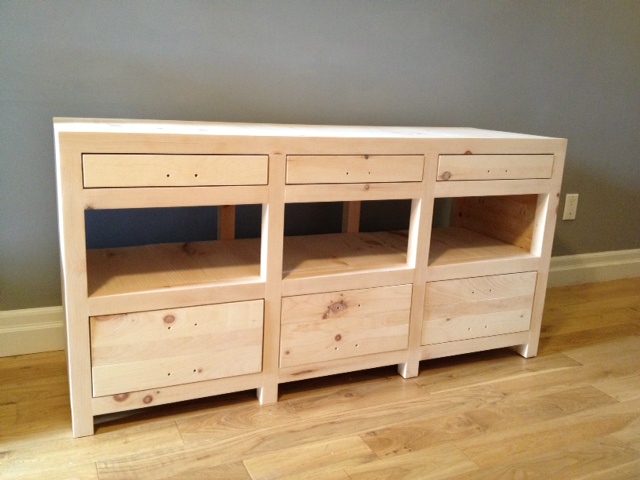
This is where we left off. The cabinet was built and sanded and ready for finishing. If you missed it, check out part one, two, three, four, and five of the project.)
Cabinet built and ready for stain & hardware
Next up we took all the drawers outside, and set up a staining station, and gave everything a coat of wood conditioner.
The drawers & doors ready for wood conditionerDIY Tip: Put your cabinet on scrap wood to make it easier to stain the bottoms of the legs
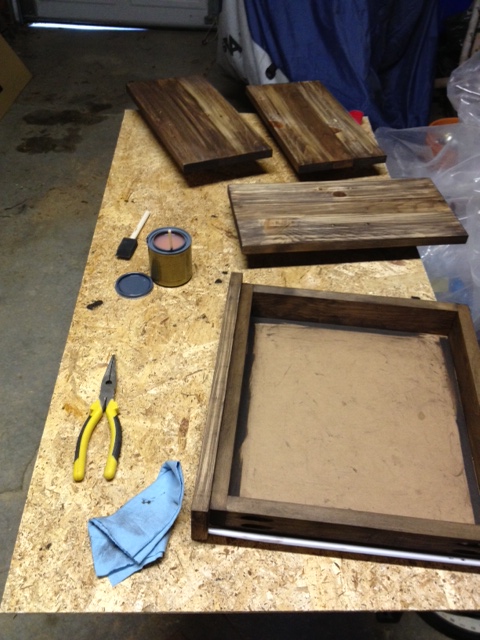
After letting the wood conditioner sit for half an hour, we set out to staining. We had done many a test on stain, and came across a cool technique we wanted to try on the cabinet. It involved wetting the wood, then putting on oil based stain on top of the water, then quickly wiping away. It left an almost zebra like effect. We knew it was going to be a risk, but decided to give it a try none the less. It involved several hours staining, many a swear word, lots of teamwork, and a whole lot of second guessing.
Cabinet stained
We took two days to stain everything, the first day we did the cabinet and all the drawer & door fronts. The next day we stained the interior of the cabinet and the drawer boxes. For the interior, we didn’t bother doing our stain technique, and instead just used the stain traditionally.
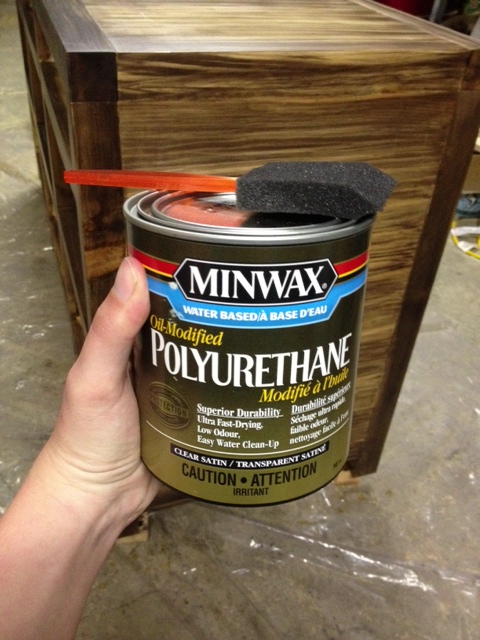
After the stain dried, we applied several coats of polyurethane, sanding with a 320 grit sandpaper in between coats. We put a total of 5 coats on the top of the cabinet, and three everywhere else.
We use Oil-Modified Polyurethane with a foam brushDrawers & Doors mid-poly
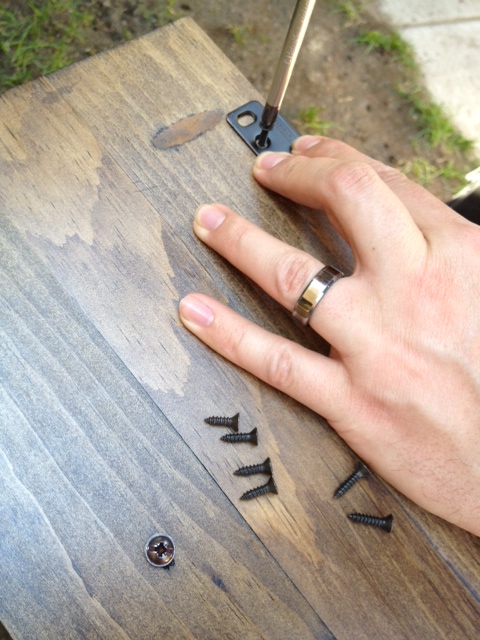
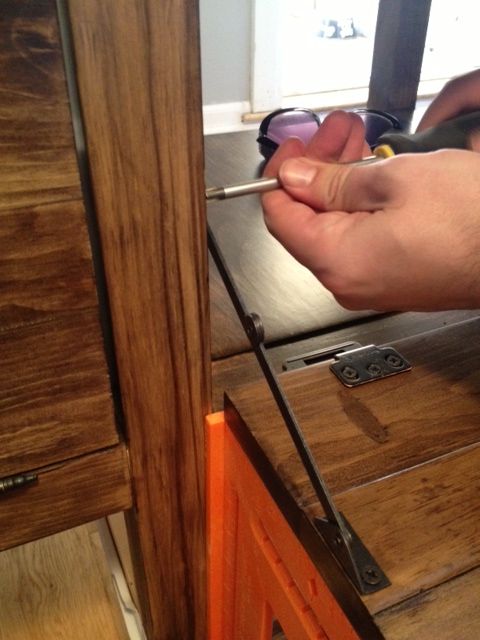
Once the poly had dried, we set to installing hardware. The screws that came with our cup pulls were too short for the double thick drawers, and too long for the single thickness doors. So we headed to the hardware store and picked up longer screws for the drawers, and El Granto cut down the screws with the dremel for the doors.
Pulls attached to door fronts, and ready for hinge installation
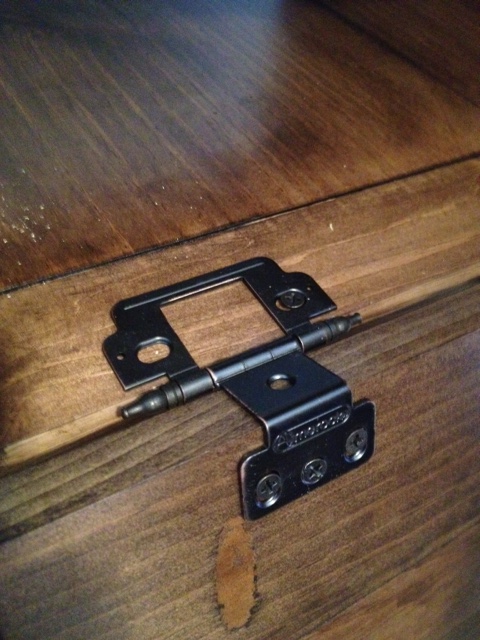
After the handles were installed, we set to installing the hinges, stays and clasps for the doors.
Installing hinges on the doors
This involved a whole load of finikity work, lots of tiny screws, and stubby little screw drivers to fit into the cabinet.
Attaching hinges to the cabinetAttaching claps to keep the doors closed
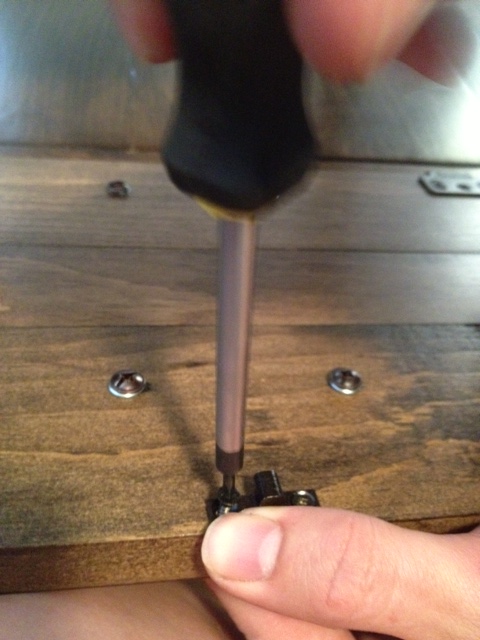
Next up, we needed to add the lid stays to make sure the doors dont open too far. We wanted them to stop at 90 degrees.
Installing lid stays
We used a square to hold the door at 90 degrees and attached the stays with small screws.
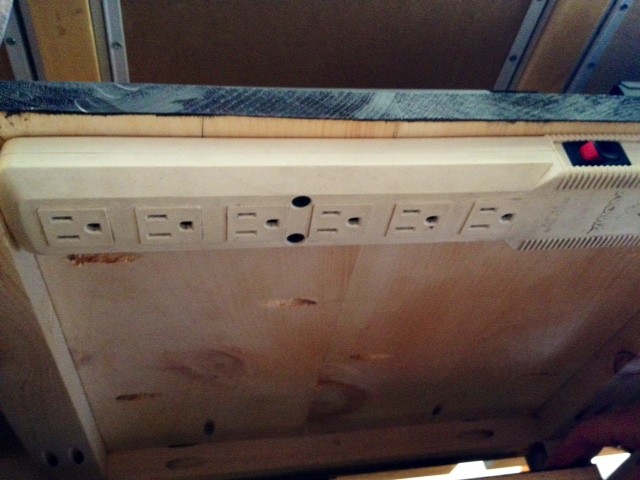
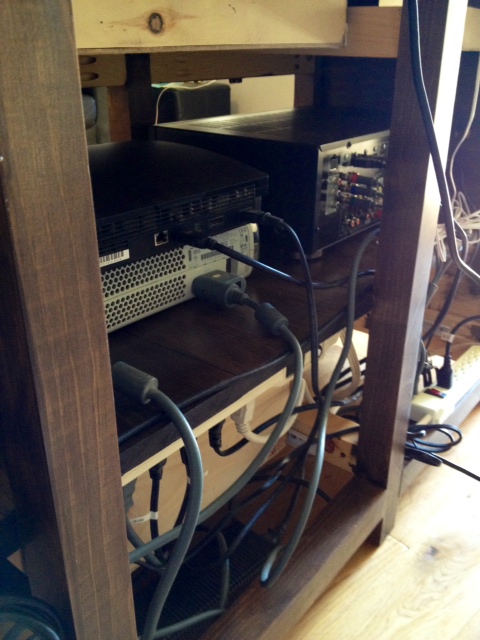
Now we could set to putting all our electronics into the cabinet. To keep things neat, we installed power bars to underneith the back of the shelves. This keeps the cords off the ground, and makes it so that the cabinet can sit flush with the wall.
The view of underneath the shelf in the cabinet showing the power bar.
We routed all the cables and electronics as best we could through the cabinet, and its so much more organized than our old media center!
The electronics all tucked into the cabinet
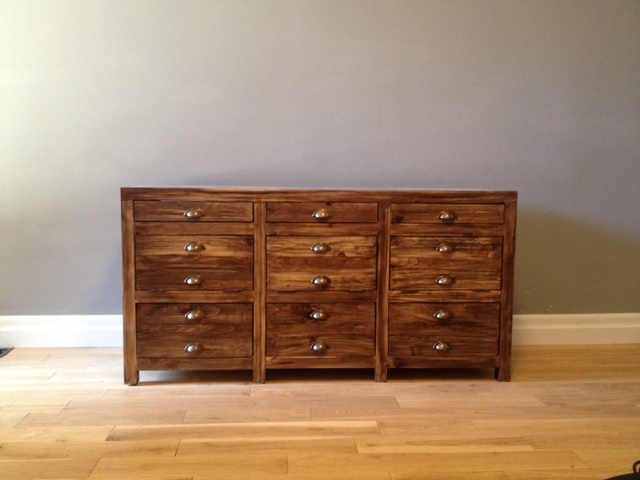
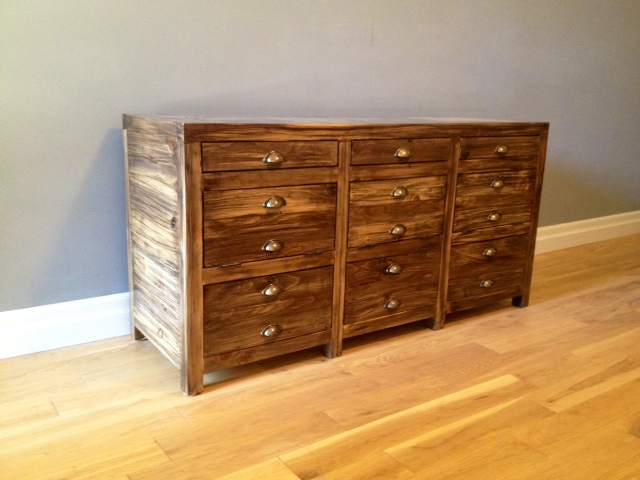
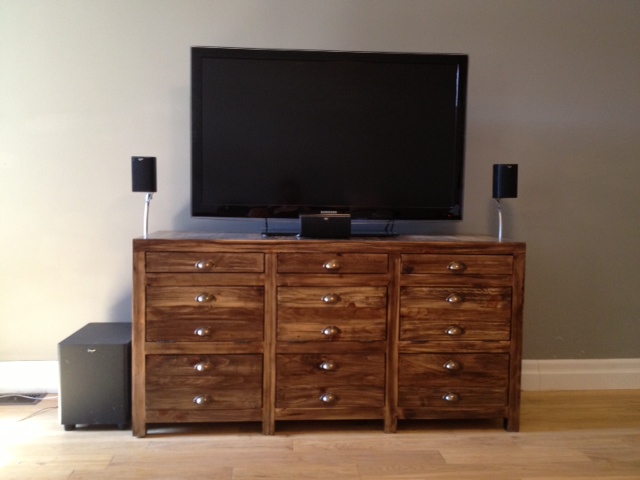
Enough with the technical stuff, are you ready to see what it looks like all finished?
Hardware: ($130)
15 cup pulls – Lee Valley
6 inset hinges – Lee Valley
6 sets drawer slides – Lee Valley
3 lid stays – Lee Valley
3 cabinet clips – Lee Valley
8 1 1/2″ felt furniture pads – Dollarama
Trips to lumber yard -4
Trips to hardware stores -10+
Coats of polyurethane – 5 on the top, 3 everywhere else
Stain samples made before deciding on one – 11
Time involved – 6 weekends, 70-80 hours total
Number of electronics in the cabinet – 11
Number of screw-ups – 3
Number of arguments – 2
Total pieces of wood – 119
Screws – about 300
Injuries – 0!
Swear words – more than I’m proud of
For an urban backyard in downtown Toronto, our yard isn’t bad. We have a detached garage, main and second floor deck, and a 12′ x 26′ stretch of grass and garden.
Everyone has a friend with a truck. He’s the guy you call on moving day, or when you bought a new sofa. Our (awesome) friend with a truck helped us carry home several loads of bricks for our patio earlier in the spring. The guy with the truck must have so many “owe you one’s” accumulated that he could call in a favor a day for a year. (Shout out to Michael!) Continue reading “The Guy with the Tools”
Crazy busy day today, so no earth shattering post, but will give you a little visual recap of what we’ve been up to in the past week. Continue reading “Instarecap”
I feel like we’ve been working on the media cabinet forever (check out part one, two, three, and four). The whole being a grown up and having to work 40 hours a week really gets in the way of project time. The end is however finally in sight. In fact, this will be my last update before the reveal.
Where we left off, we had made the drawer boxes for the upper and lower drawers. We then had to cut down the upper drawers as they were too tall. Oops.
Trimming the height of the drawer boxes.
We used our new table saw to cut everything down to size (setting the fence and ripping each side of the drawer until they were all the proper height.) After a quick sand, we installed the drawer slides and had operating upper drawers! (woot!)
All the drawer boxes installed (the drawers will have fronts on them to make them look all fancy like)
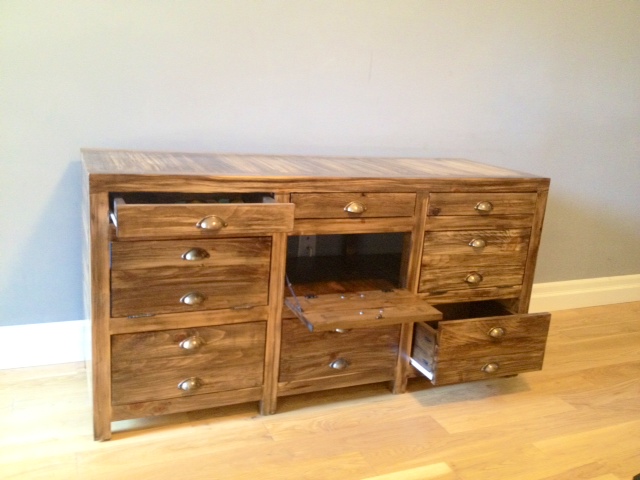
The way this cabinet is designed, the drawer boxes are fabricated and installed, then drawer fronts are attached to them (to cover the unsightly visible hardware and gaps.)
The center portion of the cabinet also gets fold down doors to hide all the electronics.
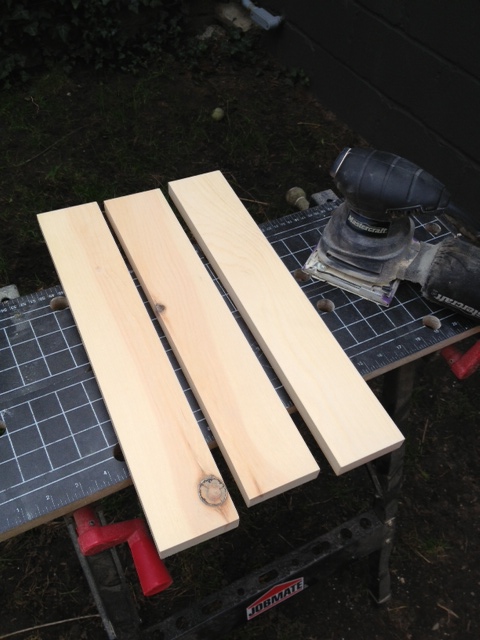
Now we needed to make the drawer fronts & doors. We headed to the garage and ripped down a bunch of lumber to size, then did all our length cuts on the miter saw.
All the wood cut and ready to assemble
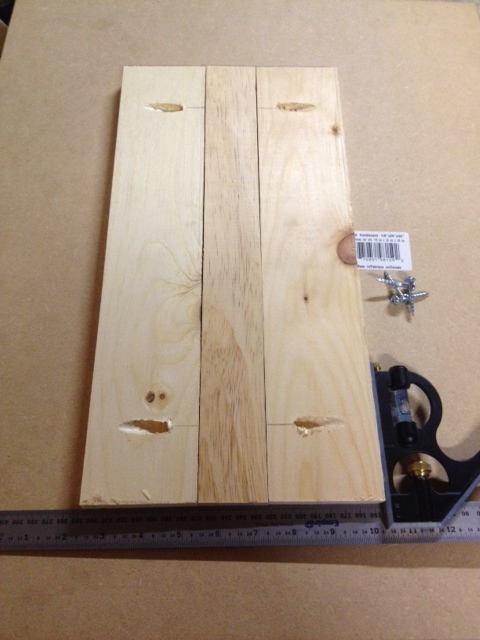
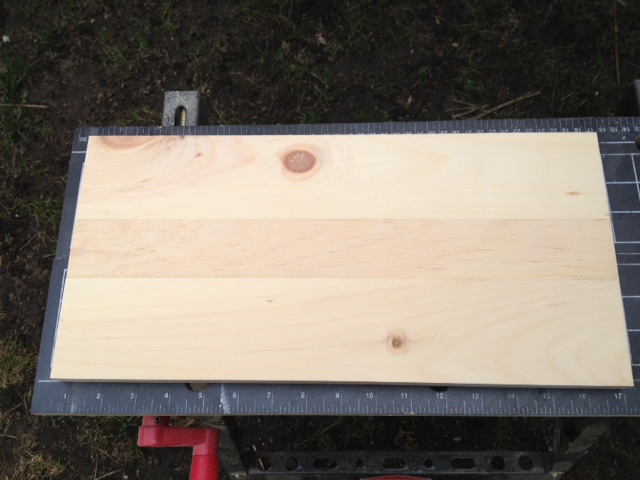
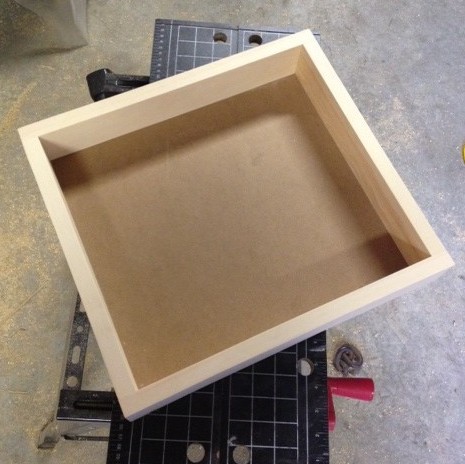
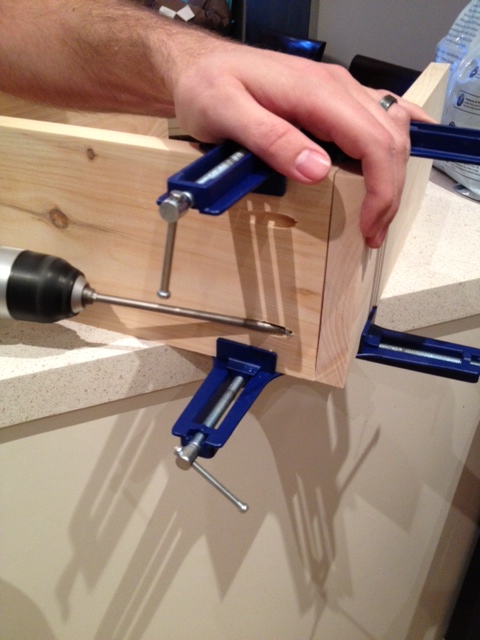
The larger doors & drawers are actually made up of three pieces attached together so that they look like two small drawers and a spacer. (as its supposed to be a printmakers cabinet that looks like it has lots of little drawers.) To attach them together, we used pocket holes and screws.
Assembling the drawer fronts using the pocket hole system. (also note the use of a square to keep everything all nice and straight & square.)
After everything was assembled I spent the afternoon filling and sanding everything.
The three small drawer fronts ready to goOne of the large drawer fronts. You can see how its made up of three different pieces.
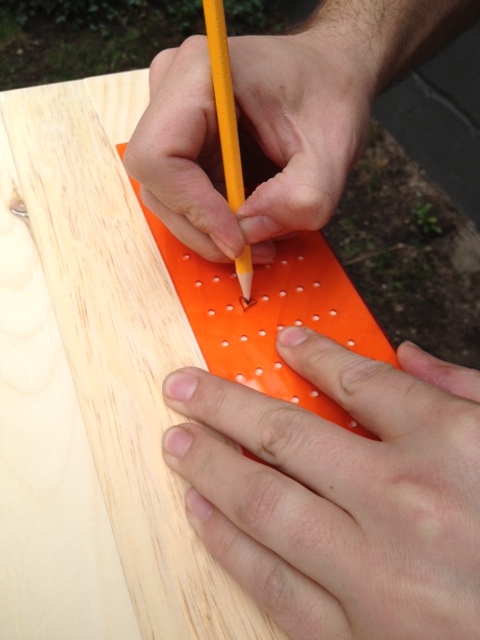
Then we used our Ikea Fixa drill template to mark where we needed to drill holes for all the handles. We have gotten so much use out of that darn template. Worth every penny.
Marking holes for the cabinet hardwareDrilling the cabinet hardware holes
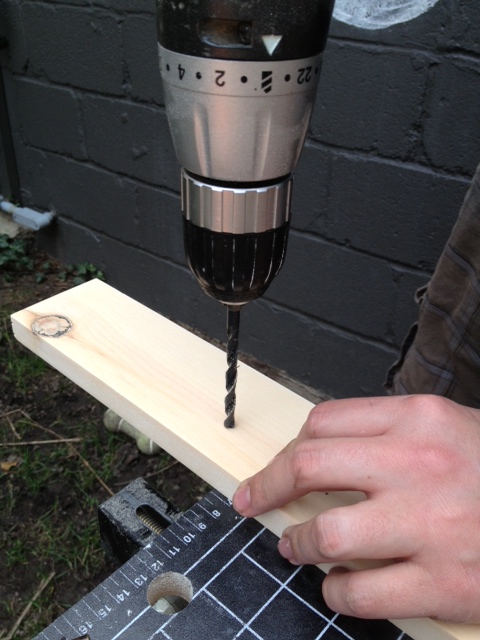
Next up we needed to install the fronts. The plans call for a very ingenious way to do this. (Sorry for the lack of pictures, this was an all hands on deck kind of task.) Essentially you space the drawer fronts perfectly in the cabinet, and attach it temporally with two screws through the cabinet hardware holes.
Temporary screws through the hardware holes holding the drawer front in place until it can be attached from inside the drawer
Then you take the drawer out, and attach the front permanently by putting a few screws through from the inside of the drawer.
Attaching the drawer fronts with some screws inside the drawer
Then you can remove the temporary screws from the hardware holes, and drill all the way through for the hardware. We continued on and attached all the drawer fronts this way. (Note, we didn’t attach the fold down doors, as we didn’t want to do that until everything was stained & finished.)
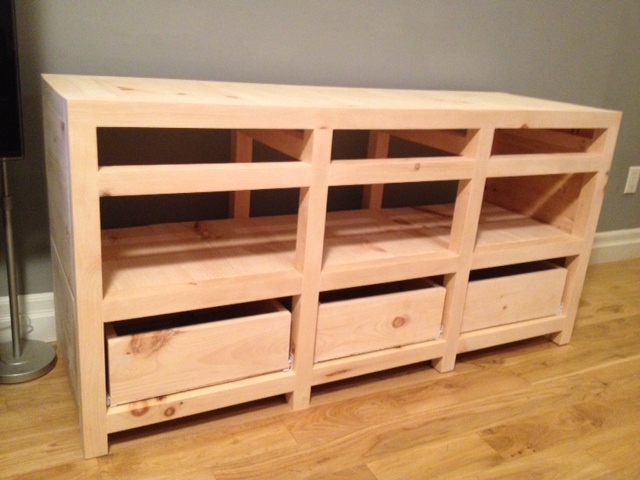
Now the whole cabinet is built, sanded and ready for finishing.
Cabinet built and ready for stain & hardware
Ta da! All that’s left is stain, poly & hardware! Stay tuned for (hopefully) the big reveal next week.
In my quest for a stain for the media cabinet, I have about driven myself nuts with options. I have tried a stack of stain cans, jars full of “custom stain mixes” and even shoe polish. I am desperate, and indecisive. I don’t know why I am having such an issue with making my mind up, I guess we’ve just put a TON of work into the cabinet, and I don’t want to screw it up. I want it to be PERFECT. (Not that I am anal retentive or anything…) I think I have come up with a stain that I am happy with (more on that next week) but I wanted to show you one of the unorthodox options I was working with that turned out pretty cool.
Meet burnt wood
Yep, I torched that wood with a propane torch. Turned out kinda neat, right? Thats not stain at all, just raw pine that’s been torched. The theory on it is that you lightly flame the wood, and bring out the remaining sap. The sap, which is all sugary (maple syrup anyone?) burns when the flame hits it much like the top of a crème brûlée. You have to be very gentle with it, or else you’ll be left with firewood. The trick is to use even strokes and to not stop and start on the wood. Pretty much exactly like spray painting.
Its a cool finish, and something we may use around the house, but I think its a bit too much for the whole media cabinet. I thought it might end up looking like a country & western bar up in here. As much as I like cowboys, it was a bit much for our living room.
Ever used any nontraditional wood finishing methods? Ever torched any wood?
Cabinet drawers, not underpants. Get your head out of the gutter.
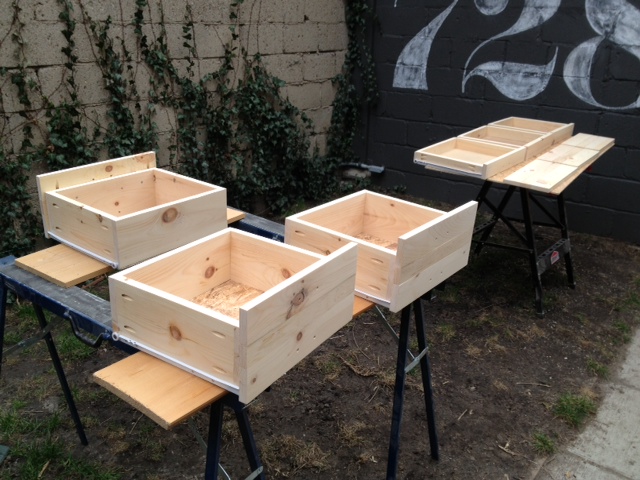
A big part of our Printmakers Media Cabinet project is the 6 storage drawers to hold remotes, and our DVD’s & video games. The cabinet has three shallow drawers at the top (for the remotes), and then three deep drawers at the bottom. Where we last left off was that we had built the small drawers.
Drawer Box. These skinny drawers go at the top of the cabinet to hold small things such as remotes and magazines
Last weekend we cut some hardboard bottoms for the drawers and attached them with brad nails.
Attaching drawer bottomsCompleted drawer
We gave the drawers a final sand, and headed inside to install the drawer slides. At this point in time the whole cabinet build had went very smoothly. No major hiccups, everything was great. Usually every project has it caveat. Its one pain in the ass task, or something liable to go wrong. Well we hit that with the drawers. We had tested the size of the drawers to make sure the drawer slides would fit on either side of the drawer into the hole in the cabinet. What we did NOT take in to account was that we purchased regular old kitchen drawer slides, which require at least 1/2″ in clearance in the height of the drawer to be able to take the drawer in and out. (The drawer slide has two rollers, and to take the drawer in or out you have to lift the drawer roller over the cabinet roller, thus the 1/2″ height clearance requirement. Our drawer boxes were 2 3/4″ tall and our hole in the cabinet is only 3″ high. So when you tried to put the drawer in, the drawer box hit the frame of the cabinet. Oops.
There were three options on what we could do to fix things.
Option A.)
Head back to Lee Valley and return our traditional drawer slides and buy the fully extending expensive slides. The reason we didn’t buy the fancypants full extending slides to begin with was that they were FOUR TIMES THE PRICE of the regular ones. If it was my kitchen and drawers that I would open and close several times a day, I would have went with the expensive ones. However, for a media cabinet that will maybe get used a few times a week, I was not ready to invest $120 in drawer slides when I could have something that worked for $30…. So I wasn’t too keen to this option.
Option B.)
Rebuild the drawer boxes shorter. This would mean essentially tossing out the drawer boxes we had made and making new smaller ones. A decent option, still cheaper than buying new slides, but it meant another trip to the lumber yard and a few hours work.
Option C.)
Cut the drawers down 3/8″ in height. This would involve no cost, but the potential for disaster was huge. (Our biggest worry was hitting a pocket hole screw with the saw blade, ouch.)
While we debated on what to do with the small drawers, we decided to build the large drawers (albeit to a shorter height than the plans said) to make sure that the drawer slides would in fact work. Cause I would be really pissed if I rebuilt the small drawers only to find that it still didnt work.
So we cut, sanded, drilled, clamped and screwed the big drawer boxes, and added drawer bottoms.
Assembling large drawer boxes
Then we gave a shot at installing the drawer slides. I was a wee bit worried at this point, and even watched a YouTube video on installing drawer slides. (Yep, that happened.) However it was one of those worry for nothing tasks. It was easy as pie to install. We had measured everything properly, the drawer slides fit in perfectly, and after a mere 20 minutes everything was installed correctly and moving without problems.
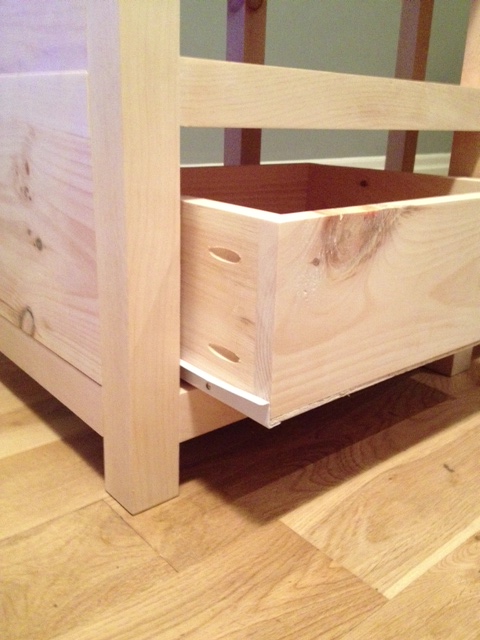
Bottom Drawers InstalledHoly crap, they actually work
The drawers still need their drawer fronts (which will cover up all the hardware and gaps etc.) But hey, it’s actually starting to look like a cabinet! Yay us!
So I bet you’re wondering what we decided to do with those small (but too tall) drawers?
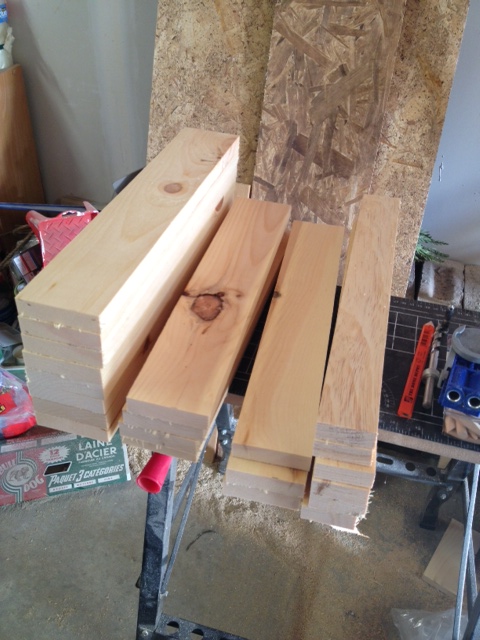
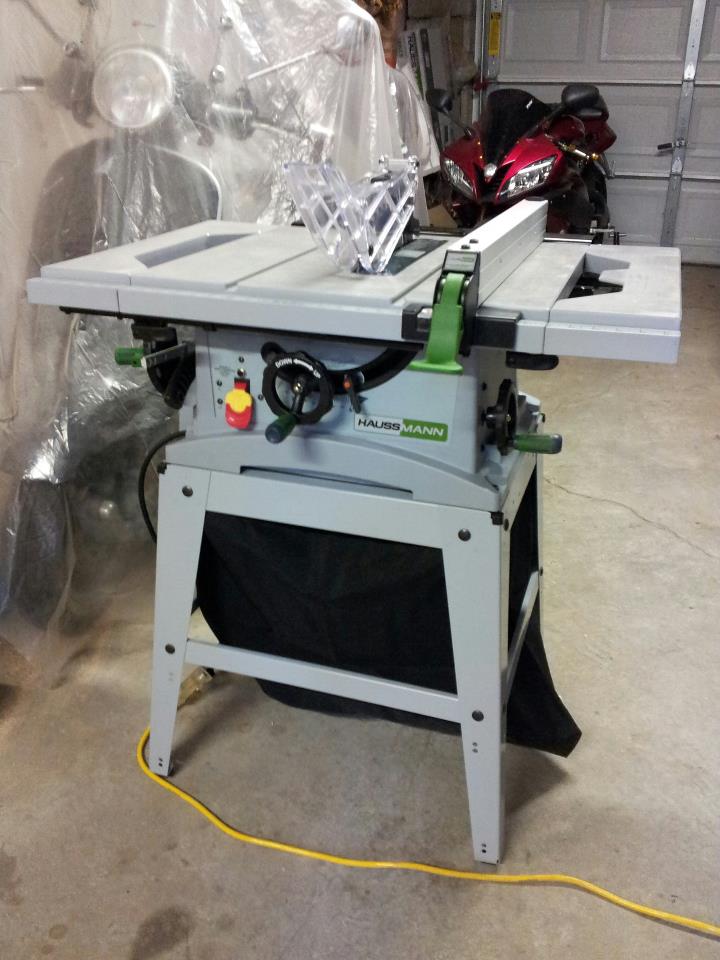
There has been one major tool missing from our arsenal of woodworking machinery; the table saw. Thus far we have gotten around not owning a table saw by having things ripped to size at the lumber yard, or doing small ripping with our circular saw. While those options have done us okay, it really would be a lot more convenient/precise to have our own table saw. For example, we’re ready to make the drawer fronts for the media cabinet, and we have to rip down three sizes of lumber to get it all done.
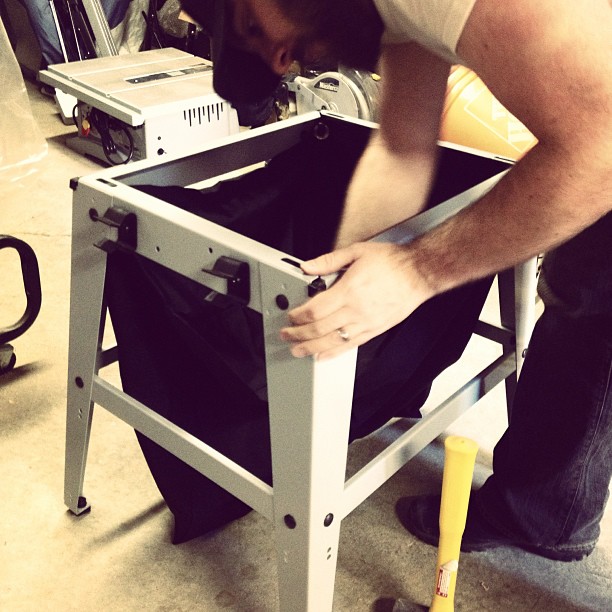
El Granto celebrated a birthday this past week, and received an (awesome) new table saw as a birthday gift from his parents! Yahoo! Last night he spent a couple hours assembling it with a giant grin on his face. It was like Christmas in our garage.
El Granto Assembling the new Table Saw
Due to the loud nature of the saw, and the late hour in which El Granto finished assembling it, we haven’t tried it out yet. However I expect El Granto will be rushing home from work today to fire it up.
Assembled Table Saw
Is it weird to be this excited about a saw? I think we need to get out more…