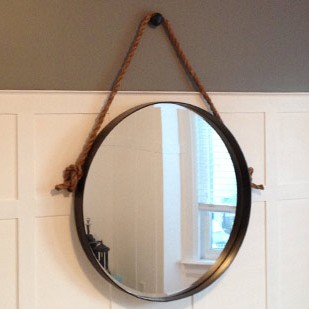
I love love love Restoration Hardware’s Iron & Rope mirror, but I could in no way afford it’s $650 price tag (sad face). Continue reading “DIY Iron & Rope Mirror”
Category: Decor
Guest Room Paint Colour Update
Yes…I am still talking about the guestroom paint colour. It did cause a little debate on facebook and amongst friends and family, with everyone taking different sides. If you will remember, the room started out yellow, VERY yellow. Continue reading “Guest Room Paint Colour Update”
Hallway Schoolhouse Light
You may have noticed that I have gushed about schoolhouse lights once or twice in the last few weeks. It’s true, I was in love. However my budget wasn’t allowing me to date any of those lights (sad face).
Not to be so easily broken, I set out to find a way to get my schoolhouse lights in my budget. I found schoolhouse glass at Home Depot for $7.50 (awesome!) I just needed to find an inexpensive fixture to use with the glass…not so awesome. I must have opened every box in Home Depot trying to find one that fit the glass. I didn’t even care about colour, as I could easily spray paint them. I struck out, hard. Nothing would work. In my depressed state, I wandered around Home Depot feeling sorry for myself. Then I spied on a bottom shelf, a clearance priced Hampton Bay Schoolhouse Semi-Flush pendant. Priced at…wait for it…$36. WTF? Where did this come from? I had never before seen this light (and I was SURE I knew of each and every schoolhouse light HD carried.) I took a pic, sent it to El Granto for approval. He gave me the thumbs up, so I promptly marched one over to the checkout.

Ideally I would have gotten three, so I could replace all the heinous hallway lights in the house, but they only had 2 left at my Home Depot (boo) and realistically I was already buying paint, so I really couldn’t carry them all. So I just took my one treasured light home, and vowed to check other Home Depot’s later.
I quickly roped El Granto into swaping out our main floor hallway light for the new schoolhouse light. So quickly in fact that I didn’t take a pic. So instead here is a pic of an identical spaceship light elsewhere in my house. (all told my teeny tiny house holds 6, yes six of these ugly little UFO’s.)


Ahhh…so much better. I have been loving gazing at my new light every time I pass it by. It’s true love I say.
SOURCE LIST:
Materials:
Hampton Bay Schoolhouse Light: Home Depot
Tools Used:
Screw Driver, Ladder
Difficulty Level (on a scale of 1-5):
One out of five
Total Cost: $36
Guest Bedroom Progress Report
It’s day four of Project Guestroom and although lots of work has went on, there’s still a ton to do. Here’s an update in pictures:
The weekend got started by prepping for our big project; board & batten. Well truthfully its not really board and batten, its more like shaker style paneling.
We got 1/4″ mdf custom cut at our awesome local lumber yard Downtown Lumber and attempted to walk it all the way home on a dolly that didnt want to cooperate. But after an hour and a half of El Granto and I yelling at the lumber, each other, and strangers passing by, we got it all home.

We then laid out our paneling, which required math, engineering and thought. It took a long time and my head hurt. The end result was a line of tape on the wall…

Then we painted and stuff, and then it looked like this:

Then we started paneling


Then we sanded, spackled, spackled and more spackled and then cried some, cause spackling sucks

Next up, caulking, cause as if spackling didn’t suck enough…
(yes yes there will be a full board & batten post and a how-to after I complete it all, so hold your horses)
Project Guest Bedroom
When we purchased the house, we envisioned a cottagy guest room, and both of us instantly thought yellow. We picked out a sunny buttery yellow, and purchased the paint prior to moving in. Our first weekend in the house we painted, and it was….BRIGHT. We decided to try to live with it, see if we liked it any better. Then when Holmes Inspection renovated our house, they colour matched the room and re-painted, but the colour was even BRIGHTER. Now when the sun pours in the bay window every morning, it’s a bit…well…neon.

We did do a few things right, we bought a nice bed, linens, hung custom blinds, and re-used some dressers. It just needs a bit more “lipstick and mascara” (and maybe a pair of killer heels).
So here goes Project Guest Bedroom
Pinterest Guest Bedroom Inspiration Board

To Do List
- Install Board & Batten trim on walls (see the how to here)
- Build closet shelves and organization
- Paint Board & Batten
- Paint Walls
- Change out light fixture
- Hang reclaimed windows
ProcureMake bedside tables- Buy bedside lamps
- Hang art
BuyMake Mirror- Add robe & towel hooks
- Find old chair and give it a coat of paint
- Add transom above doorway
Really?! All that for a room I thought was almost finished? Eeep, what do I get myself into?
Guest Room Paint Colour
Help! I have three vastly different ideas on paint colour for our guest room. Here’s the down low:
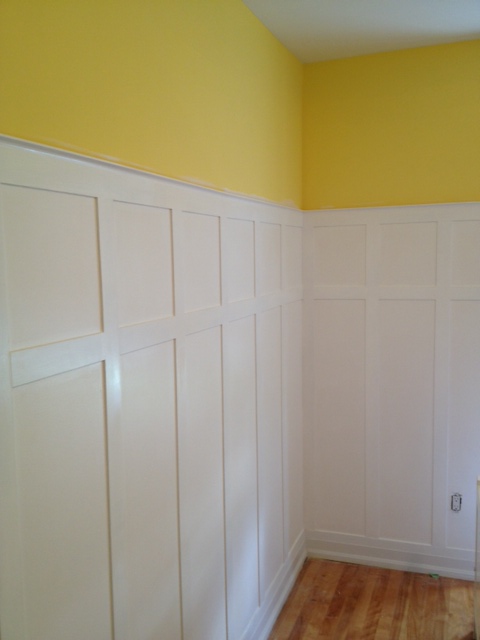
The guest room is getting a facelift with a new wall treatment & plate rail. The wall treatment will be white. Yes boring old white. Don’t worry, this room needs some boring. Currently it’s a whole-hella-lotta-yellow. A hangover’s worst nightmare yellow.
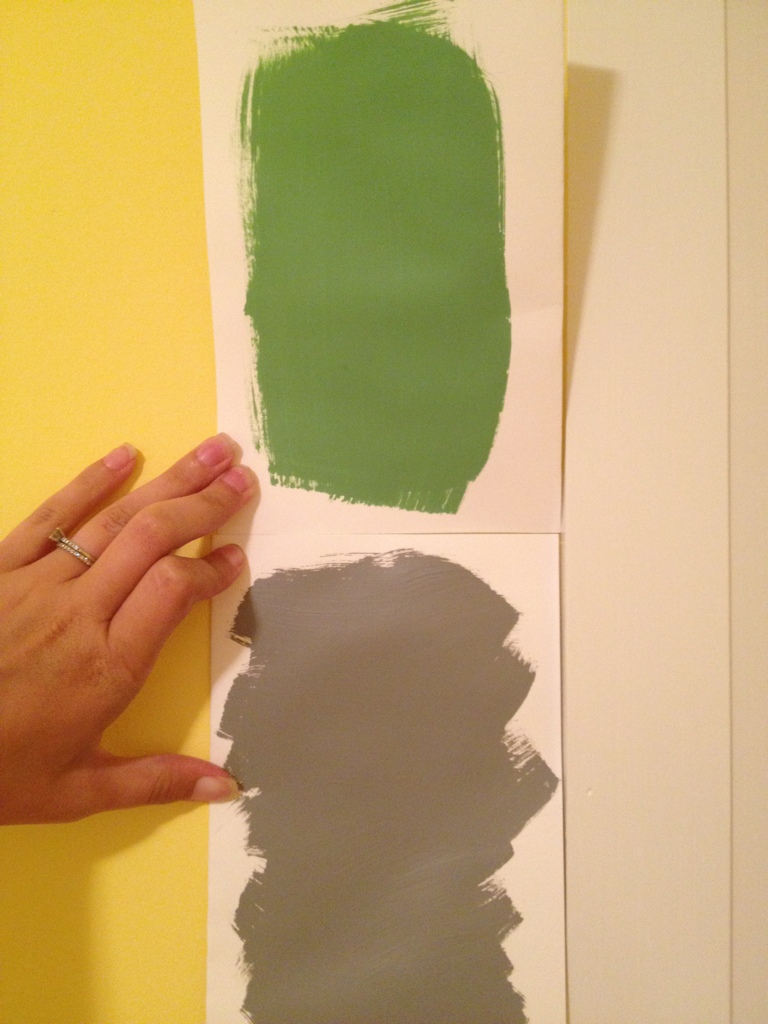
So here’s were I need your help. Above the wall treatment there’s like 2 feet of regular old wall. What colour do I paint it? I can leave my old friend yellow (who will probably look way less acid-trippish when hes confined to 2 feet of space). Or I could go all crazy on it and do green. Last but not least is my old standby; medium grey.
So what camp are you in; yellow, green or grey?
DIY Coat Rack
For those who follow me on Pinterest, you may have noticed a lot of front hall coat storage solutions being pinned to my “Organization” board lately.
Our front entryway is well…a mess. Our front door opens to a square tiled area with no closet and a blank wall. No place to put your keys, coat, shoes or, well… anything.
Slowly we have introduced a few good things to the front entryway. A Ikea Pax wardrobe for storage, a handcrafted bench from a local artisan and a giant mirror that came with our last apartment. The black sheep of the entryway however is an ugly, broken $15 Ikea RIGG coat rack that we’ve had since college.

In fact, I believe its been broken since college. Held together by duct tape and zip ties (really!) The thing fell down every time you put a winter coat on it, and generally looked like a giant blob of coats taking up a massive amount of space in our entryway. We wanted to change it for a long time…we just never actually did.
So finally we got off our butts and decided to make a wall mounted coat rack to streamline the entryway some. Our lovely reclaimed wood bench was our inspiration. We wanted something that looked like it belonged with our bench. Like a brother from another mother. We picked up a piece of 1x12x10 rough pine (also used in the bath table DIY) from Home Depot. We measured our space, and decided for a 12×33″ wide rack with a 4×36″ mini shelf on top (to hold some art etc.)

We cut down the pieces of wood, sanded the roughest bits out and got to distressing.

We hammered, nailed, sawed, chiseled, and generally beat the crap out of our wood. My favourite part is some rusty nails (that I salvaged from my pallets) that we bashed into the wood, leaving nail heads and in one case the whole nail showing. It really does make it look like its been around 100 years.

As we wanted to match the bench, I headed out to pick up the darkest brown stain I could find. I came back with Varathane “Chocolate” and put on a coat. It looked great at first, but as it dried, it was still too light. So I put on a second coat of stain, then followed it up with a coat of Minwax Water Based Oil-Modified Polyurethane.

After it dried, I sanded lightly with a fine sandpaper, then gave it a second coat. Once it was completely dry we attached some nice cast iron coat hooks, and attached it to the wall (into the studs) with some nice 2 1/2″ long black screws.
So here is the before and after:


SOURCE LIST:
Materials:
1×12 wood: Home Depot
Varathane Chocolate Stain: Home Depot
Minwax Water Based Oil-Modified Polyurethane: Home Hardware
Cast Iron Coat Hooks: Home Depot
Tools Used:
Circular saw, miter saw, measuring tape, level, stud finder, drill, small foam paint brush, rag, misc. tools to distress
Difficulty Level (on a scale of 1-5):
Two out of five
Total Cost: $40 ($16 of that is the for the hooks)
Crushing on Schoolhouse Electric & Supply Co

The storefront was very neutral when we moved in. Walls beige, fixtures neutral. The light fixtures were especially neutral. Builder basic “spaceship” lights in hallways, Ikea nondescript fixtures in washrooms and bedrooms. The sellers obviously wanted to dress the house to sell, and I get that. But I also think they missed the boat a little bit. The house was a 100 year old Edwardian Storefront. It is eclectic. The neighborhood that it’s in, the proximity to downtown and a vibrant arts community, makes me wonder why they didn’t “work” the unique aspect to it. A similar Storefront a few streets over, was renovated fantastically with period charm and character, and sold for over 150k more than we paid. Hey, I’m not complaining! I am fine with adding the detail, it just seems the sellers had their eyes closed to this fact.
Back to the lighting. Obviously changing the lighting in the whole house is e.x.p.e.n.s.i.v.e so we’ve been working it at one room at a time. Recently I have been crushing big time on Schoolhouse Electric’s lighting.
For my hallways I love the Thunderbird 4”
 or the the Loyola 4”

For the guestroom I love the Waldorf Pendant

or the Mercer Pendant

For the Dining Room I love two Factory Light No 5’s

For my Master bedroom, I am crushing on Keen Wall Sconces for beside lamps

A girl can dream right?
*Come back next week to see some new DIY hallway lighting!
(nope, I have no affiliation or sponsorship from Schoolhouse Electric & Supply Co, I just like their stuff!)
Hallway Inspiration
Our house is very very skinny (our property alone is 12.5’ wide, and after walls we’re left with less than 12’). I know what you’re thinking, how on earth can we live in such a skinny house? As many other Torontonians know, size isn’t everything, layout is. The people who renovated our house prior to us, did an exceptional job with the layout. On the main floor they squeezed in an open concept 35’ long kitchen/dining/entryway, a compact but cozy living room and a powder room. On the second floor, we have three bedrooms and an 8×8 bathroom. The one problem with the second floor is to make that layout work you need one big long hallway. It is long, and skinny, and dark. It is currently painted (you guessed it) beige, has two “spaceship” lights for lighting, four doors to the bedrooms and bath, one skylight over the staircase and a strange little nook. I have been trying to come up with solutions to make the space feel bigger, lighter, and more polished.


Here are some of my (hairbrained) ideas:
- Cut out the spaces above all the doors, and install transoms. The bathroom & office each have large skylights, the front bedroom has a big bay window and our master has a glass door and large window. I think that with transoms all this light that is usually kept captive in the rooms will spill out into the hall. I think it will also make the ceilings feel higher.

Source: srgambrel.com via Kristen on Pinterest


- Paint the walls white, trim white, and the doors gloss black. Wait wait wait, before you have me committed, hear me out. I think the contrast of the dark doors, light walls and all the natural light will actually make the space feel bigger. Contrast does wondrous things.


Source: marcusdesigninc.blogspot.com via Kristen on Pinterest

Source: plushpalate.blogspot.com via Kristen on Pinterest

Source: designspongeonline.com via Kristen on Pinterest
- Replace the lighting. This one is a necessity. There are two forms of cheap flush mount lights from the big box stores. They will hereafter be known as boob lights and spaceship lights. My metaphors are pretty straightforward. One looks like a boob, and the other like a spaceship. They both suck. Cant anyone make cheap attractive flush mounts? I would love some schoolhouse pendants in the hall space.

Source: google.com via Kristen on Pinterest

Source: houseandhome.com via Kristen on Pinterest
- Large scale artwork. The one problem is that it needs to be thin. The hallway is incredibly narrow, and already the walls get bashed with elbows when you try to carry anything down the hall. The artwork needs to not get in the way, and be well secured to the wall, and it needs to break up the large expanse of space. This is the only part that is still stumping me. You will only be looking at the art while walking down the hall, and even if you stop and look at it, you will be a foot away, so its not an ideal gallery space. May be a good candidate for some Blik vinyl wall art. Graphic and impactful, and gives definition to the space.


- Bigger mirror for the nook, small artwork and a nice large plant, preferably of the citrus tree variety. I love the thought of having a lime or lemon tree in the house, and think this would be a great place for it.

Source: williams-sonoma.com via Kristen on Pinterest
So what do you think? Have I won you over with my black doors?
Project Office
I have been working on our office for SIX MONTHS now. That’s right, half a year! Having a clingy spazzy puppy around doesn’t help. The moment you try to get some work done, he wants to play, or is hungry, or wants to go for a walk, or chew on the baseboard, or just wants so sit there and whine until you stop doing work and pay attention to him.
If having a puppy is this bad, I have no idea how people with babies eat, go pee or bathe. If I ever have kids, I just know I am going to be one of those mothers who puts the baby in the crib screaming and goes downstairs and has a glass of wine.
Where was I? Oh yes the office.
Wrangling the puppy was especially difficult when we were painting, or doing things that he could in no way be near. We would take turns working while the other watched the dog, or built a dog play area in the hallway. Needless to say the simplest task ended up taking days or weeks. I am still finishing a few things up, and a few projects are still incomplete, but it’s finally gotten to a point where I may actually let someone see it.
As for furniture; in our last office we built in a custom desk so when we moved to the storefront the desk stayed behind. We also owned a crappy old office chair, that I happily pushed to the curb before we carried away our last moving box.
So coming into the office in the new house, we owned:
- A filing cabinet covered in El Granto’s music and snowboarding stickers, which is missing the rails to actually hang files on
- A cheap Ikea drawer unit
- LOTS AND LOTS of books, antique cameras and crap.
That is not a lot to work from…Try as hard as I did, you just cant make a desk out of crap. It topples over…
So for the first six months of living in the house we used my Grandmother’s 50 year old Ikea card table as a desk, and a folding chair. More often than not we ended up working with the laptop on the sofa downstairs.
Before I post pictures of all our office projects, here is some insight on what we had planned
My Pinterest Office Inspiration Board

This board is giving away a ton of hints of what we were up to, so stay tuned for the results!
And here is our great big office plan/project to do list.
TO DO:
- Build wall of built in bookshelves
- Add Chair Rail
- Modify and paint Ikea Ingo dining table to use as desk
- Give a facelift to an old Ikea Goliat drawer unit
- Move (ugly) filing cabinet to closet, and add shelves and clothing rod
- Paint the walls
- Change light fixture for one that does not rattle when a truck drives by
- Source old bankers chair for desk (update here)
- Find the perfect reading chair & ottoman
- Find or build side table for reading chair
- Build custom crates for bookshelves
- Hide router, modem and phone gateway, and curb rogue cables
- Hang art
- Shove all our books, antique camera collection and misc crap into the bookcase in some sort of visually pleasing order
- Source interesting reclaimed object as trash can
UGH…I am tired just looking at the list…wheres my drink?