If you have been being a good boy or girl, you will have read my Project Office post and you will know I have a lot to do! One of the items on the To Do list was crates for built in bookshelves. Bookscase DIY tutorial will come soon (I promise) but until then here is a sneak peak on how we made the crates to go ON the bookcase.
I was planning on sourcing some framing grade lumber and roughing it up a bit to get a worn look for my crates. Odin & I happened to be walking through an industrial area in our neighbourhood on Friday when we spied a pile of shipping pallets on the side of the road.

I thought to myself, “self, there some rough wood, and its CHEAP rough wood”. You see, cheap is one of my favorite words. I like it so much that people often use it to describe me. So Saturday morning Odin and I took off to steal grab ourselves one of these pallets. I picked one that looked good, didn’t appear to have hobo pee or bugs on it, so I carried it home. By carried it home, I mean I walked 100 feet, rested, walked 100 more feet and had another rest all the way home. It was also a Saturday morning, and I had to walk past a hipster brunch spot in the neighbourhood looking like a crazy person. The dog happily trotted behind me wondering what on earth I was up to.

After lugging this darn thing home, swearing a few times, wishing I owned a car, and wondering what I was so damn crazy, I finally got down to work. I thought bringing it home was hard, I hadn’t yet met hard. Hard is not owning a crow bar, and trying to take out massive nails with a hammer and Mjölnir to pry and bash them apart.

Break time yet? GAH! This is hard work. You are probably asking right now, where on earth is El Granto? He was having a lovely day learning to drive NASCAR’s with his Dad and Brother. At about this point in time I was cursing him in every language that I know a curse word in. These include, English, French, Spanish and German. My mother would be disappointed that I don’t know any Danish curse words. The worst thing I know is how to say underwear in Danish. This was a hit when I was six…
So… I finally managed to pry apart some boards, and then bashed out the nails.

As you can see the wood before sanding is…well kinda gross. It will get better, I promise. Now I put some super rough sandpaper in my palm sander, and set to work.

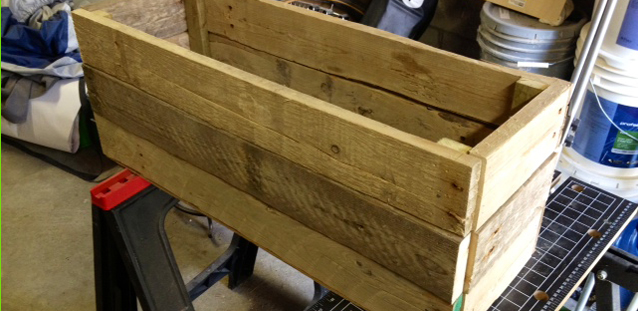
Once I sanded everything, using the dimensions of my bookshelves, I decided on a size for the crates. I wanted them to fit in the bookcase nicely, but have a little room to slide in and out. I drew up a quick diagram on a piece of wood, and started cutting! The finished size for the crates are 29″x10″x11″ and 13″x10″x11″. I cut my front pieces 29″ long for the big ones and 13″ for the small. The sides were 8 1/4″ and each crate was 3 boards high. I cut the boards to length on the miter saw, and used scrap pieces of 1×2’s as corner braces. I attached the front panels to the corner supports using brad nails. I spaced the corner supports 5/8″ in from the edge to allow space for the sides to fit flush.

I assembled both the fronts, then attached them to the sides with more brad nails. I then traced a bottom for the crate onto some extra hardboard we had laying around the garage. I cut out the hardboard with the circular saw, and nailed it to the bottom of the crate.

The wood is all different thickness, and I didn’t worry about having everything match perfectly. It just adds to the distressed look. After I had assembled it, I took the palm sander to it again making sure there were no sharp corners or splinters. There, I was done! It only took me 3 hours to make one crate. Wait, what, I need four more of these? DAMMIT! I better get back to work. I sanded and cut the wood to length for one more crate, but I ran out of brad nails. Uck. So I waited for El Granto to get home from his NASCAR adventure and then headed to Canadian Tire to pick up more nails, and some felt furniture sliders for the bottoms of the crates. We also stopped and pilfered one more crate on our way home, which I made El Granto carry, and he cursed me in the same fashion that I had cursed him earlier. Once I got home, a soft couch and a cold drink sounded better than doing more work, so I gave up, and left it for Sunday.
Sunday morning, we got all ready to start work (this time with El Granto in tow). When we went outside our neighbours were putting up a big glass panel on their amazing deck, and asked for some muscle. El Granto went to help, and I got back to work making more crates. El Granto’s work conveniently consisted of standing holding a piece of glass for an hour, then being rewarded with a plethora of yummy beverages. Of course he preferred doing this to helping me make crates…so once again I was bustin my ass alone. El Granto did stop in to help me take apart the second pallet (it’s much easier to watch him then to do it myself.) I proceeded to make one more big crate, and three little ones.

The little ones are cute. Like a puppy version of a crate. I finally finished all five of my crates, and stood back to appreciate my giant stack-o-crates.

Some of the wood turned out really cool. The ones that look all spotted were really really rough boards, that I sanded and sanded and sanded and they came out all spotty! I also really like the boards with the rough saw marks. I thought I may have to distress the crates more, but I think they look fairly worn. They look like driftwood almost. I was on the fence with staining them, but we like them just the way they are, so we’ll leave them as is for now. They do need some hardware, I am waffling between shiny fancy nickle handles (that I am using elsewhere in the room) or sticking with rustic and using some rope, either as a handle, or making small monkey’s fists and using them as pulls. What do you think?

So what do you think? Free crates, were they a pass or a fail?
UPDATE!
My idea to use pretty polished handles on my crate was overruled by El Granto, my Mom, our neighbours, my co-workers and the garbage man. So rope handles it is!
We checked Rona, and their rope was too big, Home Depot had even bigger rope and some smaller rope. We went with the small one. In hindsight, I wish it was a bit chunkier. Will be keeping an eye out for some bigger rope. Also, check out the completed bookcase here.

SOURCE LIST:
Materials:
Wood Shipping Pallets : side of the road
1×2’s: Pile-o-wood in my garage
1/8″ hardboard: My garage
Brad Nails: Canadian Tire
Sandpaper: Canadian Tire
Felt Furniture Pads: Canadian Tire
Rope: Home Depot
Tools Used:
Maul, Hammer, Circular Saw, Miter Saw, Measuring Tape, Compressor & Brad Nailer
Difficulty Level (on a scale of 1-5):
(cause damn those pallets were heavy!)
Total Cost: $7 for the rope & furniture pads
You said you used hardboard for the bottom, is that like plywood?
Hi Rebecca,
Yep! Its just cheap board. Anything sturdy will work!
Okay. Now don’t shoot the messenger here, okay? First off, I LOVE the way you write. You’re a hoot and a half (which is way more than a mere hoot, believe it or not); must be a kindred spirit thang. Anyway…
When I got to the part about taking the pallets apart, my hand reached toward the computer as if I could actually soothe you now. Oh well. It’s the thought that counts. So here’s what I’ve learned about pallets. Instead of trying to pry those suckers apart, get yourself an inexpensive reciprocating saw (SawzAll is a “brand”, but you can get a cheap one at Harbor Freight.) Don’t have one of those near you? No worries. Order online. I’m tellin’ ya, it’s worth every penny. Also, you’ll want a 9″ blade that’s made specifically for cutting nails. They cost about $3. My hands do NOT cooperate much anymore (joint crap and all that jazz), but I’ll be damned if I’m gonna let that stop me. So, I borrowed a SawzAll, bought the blade, came home with 3 pallets and managed to get those suckers apart in less than half an hour. No kidding. Plus…didn’t tear up any of the wood in the process.
Like I said…worth the $ if you’re going to use pallets for “free furniture” and the like.
Just sayin’
I too laughed out loud several times!!! Great idea and even better account of the whole event.
We found your site while looking for a bench to match our new table…which just so happens to be the RH table that was your inspiration! (RH Outlet made it almost affordable 🙂
We’ll now be using your blog as inspiration some upcoming projects…thank you!!
I lauged out loud several times reading this… on a train, next to people quietly sitting. Such a great blog!!