Our house is a three bedroom, two large bedrooms and one smaller. The smaller is of course the best choice for either an office or nursery. We wanted to plan for an office now, and if we ever needed it down the road, an easy transition to a nursery.

The space is 10.5’x8′, has a single closet and a skylight. We wanted to build in some storage, as we have a ton of books and decorative pieces that don’t really fit into our open concept main floor. After researching our options, (and doing a lot of Pinterest-ing) we decided to build a wall of Ikea Billy bookcases.
We already owned a black full size Billy, and originally were just going to purchase more of these. However, we learned that we had bought the “cheap” black one (not the black/brown wood grain one) and there were NO matching pieces to go along with it. So, we either had to throw out our current Billy and start new, or re-use the black one somehow. After much debate, and seeing how awesome a job they did over at 247reno.ca we decided to do a Billy Built-In, trimming them out and painting to get a nice custom look.
This meant acquiring 1 more Billy full size, 3 skinny Billy‘s, and the 5 corresponding height extension units. On a trip to the states I found all the height extensions on clearance for $5 each, so that saved us a ton of money. We then purchased the additional pieces from our local Ikea.
We assembled them all (without shelves or backs) and started to prime.

I used Behr’s Enamel Primer & Undercoater. It is good for all surfaces, including glossy ones. I figured I was free and clear to prime willy-nilly. NOT SO, apparently the finish the the height extensions and the sides of one of the bookcases was made from a more glossy or waxy finish, and the primer refused to stick… SO… out came the sandpaper. I removed all the primer and scuffed up the surface. I then cleaned and re-primed, which still produced mediocre results. I still wasn’t completely happy, but decided I (and my sanity) had enough priming, and would deal with it later.
Now for the bookcase backs; the full size Billy’s backs come folded into 3 panels, and when assembled look like cheap ass Ikea bookcases. So we measured them (30.5″ x 76.5″) and went to our local Home Depot and got 1/8″ hardboard cut to size. I then sanded and primed it, and it slid into the bookcase grooves perfectly, and looks MUCH better! We also replaced the height extension backs, as they were made from a more flimsy cardboard, and attached the extensions to the bookcases.
We wanted to remove the baseboard on the the wall the bookcase was going for two reasons. One: so we could get the bookcases closer to the wall and two: so that we could re-use the piece of baseboard. We scored the caulking/paint that was existing on the top of the baseboard and carefully pried the baseboard from the wall, very very careful not to damage it.

We then built the platform for the billy’s out of 2×3 pine (so that they would be off the ground enough for our baseboard to sit flush). We secured the base to the the studs in the wall (but not to the floor in case someone ever wants to remove the bookcases). We then placed the bookcases on the base and decided on spacing.


One of the bookcases was right in front of an electrical outlet. We wanted to incorporate it into the bookcase, so got an electrical box extender, and cut a corresponding hole in the back of the bookcase with an oscillating multi-tool.


We had found some 1/4″ x 2″ trim that we liked, so we spaced the bookcases 1/2″ apart. We cut 1/2″ spacers out of plywood, and attached all the Billy’s together with the spacers and some screws.
We then secured everything together with 2 x 4’s running along top of the bookcases and screwed them into each bookcase. This made one very solid piece.

We attached the bookcase to the wall with the Ikea provided L brackets, and to the base with the same L brackets. If you plan on doing this yourself, think ahead to how much space you’re gonna have left between the bookcase and the ceiling. We had about 6″, which seems like a lot, but it was SUCH a pain to put in the L brackets. We should have pre-attached them to the bookcases before we’d set them in place. You could only fit a stubby screw driver in there, and I lost many a screw that fell behind the bookcase!
We notched out the baseboard on the side walls with the oscillating multi-tool, and inserted the baseboard back in, and secured with brad nails. Now its time for the pretty stuff!

We attached all trim with brad nailer. We also picked up some 1/4″ x 2″ polar trim, and used it to fill the gaps at the bottom where the shelves are inset into the bookcase, and the baseboard left a gap. We also decided to trim out the center and top shelves with more of this trim.

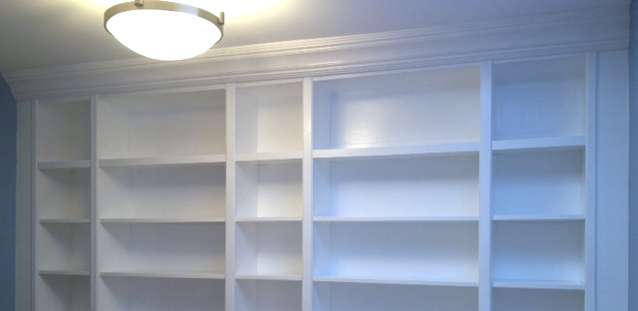
We then went on a hunting expedition to find the perfect sized crown molding. This was problematic, as we need some big big molding and our house isn’t even close to level or square. The ceiling is over 1″ taller on one side of the room, so we needed something that would cover that gap, but not dip into the bookcase. We ended up finding some great molding in a dusty corner (literally!) of our favourite local lumber store; Downtown Lumber. We nailed up the crown as best we could, dealing with the terribly unlevel room. We used more of the poplar trim to fill the spaces and considering what we were dealing with, it looks pretty good!
We then had a gap of 5″ or so on each side of the bookcase to the wall. We rip cut some MDF boards, then scribed them to the very crooked wall, installed and trimmed. At this point in time we also installed the chair rail (click for chair rail post).

As we really wanted a built in look, we decided to fill all the unused shelf holes (this really makes a difference!) We used DAP paintable caulking to painstakingly fill all the shelf holes, as well as all the screw and nail holes, and small gaps around trim. This was tedious work, but really polished the entire piece. We also had a very good helper who was ever so eager to get in on the action.

Now comes the fun bit (enter sarcasm). We installed all the shelves and painted another coat of good primer over the entire bookcase (we learned our lesson, and this time we used Zinnser BIN primer, and it was so much better than the Behr, but use in a well ventilated area, and stir stir stir it). One coat of primer took over 8 hours to complete (really). Over the next few weeks, we followed it up with 3 coats of high gloss white interior/exterior paint, and an extra 2 coats on the previously black bookcase.
After many trips to the hardware store for more paint, lots of sore muscles, and an incredibly upset puppy who was made to hang out in the hallway behind a baby gate while we were working, it was finally done!


Now we get to sit and look at it empty for 2-4 weeks until the paint completely cures…
I promise I will have a FINISHED Bookcase post to come!
*Check out the Pallet Crates we made to fit in the bookcases here.

SOURCE LIST:
Materials:
2 Full Size Billy Bookcases: Ikea
3 Skinny Billy Bookcases: Ikea
2 Billy Height Extension Bookcases for full size Billy: Ikea
3 Billy Height Extension Bookcases for skinny Billy: Ikea
2×3 Lumber for base: Home Depot
2×4 Lumber for securing bookcases together: Home Depot
1/4″ x 2″ trim: Downtown Lumber
1/4″ x 2″ poplar flat stock: Home Depot
1×6″ MDF Boards for side filler pieces: Downtown Lumber
Crown Moulding: Downtown Lumber
Dap Paintable Caulking: Home Depot
Behr Sealer and Undercoater: Home Depot (would not recommend for this project)
Zinnser B.I.N. Primer: Home Depot
Behr Premium Plus Interior/Exterior Paint in Pure White: Home Depot
Tools Used:
Miter Saw, Measuring Tape, Compressor & Brad Nailer, Level, Oscilating Multi-Tool, X-acto knife, drill, swear words, paint rollers & brushes
Difficulty Level (on a scale of 1-5):
Total Cost: About $400 (about $100 of that was primer/paint)
These are fantastic and I am about to tackle a similar project in my new home. When you painted the shelves, did you brush paint or use a paint sprayer?
Hey Kristen and El Granto,
Live this! I’m looking to do the same in a small room in my house. If all the bookshelves were white to begin with would you still have painted everything anyway? Or would that not be necessary?
Thanks for your help and great idea!
Best,
Linda
Hello,
One BILLY bookcase comes with 4 floating shelves. The middle one shelf is the one created during the construction.
I was wondering how did you thicken the middle and top shelves while still have 4 floating shelves?
I don’t clearly see how you did it ? did you buy extra shelves or pieces of wood? and then cover the pieces with the trim?
Great work. thanks.
Tim
We attached trim to the fixed shelf using bard nails.
Kristen,
I’m astonished at the differences you and your husband were able to make! From an IKEA Billy to the final picture has made up my mind. When I move, I’m buying a home, I’m going to make sure I take the list you provided, thank you, and save this page because I want THAT look!
Wish me luck and thank you so, so much for sharing this with everyone.
Mike.
This is awesome! Did the painting take forever because you painted by hand instead of spraying?
Beautiful!
Wow!!!! Those are amazing!!
I love this! Where did you get the rustic boxes for the bottom of the shelves?
We made them! See the suggested post for a how-to
These have been my inspiration to change my mudroom area from nothing to something amazing. I am now at the stage of priming and painting. Can you tell me the steps you made (clean, sand, prime, sand etc) and did you spray paint them or hand paint them? Thank you.
I just wanted to say thank you for the time it took to put such wonderfully detailed instructions up. I made a little home office in my garden and ran out of a budget for proper pine cupboards and shelves but with your instructions I was able to get exactly what I was after for 75% less. And it looks amazing. I can’t thank you enough. I want to send you a photo to show you just what you helped happen. THANK YOU!
this is AMAZING! wow. great work!!!!!
Like the idea but have a few questions. Since it is adjustable shelving are you having any problems with the paint wearing off from the shelf rubbing as it shifts around? Also can your u see gaps at the endow the shelving when you are up close or di your using the molding to somehow hide that?
I wanted to do something like this but I have tile floors and was afraid to mess them up. Ty so much for the hint on how to not mess up the floor. Your project is a fantastic inspiration. Ty for sharing.
Great post, thanks for sharing 🙂
Hi! Love your finished piece, and so inspired by your project!
We also have a small office that is 8′ high. With the Billy’s being 79.5″ high and the extenders being 14″ high, we can figure out how you guys made space for base and crown molding. Are/were there extenders that are less than 14″ when you bought yours? Did you cut them down? Thanks!
Amazing how clever of you guys to do this big inspiration as I have been looking for pine units I think I will pop over to IKEA UK based and see what they have bet you love them , the thing I find I am so critical about my own work somebody elses always looks great brill read enjoyed , Luton, Bedfordshire UK.
Hi, Just wanted to say thanks for the detailed post. Thanks to you, I now have a beautiful fitted shelving unit in the alcove of my sitting room. I’ve posted a pic on my facebook page if you want to have a look.
https://www.facebook.com/rubypatchbysue/photos/a.372221709514361.80669.372131389523393/810017825734745/?type=1&theater
I’ve also shared a link to your blog in the comments section of the post and hope to point some people in your direction.
Thanks again for the inspiration.
Sue
x
WOW! Sue, that looks amazing! You should be very proud of your work. What a great result!!
Too cool. would love to do something like that in the room upstairs.
Did you secure the MDF to the wall after the bookcases were already installed? If so, how?
We added wood strips along the wall and nailed the MDF to the strips. It worked perfectly!
Wow! What an amazing job you guys did! Well done! I never would have thought there was so much work behind that great looking result. I’m curious, do you have any idea how much that would have cost if you had had a ‘real’ built-in bookcase made?
Wow! You guys rocked this! Beautiful job! Impressive result!
Thanks Jan!
Your project came up on a search for a related topic. I wasn’t really looking for this project, but couldn’t stop reading the post. I could never do this, but it was really cool. Looks great
This is so beautiful! I am so impressed at how professional it looks with all the crookedness you had to deal with. You two are an inspiration for me to give this a try.
Oh my god, this is AMAZING. So inspiring! This is by far the best DIY tutorial I’ve found online, thank you so much for so clearly documenting the process. Besides waiting 2-4 weeks for the paint to cure, how long did it take you to construct everything once you procure all materials?
How I Waste Time
Hi Steph,
Thanks for the kind words!
The project was waylaid by a new puppy, and ended up taking us a month or so, but we could have knocked it out in two weekends if we’d worked hard!
Wow that is so great looking!! I dont know how you went from the base to the full bookcases, but I will get someone good at that to help me. This seems doable with help.
Thanks so much
Thanks for this great description of how you built your Billys! It was immensely helpful for our own project — very similar to yours, except 3 wide Billys and 2 narrow!
Thank you for the awesome post and instructions! I noted you are one of the few to paint the white Billy which I have been nervous to tackle since its definetely glossier than the birch veneer Billy. Did the primer stick to the white Billy??
It was definitely a trial and error process, and primer stuck better to some of the Billys than others. We found that sanding, cleaning and BIN primer worked best. Lots of prep, but worth it!
These turned out great! Thank you for the inspiration to do these myself after my wife pleaded for a year. Out of all of the different billy bookcase hacks I’ve seen, this is by far the most detailed and helpful. Thanks!
These look fabulous! I love the molding you chose. Did you use the backing that came with the Billys? We’re doing a similar project and are not so pleased with them. Ours has the fold lines clearly visible so we’re looking into 1/4″ panels and beadboard. Thanks for documenting your project so nicely–especially the canine helper!
Thank you for the kind words!
We replaced the backs with 1/8″ hardboard from Home Depot. We didn’t like the fold lines either! We had Home Depot cut them to size in store. It was easy, cheap, and looks much nicer!
These are amazing! The best Billy’s I’ve seen. Just a couple questions. Did you primer he shelves before and then after assembly? Did you keep shelves in place when painting the bookcases the gloss white?
Thanks so much!
We primed before and after assembly and left the shelves in place while giving it the gloss white.
Great job guys, the attention to detail totally paid off. It looks awesome!
Those turned out great! I like that you filled the unused shelf holes with Dap. I appreciate that attention to detail;)