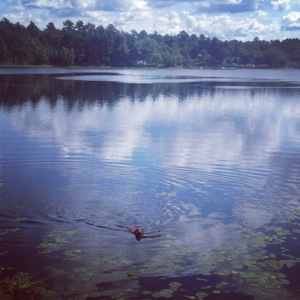
Taking a few days off for some well deserved family time at the cottage. We’ll be back in a few days, but while we’re gone we will be doing nothin but swimming, eating, relaxing and chasing sticks (in Odin’s case)!
Author: Kristen
Kristen & her husband El Granto & their Vizsla Odin live in a converted Storefront in downtown Toronto.
Door Bling
You know when you buy a house there’s a ton of expenses. Mortgage, down payment, closing, moving and all the stuff you need for the house.
What do you mean, the house doesn’t come with any closet rods, curtains or door mats? Crap. You can almost see the money evaporating out of your bank account right before your eyes.
So when it comes to things like buying new locks for the house (cause really you trust that the old owner gave you ALL the keys to the house? Even the one the dog walker had, or grandma stashed in the bottom of her purse? Yeah right.) Having someone you don’t know possibly having a key to your house? Ummm no thanks.
So new locks were a necessity, but dude locks are expensive. So you leave the hardware store with a combo set of 5 locks for $69 for the whole house. Great idea right? All the same key, easy peasy lemon squeezy.
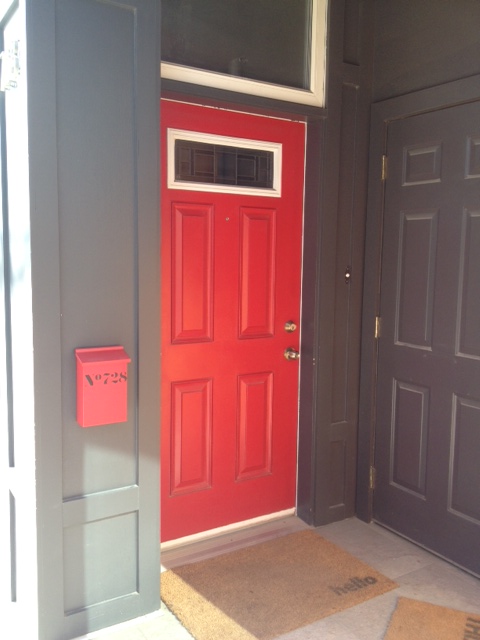
Then two years later, this is what your front door handle looks like.
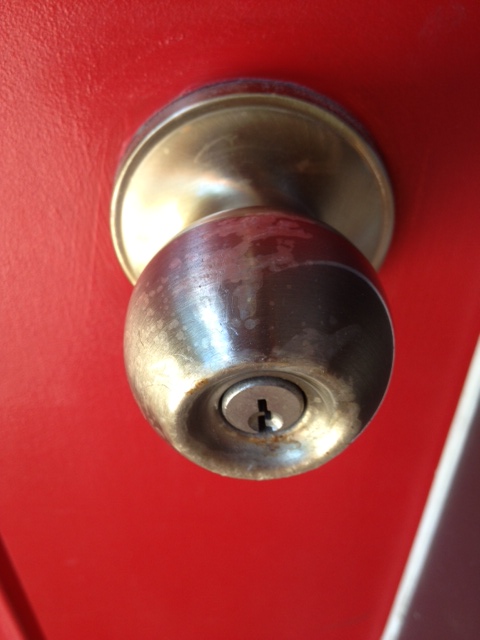
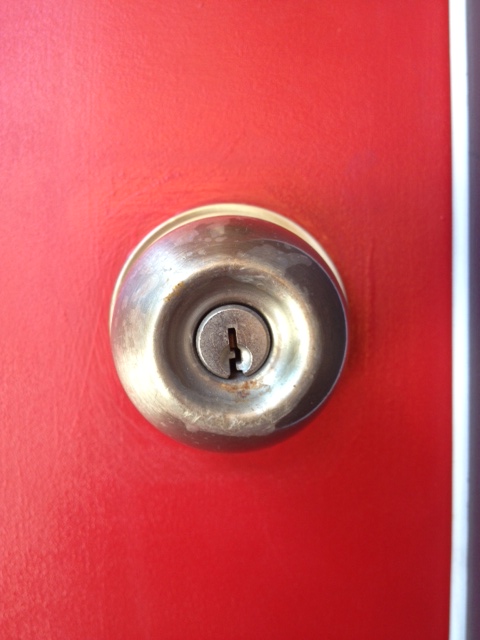
The other thing was that they didn’t look very stately. Not that our house is “stately” but these things weren’t really doin anything for the door. They were like chinos, or flip flops. Nice enough but no ones gonna complement you on them.
This past weekend we were window shopping in Rona. Yes I said window shopping. Really it’s not THAT weird. They have a Tim Hortons and they let the dog come in, so its a good place to spend an hour perusing the isles. What, you don’t window shop at the hardware store? Well then you my friend need to get out more.
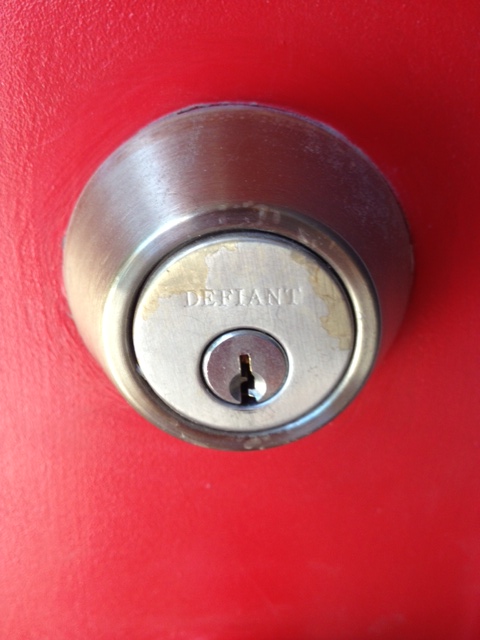
While wandering down the door hardware isle I spotted my favorite thing. A clearance sticker. I can see one a mile away. They call to me. “Look over here, you may not need me but I’m on SALE and that makes me so much more attractive.” The thing was this clearance item happened to be awesome. A “grandish” entry door set for the price of $39.
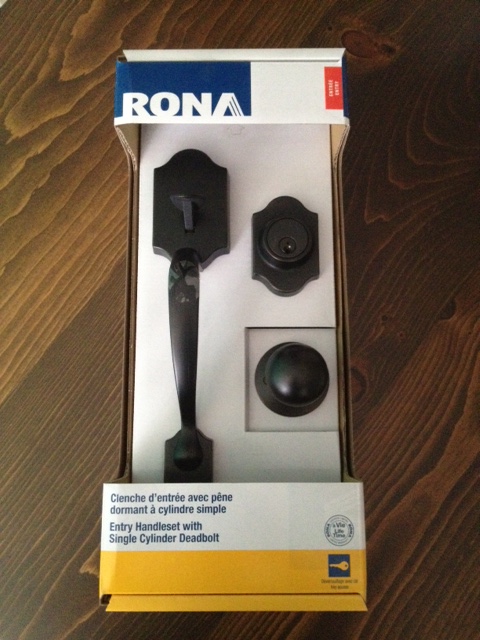
That thing went in the shopping cart faster than a Kim K marriage.
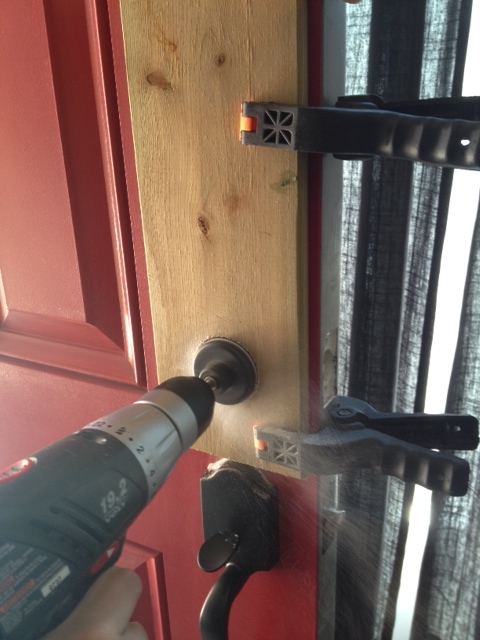
Once home El Granto set out to installing it. This ended up being a shade more complex than expected as our old dead bolt was one of those “little hole” deadbolts, whereas our new one was full size. That meant that a new hole had to be drilled in the door. Sure we have hole saw bits, but a hole saw works well because it has a little drill bit in the middle to start the hole and keep the big hole blade steady. With there already being a hole in the door, there was nothing for the little starter bit to hold onto, making a hole saw very inaccurate and rather unsafe as it would try to fly around willy nilly instead of cutting a nice hole.
So El Granto being the ingenious man I married, made himself a little guide out of a piece of old deck board. He cut a hole (with the hole saw) in the deck board, then clamped it to our door as a template to drill the new hole. The template would keep the hole saw where it should be (instead of trying to cut off El Granto’s arms and massacring my door.)
After the hole was drilled, the new hardware was installed, I touched up the paint, and voila! Grown up door hardware.
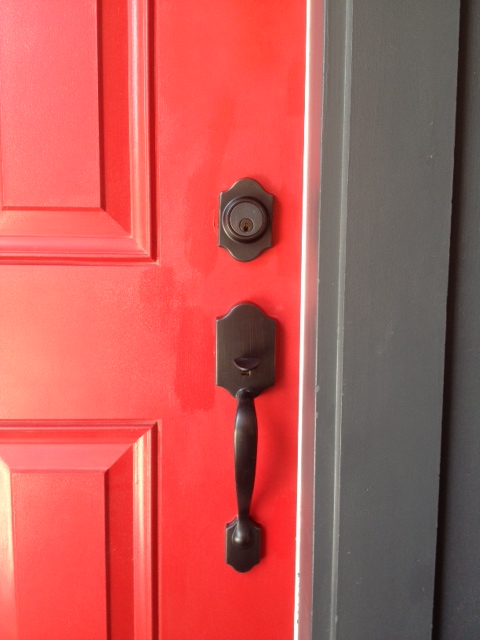
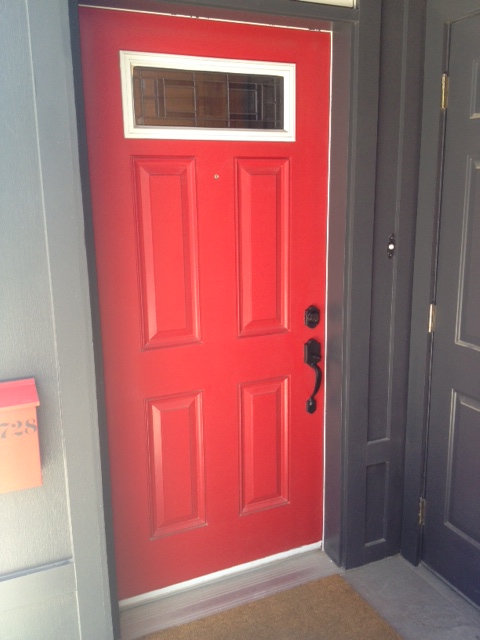
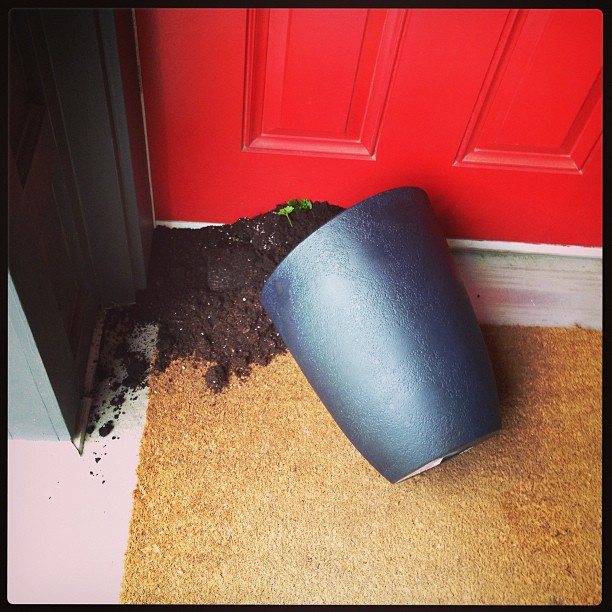
So what do you think of our $39 purchase? The front of the storefront just keeps looking better. Now if only I could keep people from stealing my plants, and we’d be golden.
Kitchen Shelves
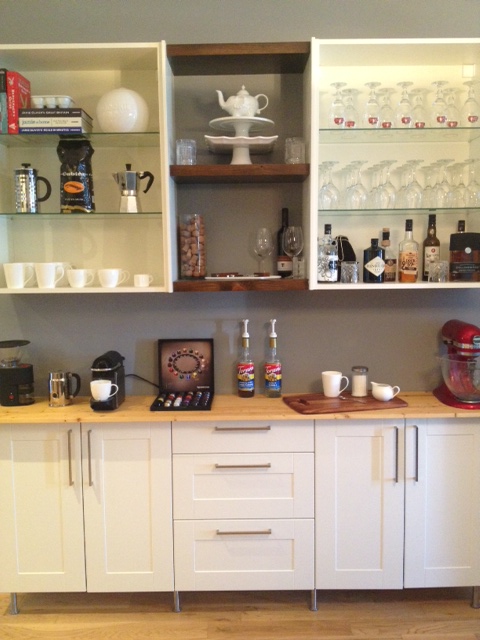
I cant believe I totally got off my butt and got some work done on the coffee bar. I know, amazing, isn’t it. I am a chronic project half finisher. Oh look at that new shiny project over there… Its not all my fault, money plays big into things, as do accessibility to materials.
SO we knocked the filler panels off our to do list, and got to tackling the open area between the upper cabinets.
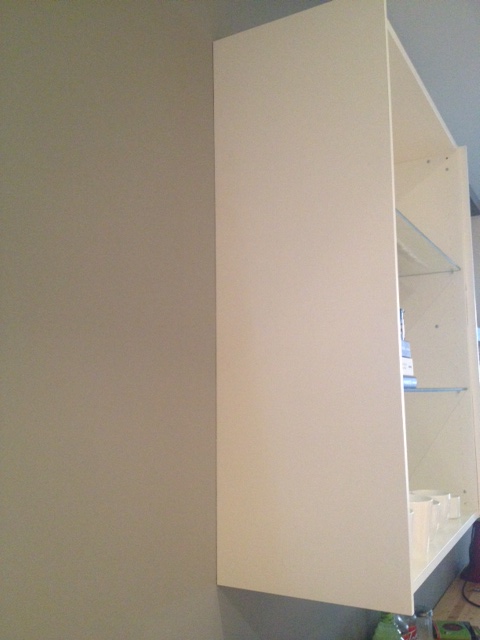
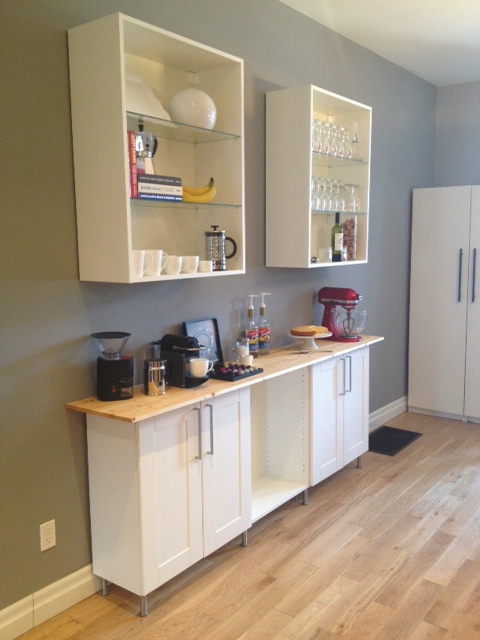
When designing the coffee bar, we left an open space between the upper cabinets for some open shelving. We thought it was a good place to mix things up a bit, and add a different colour/material.
We set out to finally add some shelves. They are short shelves, just under 2 feet wide. When deciding on materials we could have matched the cabinets, but the whole kitchen was feeling a bit matchy matchy. So we took a cue from our new dining table and bench, and went wood. We also wanted it to look a bit more modern, so we decided to forgo shelf brackets, and suspend the shelves between the upper cabinets.
Off we went to the happiest place on earth (AKA the lumber yard.)
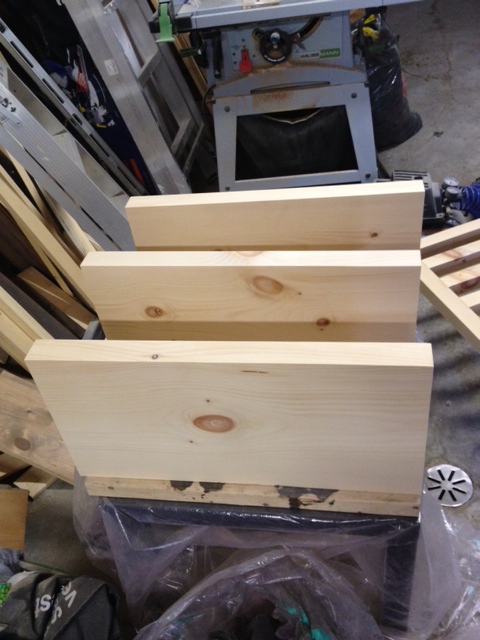
We picked up a 6′ length of 2×12 kiln dried pine from Downtown Lumber, carried it home and cut it into three shelves.
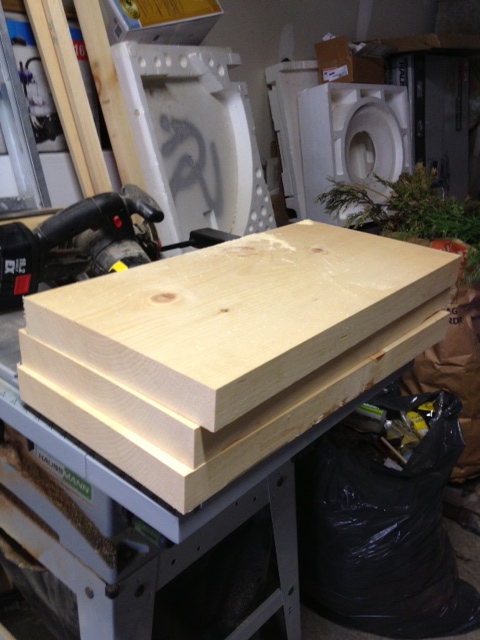
Then we sanded, and sanded and sanded some more (as always). If I could outsource sanding, I would. The only saving grace with sanding is blasting some rocking music that gets you working faster (ever listened to Andrew WK while sanding? It’s like you are compelled to work FASTER!)
After I was happy with the sanding, I cleaned everything off, and set up the shelves on blocks and gave it a coat of wood conditioner (followed by two coats of stain to match the table, and 4 coats of polyurethane.) I took photos of this step, then deleted them. Cause I’m awesome like that. So close your eyes and visualize it, k? Good.
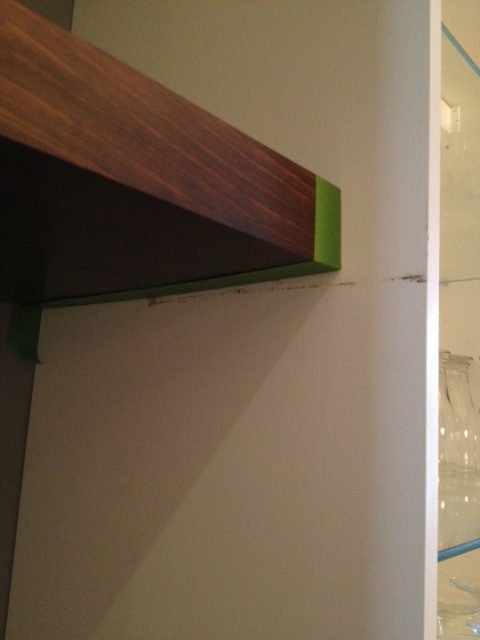
After everything was dried and purdy, we went inside to install. This went surprisingly well. A couple ladders, swear words, some screws and leveling, and the shelves were screwed through the cabinet into the shelf.
The only problem occurred was that I was TOO good at measuring, and the shelves were such a tight fit, that they left a few marks on the filler panels when we were shimmying them in place. No harm done, a bit of masking tape, and some touch up paint were all that was needed.
And ta-da, the shelves are done!
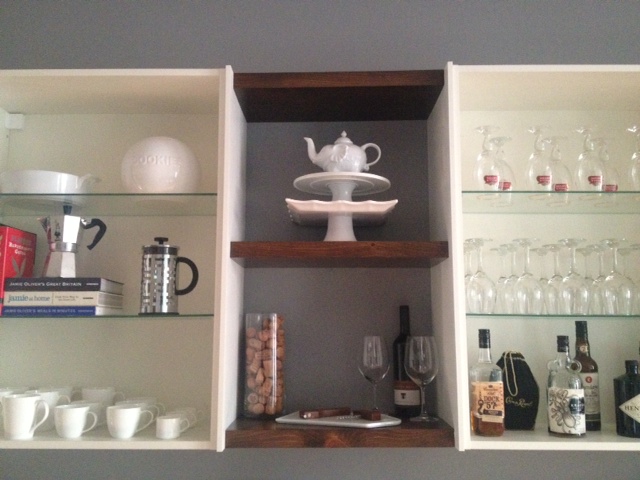
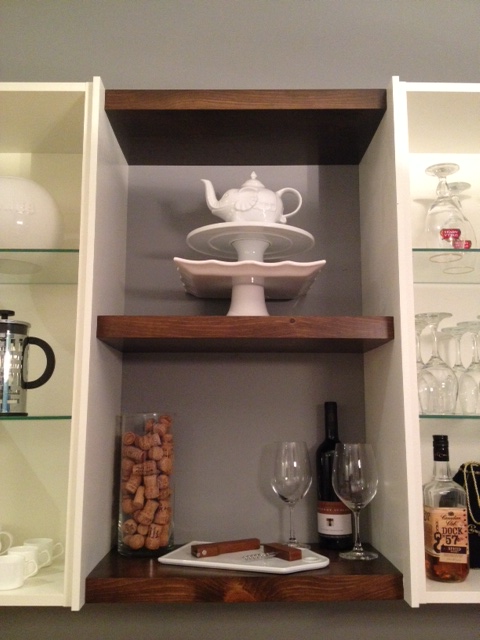
My only problem is that I am HORRIBLE at styling shelves. Anyone wanna come to my house and style my shelves for me? That and I never seem to have any accessories of the right scale. Too big, too small, too weird. Check. So this kids is what it looks like when I throw together some shelving. Maybe I can get some of my photo stylist friends drunk and convince them to style my house for me.
SOURCE LIST:
Materials:
2×12 kiln dried pine @ 6′ – Downtown Lumber
Stain – Varathane Chocolate
Polyurethane – Minwax Oil Modified in Satin
Tools Used:
Miter saw
Orbital sander
Measuring Tape
Finishing Supplies
Difficulty Level (on a scale of 1-5):
two out of five
Total Cost: $30 (for the new wood, we already owned the stain & poly)
Storefront Conversions
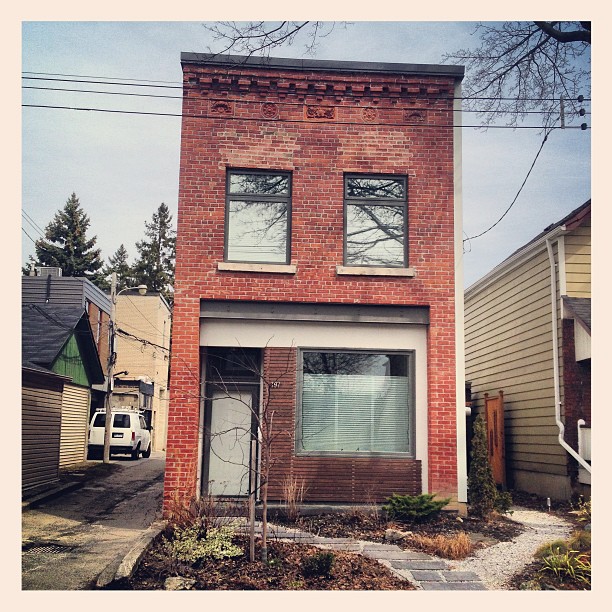
We live in a converted storefront. To non city dwellers, living in an old store may sound a bit odd. However, there are quite a few converted storefronts in our neighborhood, and in downtown Toronto in general.
Make Your Own Custom Table
I know you’re probably all “tabled-out” with my table talk last week, but I just wanted to give you all some ideas for creating your own dining table.
As you know, we made a new top for our pipe leg table. It was easy peasy. Three boards, some supports, sanding, staining and protecting and its as easy as pie. (Well maybe not pie. Pie is pretty hard to make.) So now I’ve convinced you to make your own table top, but what if pipe legs aren’t your thing… It’s too hipster for you, or too industrial, or not glam enough. So don’t worry, I got your back. I’m your girl.
This is what you need to do. Make the table top. Then pick your stain color and pick your legs. It’s like a choose your own adventure novel, but with FURNITURE!
I know, your mind is blow! (right? maybe? a little bit blown? a spark?)
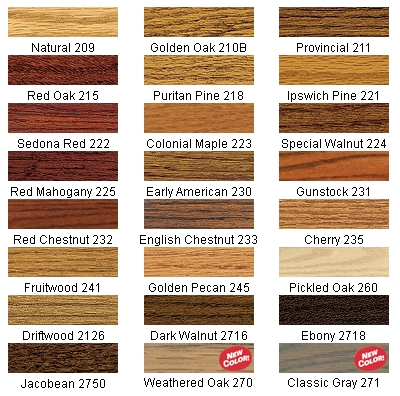
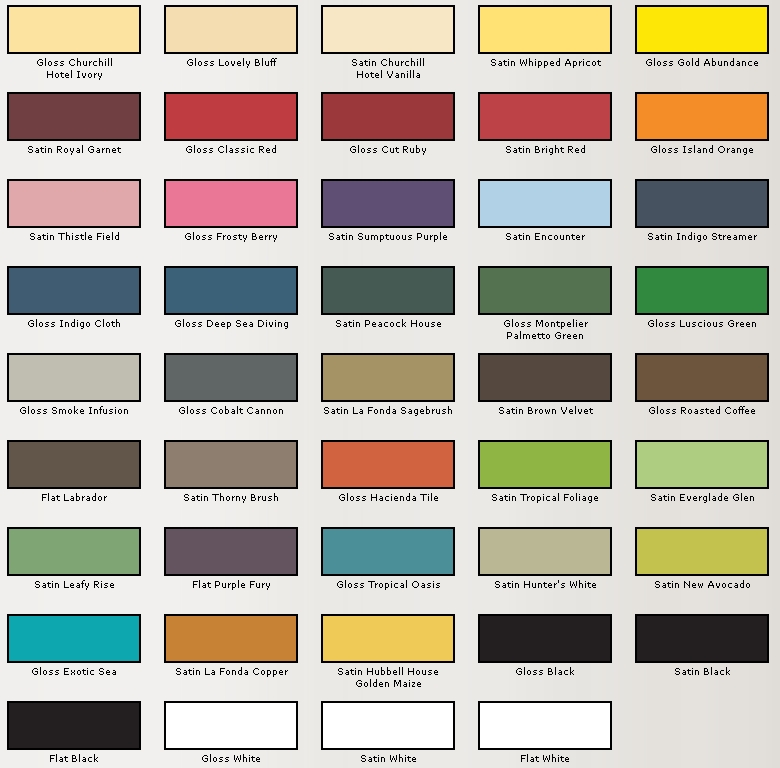
PICK A STAIN:
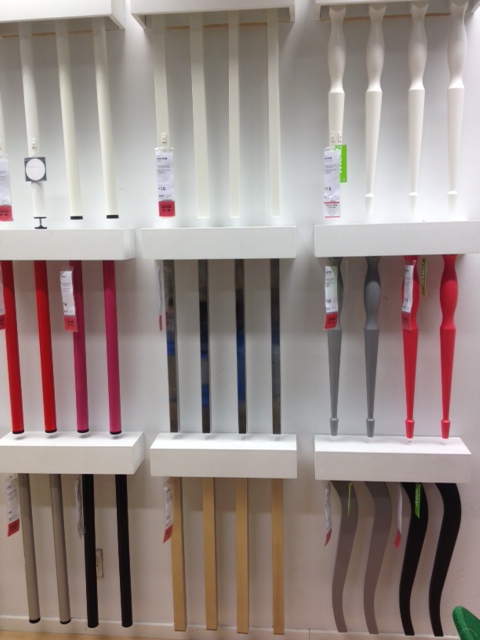
PICK A LEG:
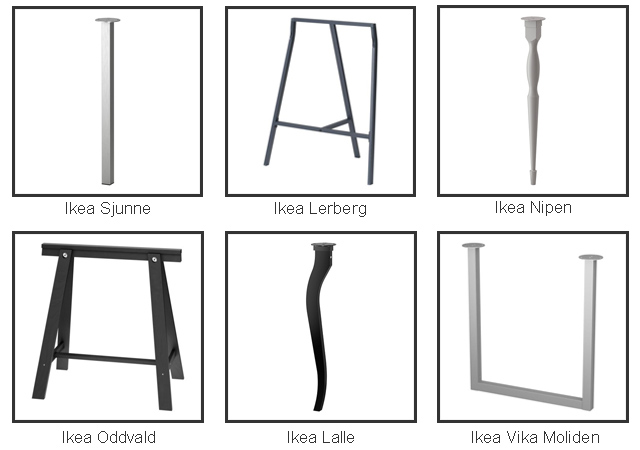
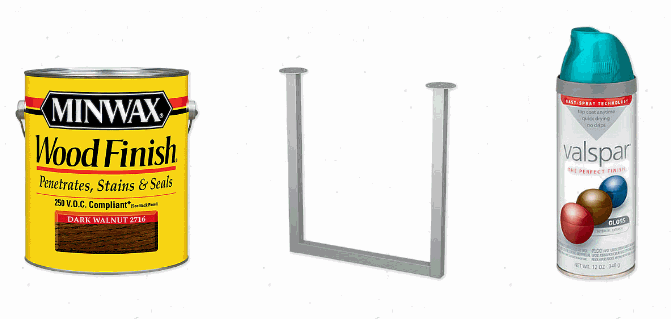
OPTIONAL: Pick a spray paint color to paint the legs:
Here’s some of my ideas:
Dark Walnut top + Ikea Vika Moliden Underframe legs spray painted Exotic Sea.
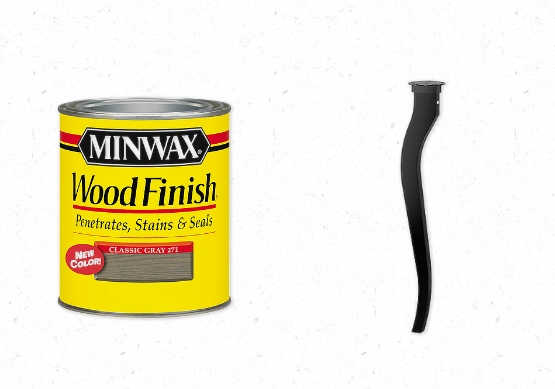
Classic Gray top + Ikea black Lalle legs
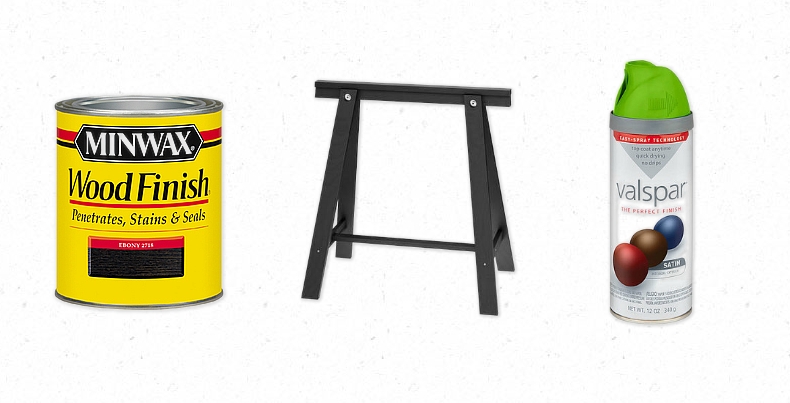
Ebony top + Oddvald legs spray painted Troical Folliage
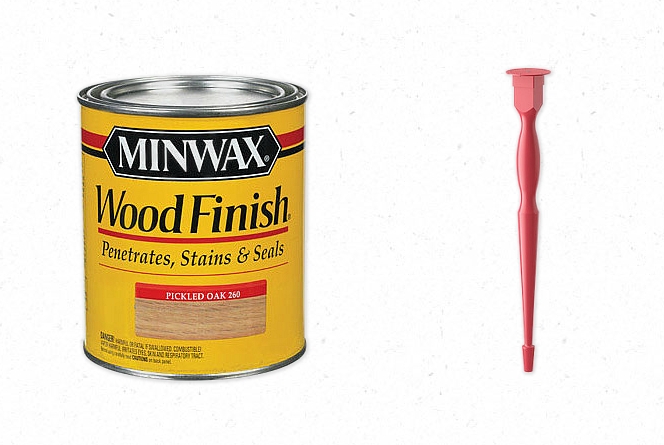
Minwax Pickled Oak + Red Nipen legs (which are more pink than red)
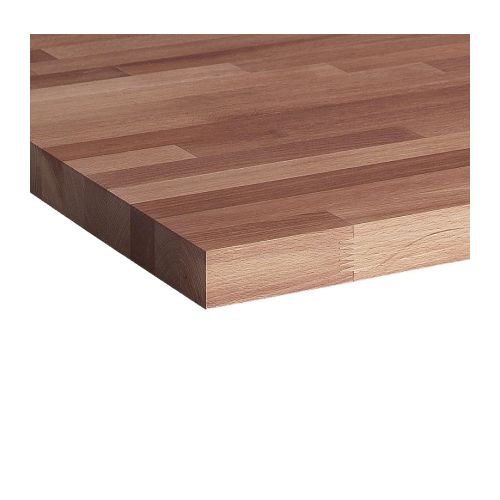
DIY TIP! If your idea of DIY & woodworking is watching HGTV in your PJ’s. Consider using a piece of prefab Ikea butcher block countertop as a table top. It comes in a 6’x3′ size (for $269) that would be perfect for a dining table!
What options would you choose?!
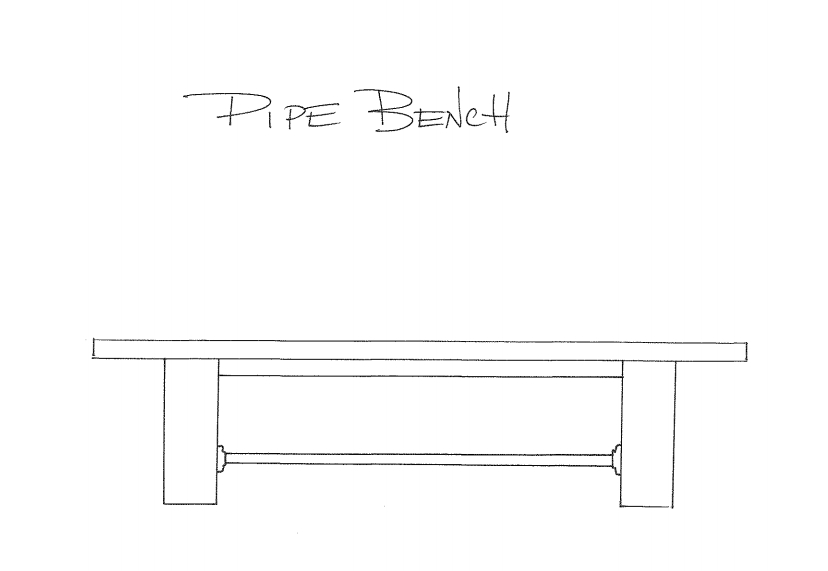
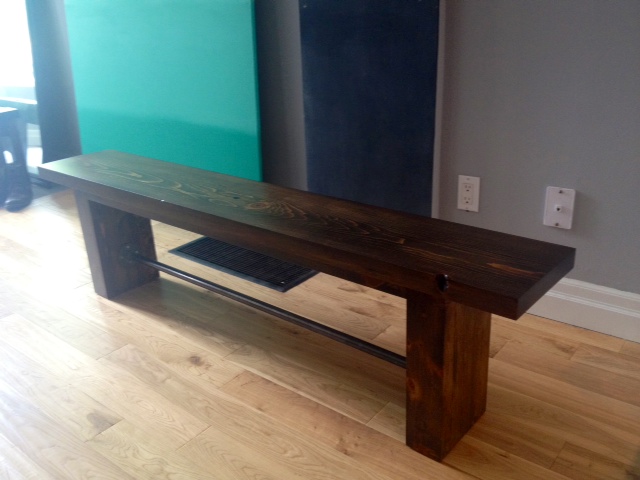
Yet Another Bench
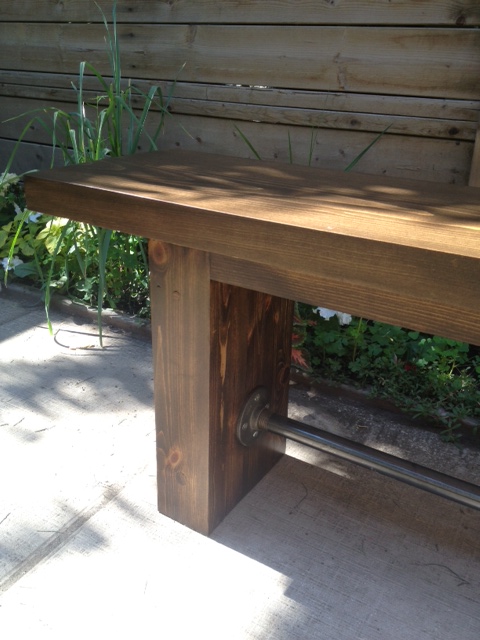
I know, I know, ANOTHER BENCH?! REALLY? Here’s the deal. We replaced the top of our pipe leg dining table, and our old bench was looking sad in comparison. It’s unfair to give one kid a present, and then stiff the other one. So Mr. Bench got an upgrade.
If you remember correctly, this is what the old bench (& table) looked like:
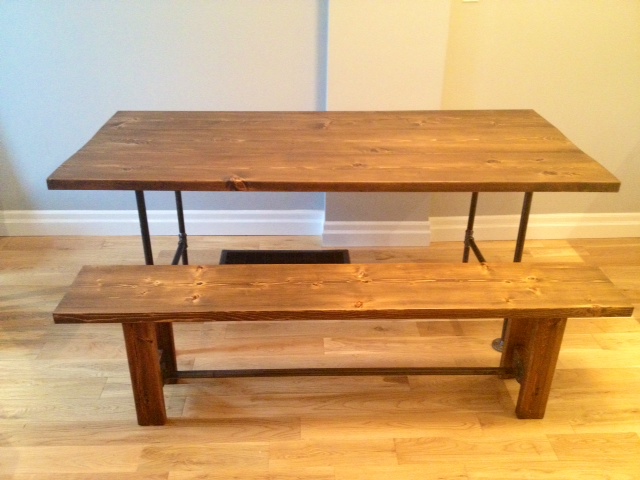
We salvaged the pipe stretcher from the old bench, and got to work making new legs & a top. We wanted something a bit more industrial looking. The old bench was fine, but a bit traditional. So we searched for inspiration and found this on Pinterest:
I loved the chunky legs and thought it had the perfect shape. So we set to building our own version with a pipe stretcher.
Buy List:
1 – 2×12 x 6′ piece of kiln dried pine (same as our table)
2 – pine 2×2’s @ 8′ for aprons
2 – pine 2×4’s @ 8′ for the legs (make sure these are square edged 2×4’s, not rounded ones like you use for framing)
3/4″ dowel
Wood Glue
4′ pre-cut piece of 3/4″ gas line pipe (threaded on both ends)
2 – 3/4″ pipe floor flanges
2 1/2″ pocket screws
Cut List:
1 – 2×12 at 68″ (bench top)
2 – 2×2 at 48 5/8″ (aprons)
10 – 2×4 at 16 1/2″ (legs) if you can, set yourself a jig on your saw to make sure all the pieces are cut exactly the same size
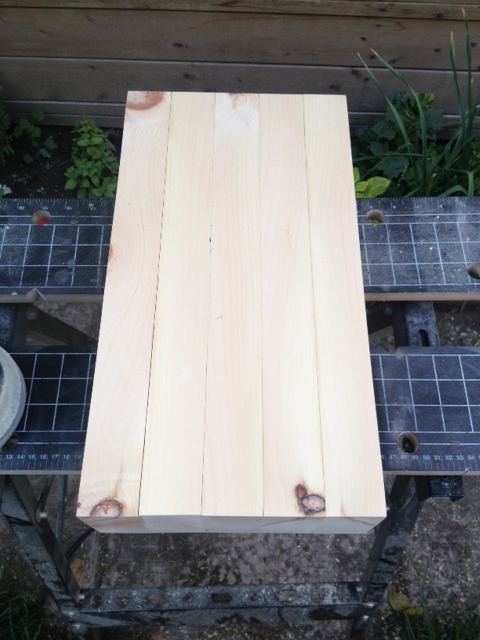
First up, glue 5 2×4’s together with wood glue and clamps making one great big 4×10, repeat with the other 5 2×4’s (if you don’t have enough clamps, do one leg, then let it dry for a day, unclamp and do the other leg.)
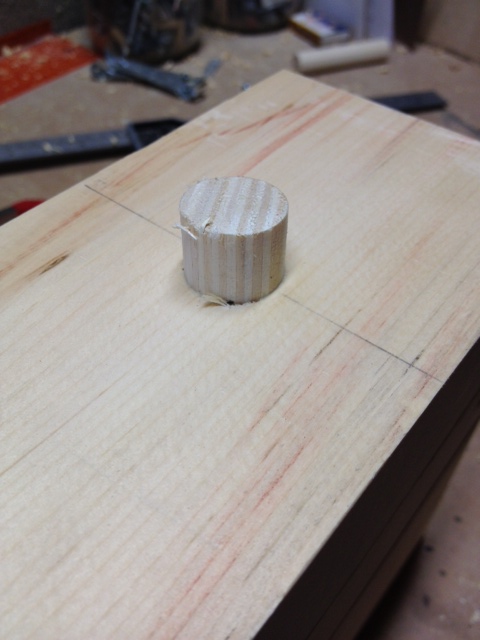
To make sure those legs aren’t gonna move, we also strengthened them with dowels (and a few screws). We liked the way the exposed dowels looked on Daniel & Adelle’s table, so we opted for that route. After the legs have dried, mark 3″ up from the bottom of the leg on one end and mark the center of the board. Then drill a 3/4″ hole with a spade bit about half way through your leg. Ideally it would go all the way through, but to do that nicely (without any tear out) and straight you really need a drill press (which we dont have!). So we opted to do a dowel from each end.
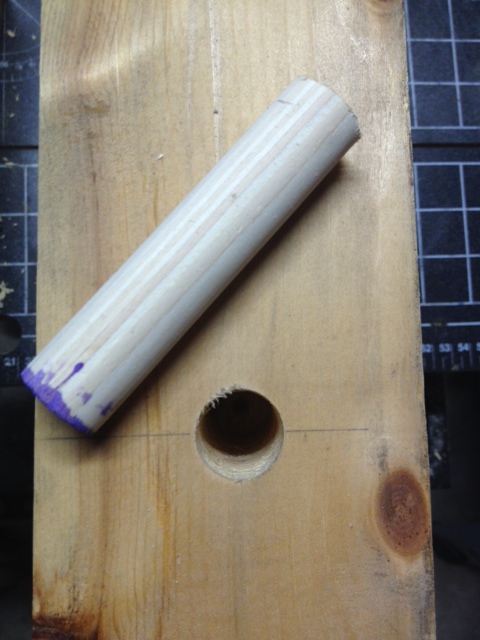
After your hole is drilled, cut a piece of dowel a bit longer than your hole, glue & tap in place. Repeat for all the other sides of both legs and let dry.
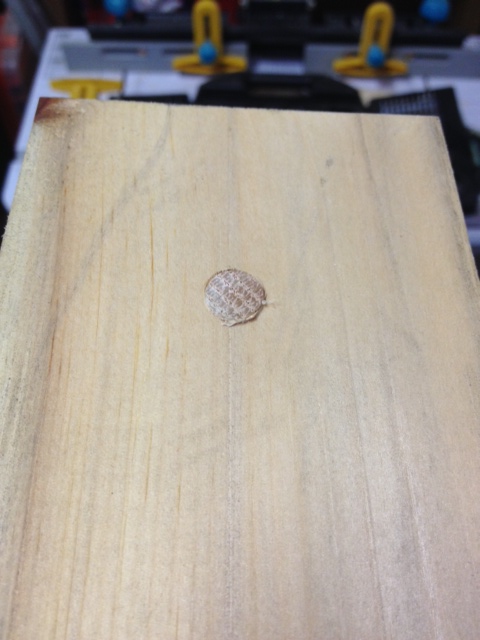
To strengthen the top of the legs we used a 3″ counter sunk screw from either end. We pre-drilled the holes with a 3/8″ drill bit, inserted the screws, then filled the hole with a wood plug & some glue. If you must use screws on a project, using wood plugs will make them a lot less glaringly obvious.
Once all the glue has dried (another day) you can cut the dowels close to flush using a coping saw, chisel, hand saw, Dremel, or oscillating multi-tool.
Now it is time to make a few pocket holes for attaching the legs to the top. We put three holes in each leg (kreg pocket hole jig set to 1 1/2″ thick material).
Time to sand. I always find that it is MUCH easier to sand pieces like legs before installing them. As we needed to sand down the exposed dowels, we started sanding with 80 grit until the dowels were flush, then switched to 100, then 150 and finally 220 grit.
The apron pieces got 2 pocket holes drilled in each end (to attach to the legs) and a good sand as well.
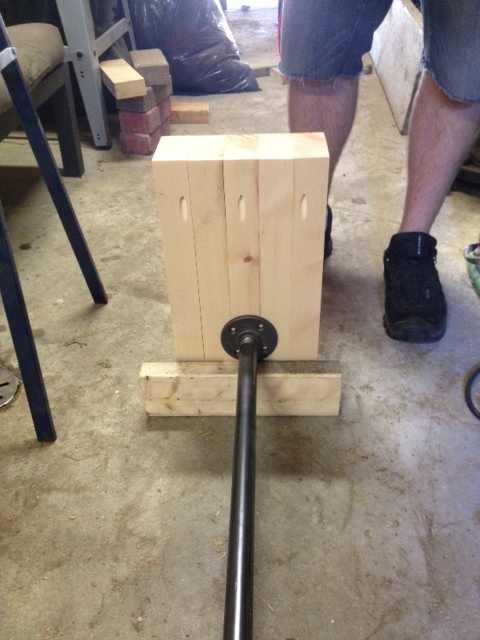
Next up, attach the flanges to either end of the pipe and attach the pipe stretcher to the legs with screws. We used a scrap 2×4 to set the flanges up from the bottom of the legs.
Next up, attaching the legs to the table and the aprons. Flip the bench top upside down and use it as a work table to attach the aprons. The aprons will give the bench even more strength, and stop it from wanting to shift sideways. Once the aprons are attached to the legs, center the legs on the bench top, and attach the legs with the pocket holes you drilled earlier.

Put in a few 2 1/2″ screws through the aprons into the top, and fill the Kreg holes with pocket hole wood plugs and glue.
Time to head back outside, give the top a sand, and an overall finish sand to the rest of the bench.
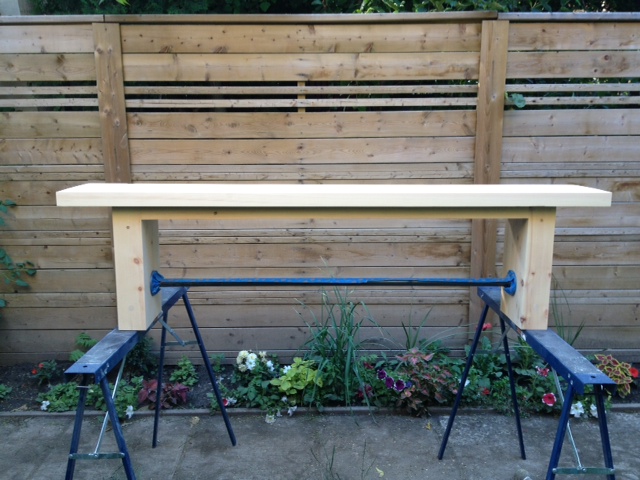

A coat of wood conditioner, two coats of Varathane Chocolate stain, and three coats of polyurethane later and this is what we’ve got. (check out my post on finishing wood here.)

SOURCE LIST:
Materials & Cut List:
(see above) – Wood from Downtown Lumber
Stain – Varathane Chocolate
Polyurethane – Minwax Oil Modified in Satin
Tools Used:
Miter saw
Drill
Kreg Jig
Orbital sander
Measuring Tape
Finishing Supplies
Difficulty Level (on a scale of 1-5):
two out of five
Total Cost: $60 (for the new wood, we already owned the pipe, stain & poly)
Quick & Dirty Outdoor Table
We got home from a week vacation in Vegas to find that our house hadn’t floated away in the Toronto Floods, and that our garden had doubled in size because of said rain. Win win. We also came home to a heat wave. You’d think I would be prepared for the heat after staying a week in the desert. No siree. Vegas heat = dry and wonderful, Toronto heat = humid and sweaty. Needless to say on our first day back we didn’t do much. We played and cuddled with Odin (who we missed desperately) and had a few cocktails on the deck.
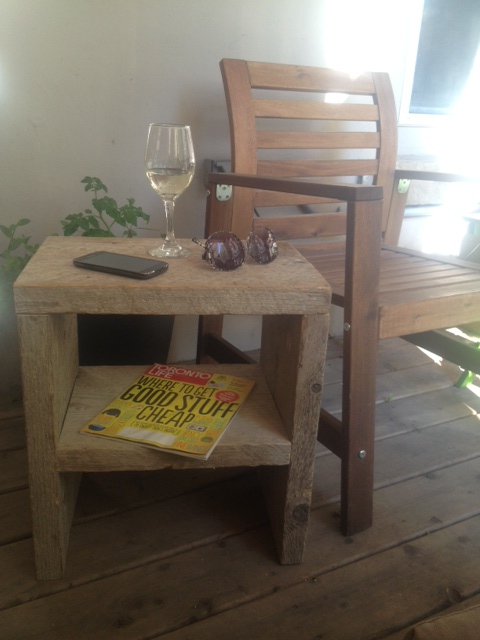
Our deck layout is small (big surprise), and features a bench and two chairs with a small folding table. This works well for the person sitting beside the table, but everyone else must hold on to their drinks, snacks, hats etc. Fed up with holding onto my wine glass, (yes yes I know, first world problems) I sprang into action and built a quick and dirty (literally) outdoor side table.
Last time I was up at the cottage, I stole borrowed an old battered 2×12 that was sitting under the bunkie. My Dad had used it for the concrete forms for the cottage foundation, and the old board was just hanging out under the bunkie left for a life of firewood/scrap. I saw the beauty in its weathered aged goodness and brought the board home with me. It has since sat littering the garage floor (much to El Granto’s chagrin) waiting for a project.
In my fit of DIY, I did up a quick drawing, decided on a design & size, and made a few cuts of the weathered wood (see cut list below.)
Outdoor Side Table
(19″ tall, 17″ wide and 11 5/8″ deep )
Note: My sketch is in no way to scale, or in correct proportions, or even straight. That’s just how awesome I am at drawing…
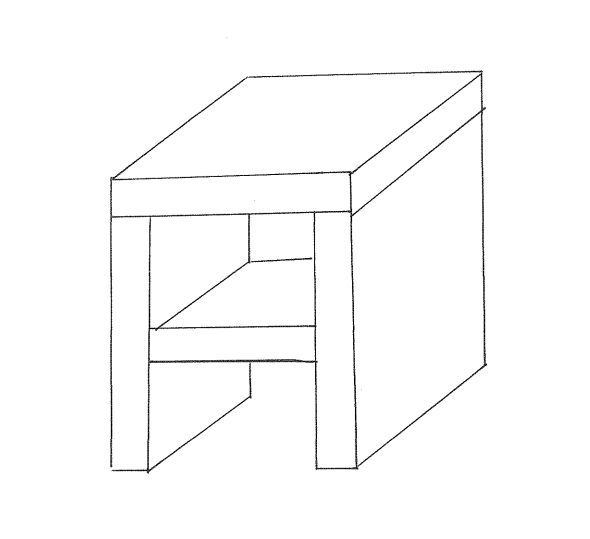
I drilled a few pocket holes (four in one end of each of the side boards, and two on each end of the shelf), and screwed in a few outdoor Kreg screws, and 15 minutes later we had a weathered side table. Perfect for holding a glass of wine, sunglasses & a magazine. I made the shelf big enough to hold our Bose sound dock. Cause no deck time is complete without some Robin Thicke.


SOURCE LIST:
Buy List:
1 – 2×12 @ 8′ (Under the Bunkie)
12 – 2 1/2″ outdoor pocket hole screws (Lee Valley)
Cut List:
1 – 2×12 @ 17″ (top)
1 – 2×12 @ 13 1/4″ (shelf)
2 – 2×12 @ 17 3/8″ (sides)
Tools Used:
Miter saw
Drill
Kreg Jig
Measuring Tape
Difficulty Level (on a scale of 1-5):
one out of five
Total Cost: $0 (booyakasha)
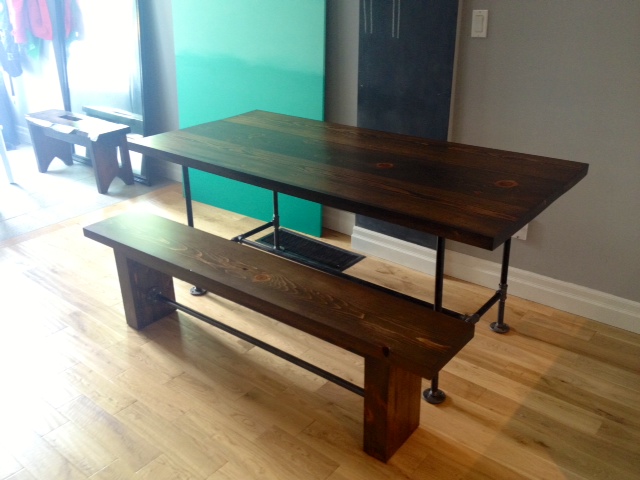
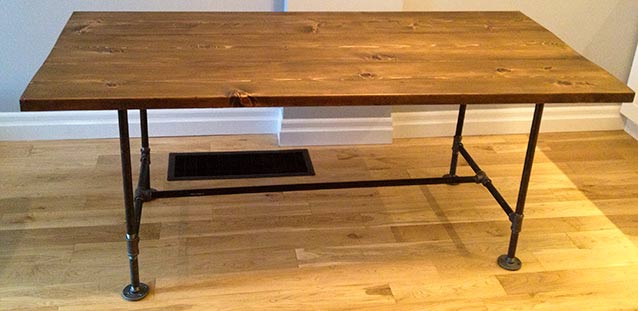
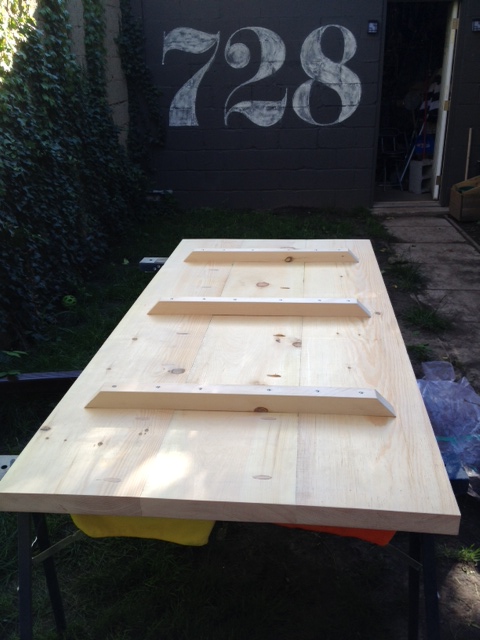
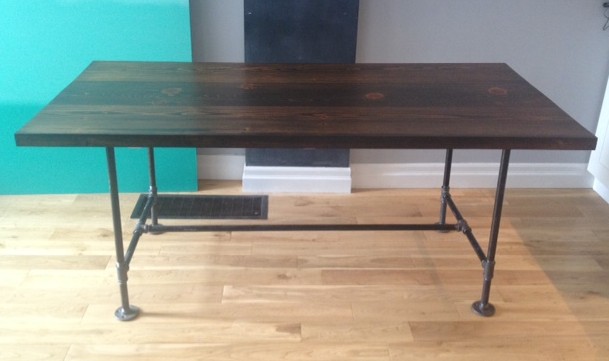
Pipe & Wood Table V2
We loved our DIY Pipe & Wood table and bench. However, we started to fall out of love with it after living with it for a few months. In order to get the table done on a budget & quick timeline we used framing grade spruce lumber from the big box store. Over time the wet wood warped, and our table was looking a bit topsy-turvy. Oops. The framing grade spruce also had rounded edges, which made for serious crumb catchers between the joints. Thirdly, we used Tung Oil to finish the table, and after a while, the tung oil started to smell, well, like spoiled oil. Nowhere in all my research did I find anyone saying tung oil would smell like butt after a few months. Lesson learned. (Although as a finish the tung oil was doing otherwise great, not a single water spot or mark on the table, if you can get past the butt smell.)
If you know me (and my neuroses) at all, you will know that I couldn’t just leave the table. I can live with dust bunnies rolling around the house becoming dust monsters, and I can live with dirty dishes in the sink, but a wonky smelly table? Not a hope.
So here it is kids:
DIY Pipe & Wood Table Version 2 (6’x 34 1/2″)
Lumber Buy List: (purchased from a local Home Hardware Building Center. Check your neighborhood to see if you have a Home Hardware Building Center or another lumber yard . They will carry a larger amount of lumber than the big box stores, at about the same prices.) If you’re in Toronto, try Downtown Lumber (a Home Hardware) or Central Fairbank Lumber.
3 – Kiln dried pine 2×12’s @ 6′ (square cut edges, not rounded ones)
1 – Kiln dried pine 2×2 @ 8′ (support pieces)
Cut List:
3 – 2×12’s @ 6′ (our lumber yard rough cut them to just over 6′, then we did nicer cuts with our sliding miter saw at home. If you do not have a sliding miter saw, or a circular saw that can cut through that thickness of wood, have your lumber yard cut it for you with their good saw, not their rough cut one.)
3 – 2×2’s @ 26″, cut to a 45 degree miter on either end.
Instructions:
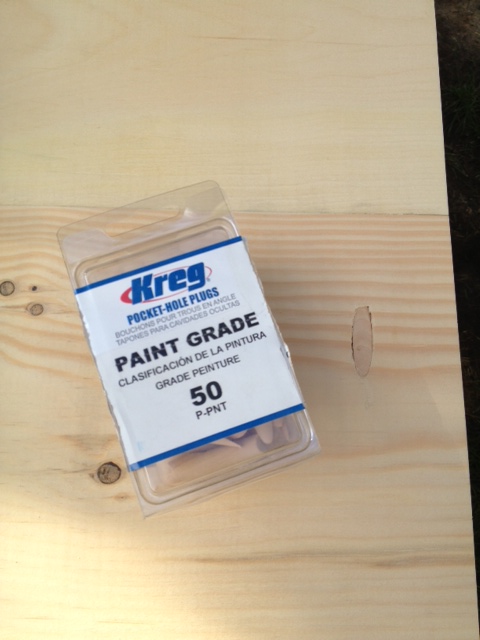
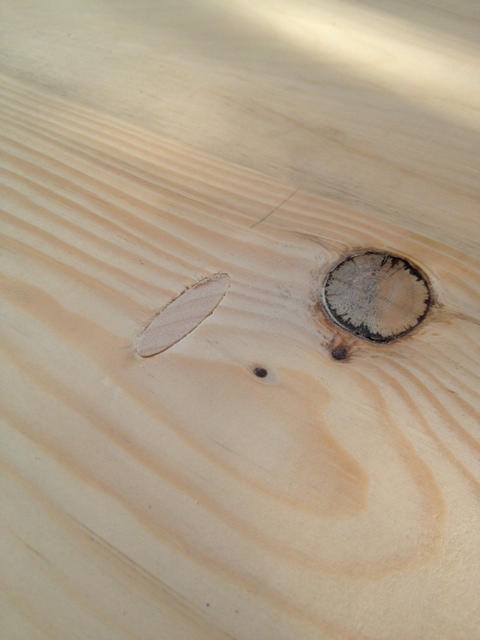
Lay out your table top boards and decide which sides you want up. Make sure to flip the grain so that one board’s grain is up, and the next is down. When you have everything laid out (and square!) mark for Kreg pocket holes every 8″ or so on the bottom of 2 of your tabletop boards. Using the 1 1/2″ thick wood setting, drill your pocket holes. (see how to drill a Kreg pocket hole here.)
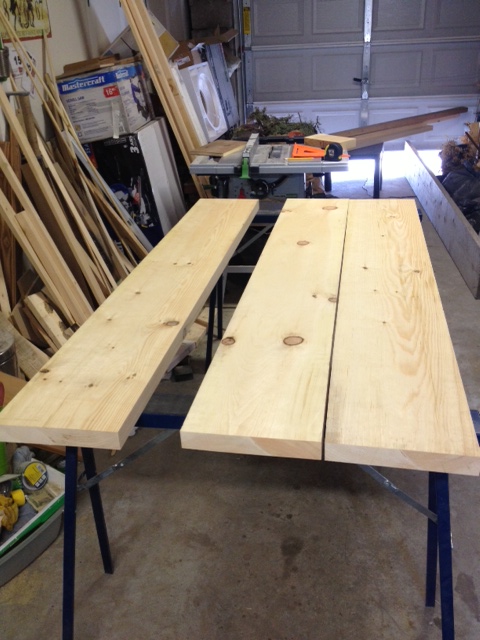
Attach your tabletop boards together with wood glue and 2 1/2″ Kreg Pocket Hole screws. Make sure your table is square before attaching the boards together. (You can check it with a square and by measuring corner to corner diagonally. If both sides are the same, your table is square.) Wipe off any excess glue that may have squeezed up between boards with a wet rag before it dries.
Once glued and screwed, attach the support pieces. We put one in the middle, and two right behind where our pipe legs would go. The ends are cut to a 45 so that its looks nicer, and you’ll be less likely to whack your knee off it later. We used some 2 1/2″ screws to attach the supports, making sure we got at least 2 screws into each board. These support pieces will try to keep your table from warping. Remember wood is a living organism, and changes during high & low humidity and heat. So you can never guarantee your wood will stay exactly the same. (That’s why you leave an expansion joint on your hardwood floors, or else they might buckle.)
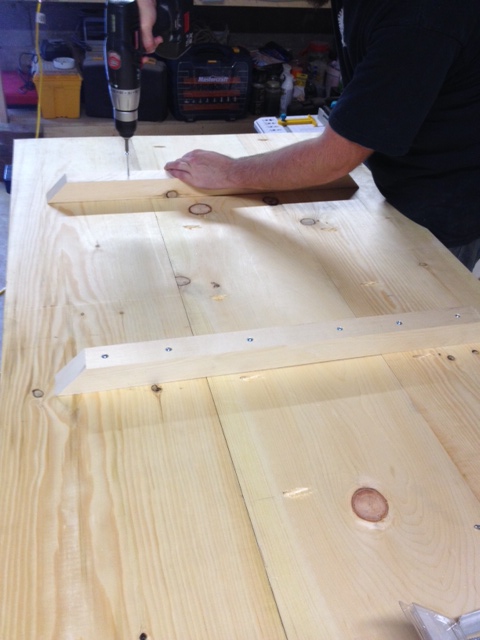
We also filled the pocket holes with Kreg wood plugs. You wouldn’t see the holes, but if you ran your hand along the underside of the table you would feel them. They also might catch on pants or stockings. The Kreg plugs are easy to use. A bit of wood glue and careful placement and they were done. After the glue dried we gave them a sand to ensure everything was nice and smooth.
Now its time to sand. I like to sand outside in the summer, so out the table went. We sanded away, then I stained the table and royally screwed it up. OOPS. Time to fix my mistake, and try again.
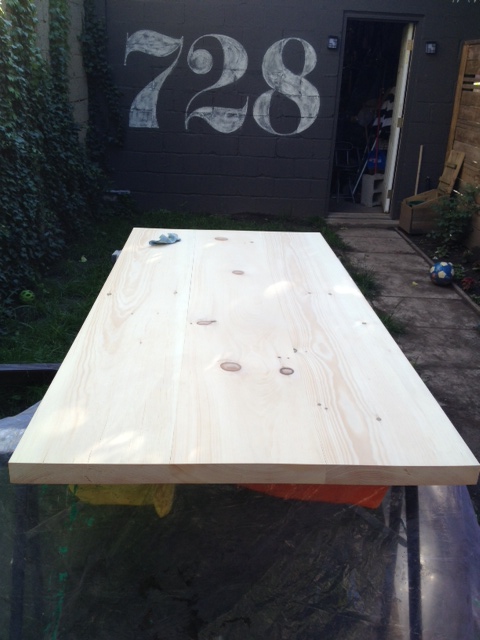
After the sanding came two coats of Varathane Chocolate Stain (check out my finishing post to see all my steps in sanding, wood conditioning & staining.)
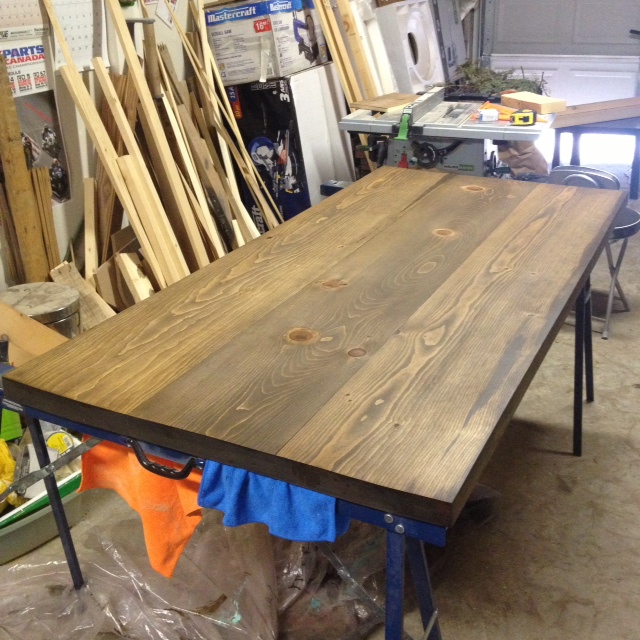
I can tend to get a wee bit anal retentive, so when it came to polyurethaning the table, I had to stop myself at 6 coats. Any more would be a bit cray cray. Realistically as long as you have at least three coats, you should be good.
Now to re-attach the legs from the old table. A bit of measuring to make sure its centered, and a few screws and we’ve got legs people.

Want to see what it looks like all finished?! (ignore my terrible lighting, the dining room is impossible to shoot in.)
Dum da da daaaaaa

***UPDATE*** We also made a new bench to go along with the table. Check it out here.
SOURCE LIST:
Materials & Cut List:
(see above)
Tools Used:
Miter saw
Drill
Kreg Jig
Orbital sander
Measuring Tape
Difficulty Level (on a scale of 1-5):
two out of five
Total Cost: $100 (for the new wood, we already owned the pipe, stain & poly)
Blogaversary – The Truth
So its official, we’ve been blogging for a whole year and over 200 posts! I know, time flies! Our Blogaversary also happens to fall on our summer vacation. So although we’ll be taking a break from the blog for a week of sun and fun, we will have a few new things to share with you.
First up, THE TRUTH!
Facebook, Twitter, Instagram and blogs skew our perspective of other peoples lives. You don’t see piles of laundry, their kids screaming, couples having arguments, bills, stress and chaos. The internet is like a magazine, only the most flattering parts of something are shown.
I know you see El Granto & I working away on projects every weekend, but here’s the truth. It doesn’t always go as planned, sometimes we screw up, and big. When were in the middle of a project, our house is in chaos, the laundry un-done, a dust bunny rolling down the hallway gathering size, and sometimes we have cereal for dinner.
So here is a post about the truth. The good, the bad and the ugly, but all of it true.
- Every single photo on the blog is taken with a cell phone. When we started the blog, I didn’t want to drag out our DSLR for every photo. I didn’t want to shoot raw, process, retouch and re-size. The blog is a hobby, and as such, it needed to not take up all of our time to maintain. So we shoot every photo on my iPhone, export it as a medium res image, and upload. No color correcting, no retouching. What you see is what you get.
- I write all my blog posts on the bus. I have a long commute, and between my 9-5 day job, commute, life & our projects it didn’t leave much time for blog writing. I would rather spend my evenings cuddling on the sofa with husband and puppy that stuck in the office writing. So I have found time during my commute to write my posts. I write everything as a draft in my email (again on my phone!), then when I’m at a computer I copy and paste and upload the photos.
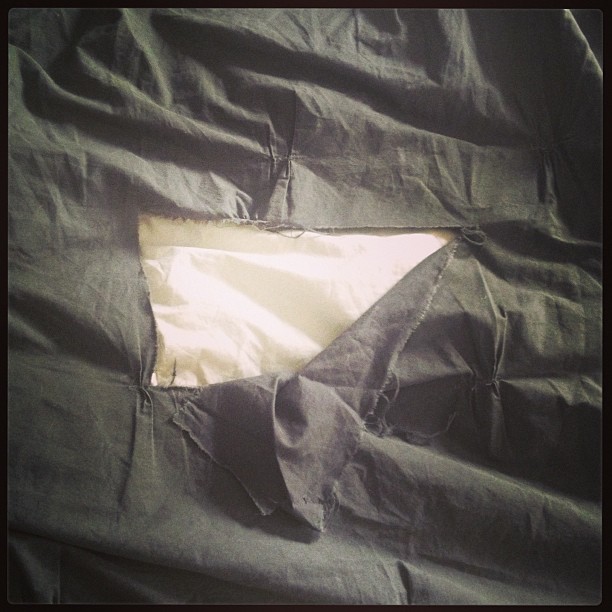
whats that? oh you know, the dog ripping a hole in our $150 douvet cover - We argue. We are both very stubborn and passionate people. We have opinions and like to do things our way. We argue over how to do projects, how much money to spend on them, and when things go wrong we can be not so nice to each other. I think the key to out working together is to know our strengths, to listen to eachother and to take a break when things aren’t working right. Usually a few minutes away (most likely with a drink on the deck and a game of fetch with the dog) and we are relaxed to give it another go.
- DIYing calms and relaxes me. I know that sounds crazy, as normally DIYing stresses people out. They do call it Divorce Dust after all. However building takes me to my happy place. If I could quit my day job and build things all day I would be happier than a pig in s#!t.
- I dream about reno projects. I often have trouble falling asleep at night, and to calm my brain I think about projects I’d like to do, and how I’d do them. I think planning is half the fun in a project (nerd alert).
- I am the spastic one, and El Granto is the calm level headed one. I have crazy ideas, and he brings me down to earth and keeps me sane. We are both creative types and feed off eachothers ideas. One of us can have a great idea and then the other one will chime in to make it even better. This is both a good and a bad thing, as it usually means more work or more money to spend on a project!
- El Granto built and maintains the site. When I said I wanted a blog, he set it up on a site we already had, and gave me one month to blog. He promised if I stuck with it, he’d give me my own domain. Well one month and 19 posts later, he realized that I wasn’t joking, and really wanted to do this. So that day he signed me up for a new domain, and www.storefrontlife.com was born.
- Ever wonder what we do for (real) jobs? I work in the photography industry, and El Granto is a web developer.
- A lot of the time we have no idea what we’re doing. We research things and watch YouTube videos like the rest of you. We’re not experts, and a lot of the time we’re just winging it. Most importantly we read the instructions. Most of the time there’s an expert telling you EXACTLY how to do something, you just have to follow the instructions.
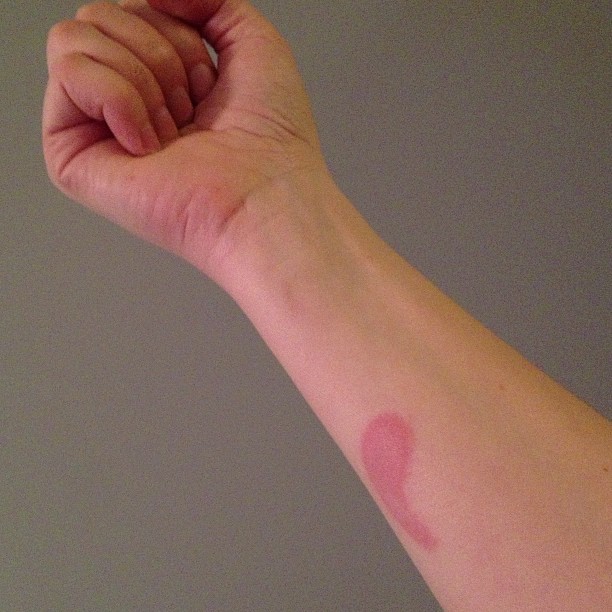
Yep, that’s a burn in the shape of a comma, forever scarred into my arm - I use all the tools, and pull my weight in projects. Ours isn’t a house of “honey-do lists”. Everything is a group effort, and each of us pulls our weight in projects. We both have strengths and weaknesses, and things we like to do more than others. For instance, I usually let El Granto do most of the drilling, as for the life of me I cant hold a drill straight. I also am not the biggest fan of the table saw, and usually let El Granto do most of the cutting on it. El Granto hates sanding (I could probably trade him bathroom cleaning duty for sanding) but I don’t mind it that much, so I usually sand while he continues to build. However, I love the miter saw, and my anal retentiveness usually has me doing the measuring and finishing cuts.
- We have not made a penny off the blog, and our intention was never for this blog to make any money. We were doing the projects and sharing them with friends and family on Facebook already, and thought maybe someone else out here would like to hear about them. We also have went a year without ads or sponsors. That’s not to say that we wont consider that in the future (cause hey, this blog does cost $ to run!) but we want to share what we do, and hope you get some inspiration out of it!
So that’s us, in all our flawed glory. Thanks for spending the time with us for the last year, and hopefully we can get into some more fun in the years to come. Ohh snap, sh$t just got sentimental.
Playing Dress-Up
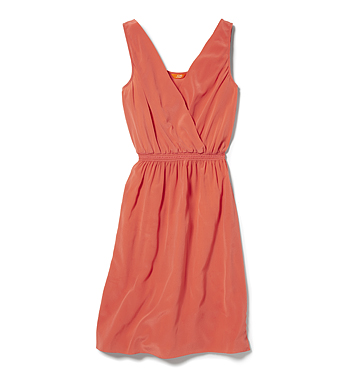
I know you usually see me wielding a drill, or covered in sawdust, but underneath all the paint & polyurethane, I am still a girl.