Sink Hunting

I really want to get started on our DIY kitchen concrete counters (which by the way, I’ve been doing a ton of research on, and I think I found the most awesome product ever. More on that soon.) However, before we can even think of making the new countertops, we need to find a new sink.

This is the sink we own:

Ikea Boholmen 1 1/2 bowl inset sink with drainer
Our Kitchen
You can spy it to the right of the stove

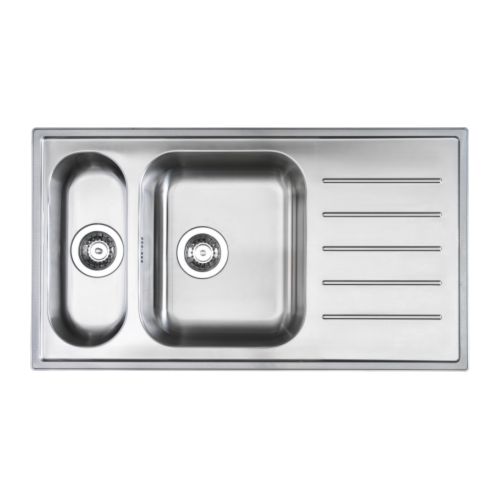
I hate this sink. Yes, I know hate is a strong word, but this sink deserves it. I have a itty bitty kitchen, and this sink takes up a large amount of real estate for being such a tiny sink. The 1 1/2 bowl thing is useless. The small sink on the left is shallow and used solely for rinsing vegetables. The larger (and I say larger in relative terms) sink is okay, but still not large enough to wash a large pan or fill a stock pot.

The drainer, while useful for draining wet dishes, it always has a wet dish hanging out on it, cause why would you dry the dish and put it away if you could just leave it? It also takes up a lot of space on the counter.

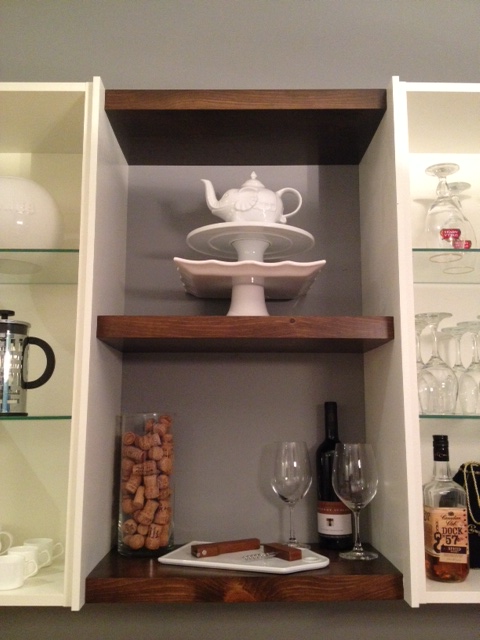
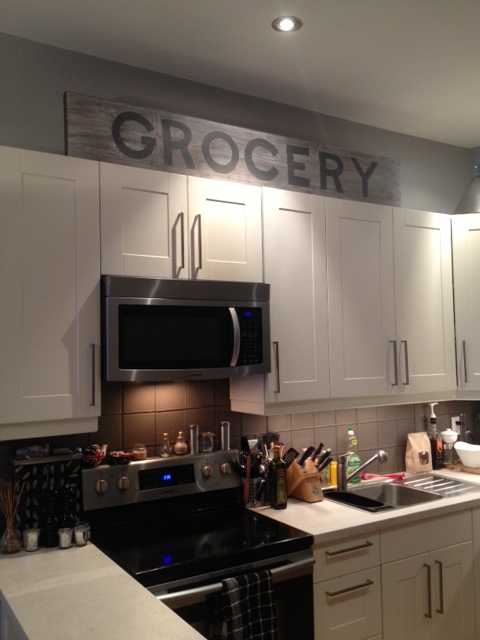
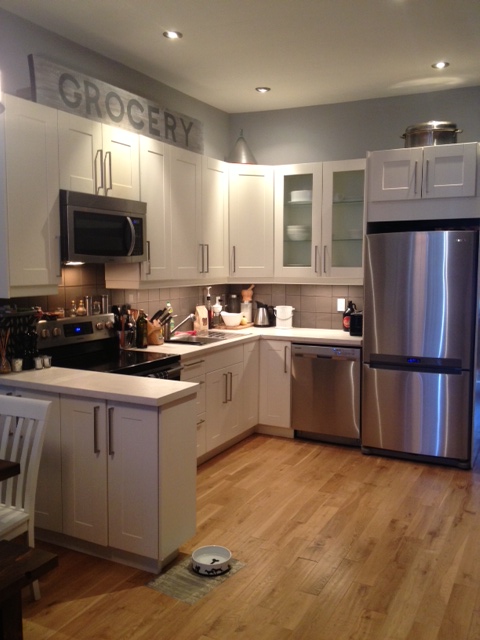
To give perspective, here is our entire kitchen.

The Kitchen
Yep, that’s the whole kitchen. See how much counter space I have? See how much the tiny sinks + draining board take up?

So when the new counters get made, that sink is out. It’s headed to Craigslist, hopefully to find a new home where its owners actually love it. (Oh and don’t even get me started on that backsplash, it will be outta here not long after the sink & the counters.)

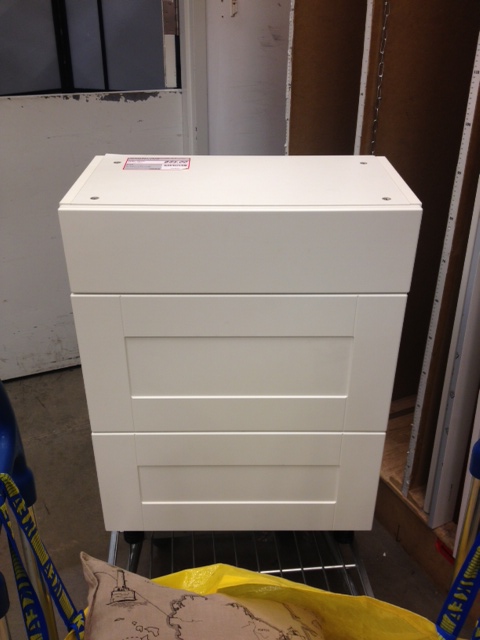
Time to shop for a new sink. We have an Ikea 24″ sink cabinet, which is small. A double bowl is really out of the question. For those of you aghast at that decision, read Carol Reed’s post about single vs double sinks. While you’re at it, read her post on the advantages to Ikea kitchens.

Having such a small Ikea sink cabinet  means buying an Ikea  sink made to fit into that cabinet would be the easiest choice. I have looked at all the big box stores, all the special order sinks online, but realistically I haven’t found anything that can beat my Ikea options. Have you priced out a farmhouse sink lately?! I love you Kohler, but you are not in my budget.

So Ikea it is.

I have narrowed it down to two sinks.

OPTION A.) Shiny McSinkerson

Bredskar Single-bowl inset sink $249
Ikea Bredskar Single-bowl inset sink $249

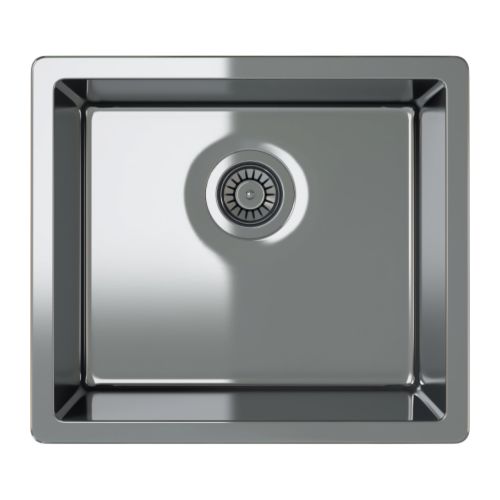
Modern looking Stainless sink. Simple design, nice price tag. Would like it better if it was undermount, but drop in isn’t that bad. (I have never owned an undermount sink, so I am used to the crumbs.) It also has the look of a square edge sink, but without the actual square edges, which from reading reviews online I’ve heard are the pits.


OPTION B.) Goin to the Farm

Ikea Domsjo Farmhouse Sink
Ikea Domsjo Farmhouse Sink $249

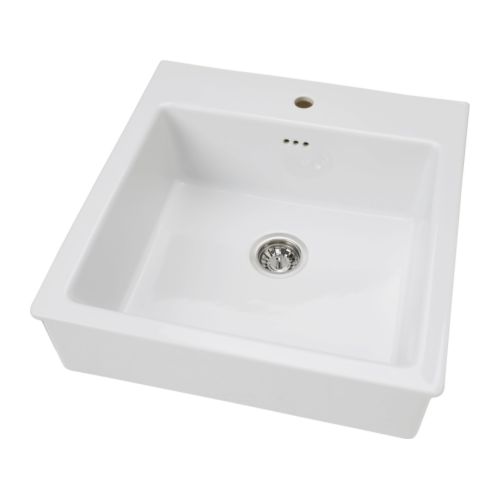
I love the look of a farmhouse sink mixed with a more contemporary and/or industrial looking kitchen. I love the apron front, and the single hole means we can re-use our current faucet until we can save up for a new one. It’s also made to fit our current sink cabinet, so install will be pretty easy. Oh, and did I mention the price? $249! Have you priced out a farmhouse sink lately? This ones gonna be hard to beat.

Shiny McSinkerson vs. Goin to the Farm

Whats your vote? El Granto loves the farmhouse sink all the way. I am still a bit torn. Not to mention, the farmhouse is sold out in every Ikea close to us, so getting it will mean a rental car trip to Ikea Burlington.

Do you have any experience with either of these sinks? I hear glasses/dishes can break really easily in the Farmhouse sink, and that it can also get scratches. Is it worth it?

Paintin Signs

When we bought the Storefront, it had essentially been eliminated of all its character. It had been in bad shape, and the owners before us had brought it back, and modernized it, but in doing so had removed everything of the past. Don’t get me wrong, I love our spray foam insulation and skylights, but I’m not the biggest fan of the white vinyl windows and the lack of original trim & doors.

So in our quest to add some character back to the Storefront, I want to add in a bit of it’s past. When the Storefront was originally built it housed a Grocer. Later it did a stint as a Barber Shop, and until the 60’s it was a Tailor & Cleaner.

I have been scouring flea markets and antique shops for anything Grocery, Barber or Tailor related and have yet to find ANYTHING awesome for the house. Barber pole? Nope. Grocery Store sign? Not a hope.

Resigned to my failure, I decided to make things related to the past for the house. I started with a Grocery sign for the kitchen. (Cause a grocery sign was a shade easier than a barber pole…)

I headed into the garage and found a couple spare pieces of 2×12’s that were 6 feet long. I distressed one with some stain & a blow torch, and the other I whitewashed with some watered down chalk paint.

I then laid out my type. I made each letter about the size of an 8.5 x 11 sheet of paper, and just freehanded the letters with a pencil until they looked OK.

freehand sign paintin

I grabbed some paint, and filled in the lettering with a small foam brush, and let it dry.

Then I sanded everything to give it a worn look, and I had two (yes TWO) grocery signs ready to go.

Two (yes TWO) grocery signs

I then made El Granto put each one up on the kitchen cabinets so I could decide which one I liked best.

This one won out.

Grocery Sign
Grocery Sign
The Kitchen
The Kitchen

And now the other one is still hanging out in the kitchen leaning against a wall cause I have NO IDEA WHAT TO DO WITH IT. I’m really knocking it out of the park lately.

Anyone want a Grocery sign?

Burglar Proofing Flower Urns

As you know, I have a wee bit of an issue with a Flower Burglar. After my last rant, I did, well nothing. I planted a few cheap (and now shabby) plants in the front planter box (that no one would want to steal), failed at watering them, and never got another urn for the front stoop.

Don’t get me wrong, I had grand ideas of staging a stakeout and adding a flower cam, but after being indecisive I ended up doing nothing.

That was until I was at my local grocery store, and spied them liquidating their cast iron urns. This girl cant let a great deal pass her by, so the urn was loaded up into my in-laws car, and carted home.

instagrampots

Now this puppy weighs a few pounds, and to increase tonnage I filled the bottom with bricks. However, I wasn’t gonna let that be the sole deterrent. So we rummaged through the garage, found some aircraft cable from our outdoor curtain project, and picked up a large heavy duty eye-hook & cable ends.

We attached the eye to the house, and then attached the cable around the base of the urn.

aircraft cable urn

Yeah, I know someone can still steal the plants, but hopefully they will be deterred. They COULD cut the aircraft cable, but I’m hoping our little flower thief will think that crosses the line.

new urn (named Ernie)

So far its been a week, and no flower burglars. Wish us luck!


Ikea As-Is Score

I went to Ikea in search of a plant. I left with kitchen cabinet drawers.

Every time I visit Ikea I take a look at the as-is section. Most of the time there’s nothing to be had, but sometimes, they might have the very thing you need.

Last you saw it, the coffee bar was still missing it’s drawer unit (bottom middle) as well as the upper glass doors. Why you ask? Cause that stuff was expensive… The drawer unit alone was $232 before hardware. Ouch.

Coffee Bar
Coffee Bar

That was until I walked into Ikea on a fateful Friday night, and spied this fellow happily sitting in the as-is department with an $85 price tag.

Why hello there sad little drawer unit without a kitchen to call home

It was a complete drawer unit EXACTLY the size that we needed for the coffee bar. In perfect condition, fully assembled. I don’t know how poor little drawer unit got to the as-is, he clearly wasn’t a floor model as he didn’t have any handles, nor had the cabinet ever been attached another cabinet (as it didn’t have any holes drilled through it). I frantically texted El Granto at home confirming that yes that was the size we needed, and then I ran to the check out, having my own “Start the car!” moment.

When I got home, we tried to figure out how to get the drawers OUT of the cabinet, as I actually already had the exact same cabinet frame already installed in the kitchen, and just needed the drawers. However they just wouldn’t come out! After goggling it, I finally discovered that there are two little tabs (one on either side) of the bottom of the drawer. If you press both tabs simultaneously towards the sides of the drawer and lift up and out, your drawer will come unattached from the drawer slide.

drawers removed
Drawers removed

El Granto then removed the drawer slides from the cabinet frame and installed them in our coffee bar and slid the drawers back in place.

Using our cabinet handle template, El Granto attached matching handles, and our coffee bar was finally starting to look somewhat complete.

coffee bar
Look at those drawers!
Coffee Bar
Coffee Bar

With the new drawers, open wood shelving and filler panels all complete, its looking pretty good. Progress baby!

Have you ever scored anything amazing in the as-is section?

Concrete Countertop Test Run

I really want to build concrete countertops for my kitchen. My laminate counters suck, and the coffee bar is curremtly covered in a $20 wood shelf from Home Depot.

I had a bag of concrete hanging around the garage (don’t you?!) and decided it was high time to put all my researching to the test and pour some concrete. I decided to make a “cutting board” as my test run, and grabbed some spare melamine (I’m not a hoarder, I just have stuff in the garage…collecting dust…that might some day get used.) SO the melamine… I had El Granto rip down a few pieces into 2″ strips and then built a little form with some spare screws.

Building the mold (and making sure it's square
Building the mold (and making sure it’s square)

Next up, sealing the cracks in the form with silicone caulking. I conveniently had a new tube of silicone caulking. I inconveniently could not find my caulk gun. Cause it’s an easy thing to lose. You know, giant red tube thingy that looks like a weapon. Yep, missing. Hardware store? Closed. Dollar store? I may be able to find paint brushes, and tie downs, but a caulk gun was not to be had at Dollarama. My neighbours had been outside working on project as well, and we had passed an air compressor over the fence earlier in the day (true story) so I figured I’d ask if maybe they had one. BINGO! Caulk gun. Except theirs was contractor grade and made for big tubes of caulking, and my wee bitty tube of silicone was too small. So now what? I shoved a piece of wood into the bottom of the caulking tube and hoped for the best.

I started caulking, and I got silicone EVERYWHERE. All over me and the mold.

DIY TIP. Tape your mold or you’ll get silicone everywhere. After about 10 minutes I was covered and sticky and I had done the WORST job of caulking anything in my life. I threw in the towel (this was a test after all!) and left it to dry.

Mold Made (with crappy silicone job)
Mold Made (before crappy silicone job)

Next day we moved the mold outside on worktable covered in a plastic drop cloth, and I (with my girly muscles, a shovel and a piece of wood) mixed up a half bag of concrete. In hindsight, it could have used a bit more water, and I could have used a trowel (rather than a piece of wood) to get it well into the mold.

Pour area prepped. Drop cloth & screeding board ready
Filling the mold
Filling the mold. Don’t you just love my work outfit? Paint covered work shirt and track pants. I really should buy an attractive set of work clothes.

I then (smartly) took the sandpaper off my palm sander, and covered it in a bag, and vibrated the crap out of the mold.

sander
Sander covered in a bag
Vibrating the mold
Vibrating the mold

Then we screeded the top (which also didn’t go so well, as it started pulling gravel out of the mold, but again I think my mix was too thick.)

Screeding the mold
Screeding the mold

Then I let it dry, covered with plastic for a day. I didn’t put a wire mesh in it, cause A.) it was a test and B.) I didn’t have any in my garage…

I un-molded, and voila.

Concrete cuttingboard
Concrete just after de-molding
Concrete cuttingboard
It worked!

Things I learned:

  • Concrete is heavy.
  • 2″ is too thick for our countertop. It just looked too big (that’s what she said). In all seriousness, 1 1/2″ is a much more reasonable size, 2″ was just overkill. Like a Hummer H2.
  • My mix needed a bit more water.
  • Counter sink the screws! Or else you can screed it very well.
  • I will not mix up all the countertops in a bucket. Concrete mixer rental is imperative.
  • I needed a better concrete mix than the $4 bag of all purpose. It was too rocky and rough. The top of my cutting board was great, but the sides showed too much aggregate.

Next up, I will be filling the holes, adding some feet to my “cutting board” test driving some concrete sealers and waxes, and then putting it to the test in my kitchen. Wish me luck!

Have you ever played with concrete? Any tips to pass on?

Door Bling

You know when you buy a house there’s a ton of expenses. Mortgage, down payment, closing, moving and all the stuff you need for the house.

What do you mean, the house doesn’t come with any closet rods, curtains or door mats? Crap. You can almost see the money evaporating out of your bank account right before your eyes.

So when it comes to things like buying new locks for the house (cause really you trust that the old owner gave you ALL the keys to the house? Even the one the dog walker had, or grandma stashed in the bottom of her purse? Yeah right.) Having someone you don’t know possibly having a key to your house? Ummm no thanks.

So new locks were a necessity, but dude locks are expensive. So you leave the hardware store with a combo set of 5 locks for $69 for the whole house. Great idea right? All the same key, easy peasy lemon squeezy.

Then two years later, this is what your front door handle looks like.

Door handle
Look closely. See all the peeling covering? Nice.
door handle 2
Here’s another view showing the really sweet rust action going on.
The deadbolt
The deadbolt wasn’t much better. Remember these are outdoor lock sets protected by our covered entryway. So snow & rain don’t even touch them. That’s what it looked like after two years use. Quality product eh?

The other thing was that they didn’t look very stately. Not that our house is “stately” but these things weren’t really doin anything for the door. They were like chinos, or flip flops. Nice enough but no ones gonna complement you on them.

See, they're OKAY but not awesome.
See, they’re OKAY but not awesome.

This past weekend we were window shopping in Rona. Yes I said window shopping. Really it’s not THAT weird. They have a Tim Hortons and they let the dog come in, so its a good place to spend an hour perusing the isles. What, you don’t window shop at the hardware store? Well then you my friend need to get out more.

While wandering down the door hardware isle I spotted my favorite thing. A clearance sticker. I can see one a mile away. They call to me. “Look over here, you may not need me but I’m on SALE and that makes me so much more attractive.” The thing was this clearance item happened to be awesome. A “grandish” entry door set for the price of $39.

New lock set
Yes, I said $39!

That thing went in the shopping cart faster than a Kim K marriage.

Once home El Granto set out to installing it. This ended up being a shade more complex than expected as our old dead bolt was one of those “little hole” deadbolts, whereas our new one was full size. That meant that a new hole had to be drilled in the door. Sure we have hole saw bits, but a hole saw works well because it has a little drill bit in  the middle to start the hole and keep the big hole blade steady. With there already being a hole in the door, there was nothing for the little starter bit to hold onto, making a hole saw very inaccurate and rather unsafe as it would try to fly around willy nilly instead of cutting a nice hole.

So El Granto being the ingenious man I married, made himself a little guide out of a piece of old deck board. He cut a hole (with the hole saw) in the deck board, then clamped it to our door as a template to drill the new hole. The template would keep the hole saw where it should be (instead of trying to cut off El Granto’s arms and massacring my door.)

Hole Template
Hole template clamped to door

After the hole was drilled, the new hardware was installed, I touched up the paint, and voila! Grown up door hardware.

New door handle
I just couldn’t wait for the paint to dry, so ignore the touch ups
door hardware
Yay new door hardware!

So what do you think of our $39 purchase? The front of the storefront just keeps looking better. Now if only I could keep people from stealing my plants, and we’d be golden.

Kitchen Shelves

I cant believe I totally got off my butt and got some work done on the coffee bar. I know, amazing, isn’t it. I am a chronic project half finisher. Oh look at that new shiny project over there… Its not all my fault, money plays big into things, as do accessibility to materials.

SO we knocked the filler panels off our to do list, and got to tackling the open area between the upper cabinets.

Upper Cabinet After
Upper Cabinet Filler Panels
coffee bar progress
Coffee Bar

When designing the coffee bar, we left an open space between the upper cabinets for some open shelving. We thought it was a good place to mix things up a bit, and add a different colour/material.

We set out to finally add some shelves. They are short shelves, just under 2 feet wide. When deciding on materials we could have matched the cabinets, but the whole kitchen was feeling a bit matchy matchy. So we took a cue from our new dining table and bench, and went wood. We also wanted it to look a bit more modern, so we decided to forgo shelf brackets, and suspend the shelves between the upper cabinets.

Off we went to the happiest place on earth (AKA the lumber yard.)

Lumber Yard
Wood as far as the eye can see. Its like Disney Land for 30 somethings who like woodworking

We picked up a 6′ length of 2×12 kiln dried pine from Downtown Lumber, carried it home and cut it into three shelves.

Wood cut
Wood Cut. We also marked which side was the prettiest, and if it would face up or down (cause you’re looking up underneath the taller shelves)

Then we sanded, and sanded and sanded some more (as always). If I could outsource sanding, I would. The only saving grace with sanding is blasting some rocking music that gets you working faster (ever listened to Andrew WK while sanding? It’s like you are compelled to work FASTER!)

After I was happy with the sanding, I cleaned everything off, and set up the shelves on blocks and gave it a coat of wood conditioner (followed by two coats of stain to match the table, and 4 coats of polyurethane.) I took photos of this step, then deleted them. Cause I’m awesome like that. So close your eyes and visualize it, k? Good.

Shelves ready for stain

After everything was dried and purdy, we went inside to install. This went surprisingly well. A couple ladders, swear words, some screws and leveling, and the shelves were screwed through the cabinet into the shelf.

The only problem occurred was that I was TOO good at measuring, and the shelves were such a tight fit, that they left a few marks on the filler panels when we were shimmying them in place. No harm done, a bit of masking tape, and some touch up paint were all that was needed.

Marks on the cabinet covers

And ta-da, the shelves are done!

Shelves complete
Shelves complete
Shelves complete
Shelves complete
coffee bar
Open Shelving

My only problem is that I am HORRIBLE at styling shelves. Anyone wanna come to my house and style my shelves for me? That and I never seem to have any accessories of the right scale. Too big, too small, too weird. Check. So this kids is what it looks like when I throw together some shelving. Maybe I can get some of my photo stylist friends drunk and convince them to style my house for me.

SOURCE LIST:

Materials:
2×12 kiln dried pine @ 6′ – Downtown Lumber
Stain – Varathane Chocolate
Polyurethane – Minwax Oil Modified in Satin

Tools Used:
Miter saw
Orbital sander
Measuring Tape
Finishing Supplies

Difficulty Level (on a scale of 1-5):

two out of five

Total Cost: $30 (for the new wood, we already owned the stain & poly)