Kitchen Faucet

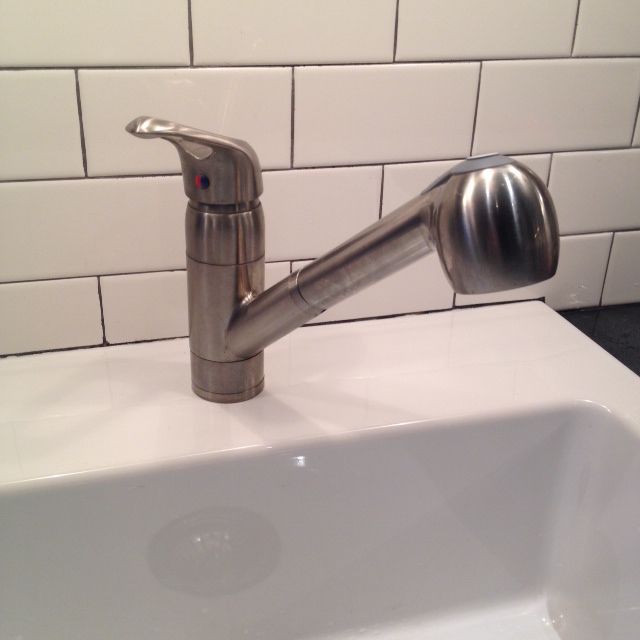
When we updated our kitchen waaaay back over a year ago, we had big intentions to upgrade everything. Pantry, faucet, lighting, storage. However…by the time we finished the projects we did take on, we had run out of time and money. Womp womp. Those last few little projects got put in the “next time” category, and we told ourselves that they would be the next things to be tackled. A year plus passes, and it’s a sad day when you look at your beautiful counters, sink and backsplash, and shake your head at your old kitchen faucet marring the beautiful otherwise finished space. (OH, or caulking the back of the sink, totally failed to complete that one too!)

photo 4(4) photo 5(2)

Kitchen faucets are a big decision. It’s the most used item in the kitchen. From cooking and cleaning, to filling the dogs water bowl. That sink and faucet get used all day long. I wanted to make the right decision on our kitchen faucet.

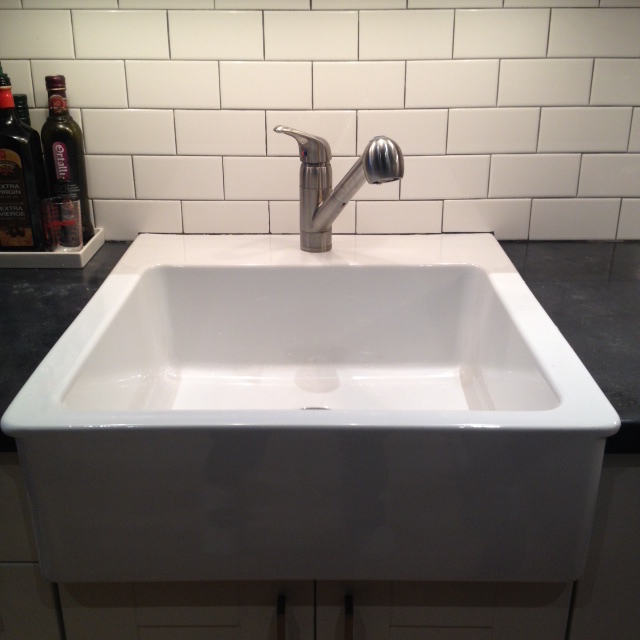
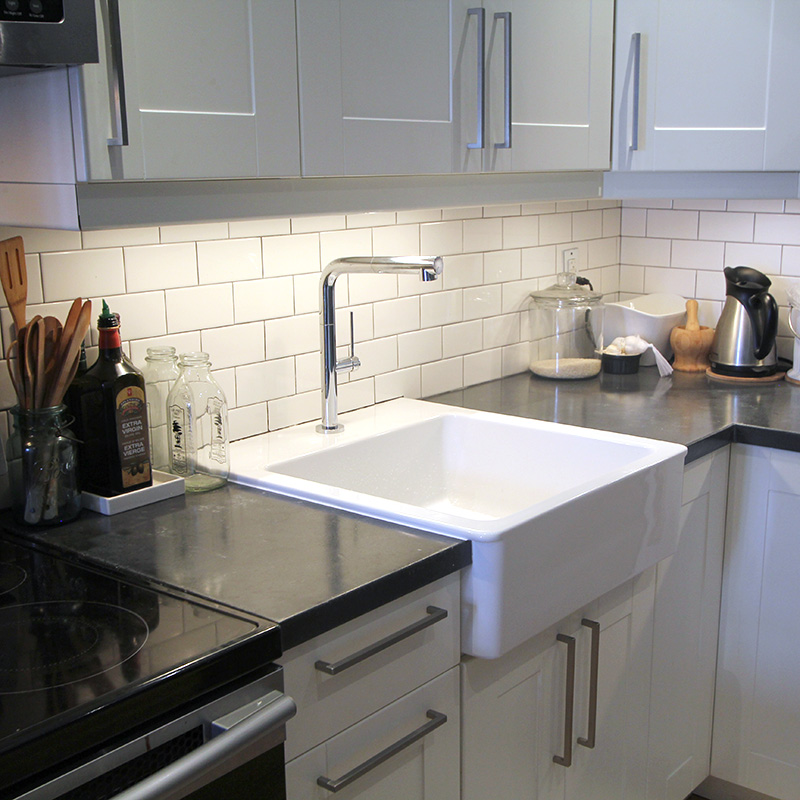
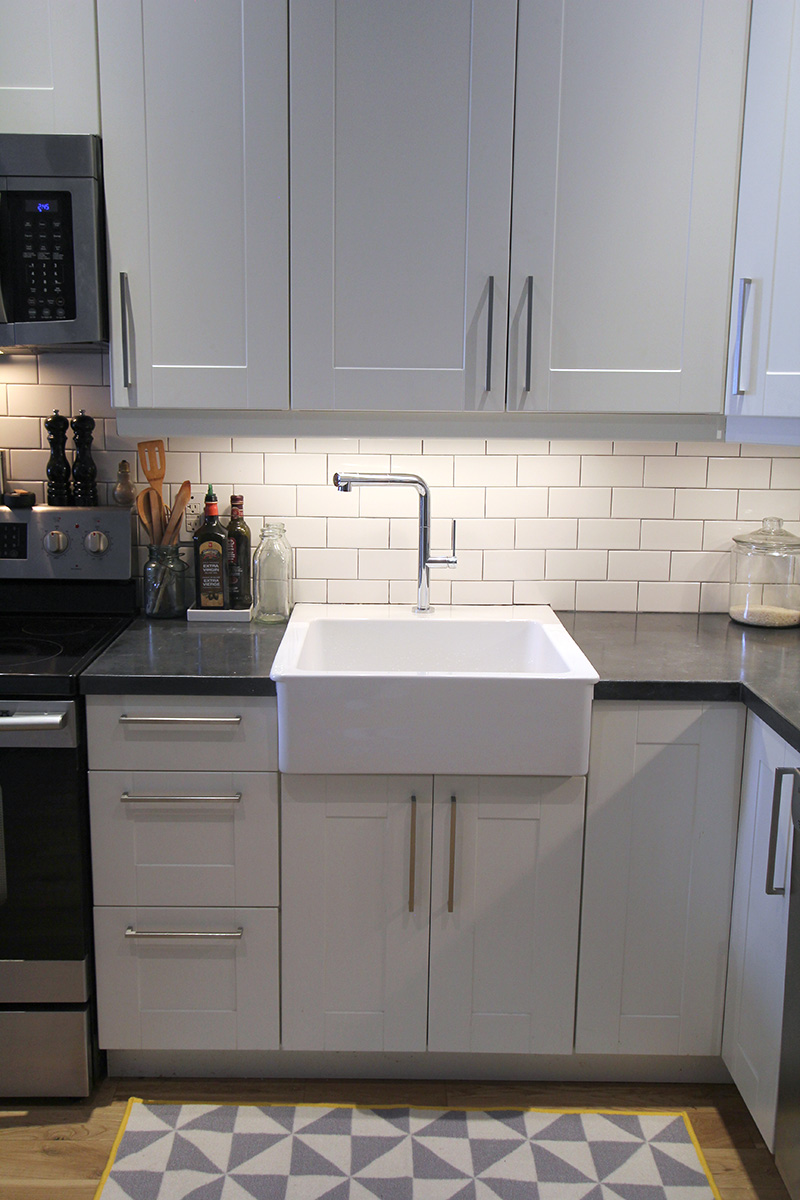
We had several considerations when faucet shopping. Firstly, we have a cabinet right above our sink (that could not be raised, as it sits asymmetrical to the sink). That cabinet severely limited our faucet height, and we needed to choose a faucet that was not too tall. Secondly, the white farmhouse sink is a bit high maintenance when it comes to cleaning. Its got a nice flat bottom, but food tends to hang about, not making its way to the drain. Our current pull out faucet is incredibly helpful for giving the sink a quick rinse, and keeping everything clean.

With that in mind, our faucet options were now limited to shorter faucets with pull out sprayers. This takes probably 75% of kitchen faucets out of the running!

After some pretty big deliberations, and weeks of himming and hawing, we had narrowed it down to two Riobel faucets.

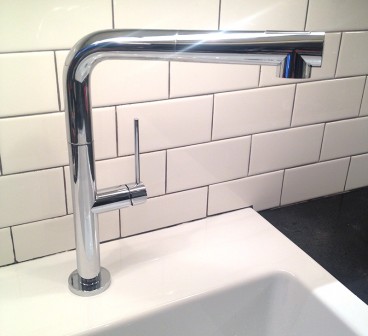
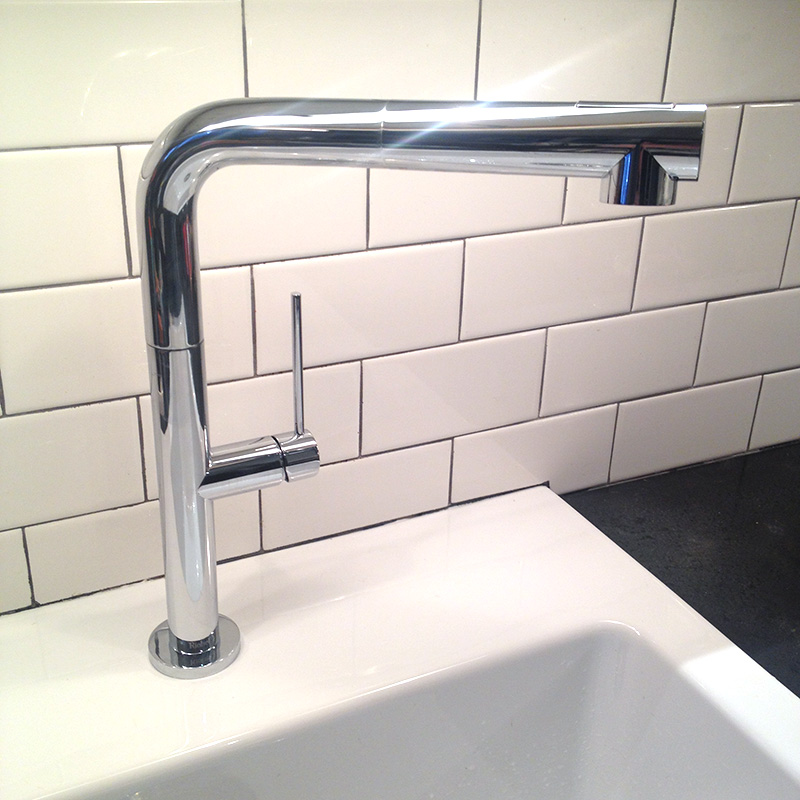
The modern but classic FE101, with sleek pull out sprayer, single temperature and water lever, swivelling spout and two spray settings.

Riobel FE101C
Riobel FE101C


OR the BR400x classic yet refined bridge faucet with flat cross handles and side sprayer.

Riobel BR400XC
Riobel BR400XC

I loved loved loved the bridge faucet, but El Granto wasn’t a fan of the dual temperature adjustments and I was worried about drilling so many holes into my ceramic sink, and about how in style they would be in a few years. Bridge faucets are a big fad right now, and I was worried they would be the next mason jar or chevron.

After several restless nights sleep, I finally pulled the trigger, and ordered the FE101. We installed it in less than 15 minutes (it had a magical wrench free installation), and for the last month we have been putting it to the test.

IMG_3642-WEB

All of its mechanisms are smooth and responsive. The temperature and water control handle move with the slightest touch, and water can be easily adjusted for filling up things (like water bottles) where I tend to make a huge mess if the water is on full blast.

The swivel is smooth and the faucet stays where its placed, even when it is off to one side.

IMG_3632-WEB

The pull out sprayer is easy to use, and the end has a ball bearing, so the directional control is incredible. The sprayer also has a magnet so it pops itself back in place when the sprayer is retracted. To change between sprayer settings, there is a hidden switch on the sprayer. When activated the stream of water turns to a nice spray that is perfect for washing vegetables.

Kitchen2web

The faucet itself is chrome, which adds a lot of sparkle to the kitchen. We have under cabinet lighting, and the faucet catches the light and just glows. The chrome does easily show fingerprints, but a quick wipe with a tea towel and its spotless. Our last faucet had a lot more water spots on it, as the only way to turn it off was to reach your hand above the faucet. As your hands are wet, you were perpetually dipping onto the faucet. With our faucets controls on one side, any water drips fall to the sink deck, and not on the faucet. This has made keeping it looking good a lot easier.

photo(2) copy

kitchen4web

We have really run the faucet through its paces. From washing the smoker grill, to filling up watering cans and buckets. The hose on the sprayer is long enough that I can set the dogs water bowl on the counter and fill it up without having to put it in the sink. It has performed very well. We only had to make one modification. The sprayer water line is quite long, and was getting caught on the bottom of the P trap. To fix it, we changed the position of the hose weight, and it hasn’t gotten stuck in the last few weeks.

Also, I only managed to spray water all over the kitchen ONCE by accident. When I placed the sprayer back in, I did it so the spray was facing to the side, not down. When I turned the sink on again, a jet of water shot everywhere. Lesson learned; don’t point your guns at things you don’t intent to shoot.

Kitchen3web

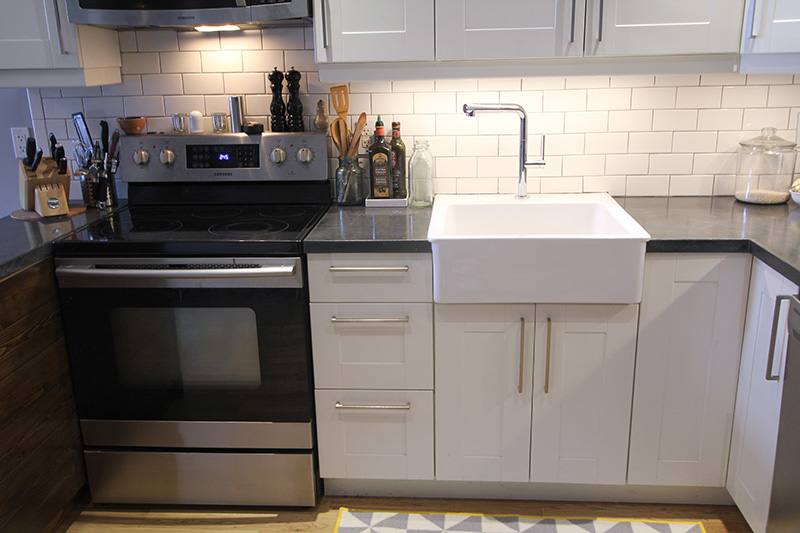
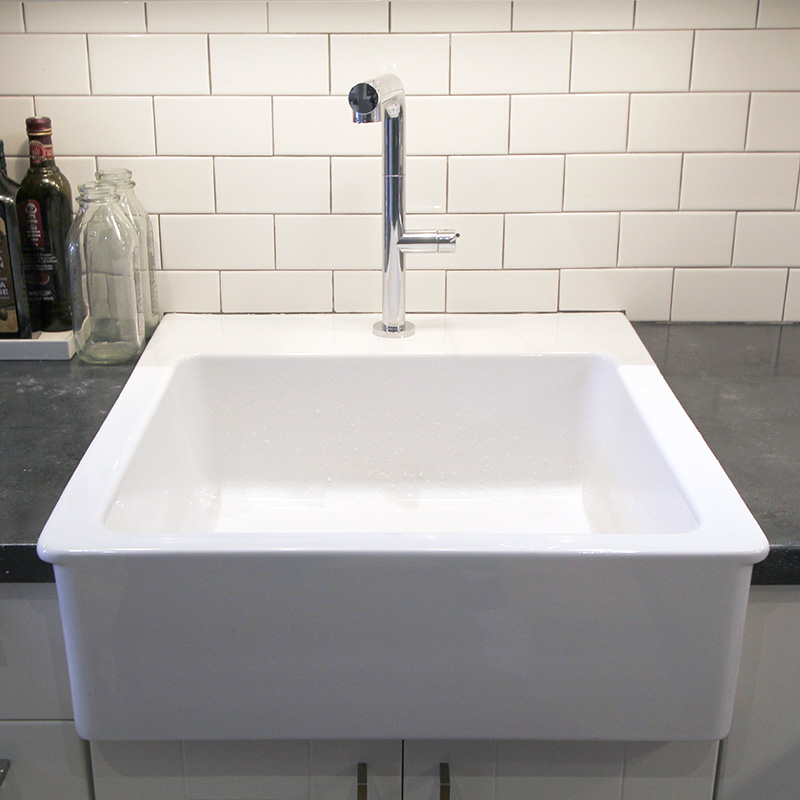
All in all we are very happy with our faucet choice. We are just wishing we made this decision when we renovated the kitchen. It also classes up the joint! Bye bye builder basic faucet, and hellllo pretty lady!

If you haven’t heard of Riobel, you should check them out. They are an awesome Canadian company producing some pretty fabulous faucets. You can check out their dealer locator.

What do you think of our new sink candy? Have you installed a kitchen faucet?


Disclosure: We partnered with Riobel on this project, but all opinions, typos and missing commas are of course our own.


Tool Test Drive – Milwaukee M18 Fuel 7 1/4″ Cordless Circular Saw

There is nothing more infuriating than being knee deep in a project, then realizing you don’t have the correct material or tool. It stops you dead in your tracks and you’re left spending your Saturday at the hardware store instead of working.

For instance, we were working on the tabletop for Project Nelson. We had planed, measured and glued up the top, and were just about to square up the edges. See it’s a lot easier to do a rough cut to length of all your boards, glue them together then draw a nice square line and then cut the top to square. We were just ready to cut when we realized we didn’t have the tool we needed. The tabletop was built with 1 3/4″ pine, and our corded circular saw had given up the ghost on the last project. Our cordless circular saw was a 6 1/2″, and does not have the cut depth to cut through 1 3/4″. Womp womp.

Our current saw with a blade depth if 1 1/2". Not deep enough to cut through our project.
Our current saw with a blade depth if 1 1/2″. Not deep enough to cut through our project.


We were at a standstill. What to do? Our options were to buy, rent or borrow. I don’t like renting woodworking tools from the big box store. They tend to have terrible blades, and it’s not worth risking your project on. So that left us with buy or borrow. I hate rushing to buy a tool without doing my research first. Borrow it is.

We happen have made friends with our local tool rep; James. I actually call him Toolman James. (Get it, like Tim the Toolman Taylor?) I shot him out an email saying “Hey James! We’re in a pickle! Do you have a circular saw we could borrow?” He responded with “Actually I do! But you have to promise to give it back, it’s brand new.” Fair enough. I can be a tad bit delinquent with my tool returns.

James sent over the saw, we took one look at it, and were pretty darn happy to have Toolman James as a friend. He sent us over the brand spankin new Milwaukee M18 Fuel 7 1/4″ cordless circular saw. Holy cow. Now this is a saw. Where our 6 1/2″  saw maxed out at a 1 1/2″ cut depth, the Milwaukee cuts through 2 1/2″. This is exactly what we needed.

Milwaukee M18 Fuel 7 1/4" Cordless Circular Saw
Milwaukee M18 Fuel 7 1/4″ Cordless Circular Saw

With saw in hand, we headed out to the workshop to do some test cuts. Cordless saws can often have a tough time of cutting thick lumber. They can burn and bind, and generally not have enough power. Our first cut was to put it to the test. We grabbed a scrap 2×12, drew a square line, and El Granto handheld the cut.

Milwaukee M18 Fuel 7 1/4" Cordless Circular Saw
Making a test cut

The saw had no problems with the 2×12. It cut through it like butter. No sticking or burning, and the best part; little to no tear out (even with the 24 tooth framing blade). The cut was spectacular. I was also impressed with El Granto’s cut. For handheld it was immaculate. When I commented on his prowess, he deferred credit to the saw saying it was smooth, didn’t kick back, fight him or try to drift. The saw was also incredibly quiet for such a big & powerful saw. It also has a handy LED to light up your cut area and a hook on top so you can hang the saw while not in use which is very handy for a large saw like this.

Impressed, we got ready for our big cuts. We set up a fence, raised the blade height so it would cut through our lumber, but the motor wouldn’t get in the way of our fence, and made the first of two cuts.

Milwaukee M18 Fuel 7 1/4" Cordless Circular Saw
Making the cut

Holy crap. The cut was perfect. Absolutely perfect. Even on the 30″ span, the brushless motor didn’t run out of power in the least. The cut was clean with no tear out, burning or blade wobble. The thin kerf blade didn’t produce a ton of sawdust, and the extended capacity M18 battery didn’t even register a drop on charge. It is hands down the most powerful circular saw I’ve ever used, and that’s corded or cordless. It has a heavy duty ridged metal base, a 50 degree miter swivel, and adjustable blade depth.

Milwaukee M18 Fuel 7 1/4" Cordless Circular Saw
Now that is a deep blade. Our lumber is 1 3/4″ thick, and the blade can cut even thicker, all the way up to 2 1/2″

A second hand hold makes it comfortable for two handed use, yet the saw is operable one handed. It’s powerful yet not heavy and unwieldy. I think the saw is perfect for job site use, yet still accessible to the amateur woodworker. Overall, I give the saw 4 1/2 hammers out of five.

five out of five
Milwaukee M18 Fuel 7 1/4" Cordless Circular Saw
Overall, an absolutely great saw.

Now, I need to think up some creative excuses for when Toolman James asks when I’m giving back his saw. “The dog ate it” really is not applicable in this situation.


Bagster Dumpster in a Bag

This post is brought to you by Waste Management’s Bagster Dumpster in a Bag.


As carless urban DIY’ers, with strict limited city garbage pick-ups, getting rid of our renovation junk can we pretty darn problematic.

In fact, we just kinda stockpiled all of it until we could figure out how to get rid of it. I promise we’re not into hoarding territory yet, but dammit the junk is piling up. In the last year we have completed a kitchen mini-reno, a basement reno, decking re-vamp, general projects, and woodworking. All of this has created a lot of debris. We could just get a dumpster, but they’re expensive, and the biggest problem we have is access. We have no front yard or laneway, and our backyard access is blocked by our garage. When we had the house fixed my Mike Holmes, they actually put a dumpster in our neighbors yard (thanks best neighbors ever!), and took down our fence for access.

So I think you can see our issues. No place for a dumpster, and no way to get rid of our non-recyclable renovation junk. Enter Waste Management’s Bagster dumpster in a bag. It’s a fold out portable dumpster made with tarp like fabric. It can hold a crazy amount of stuff. 3300lbs or 20 garbage bags of renovation debris. Perfect. So we ordered our bag online, and got it shipped to our house. You can also pick them up at the Hardware Store. See thebagster.com for your closest retail locations. You don’t have to pay for the collection of the bag until you schedule the pick-up.

Bagster Dumpster in a Bag well really, it's a Bagster bag IN another bag ;)
Bagster Dumpster in a Bag well really, it’s a Bagster bag IN another bag 😉

Now, where do we put it up? We can set it up on the 4′ of concrete behind our garage that is technically our property between the garage and the alleyway. Except…. I called Waste Management, and you need to have 16′ of clearance above the pick-up site, and our garage has a roof overhang (of about 2′). This complicates things, as the arm from the pick-up vehicle won’t be able to reach the bag without hitting the roof overhang. Oops.

Time for plan B: Pushing back our front planter box, and placing the Bagster dumpster bag on the concrete in between the sidewalk and the Storefront. The problem here, is that the planter box is about oh… a thousand pounds. We can either dig up a bunch of the dirt/flowers to lighten the load to move it, or push it Worlds Strongest Man style.

Exterior of the Storefront & Planterbox
Large, HEAVY planter!

Guess which one we choose? OH THAT’S RIGHT, muscles baby!

El Granto and I heaved and hoed and pushed that planter out of the way!

Now we could assemble the Bagster bag. The bag came with assembly instructions. Basically you open it up, then fold the sides down so that it stays open. When you start to fill it up, you can lift the sides up and put more stuff in.

Bagster Dumpster in a Bag set up and ready to go

Let the junk cleaning begin! We stored our construction debris in large bins, boxes and bags, and we started carting out the junk and dumping it into the bag. A few hours work later, and the Bagster dumpster bag was really filling up.

Construction Debris be gone!

These are some of the things we tossed in the Bagster bag:

Tile, whole & broken
Drywall, small and large pieces
Old laminate kitchen counters
Melamine molds that we used for our concrete countertops
Used buckets coated in concrete (unrecyclable)
Pressure treated deck railings
Paint & stain covered drop cloths
Wood offcuts
Old and Broken Bicycle and Snowboard Parts

WOWZA! That's a whole lotta junk in the dumpster bag!
WOWZA! That’s a whole lotta junk in the dumpster bag!

LOOK AT ALL THAT JUNK!

We were able to fit in way more than we anticipated, removing all the junk from our garage.

This used to be a storing ground for renovation debris. So nice to have the space back!

After we finished, we went online and scheduled a pick-up and made payment for our order. They will come and pickup within 3 days. Our pick-up actually came the next day, which was awesome.

The one thing we had to deal with for pick-up was that parking is allowed in front of our house. If cars were parked there, they wouldn’t be able to access the Bagster Bag. I called and spoke with a Waste Management Bagster rep, and they said they could call me an hour before pick-up, so that I could ensure no cars were in the way. After I got the call, I ran out and placed some temporary pylons in the way, so that the truck could easily collect. Within the hour they had picked it up, and even sent me a confirmation email saying everything went as planned.

The Bagster Dumpster in a Bag seems like it would be perfect for a small bathroom or kitchen reno, flooring project, spring cleanup or if mother nature strikes and you need to clean up after a flood. We are tackling our bathroom renovation next, and this will be perfect for carting away the old tiles & subfloor. If you were doing a whole house renovation, a traditional dumpster will still be the way to go, but for small renovations and cleanup projects this works perfectly.

The Bagster Dumpster in a Bag

Have you ever used a Waste Management Bagster Dumpster in a Bag? How did you like it?

Disclosure: This project was brought to you by Waste Management Bagster Dumpster in a Bag, but all opinions and junk are our own.

Making your zapper zap through walls

You may know of our Printmakers media cabinet build. We love our cabinet. But there was one major design flaw (well not so much a flaw, more of a drawback). If we wanted to watch TV or control the volume on anything in the cabinet we needed to have at least one door open so that the remotes could reach the components.

I looked around for a solution and couldn’t come up with much. Until one day I was listening to a podcast and off topic one host started talking about an IR repeater and how he put all his components in to a closet. DING!

I headed over to Amazon and promptly purchased the Cables To Go Impact Acoustics 40430 Infrared (IR) Remote Control Repeater Kit. Long name. Tiny thing. Great product.

An IR repeater takes the infrared signal from your remote and “blasts” it out out of little stick on modules. It’s super simple to hook up and took no time at all to get working.

Step 1:
Position the IR receiver:

photo 1(1)

I chose just under the center speaker. Even with our bluetooth remote out of habit we always point it at the TV. This can sometimes be a problem when your components are a foot below the tv. This takes all the guesswork out of changing channels.

Step 2:
Plug the IR receiver in to the base unit.

Step 3:
Plug your IR Blasters in to the base unit (while you’re at it plug in the power cable too).

photo 4

Step 4:
Position your base unit somewhere hidden. Mine is actually sitting right on top of our audio visual receiver.

Step 5:
Position your IR blasters over the IR sensors on your equipment.

photo 2(1)

You can figure out where your IR sensors are by shining a flashlight on to the front of your components at a 45 degree angle. You’ll see a circle under the translucent plastic (usually about the size of a nickel). Peel off the sticky back of the blaster and stick it on.

The kit I purchased came with two double blaster cables. We only have two IR controlled components in our cabinet so I only needed to use one cable.

The IR repeater will now take any signal it gets and blast it out to all the components and you can leave your cabinet doors closed!

photo(1)

Two unforeseen advantages came along with installing the IR repeater too! One, the dog is no longer tall enough to get in the way of the remote signals and two, there’s a little blue LED on the IR receiver so you know 100% when  you’re sending a signal.

I’m 100% so happy happy happy that this little guy came in to our entertainment world. No more unsightly audio visual components hanging out in open doors. No more dog smashing in to them while playing and no more getting up (after forgetting they’re closed) to open the door when you’ve finally sat down after a long day at work! That last bit happened WAY too often.

In the Hood – Wallace Espresso

We love coffee. We love it so much we built a coffee bar in the kitchen to house all our coffee paraphernalia. As a coffee lover I am thoroughly enjoying the café explosion in the neighborhood. Cafés big and small are opening up at every direction. What does this mean for us? Winter dog walking has improved exponentially…

Wallace Espresso
Wallace Espresso

The newest addition to the neighborhood is Wallace Espresso. Aptly named it resides on the corner of Lansdowne and Wallace. WE opened quietly two weeks ago with a small sandwich board sign and a few turquoise chairs out front.

WE Exterior 2 (2)

That’s all it needed to get word out. Heck I knew it existed via Twitter before I even got home from work the day it opened.

In a small but cozy storefront they are serving up some excellent espresso and pleasant conversation. The shoppe is bright and adorned with a few stools, reclaimed barn lights, a gorgeous wood bar and a vintage map of Toronto (with more art to come from a local artist). It’s got just enough cool without being over the top.

WE Map (2)

WE Map (1)

The big draw to the space however is the espresso. The menu is non existent (no really, there isn’t one).  I am sure however they would be happy to make you any espresso based beverage you’d like. (I didn’t spy any coffee syrups so flavored latte fans you may be out of luck.)

On our first visit to the space we ordered two double americanos and they were made quickly and precisely. The barista confirmed cup size with us and asked how much water we would like. Both things the sign of a barista who cares about his patrons preferences (I hate nothing more than an over-watered americano with no space left for my cream and sugar!)

WE Exterior 2 (1)

The espresso was light and nutty with a nice crema. In fact I liked it so much I had almost finished mine before we even got to the subway.

The biggest surprise from WE is the prices. $2 for a double americano. Yes that’s right, I said TWO DOLLARS! That my friends is only 20 cents more than a coffee from Tim Hortons. Why suffer through mediocre coffee when you can have fresh espresso goodness for almost the same price?!

We have yet to try their lattes or cappuccinos, but I am sure they are just as excellent as the americanos. They also have a small selection of fresh baked goods to fulfill your sweet tooth craving.

WE Interior

WE is an excellent addition to the neighborhood and a spot we have quickly found ourselves visiting on a daily basis. They make you feel so welcome I witnessed a gentleman almost leave without paying. (He wasn’t running out on the bill, he genuinely got swept up in the conversation that he just strolled out!)

Stop in, try some amazing espresso and make some new friends!

In the Hood – Whipporwill Restaurant & Tavern

I know the blog is usually about our DIY projects, and I sneak a bit of lifestyle in here or there. In the last few months I have been thinking about including some details/reviews of the great local business in our west end Toronto neighbourhood. Continue reading “In the Hood – Whipporwill Restaurant & Tavern”