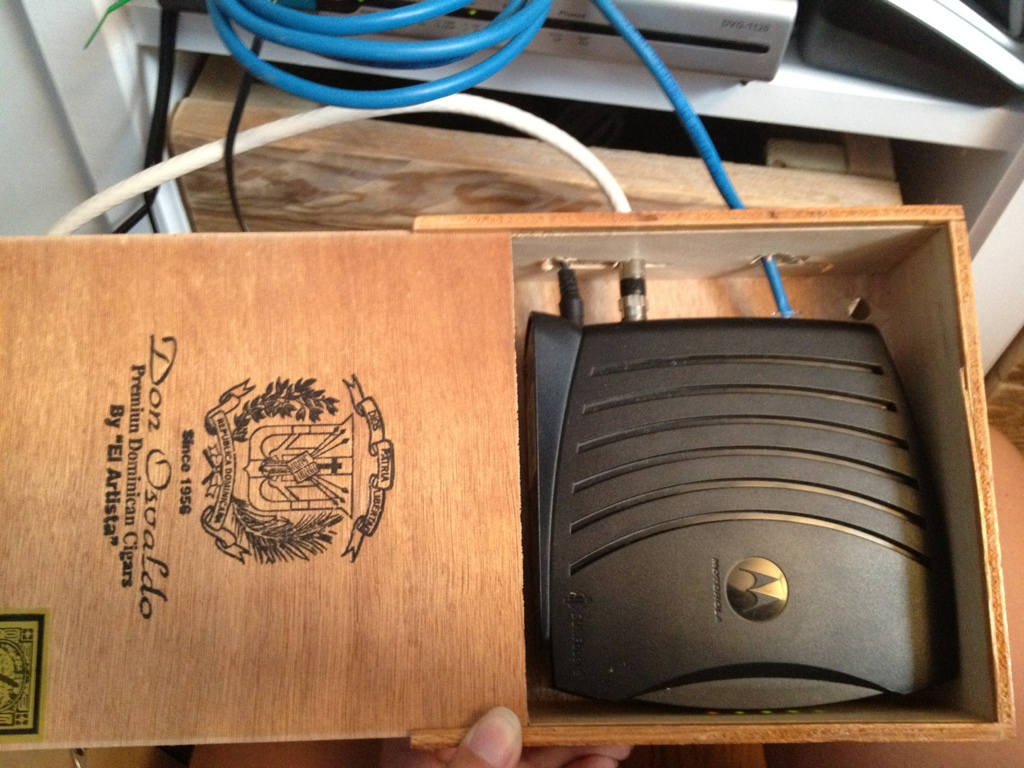
I enjoy having internet, hell without it I wouldn’t be posting this. However I hate all the technology required for it. Wifi cable modem, router, cables, wires…yuck. They are always a tangled mess of blinking lights and ugly plastic. So what do you do about it? Make friends with some cigar smokers (thanks El Granto & Father in-law) & steal some of their pretty cigar boxes.
Drill some holes for cables, antennas and air flow in your cigar boxes. Plunk your tech junk in them and stack em up.
All our tech fit into two boxes other than my stupid VOIP gateway which is giant and stupid, and wouldn’t fit in anything. There… I told it. (until I find a box or old book for the gateway to fit in, he will just sit below the boxes.)
No one would know these unsuspecting boxes on my bookshelf hold all that ugly crap. There may be dirty dishes in the sink and laundry piling up but it makes me sleep a little better at night knowing that my tech junk is neatly tucked away.
For those who follow me on Pinterest, you may have noticed a lot of front hall coat storage solutions being pinned to my “Organization” board lately.
Our front entryway is well…a mess. Our front door opens to a square tiled area with no closet and a blank wall. No place to put your keys, coat, shoes or, well… anything.
Slowly we have introduced a few good things to the front entryway. A Ikea Pax wardrobe for storage, a handcrafted bench from a local artisan and a giant mirror that came with our last apartment. The black sheep of the entryway however is an ugly, broken $15 Ikea RIGG coat rack that we’ve had since college.
Ikea RIGG Coat Rack
In fact, I believe its been broken since college. Held together by duct tape and zip ties (really!) The thing fell down every time you put a winter coat on it, and generally looked like a giant blob of coats taking up a massive amount of space in our entryway. We wanted to change it for a long time…we just never actually did.
So finally we got off our butts and decided to make a wall mounted coat rack to streamline the entryway some. Our lovely reclaimed wood bench was our inspiration. We wanted something that looked like it belonged with our bench. Like a brother from another mother. We picked up a piece of 1x12x10 rough pine (also used in the bath table DIY) from Home Depot. We measured our space, and decided for a 12×33″ wide rack with a 4×36″ mini shelf on top (to hold some art etc.)
Cutting the boards to size
We cut down the pieces of wood, sanded the roughest bits out and got to distressing.
Sanding
We hammered, nailed, sawed, chiseled, and generally beat the crap out of our wood. My favourite part is some rusty nails (that I salvaged from my pallets) that we bashed into the wood, leaving nail heads and in one case the whole nail showing. It really does make it look like its been around 100 years.
Distressed Wood
As we wanted to match the bench, I headed out to pick up the darkest brown stain I could find. I came back with Varathane “Chocolate” and put on a coat. It looked great at first, but as it dried, it was still too light. So I put on a second coat of stain, then followed it up with a coat of Minwax Water Based Oil-Modified Polyurethane.
After 2 coats of Chocolate stain
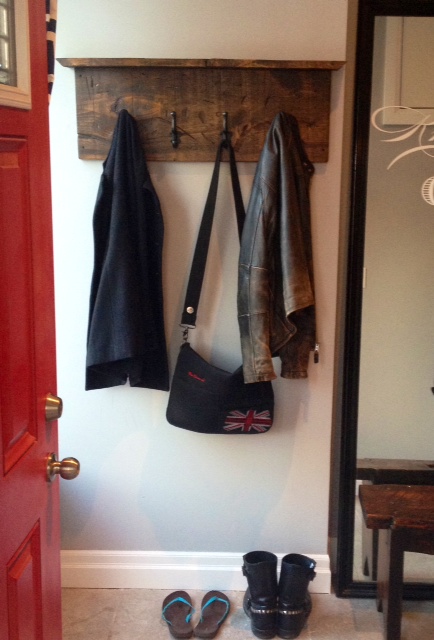
After it dried, I sanded lightly with a fine sandpaper, then gave it a second coat. Once it was completely dry we attached some nice cast iron coat hooks, and attached it to the wall (into the studs) with some nice 2 1/2″ long black screws.
So here is the before and after:
Before: Coat MonsterAfter: YAY!
SOURCE LIST:
Materials:
1×12 wood: Home Depot
Varathane Chocolate Stain: Home Depot
Minwax Water Based Oil-Modified Polyurethane: Home Hardware
Cast Iron Coat Hooks: Home Depot
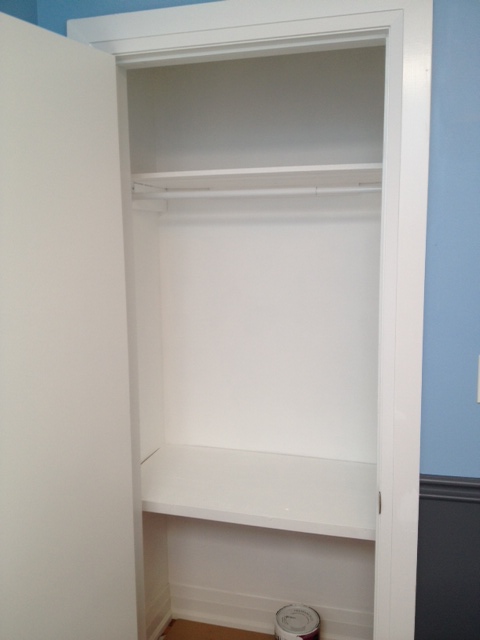
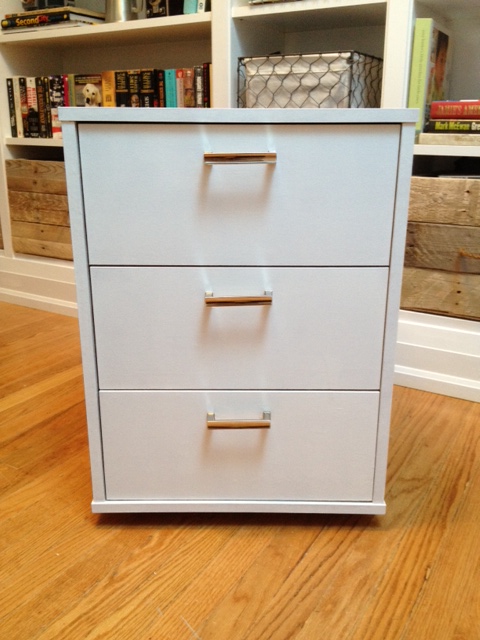
As our office is actually our third bedroom, it conveniently had a closet. A closet was the perfect place to store all the not so pretty office essentials. i.e. paper, cd’s, printer, El Granto’s ugly utilitarian college filing cabinet, as well as some oversize items that take up a lot of space in our own closet (I’m looking at you luggage…) To get the best usage out of our closet, we decided to place the filing cabinet on the floor of the closet and to build a shelf over top of it to house the printer and misc supplies. I mentioned to El Granto that I would like to work on this mini project after work one night and I came home it was magically built! I quickly put a coat of primer on it.
Closet Shelf Primed
Then stood back and said, well now that works so well we need MORE shelves. We decided to put in a shelf and a closet rod so we could hang extra clothes or for if the office is ever turned into a nursery. So we got to work, hung a rod and another shelf.
I then primed it all and gave the whole closet two coats of white paint. It’s not like anyone will be inspecting my office closet, but it just neatened everything up. Now all our crap unattractive items can be safely shut behind doors (and I have a place to quickly shove rogue office items when company is coming over.)
Office Closet Painted
The office is really starting to shape up now! SOURCE LIST:
Materials:
5/8″ Plywood for shelves: Home Depot
2×2’s and 2×4’s for shelf supports: Home Depot
Behr Sealer and Undercoater: Home Depot
Behr Premium Plus Interior Eggshell paint in Pure White: Home Depot
Frog Tape: Canadian Tire
Closet Rod: Home Depot
I loooove baths. Like unhealthy obsession love. Like you may have to call Intervention love. If we had money and space in our backyard I would have a hot tub for sure. A bath is like a hot relaxing hug. When I have had a shitty day, all I ever want to do is take a glass of wine and a book to the bath. When I have baths I drag all sorts of things into the tub with me. My Kobo (e-book reader), beverage, glasses, candles etc. Thats a lot of stuff. About 10 minutes into the bath I start to get all sweaty (cause I have the bath set to boil) and I am always afraid I am going to drop my Kobo in the bath. So about 6 months ago when I pinned this lovely pin to my Pinterest.
I love the whole bathroom, but especially the live edge board acting as a table on the tub. I normally hate bath accessories. I don’t need a wire basket to hold my loofah. I need a wine glass cup holder, and manufacturers don’t seem to be making those… So finally after much procrastination I set out to make myself one.
I loved the thought of using reclaimed wood, or a nice live edge slab like the above photo, but alas I couldn’t source anything easily/locally. So instead I purchased a rough 12″ wide 1″ thick pine board from Home Depot. The rough boards are a good deal. We got a 10′ long one for about $10. We had the guys at HD cut it down to 2 five foot lengths for us, so it would fit in the car. I came home, measured up the width of my bath tub, and cut a board to length. We distressed it a bit, and I took the sander to it smoothing it a bit, but still leaving it fairly rough.
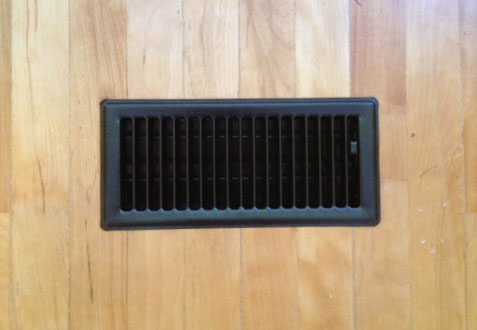
We live in a 100 year old home, and we have plastic heat registers. Hey, I am no historian, but I feel pretty confident in saying that that they aren’t original… Not only are they plastic, but they are different colours and patterns. We’ve got white slatted ones, plastic stainless steel look swirly ones, brown ones that are trying to blend in with the hardwood (but clearly don’t) and we have one pretty black metal one.
Fed up with our ghetto registers, I looked into replacing the whole house with reproduction Edwardian ones. As El Granto and I wanted to keep eating for the next year, that was not an option…
We were left with two viable options, live with them or paint em. Of course, I choose to paint. We headed to the hardware store and picked up some Rustoleum Universal All Surface in Oil Rubbed Bronze. Have you painted with this spray paint? It’s freakin awesome. You can spray any direction, on any surface (even plastic!), with no prep other than making sure the surface is clean. The cleaning is the most time consuming part. When our house was reno’d most outside walls and all the ceilings were torn down and re-drywalled. If any of you have ever drywalled anything you will know that drywall dust is the son of Satan. That shit gets everywhere. When we moved back into the house we spent two weeks cleaning up drywall dust and I still find it in strange hard to reach places (tops of kitchen cabinets, under bathroom vanity, caked onto light fixtures). Drywall dust really is my nemesis.
The heat registers were hiding a dark secret; a plethora of drywall dust stuck in all their nooks and crannies. I painstaking cleaned out every groove with my pinky fingers and a damp rag. After that was done and I had a few recuperating drinks, I headed out to the alleyway behind our house and gave 2-3 thin coats of the oil rubbed bronze spray paint. I let it dry overnight and the difference is incredible! They all match…and don’t look like cheap plastic! A $9 can of spray paint gave new life to 7 regular heat register covers and 4 cold air returns. Got mis-matched registers? Paint em!
Oh, and a bit of advice. I googled painting heat registers before starting out and someone suggested removing the flappy thingies. That is a shitty idea. They do NOT come out easily, and they all fall apart, and you have to bend things and it sucks. So don’t worry about it, just open them slightly and make sure you paint them good. I think my mantra should be “if it sucks, don’t do it”. There, words to live by. Now go paint your ugly heat registers.
Before (UGLY)After (PRETTY)Before – Ugly Mis-Matched RegistersAfter – All the same colour!
SOURCE LIST:
Materials:
RustOleum Universal in Oil Rubbed Bronze: Home Depot
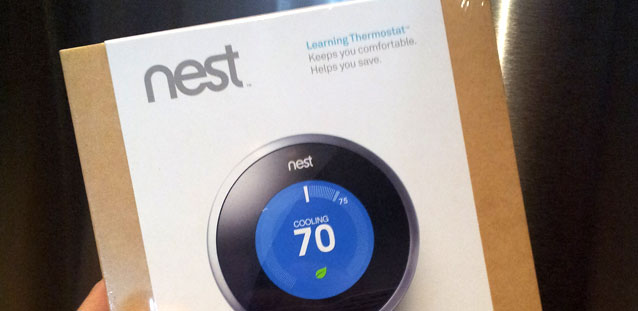
El Granto here. My first post on Storefront Life and it’s about something really cool (and hot)!
We’re really consistent with our thermostat settings. We always have it on program and rarely change the settings (unless we’re in the yard enjoying our Friday libations with friends then we shut the AC off to have some quiet).
But when a friend showed me the Nest learning thermostat I saw real potential.
This thing learns your routine and sets it’s self accordingly. Cools or warms the house in the right amount of time before you get home and even takes outside weather and previous cooling/heating times in to account in getting to the right temperature in preparation for you to return. It even knows when you’ve left the house and switches its self to away mode if you’re gone long enough.
I fell in love. But the price was too rich for my blood. Poo.
Enter a good great friend who wanted to repay a favor (actually the same friend who introduced me to the Nest and knew how I felt about it).
All of a sudden I get an email stating that my Nest order has been received and to expect my new thermostat in a few days. I first had a moment… “WTF!? Waaaaaait a minute… Have I been shopping online in my sleep again?!” Then I realized what my buddy had done and I was ecstatic! There was definitely some man hugging and maybe a tear.
Fast forward a few anxious days and my (oops our) new Nest arrived!
OMGOMGOMG!
I couldn’t wait! As soon as Kristen got home I set her to dog watching and started the install.
I already knew that the Nest was compatible with our system because we have a newer HVAC installation (thanks in part to the Holmes crew). This is something you will have to check though. Last thing you want to do is dish out almost $300 to find out you bought a really fancy looking $300 paper weight.
Step One:TURN OFF THE BREAKER TO YOUR HEATING, AC, AND THERMOSTAT! Whenever you’re dealing with anything hard wired always turn off the breakers! Safety first! Now remove the old thermostat. It’s probably just screwed right in to the drywall without anchors or anything because no one expects you to be swinging on the thermostat like crazy monkeys save that for the light fixtures. Your new Nest comes with convenient little labels to stick to your old wires to ensure you don’t forget what goes where. They have strange code letters like Rh, W1 and, O/B. Use the included screwdriver to remove your old thermostat. This thing is handy and a great include to the Nest package. It’s so handy it’s earned its self a spot right beside my computer for future office related screwdriver needs (removing cases, drives and the occasional deep nasal scratching).
Our old and yucky and stupid thermostat.Remove the old thermostat and use Nest’s nifty stickers.The awesome Nest screwdriver (yes that’s Kristen’s hand not mine, mine are all calloused and hairy and manly not dainty like a princesses).
Step Two: Make preparations to patch the holes from your old thermostat and find out that your spackle has turned hard as stone.
This spackle is no good 🙁
Step Three: Mad dash to the hardware store with the dog in tow to get there before it closes to aquire new spackle. I picked up DAP spackle because we had such good results from the caulking. (As a side note: I love spackling. I find it so much fun and I get very excited when I get to do it. It’s the little things I know.) This stuff is cool because it goes on pink and turns white when it’s ready to sand and paint. Two applications and sands left the old holes invisible. (Also don’t forget to be so excited about getting to spackle something that you don’t take pictures of this part for your blog.)
Step Four: Pull the wires through the Nest base plate and screw it to the wall. As Kristen is the paint master we chose to paint around the Nest after install allowing the spackle to set a little longer. The base plate includes a handy built in spirit level so you can’t install it crooked! Ingenious! Last thing you want is for your thermostat to be unlevel as many depend on being so to do their job. Use your new screwdriver!
Step Five: Hook up your new Nest. Using your reference stickers just plug in your wires to their new homes and snap that sucker on to his/her base plate (his/her to be explained soon).
Base plate, spirit level and screwdriver. A trifecta of awesome product design.Wires hooked up! Ready to go!
Now just flip those breakers back on!
Your nest will run through a few seconds of boot up and then scan for WiFi. That’s right this little beauty hooks right up to your WiFi for everything from weather reporting to firmware updates. Yep Firmware updates! This means that the Nest team can add new features to your Nest without you having to do anything! Ladies and gentlemen it’s 2012!
Stick in your WiFi credentials and tell the nest where you live this allows the Nest to get weather updates so it knows if it’s hot or cold out. If it’s an abnormally hot day your nest will turn its self on earlier because it knows that it will take longer for your house to cool before you get home. So smart!
Got WiFi?
The setup will take you through several steps like setting your away margin (fancy terms!). This is the acceptable levels that your house can be at during your away time. Because our little red devil is home all day we set ours to between 16c and 25c. That’s not too cold in the winter and not too hot in the summer. We know that our house will never reach those temperatures though because of the awesome insulation job that the Holmes crew did. You also get to NAME your thermostat. It’s a little funny but the name shows up in the app (available for iPhone and Android. Sorry BlackBerry users!) and that’s just cool. Being that I was doing the setup I had to take the chance to put some nerd in to one of the coolest things in my house so I named my our Nest Jarvis after Tony Stark’s computer in the Iron Man movies (also real life butler in the comics but you’ve got to admit this thing looks like it’s straight out of Iron Man).
Welcome home Jarvis.
After this Jarvis went in to learning mode.
During learning mode I THINK it’s best to keep your temperature changes to a minimal and on a schedule. So when we wake up I go downstairs to feed the dog and turn the AC to 22c. Then when we leave we turn Jarvis to away. When I get home I turn Jarvis back on and set the temp to 22c. Then when we head up to bed we turn Jarvis down to 21c (we like it cold while we sleep). Jarvis learned quickly the first few days of having him and had a vague schedule right from day two. But then we messed it all up by going on vacation during his learning phase and setting him to away for seven days. We’ll be switching him back to learning mode so he can reset to a proper schedule on our next work day.
Now get your wife to paint around the unit and go have a beer.
This whole install (including emergency hardware store visit took about 45 minutes!)
The idea is that your Nest will learn when we’re coming and going and will think for us about our home temperature and we’ll only have to change it under circumstances that are different to our normal routine.
Our powder-room was newly renovated before we purchased the house, but was very very bland. The fixtures were in brand new condition, but the space was beige and boring. Continue reading “Powder Room Facelift”
A long long time ago, when El Granto & I moved in together, El Granto was still in school, I had just graduated and was working my first big kid job. We had no money, ate copious amounts of pasta and potatoes, and spent what was left on (cheap) beer.
Needless to say our furniture consisted of things we’d stolen from our parent’s houses. We did manage to purchase a few new things; some drapes, a few Ikea Lack side tables, and a Ikea Goliat drawer unit that we used as a night stand/little dresser in our bedroom.
Ikea Goliat
That unit later graduated to living in our office when we purchased real bedside tables, and has now lived through 8 years of our abuse. It holds all the strange things one accumulates. Also known as the junk drawer. It houses batteries, calculators, phone & camera chargers, memory cards, travel voltage adapters, a screw driver, camera batteries, luggage tags, a sling shot etc. “Important” stuff don’t you know where else to put.
When faced with the office reno, we wanted to keep our useful friend Goliat, but he needed some cosmetic help. His laminate “birch effect” finish looked like plastic, and the handles were not even trying to disguise the fact that they were plastic. He needed help! So we carried him out to the garage, took off the handles, scuffed him up with some sandpaper, and gave him a coat of Zinnsser B-I-N primer. In hindsight I should have given it two coats, it would have probably eliminated one of my coats of paint later.
Goliat Drawer Unit with One Coat of Primer
After priming I gave it a quick sand, and added 3 coats of white gloss interior/exterior paint. We let it dry, and added three new Martha Stewart 3 in. Channel Cabinet Hardware pulls from the Home Depot.
The hardware was a bit of a pain to be honest. I sourced from their website. The handle I chose said “in store only” so I walked the 3km to Home Depot to find the crappiest selection of in stock hardware ever! I was astonished at how dated and bad it was. After spending 20 minutes to finally track down the kitchen designer, I found my hardware on a sample board in a drawer. The Martha Stewart hardware was all spectacular and well priced, but SPECIAL ORDER! UGH. I hate the words special order. It means waiting, delays, incorrect shipments and anger. I had fallen in love with the handles, so I sucked it up and ordered.
I ordered on a Monday, and the kitchen designer said it should be in store in about a week. They arrived in store the following Monday (yay!) I brought them home and realized I had measured incorrectly. BLARG. Stupid Kristen. They’re too big. They’re not even the right size for other projects around the house that need new handles.
So… I had two options. Return them and order some new ones, or fill the holes in the drawer unit, touch up paint, and re-drill them. The problem with ordering new ones, is that the smallest any of the pretty Martha Stewart ones came in was 3″ and the Ikea drawer unit was SMALLER than that. Leave it to Ikea to not use standard sizes!
So I filled the holes… (AFTER I HAD ALREADY PAINTED IT) and then PAINTED IT AGAIN. Do my capitals express some of my angst?
Wood Filling HolesDrawer Pull Holes Filled and Painted
I then marked and drilled new holes for the new hardware, and FINALLY it was done!
Finally Finished!Handle Close-Up
SOURCE LIST:
Materials:
Previously owned Ikea Goliat Drawer Unit
Zinnser B.I.N. Primer (spray can): Canadian Tire
Behr Premium Plus Interior/Exterior Glossy paint in Bright White: Home Depot
Frog Tape: Canadian Tire
Martha Stewart 3 inch Channel Pulls: Home Depot
We needed a desk for the office. We loved old bankers desks, and lovely chunky vintage desks, but we had one problem. Whatever desk we wanted in the office needed to be able to fit up our tiny staircase, or be hefted up and over our second floor deck. Otherwise it needed to be assembled on site. After lugging our mattress and other large furniture up and over the deck, I was in no way, shape, or form, about to do that again. So it looks like we were building something on site. We didn’t need anything fancy, just a desk to use the computer on and store unpaid bills. I cost out the materials to build a simple table ourselves, then I thought to myself: self just suck it up, be the cheap ass that you are and buy something from Ikea! It will be less expensive, less work, and you get to spend time with the happy little Ikea man assembling it. So we reviewed the cheapest Ikea desk solutions, and discovered that the Ingo Dining Table was exactly the size we needed, and was made of solid unfinished wood, and was SIXTY NINE dollars.
Ikea Ingo Dining Table
Yes that’s right, a solid wood desk for less a hundo. Sign me up. So we got our dining table, assembled, and then decide what to do with it. I loved Katie’s Ingo desk hack so I thought I would give that a try. Then my brad nailer and I got in a fight, he decided he would shoot nails sideways out of my project and after many a screaming match, we decided to divorce. So decorative trim on the desk just wasn’t going to happen. Instead, I installed a bottom cross piece, primed, sanded and painted it with two coats of white paint, wiped my hands, signed the alimony agreement, and called it a day.
SOURCE LIST:
Materials:
Ingo Dining Table: Ikea
Zinnser B.I.N. Primer: Home Depot
Behr Premium Plus Interior/Exterior Glossy paint in Bright White: Home Depot
Tools Used:
Paint Brush, Small Foam Roller & Tray, Sand paper


")
")


")
