
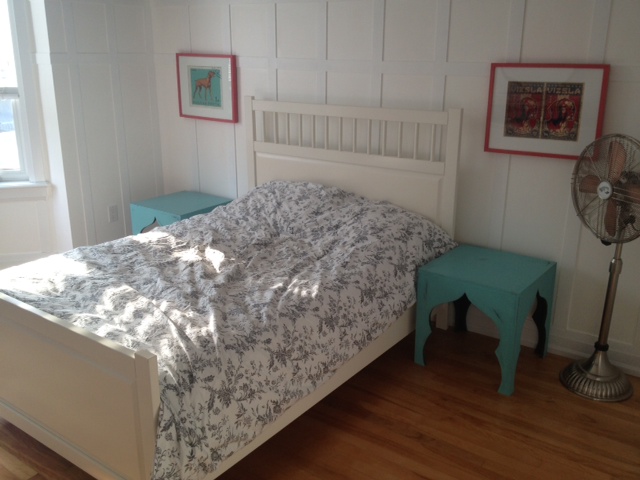
I love dogs. I love my dog, I love other peoples dogs. In general I just love em all. I have a super big soft spot for Maddie. Continue reading “Maddie On Things Tour is Coming to Town”
Author: Kristen
Kristen & her husband El Granto & their Vizsla Odin live in a converted Storefront in downtown Toronto.
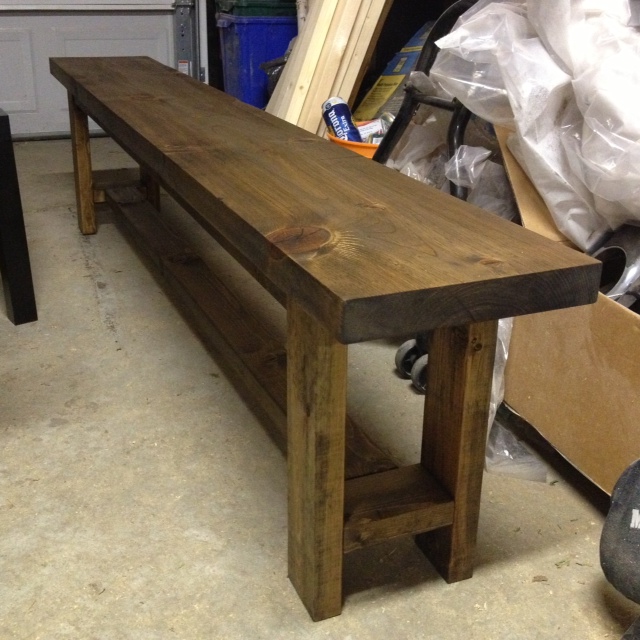
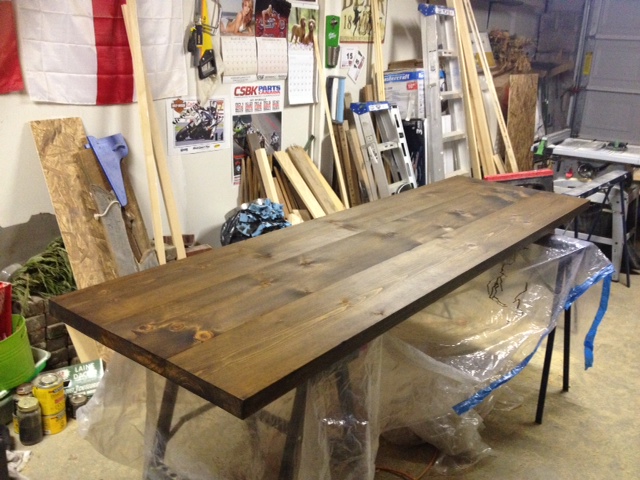
Farmhouse Table Reveal + Plans
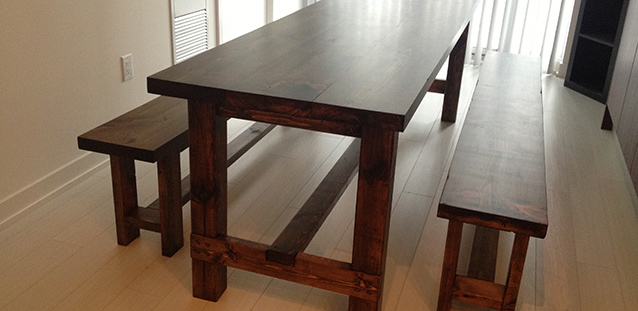
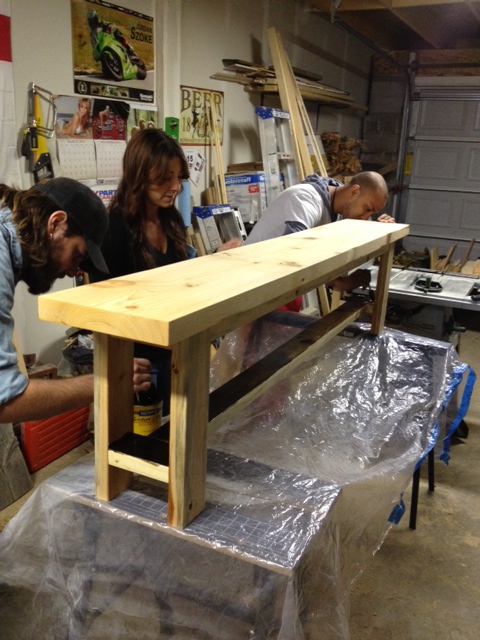
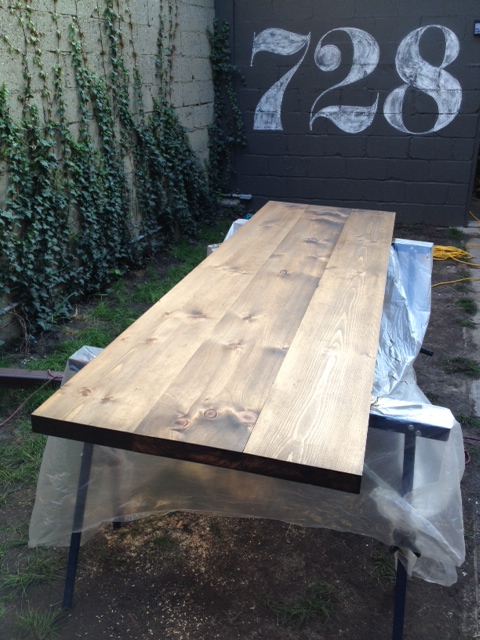
Aaaaand were done! Daniel and Adelle moved into their new place and took their newly finished modern farmhouse table and benches with them. Mind you as much as we will enjoy our garage space back, we will miss working with Daniel and Adelle on this project! It’s different working with friends than a spouse, it’s laid back and there (usually) isn’t any swearing involved. Throw in a piña colada or two, and it’s a party with work involved.
If you missed the beginning of the project, check out part one, two, three, and four.)
So without further adieu, here is the table!
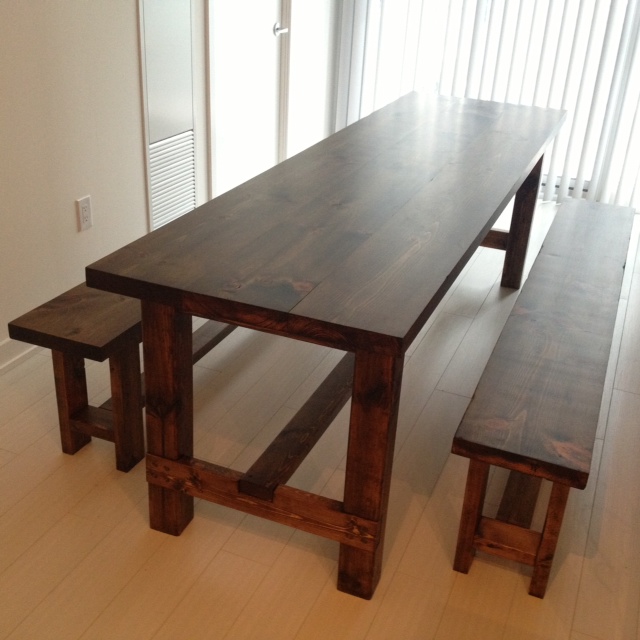
It fits perfectly in their narrow condo, and the benches hide away completely when not in use, making this table able to function as stand in kitchen prep surface.
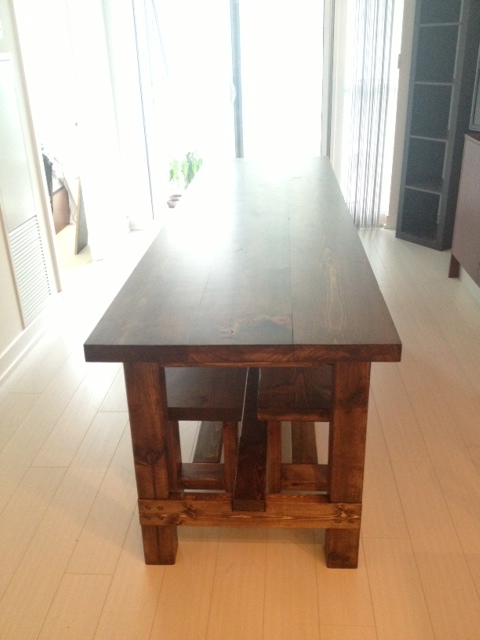
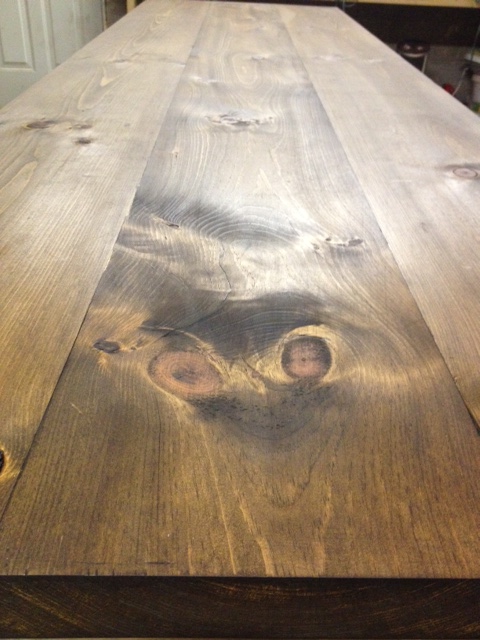
The deep stain color works great with their white walls and light floors.
The table also does a mean job of holding a glass of wine or two (we had to test the table out…come on!)

SPECS & PLANS:
The table is loosely based on the Ana White farmhouse table plans. (We changed size, removed the breadboard ends, and used dowels instead of screws for the table legs. ) For in depth instructions on how to assemble the table check out her plans here.
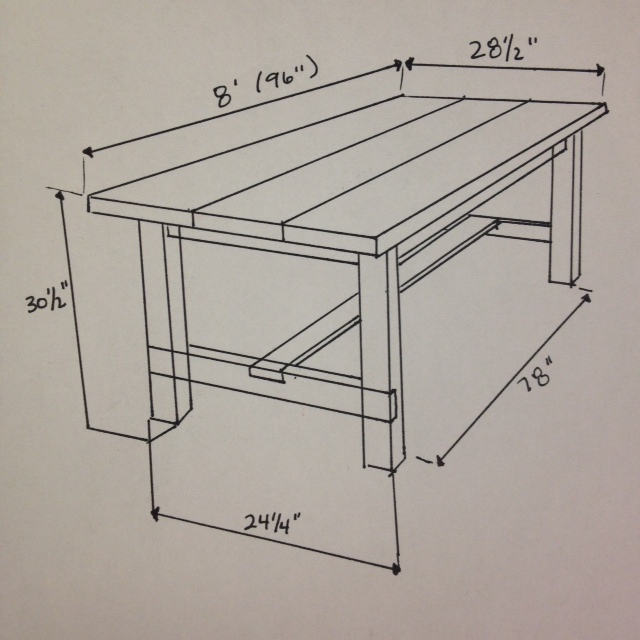
Farmhouse Table
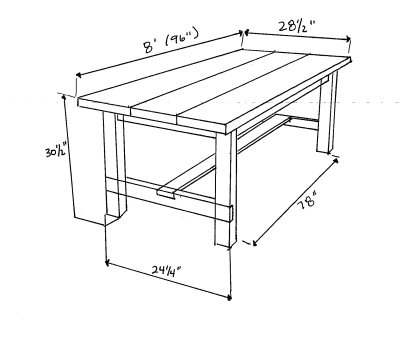
Lumber Buy List:
5 – 2×4 @ 8′
3 – 2×10 @ 8′ (we used kiln dried pine from Downtown Lumber for the table top, it was worth the extra expense! If you cant find kiln dried pine, purchase spruce 2×12’s from your local hardware store, and rip down to 9 1/2″ wide removing the beveled edges while you’re at it (they will be huge crumb catchers if you leave them)
1 – 4×4 @ 10′ (if you cant find 4×4’s in untreated spruce or pine, use cedar)
Cut list:
4 – 4×4 @ 29″ (legs)
2 – 2×4 @ 78″ (long aprons)
2 – 2×4 @ 17 1/4″ (short aprons)
1 – 2×4 @ 85″ (stretcher)
2 – 2×4 @ 24 1/4″ (stretcher supports)
3 – 2×10 @ 96″ (table top pieces)
Instructions:
Cut all lumber to length.
With Kreg Jig set to 1 1/2″ material, drill one pocket hole every 8″ or so on one side of two of the table top pieces (the outside tabletop boards). Then attach the outside table top pieces to the center table top board with wood glue and 2 1/2″ pocket hole screws. (see our post on building the table top here.)
Drill Kreg Pocket holes on top and sides of all apron pieces. Make 2 holes on the ends, and a hole about every 8″ on the tops.
Notch out legs for the stretcher supports. Make notches 3 1/2″ high by 1 1/2″ deep positioned 6″ up from the bottom of the leg, and 19 1/2″ down from the top of the leg.
Notch out stretcher supports. Make one notch in the center of each stretcher support. Make notch 3 1/2″ wide by 1 1/2″ deep.
Assemble legs by attaching short aprons to legs (inset by 3/4″) then set stretcher support into leg notches, and attach with screws or dowels (see how we did the dowels here).
Attach long aprons to legs, with pocket screws.
Flip tabletop upside down, center legs upside down on the table bottom, and attach legs to table top with pocket hole screws.
Attach stretcher to stretcher supports with screws or dowel.
Sand, stain & finish as desired.
Farmhouse Bench
(for TWO benches, halve the amounts if you’re only making one)
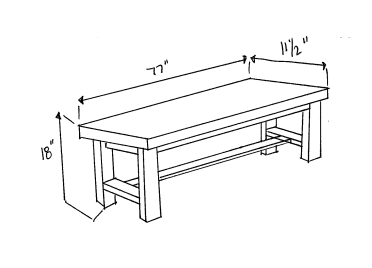
Lumber Buy List:
7 – 2×4 @ 8′
2 – 2×12 @ 8′ (7′ if possible)
Cut List:
8 – 2×4 @ 16 3/4″ (legs)
2 – 2×4* @ 61″ (aprons) *= we ripped a 2×4 down to 2″ wide. You can also buy 2×3’s instead of 2×4’s
2 – 2×4* @ 6″ (short aprons) **= we ripped a 2×4 down to 2″ wide. You can also buy 2×3’s instead of 2×4’s
2 – 2×4 @ 61″ (stretchers)
4 – 2×4 @ 6″ (stretcher supports)
2 – 2×12 @ 77″ (bench tops)
Instructions:
Cut all lumber to size.
Drill pocket holes on apron pieces (Kreg set for 1 1/2″ thick material). Two holes on each end, and about every 8″ on the top. Drill two pocket holes on top of small aprons. Drill two pocket holes on each end of stretcher supports. Drill two pocket holes on each end of stretchers.
Attach stretcher supports to legs 3 1/2″ up from the bottom with 2 1/2″ pocket hole screws. Attach long aprons to legs with pocket hole screws.
Flip bench top upside down, and attach legs (also upside down) to bench using the apron pocket holes and pocket screws. Attach side aprons to bench top. Attach stretcher to stretcher supports.
Repeat for second bench.
Sand, stain and finish as desired.
SOURCE LIST: (one table + two benches)
Materials:
Lumber (see above)
Minwax oil based stain in Jacobean
Minwax wood conditioner
Polyurethane – Minwax Oil Modified in Satin
200 2 1/2″ Kreg pocket hole screws (Lee Valley)
Wood Glue
Foam brushes (Dollarama)
Rags
Sandpaper (150, 220 and 320)
Kreg Screws – Lee Valley & Home Depot
Tools Used:
Miter saw
Table saw *not necessary, you can get material ripped to size at the lumber yard
Circular saw
Square
Kreg jig
Drill
Palm & orbital sanders
Measuring Tape
Difficulty Level (on a scale of 1-5):
three out of five
Total Cost: $400 (Lumber $320, Screws $20, Finishing materials $60)
Time frame: Two weekends (one to build, one to finish)
Essential Tools for the DIY Beginner
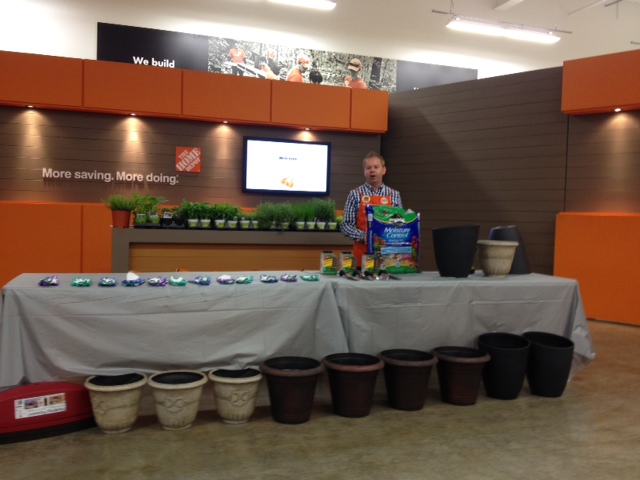
Recently I was fortunate enough to receive an invite to a DIY 101 seminar put on in conjunction with Rambling Renovators and Home Depot. It was a super fun event where we got to learn about gardening, tools and spray painting with the Home Depot pros. I learned a ton of new things (especially in the gardening area, as I totally have a black thumb!) Check out this excellent recap by Jen at Rambling Renovators (and you can even spy my mug trying out the cordless brad nailer!)

The seminar on tools got me thinking. El Granto and I have been very lucky and have received a lot of our DIY tools as presents from family. Some hand me downs, and some Christmas and birthday gifts. I still have the hammer my dad gave me when he dropped me off at my first apartment in college. He left me with a small array of tools; hammer, screw drivers, and a little tin full of misc screws and nails. He didn’t want me to be the girl hanging pictures and assembling Ikea furniture with a butter knife. Thanks Dad!
We now have quite the tool arsenal, but if you’re just starting out on the path to DIY getting your needed tools can be an expensive and overwhelming experience. So to help you out, I have devised a list of the best items to purchase to get you started on most tasks.
Essential Tools for the DIY Beginner
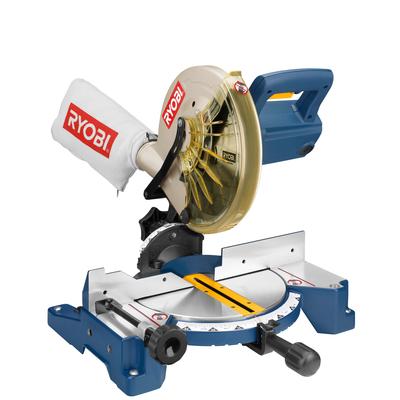
Miter saw. This workhouse will have you making precise, clean cuts for everything from trim and moldings, to framing and furniture. To start out, all you need is a basic 10″ single bevel compound miter. If you outgrow this down the line, corded tools hold their value well, and you’ll be able to resell on Kijiji or Craigslist.
Good quality tape measure (or two!) You will literally use this non stop. Measure twice really is a motto to live by. Purchase a good quality tape. One that is sturdy, accurate and has a good extension. We currently have FIVE!

Level. Not only is a level great for well, making things level, but I often use mine as a straight edge and saw guide. Invest in a level, as this is a tool that you will have for years to come.

Cordless drill. This is the tool that will probably get the most use in your workshop. From assembling furniture to making short work of little projects, a good drill is essential. Make sure to choose a cordless drill wisely. Choose one that has a good battery life, quick charging time, is lightweight but powerful. This is a tool to invest in. Purchase one with a 1/2″ chuck (3/8 is just too small). Also consider your other battery powered tools, and purchasing a line of products that you can interchange the batteries. It means less chargers, and having backup batteries ready when you need them. I am scoping out a new drill (El Granto’s is a bit too big and heavy for me). This Ryobi drill + impact set I have my eyes on.

Hammer. A well balanced comfortable hammer will make short work of your task. Choose one that is lightweight but powerful to reduce fatigue.

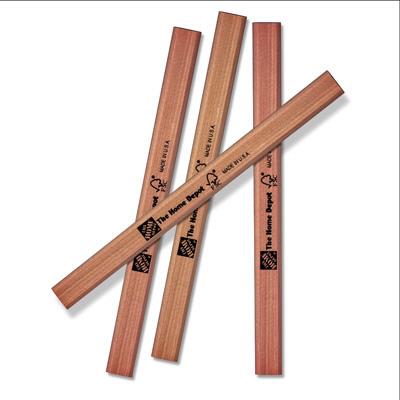
Pencils. This may sound like a “DUH” item, but when you need one, you can never seem to find one. Buy a few good quality ones and keep them sharp and handy. (Don’t forget a sharpener too!)
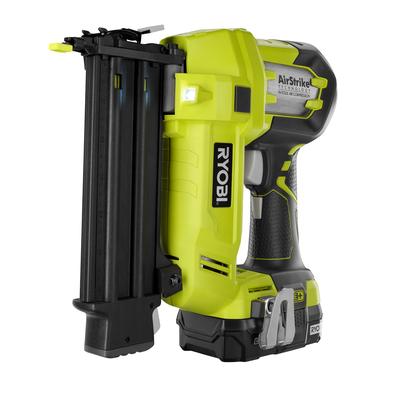
It also doesn’t hurt to splurge on a fancy tool or two. After trying out this puppy at the Home Depot DIY 101 seminar I am in LOVE. This cordless brad nailer has me wanting to tackle another trim project like our guest room board & batten. Heart <3 …
Tips!
- Home Depot will rip down large lumber for you such as plywood (for a small fee). For big projects, bring your cut list with you and have them cut it for you. A table saw is a big purchase, and unless you’ll be using it a ton, you really don’t need one!
- You don’t need a truck to get big lumber home! We don’t have a car, and (as you know) build a lot of stuff. We walk home with what we can, but for larger purchases we rent the Home Depot take it home van. For $25 you get 90 minutes rental time, which is plenty of time to get everything home and unloaded.
- Don’t be afraid to ask for help. If you’re unsure on a project, do research and ask for help before getting started. It’s much better to plan and research and get it right the first time than to do a poor job and waste expensive materials. Don’t forget to read the instructions! Packages can often tell you exactly how to get things done. Use resources like sales people at the hardware store, and free in store workshops to help you get the knowledge you need.
*I was not paid in any way for this post. All opinions are my own!
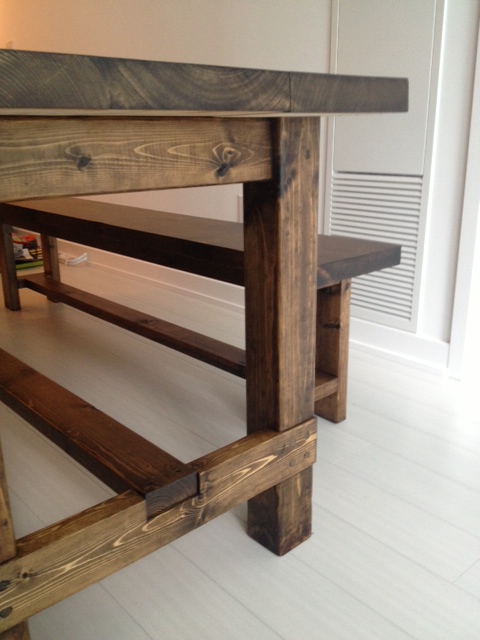
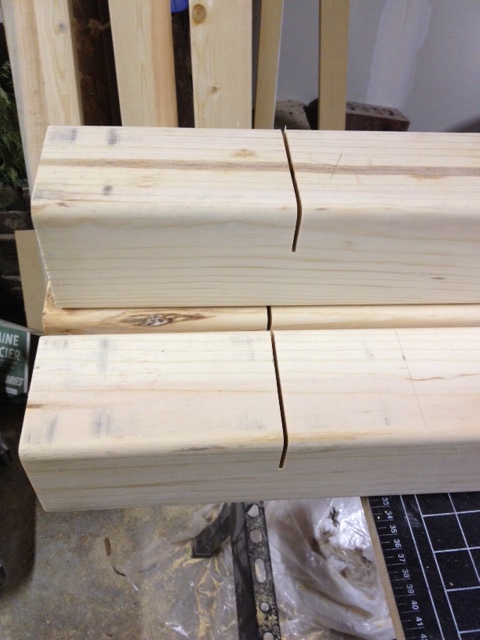
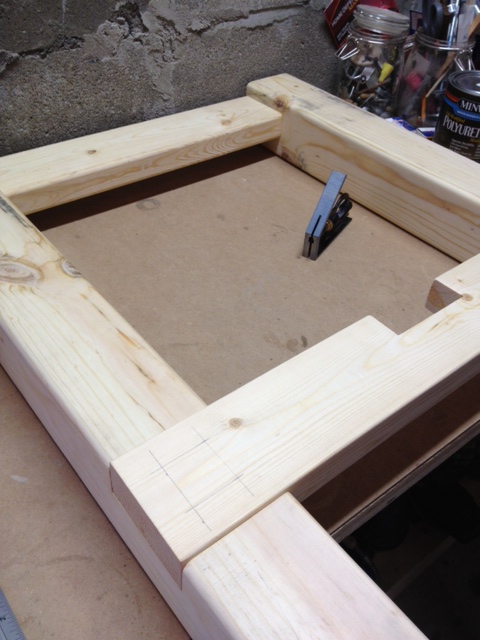
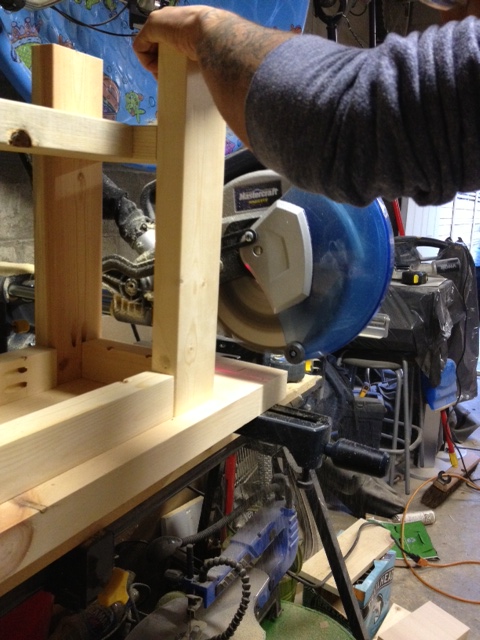
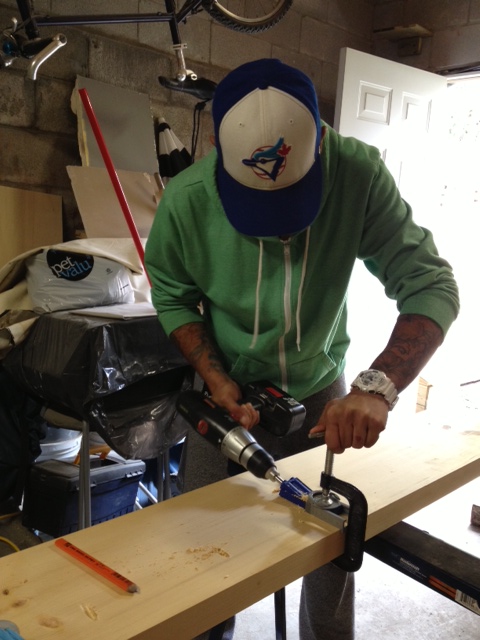
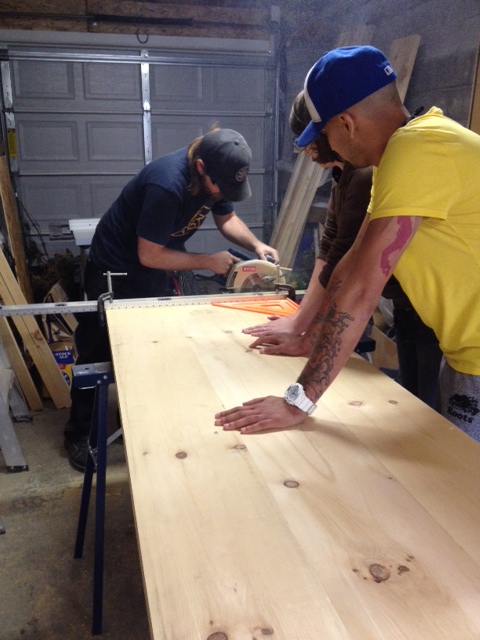
Legs!
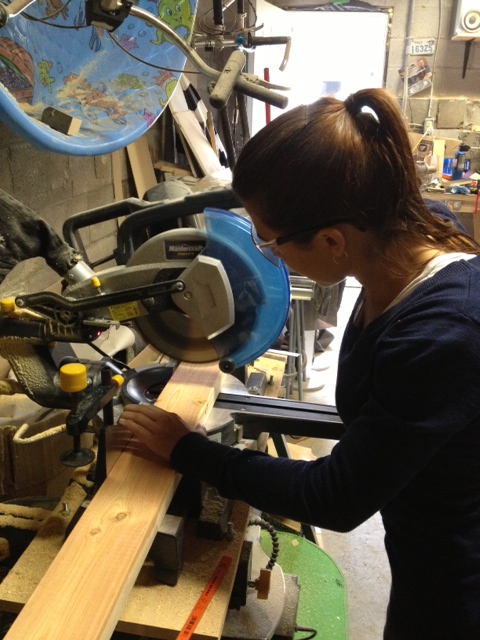
Daniel and Adelle move into their new place this weekend so we’ve been hustling to try to get their farmhouse table finished in time. When we left off, we had fabricated and stained the table top and one bench.
This past weekend we powered up and knocked out a second bench and got to making the farmhouse table legs. We lucked out and our local lumber yard carries untreated spruce 4×4’s. This will undoubtedly be the toughest material to track down if you’re building this project. The big box stores usually only carry 4×4’s in pressure treated and cedar. Neither of those is ideal for an indoor table, but if push comes to shove and you can’t find untreated spruce, go for the cedar.
The legs consist of 4 4×4’s, two stretcher supports, a stretcher and four apron pieces (two short, and two long). The leg uprights need to be notched out for the cross pieces, and the cross pieces need to be notched for the stretcher. Good thing we got a new table saw right?! Right! The easiest way to notch is to make a bunch of kerf cuts. A kerf cut is a cut the width of the blade that usually doesn’t go all the way through the wood. (Kerf is actually the term for the width of the material removed by the blade.) For the notches we made a ton of kerf cuts close together and then banged out the little slices of wood. (you can also do this with a circular saw if you don’t have a table saw!)
We set the table saw fence for the first cut and the blade to 1 3/8″ high (we want the cross pieces to stick out 1/8″ from the leg posts to show off the notches, it will make more sense when its assembled.) We made the first cut on each post then the last cut. We then progressively made close cuts all the way in between.
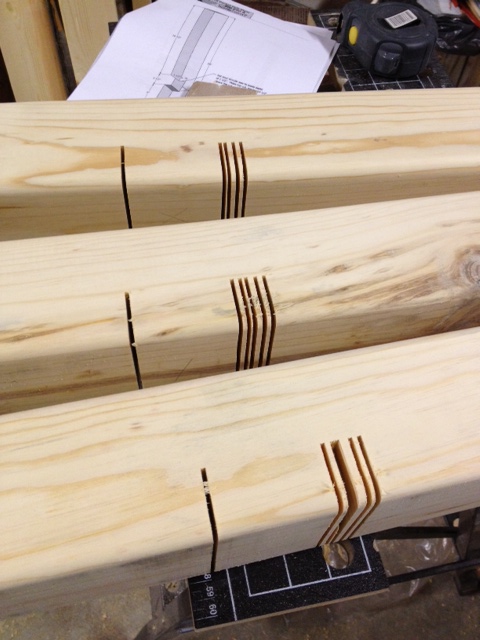
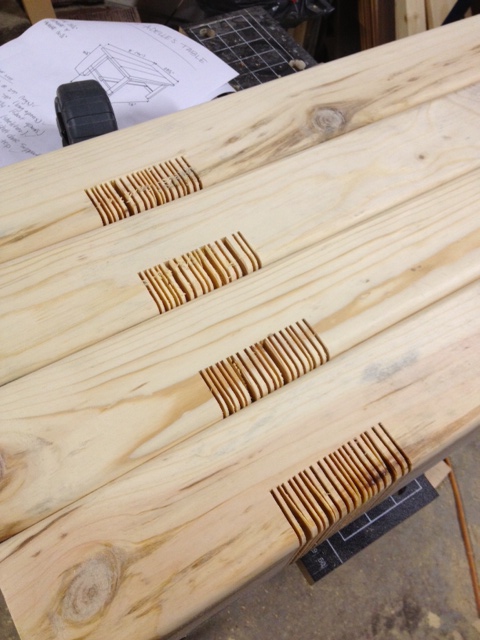
When we were done (and this does take a while!) we knocked out all the little slices of wood. We were left with a few nubs and errant wood slices, so we broke out the oscillating multi-tool and or made short work of them.
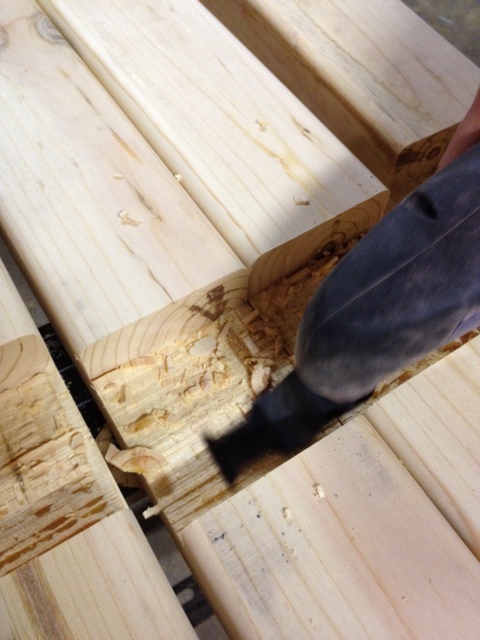
Now, if you EVER see someone cleaning up their kerf cuts like this. DON’T take their advice! That is the most dangerous thing I’ve ever seen! Use an oscilating multi tool, or a chisel, or heck even a jig saw, but do NOT use a table saw like that. My fingers hurt just thinking about it. Eeeep.
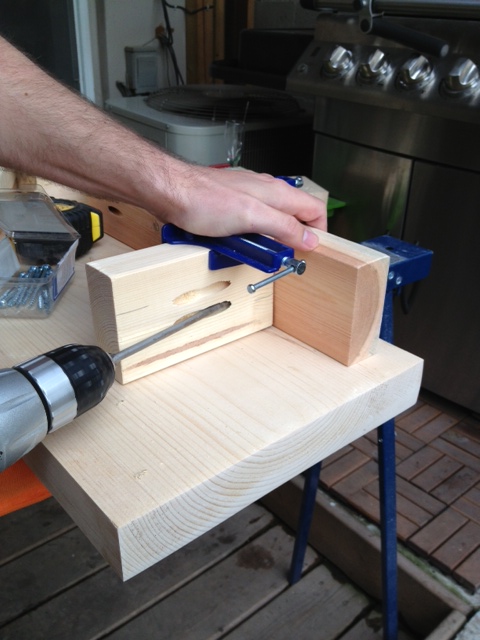
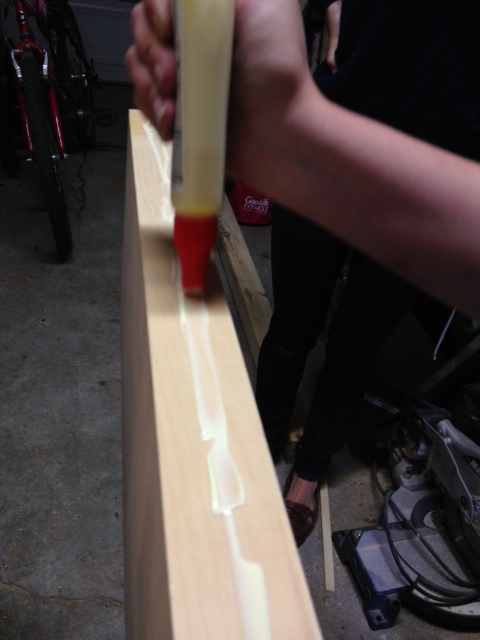
Now lets build some legs. We need to attach the aprons to the legs with pocket holes, then the stretcher support into our notches.
The easiest way to secure the stretcher support the legs would have been with screws. BUT if we used screws they would be visible on the front of the legs where the supports notched in. No way to use pocket holes there. I don’t like screws visible unless there is no other way.
So out went the screws and in came 1/2″ dowels. We purchased a 6′ length of 1/2″ dowel from the hardware store and cut them down to about 3″ lengths. Then we took a 1/2″ spade bit and drilled four holes in a square pattern. We used a piece of tape to mark the bit depth, so that we didn’t drill too deep or too shallow.
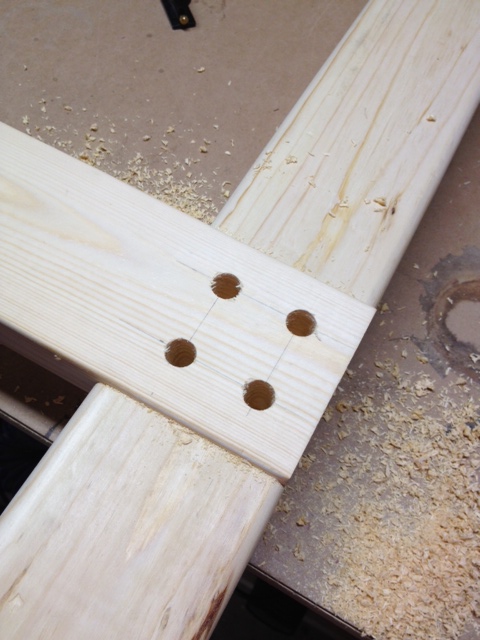
We inserted the dowels with wood glue and let them dry. Once they were dry, we cut them down with a coping saw.

Now they were ready to be sanded flush. A few minutes with a power sander and they were looking faaaaantastic.
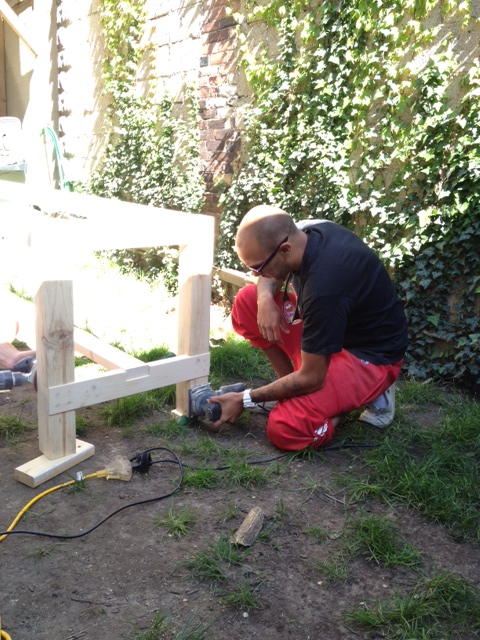
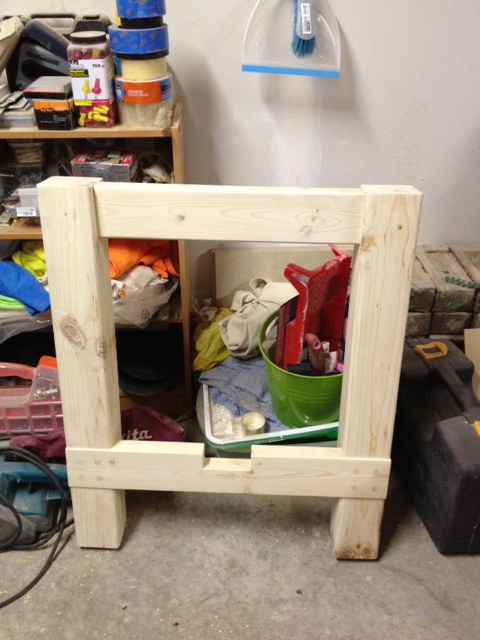
While we were at it, we also sanded the long aprons, and the stretcher for the table. The table will remain in 6 pieces until its assembled in the new place.
Now it’s time for staining and polying all the pieces, and they will be ready to be assembled this weekend!
Paint those Knobs
When we bought the Storefront there was an overwhelmingly large amount of stuff that needed purchasing. The house came without closet rods, window coverings, shower curtain or rod, or even a bathtub plug. So when we moved in, we took a big trip to Ikea and Home Depot and bought the things we needed. It all started to add up very quickly. We tried to save money anywhere we could, and new locking door sets was one place we saw the ability to save a lot of coin. We needed four locking doors. Two dead bolts & two locking handles for our exterior doors (front door, back door, garage & our master balcony). We spied a 4 pack of deadbolts & handles for a great price in stainless steel, brought it home and installed.
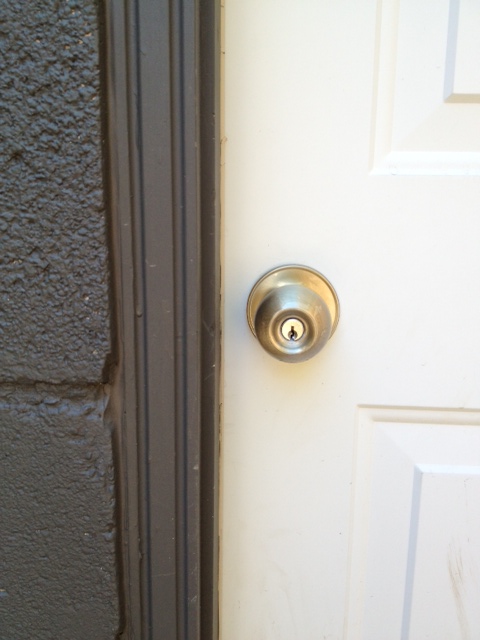
Two years later, and they’re looking shabby. They were covered in some sort of protective covering, which is peeling and looking pretty haggard. Something needed to be done. So what would it be, buy new ones, or try to refurb the ones we have? Time for some spray paint.
Practically everyone on the entire internet has painted doorknobs (don’t believe me? Do a google search for “spray painting door knobs”, or look on Pinterest.) See? The whole internet. Some with better results than others.
So I decided to jump on the bandwagon. I had previously spray painted closet handles with RustOleum Universal Oil Rubbed Bronze, and they are still in perfect condition, so I figured that was the way to go.
The problem is, (as most know) we live in a very urban environment. We live in a converted Storefront, on a very busy street, steps from the subway. While we have plenty of lovely neighbors, there is still a bit of crime, drugs, prostitution, and generally we try to be very aware of our surroundings, and try to keep our house (and us!) as safe as possible. SO, taking off all the door handles and locks for two days while we spray painted them, was not an option. Each of our doors has both a deadbolt and a locking handle. Overkill I know, but it came in handy for this project, as we were able to take off either the handle or the deadbolt and paint it, while the other stayed on the door keeping the ability to lock it.
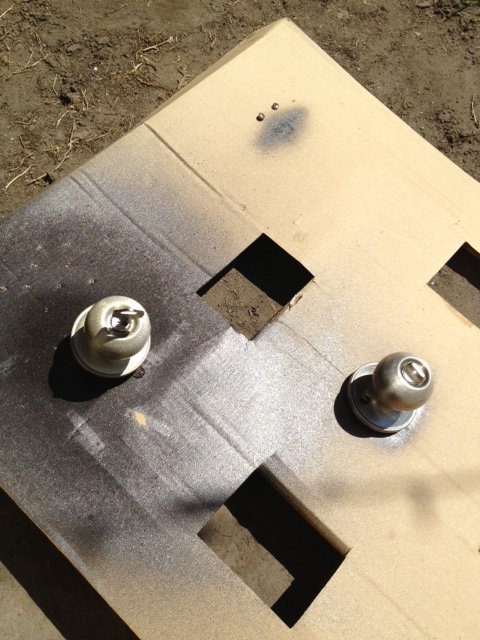
So off came the locks, one at a time. They got lightly sanded (using 320 sandpaper), cleaned with a degreaser and dried. I then placed an old key in the lock and sprayed with several thin coats of spray paint. They dried for 24 hours, and then were re-installed.
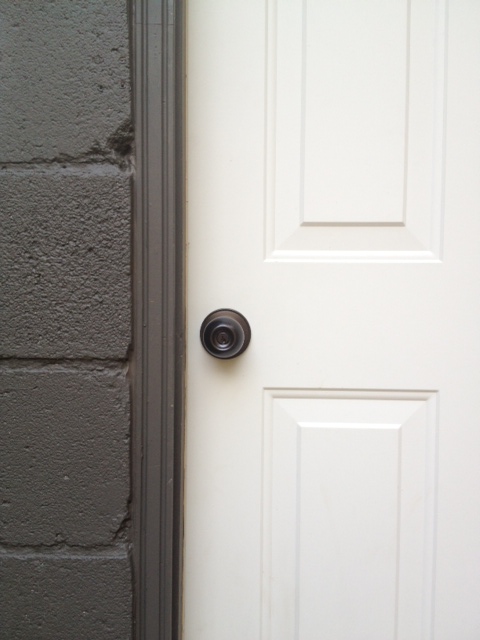
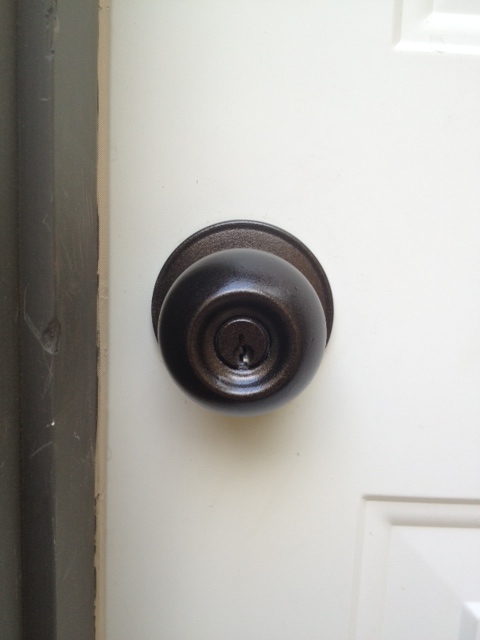
We still have a few remaining knobs around the house, but so far the garage and back doors are looking snappy in their new ORB clothes.
Who let the dogs out?
We left the dog alone in the house today. All by himself, out of his crate, for the first time. For fellow dog owners out there, you can understand how apprehensive I currently am. He normally spends the days in his crate, which he’s absolutely fine with. He knows his Monday-Friday routine and he knows that someone will be home in a few hours to let him out and go for a walk.
I’m sure he would happily stay in his crate during workdays for the next ten years, but that’s not what we want. We want him to be able to sit at the window and watch the people walk by, to nap in the sunshine, and to wander around the house as he pleases.
We want him to be a normal dog.
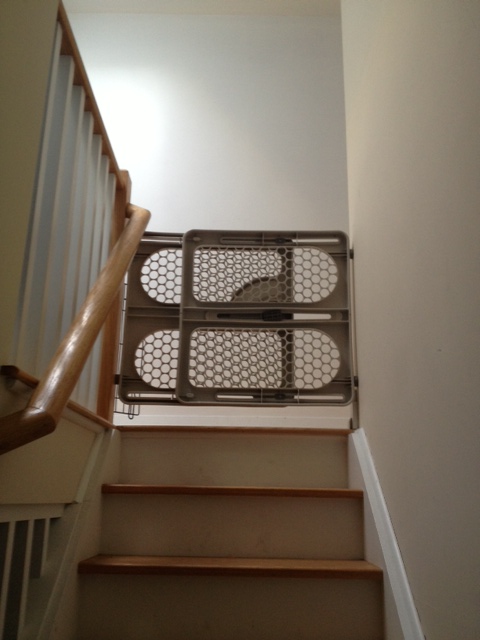
So were trying an experiment today. We de-cluttered our guest room, shut all the other upstairs doors, left his crate open, and put a baby gate at the top of the stairs.
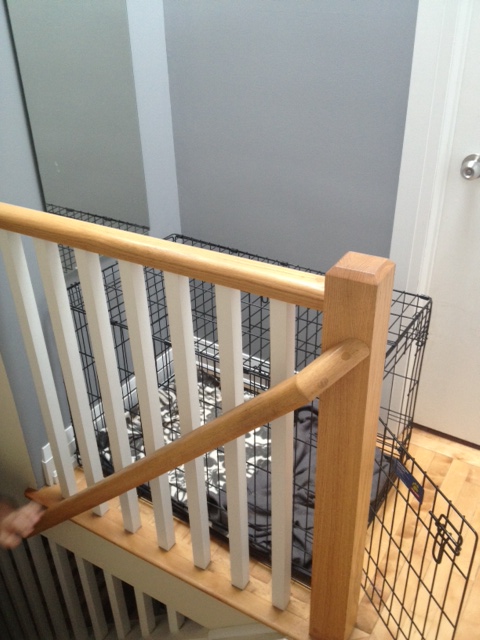
We left as if nothing was out of the ordinary, and went to work.
I’m worried that he will cry and bark all day. I’m worried that he will scratch at the windows and hurt himself. I’m worried that he will jump over the baby gate and plummet down the stairs. I’m worried that he will chew his way through doors, or furniture or Marley style through drywall.
Is this what parents feel when they leave their teenage kids alone in the house?
So what do you think, is Odin basking in his new found freedom and being a good dog? Or is he screaming his head off annoying all my neighbors?
***UPDATE***
Odin did great! Not a single thing out of place when we got home. He has since spent several days home alone without incident. Very proud of our pooch, and his independence!
Benched
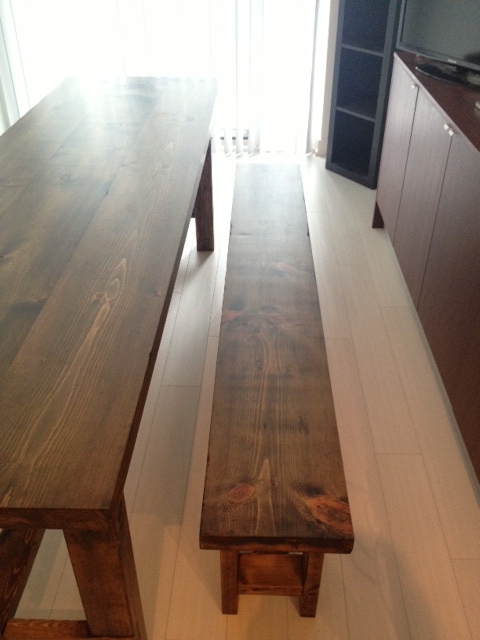
Daniel & Adelle’s Farmhouse Table project is coming along. The tabletop is built, stained and ready for polyurethane. We still need to make the legs & aprons, but its getting there! We also managed to knock off some progress on the matching benches.
The benches are 77″ long, which means they will just fit underneath the table. The reason they went with this design was so that the benches could completely fit under the table when not in use. This will work well in Daniel & Adelle’s long but narrow dining space. Being able to get rid of the benches also means the dining room can quickly be turned into an impromptu dance floor when a dance party just happens to break out. What, you don’t have surprise dance parties in your dining room? Psssht, you’re not living until you dance like Elaine, or break out a Tom Cruise pantsless dance routine in your dining room. Impromptu dance sessions happen all the time with our friends.
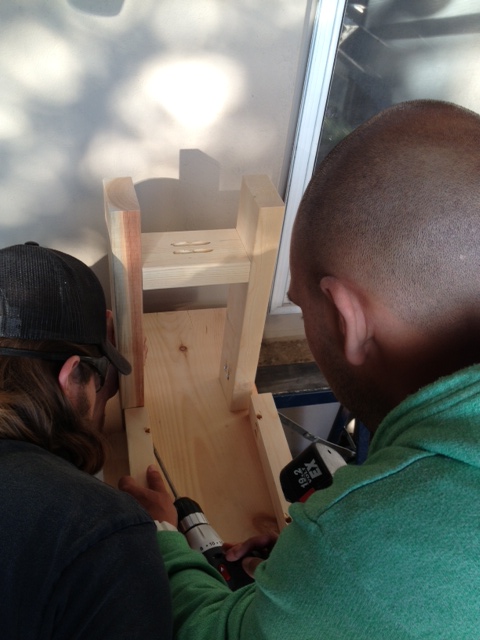
The benches are simple, but needed a bit of cutting, sanding and a load of pocket holes. We got started by sanding the bench top, and cutting the legs, aprons, stretcher and stretcher support.
All the support pieces are made from spruce and the bench top is from 2×12 pine. For the aprons, straight up 2×4’s would have been a bit bulky and heavy, so we ripped down 2×4’s to 1 1/2″ x 2″ on the table saw for the side & end aprons.
The assembly of the bench was a bit tricky due to the limited space for the pocket holes. The pocket holes for the apron supports actually intersected each other. Good thing all of this will be hidden! We also broke out the corner clamps again (they are getting a lot of use!)
We used a ratchet and driver bit to manually drive all the screws for the bench legs. At this point in time I believe I felt it necessary to check on the dog, or tie a shoe, or any task that got me out of screwing in all those difficult screws.
Once the legs were assembled we attached the aprons (insetting them by 1/8″ for a little flair) and the bench was made.

Awesome, complete, woot!
Wait…why does the bench top look so long??? Oh CRAP! I got so carried away at the start, I forgot we needed to cut the bench tops down to size! Woopsies! This bench was 7 feet long, when it was only supposed to be 77″. Now what? We do disassemble the whole thing and cut down the top?(Remembering all those screws put in by hand….) That doesn’t sound like fun…
OR we could lift the whole bench upside down and cut the top on the miter saw. Seriously?!
YEP. It happened. The miter saw table rollers & two people held up the bench, while Daniel cut the bench top down to size. Phew, crisis averted. At least I didn’t screw up the whole project. With a few minutes work, we were back on track. I am very thankful I realized before staining!
Speaking of staining, after all that sanding was done we applied wood conditioner and then stained away. Talk about a staining party. The four of us were staining away in our tiny garage on a Tuesday night. (Even El Granto picked up a brush and he doesn’t do that often!)
One bench built & stained, one more bench to go!
Introducing Pudding
This my friends is Pudding.
Farmhouse Table – Making the Table Top
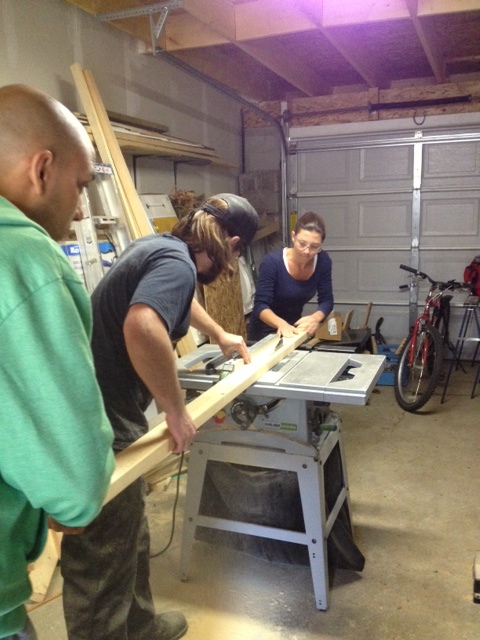
We made some headway with Daniel & Adelle’s Farmhouse Table in the last week. We put in one solid days work on the weekend, as well as one weekday evening.
Our work was a bit all over the map, as there was four of us we decided it was best to go our separate directions and knock off different tasks. I will try to focus my posts on each specific topic, and today we’ll get down with how we made the table top.
Bright and early we headed to the lumber yard, bought all the lumber & supplies, and rented a Zipcar van to get them all to the garage. We are using spruce for the legs & supports and gorgeous 2″ thick pine for the table and bench tops.

We inspected the tabletop boards, and decided on layout. We attached the tabletop boards together using the Kreg Pocket Hole system, 2 1/2″ screws and glue.
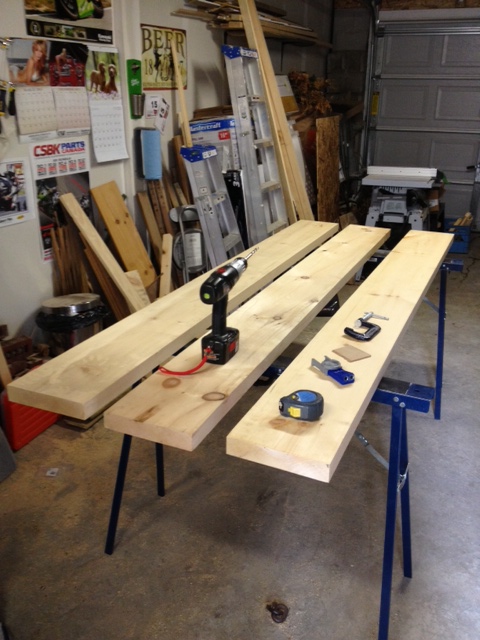

We added support pieces to the underside of the table to try to curb any warping the table may want to do (we are not using breadboard pieces on the table, so we wanted some extra assurance that things would stay put.)
After that, we clamped on a guide (we used a level) and cut the ends flush on the tabletop with a circular saw. The poor saw had a bit of a tough time with the thick wood
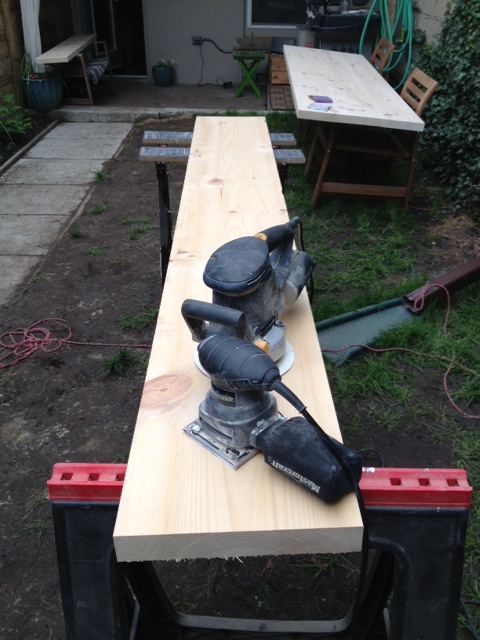
Sanded, sanded and sanded some more. While two people were power sanding, the other two were alternately cutting the rest of the lumber we needed, and hand sanding.
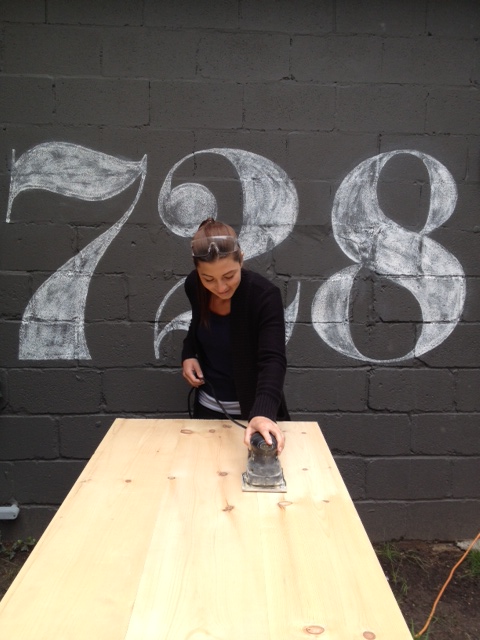
After we could just sand no more, we decided to give the table top a coat of wood conditioner, then a coat of stain.
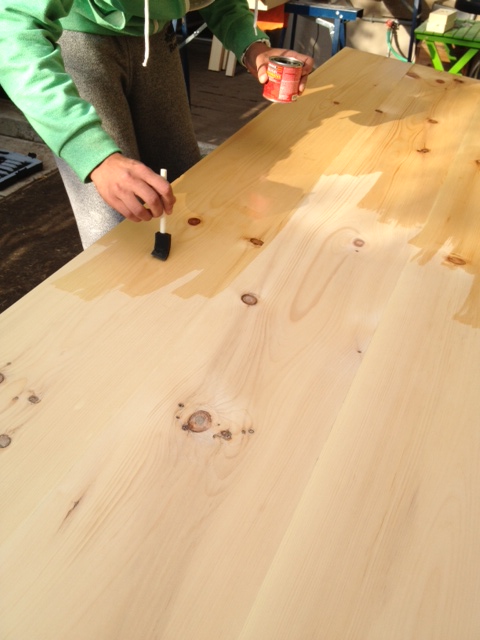
We let the stain dry, and applied a second coat a few days later.
The table top is now ready for poly, and we can move on to making its legs.
We are not going to assemble everything until we’ve moved it to Daniel & Adelle’s new place, as this huge table would never fit through doors assembled!
This weekend is a holiday weekend in Canada. I think we will be turning our attention to gardening, bbq’s and drinks on the deck. I fear we will not be very productive this weekend!
Any big plans for the weekend? BBQ’s, cottages, fireworks?
B-The Face Launch Party
We have a friend Chelsea who is one of those people that lights up a room as soon as she enters it. She perpetually has a smile on her face, and absolutely everyone adores her. She has an infectious personality, and is a hellovalota fun. Her day job is being a morning show radio host (I know, how cool is that!) and she also recently won the spot as the B-Playfull Social Media Ambassador for Mercedes-Benz B-Class in Canada for their B-The Face program. Check it out here.

Last night we were invited to celebrate with Chelsea and the other three Ambassadors at a launch party at a Mercedes dealership. We got to dress up, sip beverages and indulge in canapes while drooling over the Mercedes line up.

We also insisted Chelsea sign our posters with inspirational quotes.


It was a great night had by all, but was unfortunately cut short when a light in the dealership decided to catch fire (oops!) We had to be evacuated and the firemen had to come in and do their thing. Nothing says a party like sirens and flashing lights.

Firetrucks aside, it was a great party! Congrats Chelsea, and thank you Mercedes-Benz Canada for the event!