IDS 2015 – What to See

IDS 2015 (Interior Design Show) is probably my favorite show of the year. It is full of inspiration, the latest and greatest home products, and some of the best up and coming designers. This year it hits Toronto from January 22-25, 2015. We will be heading there for trade day on the 23rd and will be sharing some of our favourite things over on Instagram (make sure to follow along with #ids15). However, I already have a few things on my must see list!

CUBITAT, a special feature by Urban Capital, focusing on transformable design and architecture as object.

Jonathan Adler – On the main Stage Saturday 12pm-1pm


sTUDIO North

Studio North, an always favourite curated collection of emerging practitioners on the Canadian design scene.  Studio North itself is a reason to head to IDS. It is my favourite part of IDS and one that usually takes up most of my time. Seeing the incredible up and coming Canadian design talent, speaking to the artists, and buying their work. Its a huge source of inspiration, a great way to work with local artists, and has some of the BEST designs I have ever seen.

Here are a few of my faves from Studio North IDS 2014:

Studio North

Studio North

Studio North

Great speakers on the main stage on Sunday the 25th. Lynda Reeves starts things out from 12-1pm, Suzanne Dimma with Mark Challen 1:30-2:30pm and the House & Home editing team including the awesome Margot Austin will be knocking it out of the park from 3-4pm.

Sunday Schedule

Designboom Mart, a pop-up shop and Designboom’s only Canadian location for buying jewellery, accessories, textiles and furniture from their sources, created by Toronto’s Arc & Co. Design Collective.

designjunction lounge, designed by London-based Michael Sodeau of Michael Sodeau Studio, featuring La Marzocco and Muuto. YES Muuto, the Scandinavian design line I fell in love with in during my trip to Denmark and Sweden. Remember that awesome stone salt dish I brought back? YEP! Muuto. Cant wait to see the lounge!

The IDS Opening Night party goes down on January 22nd, and the show opens to the public Saturday January 24th, 2015 to Sunday January 25th. Get your tickets here. See you there!


New Adventures

Every blog in the blogging universe seems to be hitting publish on a big 2015 goals, recaps, hopes & dreams post etc. I’m not really a resolution kinda person, so that sort of a post was out of the question, but I have taken a good hard look at blogging, and I intend to make some changes around here in the coming year.


But the biggest change of all, is coming career wise.


Continue reading “New Adventures”

Light it up!

The Storefront has potlights in a few areas on the main floor, most notably the entryway and the kitchen. They’re great for keeping the place generally looking nice and bright, what’s not so great about them is that they are perpetually burning out, and are a pain to change.  The type of socket in our lights is a tiny screw in one, which we could only find bulbs for at Rona. A two pack of bulbs cost around $14, and on average would last less than three months. When one light would burn out, the next were sure to follow within days. If we didn’t have spares on hand (which I’m terrible with!) We would often find ourselves in the dark. UGH. We are carless, so a trip to the hardware store for new bulbs would always be left to the following weekend. The kitchen at least had under counter lighting to aid with the whole seeing the food I am cooking business, but the entryway did not have any backup lighting. If you came home after the sun had set you were essentially left in the dark to take your shoes off.

The day before Halloween the entryway light burnt out (of course!) Not wanting to freak trick or treaters out, or have the neighborhood think we were shirking away from candy duty, El Granto attempted to take one of the working light bulbs from the kitchen and put it in the entryway. I say attempted, as the moment he tried to take that bulb out of the death grip of a pot light, the thing shattered into a million pieces. This luck continued until El Granto had exhausted ALL WORKING LIGHTBULBS, and our house was essentially in the dark. Needless to say Halloween was embarrassing. I over compensated by lighting EVERY CANDLE WE OWN and placing them in the entryway and front window. Hopefully our house appeared spooky, not like we forgot to pay the power bill.

That weekend, we promptly headed to the hardware store to pickup bulbs. El Granto had been suggesting LED bulbs for ages, but gosh darnit, they are expensive, and we had not seen any in person that fit our strange potlights.  We were convinced we would not be able to find new, better bulbs for our lights, and we would resort to replacing ALL the pot lights.

I left El Granto alone in the lighting isle at Home Depot (dangerous), and went in search of supplies for another project.  When I returned, expecting the worst, I found El Granto with childish grin on his face. He had managed to find not only bulbs for our lights, but LED bulbs. Philips MR16 LED bulbs. Ones that promised to last for longer than three months, and avoid us looking like the neighborhood weirdos without lights. I was skeptical. We hadn’t been able to find iridescent or florescent bulbs in this socket size, how could he really have found well priced LED ones? But after taking apart packing in the store (yes, we were THOSE people.) The light bulbs looked almost exactly the same. Except the new ones were a tiny bit longer. We took a chance, and bought enough bulbs for the main floor. They weren’t cheap, but definitely not as expensive as I thought. We have 5 pot lights, four in the kitchen and one in the entryway.

Philips LED Lights Philips LED Lights

We purchased two 2 packs, and one single, and our total came in at just over $75 before taxes.

Back at home, El Granto set to installing them. After reading the package, it says they cannot be installed in closed light fixtures. Our pot lights had a glass cover at the bottom, which we decided to remove. It would look exactly the same (the glass was completely clear) and hopefully that would let out the heat better (perhaps that’s why our bulbs went so fast!?) as well as give us a bit more space in case the new slightly longer bulbs were a really tight fit. The new bulbs installed quickly and easily (no problems with the length).

Philips LED Lights Installed

The color is a nice bright white. The kitchen receives a lot of light from the front storefront window, and the bright white works perfectly with that natural light, without being too blue, or industrial feeling.

After living with our new potlight LED’s for a couple months, we received a sample of the Philips SlimStyle LED bulb in the mail. This one has a regular light bulb connection, and we decided to try it in a lamp in our bedroom.

Philips LED LightPhilips LED Light

El Granto has a desk lamp for a beside lamp. It is nice and manly, but the current bulb  is a CFL that is a gazillion watts, and laying in bed it shines directly in my eyes. It’s like a fog lamp. It was unattractive, way too bright, and not a very nice color. That lamp was the obvious choice to try out the the SlimStyle bulb.

The SlimStyle knocked it out of the park. It has a nice soft light, great colour, and looks nice in the lamp (as opposed to the CFL that stuck out past the end of the shade with its weird looking tubes). It also dims in a neat way when you turn it off.

Philips SlimStyle Bulb

IMG_3025WEB

After several months using the Philips LED bulbs (both the potlight & the SlimStyle) we are very happy. No burnt out lights! Apparently the Philips LED bulbs are also dimmable, which is pretty cool.

Disclosure: The SlimStyle bulb was a sample that we received for free. We paid out of pocket for the potlight bulbs, and we did not receive any compensation for this post. As always, all opinions, words, typos, poor grammar and overuses of the word awesome are our own.


Project Pantry

In our main floor hallway lives a strange small nook. He resides between the side of the refrigerator, and the powder room. He’s tall and skinny at 81″ high, 15″ wide and 18″ deep.

We have lived with this weird nook for four years, and during that time Mr. Nook has held the broom, dustbin, dog food, soda bottles, and a plethora of other things you had no idea where to put. At parties, I have come across one or more people just hanging out in the nook, having a jolly good time.

But seriously though, what the heck is Mr. Nooks purpose?! We live in a small 12′ wide house, and real estate is prime. Mr. Nook was taking up valuable space, and not being very helpful.

Here is a look at the nook in all its glory. Sorry for the closeups. Even with a wide angle lens, this nook is hard to photograph.

IMG_3006WEB

To the left of the nook is the cover panel covering the side of our refrigerator. To the right is the door to the powder room.

IMG_3010WEB

The nook is even trimmed out with baseboard! It’s like a tiny little room.


IMG_3005WEB

Here you can see that it is framed up to be the same height as a regular door (but only for really skinny people).

We were at Ikea the other day picking up the last of our glass doors for the coffee bar, as Ikea went and discontinued ALL their current kitchens. We were still missing a few glass doors, so we hustled there to grab them before they sold them off. As you know, I cannot go to Ikea without perusing the AS IS section for possible project supplies. I was sorting through loose cabinet doors when I struck upon these doors.

4dd4b32e38babc1a6216f401c5177275

They are Adel brown high cabinet doors meant for Ikea’s pantry system. The door style is Adel (same as our Kitchen) but in brown. Armed with an Ikea paper measuring tape, I noticed that the doors were almost the same size as my nook. The total height of the two doors was 79″ (my opening is 81″) and the width is bang on at 15″.

The doors were the wrong color for my kitchen, but they were…wait for it…$23 total.

The doors promptly got tossed onto the cart, and brought home with us, while I was giving fist bumps to random strangers and congratulating myself on a badass score.

I know what you’re thinking:

A.) The doors don’t even match my kitchen

B.) The nook isn’t even IN my kitchen

C.) I didn’t buy a cabinet to go along with the doors

All true. BUT I have a PLAN!

IMG_3001WEB

Step One: Lengthen the door an extra two inches. Fill the current hardware holes on the door, lightly sand, prime and paint to match my kitchen cabinets. (no really, it will match, I promise. I already tested it out by making my own cabinet cover panels for the coffee bar.)

Step Two: Trim out the door opening, add reinforcement for the hinges, hang the doors and add hardware.

Step Three: Deck out the inside of Mr. Nook with some badass storage solutions.

What kind of storage you say? Drumroll please…..PANTRY!

Here is the pantry plan:

Drawers for spice, pasta & boxed good storage.

Shelves for tins, bottles, jars and canisters of dry goods.

Sheet pan vertical storage.

Counter to set things down on. (Inspired by Karen’s pantry)

I will get started as weather permits (it’s darn cold in our garage right now!)

In the interim, check out my Kitchen board for some of my pantry inspiration.

Follow Kristen – Storefront Life’s board Kitchen: Modern + Industrial + Traditional on Pinterest.

What are your must haves for a pantry?


Concrete Swiss Cross

In the modern and Scandinavian home scene you notice a lot of similar trends. Monochromatic palettes, clean uncluttered design, negative space, candles, wood, black and white etc. One other motif you will note is Swiss crosses. They’re on blankets, pillows, art and accessories. Find a scandi home pic on Pinterest, and play the find the Swiss cross game. Why is this motif so popular? It’s simple, bold and classic. Not a design fad, but a timeless design element.

I’ve been Scandinspired as of late, so when I spotted X silicone ice cube trays at Ikea, I saw them not as X’s but as +’s. With silicone + tray in hand, I used some leftover concrete from my concrete clock project to make concrete Swiss crosses.

Concrete Swiss Crosses

I poured excess grey concrete into my silicone ice cube trays, and covered with plastic. I left them to cure overnight, then easily popped them out of the silicone mold. [see how to mix & pour the concrete here.]

Concrete Poured into Ice Cube mold

Any excess concrete was lightly sanded off, and the crosses were lightly sanded the edges of the +’s so they would stand up easily.

Concrete Swiss Cross

Not only did I use up my excess mixed concrete, I also made a cute decor item. The little Swiss crosses look sweet in my black and white powder room.

Concrete Swiss Cross

Concrete Swiss Cross

Working with concrete and silicone molds was incredibly easy. I am now on the hunt for other cool silicone molds. One of those sphere ice cube trays perhaps?

SOURCES:
Concrete – Buddy Rhodes 10lb Artisan Mix
Silicone Ice Cube Tray – Ikea

See post on mixing the concrete here.

Difficulty Level (on a scale of 1-5):

one out of five


Total Cost: $3

Tool Test Drive – Milwaukee M18 Fuel 7 1/4″ Cordless Circular Saw

There is nothing more infuriating than being knee deep in a project, then realizing you don’t have the correct material or tool. It stops you dead in your tracks and you’re left spending your Saturday at the hardware store instead of working.

For instance, we were working on the tabletop for Project Nelson. We had planed, measured and glued up the top, and were just about to square up the edges. See it’s a lot easier to do a rough cut to length of all your boards, glue them together then draw a nice square line and then cut the top to square. We were just ready to cut when we realized we didn’t have the tool we needed. The tabletop was built with 1 3/4″ pine, and our corded circular saw had given up the ghost on the last project. Our cordless circular saw was a 6 1/2″, and does not have the cut depth to cut through 1 3/4″. Womp womp.

Our current saw with a blade depth if 1 1/2". Not deep enough to cut through our project.
Our current saw with a blade depth if 1 1/2″. Not deep enough to cut through our project.


We were at a standstill. What to do? Our options were to buy, rent or borrow. I don’t like renting woodworking tools from the big box store. They tend to have terrible blades, and it’s not worth risking your project on. So that left us with buy or borrow. I hate rushing to buy a tool without doing my research first. Borrow it is.

We happen have made friends with our local tool rep; James. I actually call him Toolman James. (Get it, like Tim the Toolman Taylor?) I shot him out an email saying “Hey James! We’re in a pickle! Do you have a circular saw we could borrow?” He responded with “Actually I do! But you have to promise to give it back, it’s brand new.” Fair enough. I can be a tad bit delinquent with my tool returns.

James sent over the saw, we took one look at it, and were pretty darn happy to have Toolman James as a friend. He sent us over the brand spankin new Milwaukee M18 Fuel 7 1/4″ cordless circular saw. Holy cow. Now this is a saw. Where our 6 1/2″  saw maxed out at a 1 1/2″ cut depth, the Milwaukee cuts through 2 1/2″. This is exactly what we needed.

Milwaukee M18 Fuel 7 1/4" Cordless Circular Saw
Milwaukee M18 Fuel 7 1/4″ Cordless Circular Saw

With saw in hand, we headed out to the workshop to do some test cuts. Cordless saws can often have a tough time of cutting thick lumber. They can burn and bind, and generally not have enough power. Our first cut was to put it to the test. We grabbed a scrap 2×12, drew a square line, and El Granto handheld the cut.

Milwaukee M18 Fuel 7 1/4" Cordless Circular Saw
Making a test cut

The saw had no problems with the 2×12. It cut through it like butter. No sticking or burning, and the best part; little to no tear out (even with the 24 tooth framing blade). The cut was spectacular. I was also impressed with El Granto’s cut. For handheld it was immaculate. When I commented on his prowess, he deferred credit to the saw saying it was smooth, didn’t kick back, fight him or try to drift. The saw was also incredibly quiet for such a big & powerful saw. It also has a handy LED to light up your cut area and a hook on top so you can hang the saw while not in use which is very handy for a large saw like this.

Impressed, we got ready for our big cuts. We set up a fence, raised the blade height so it would cut through our lumber, but the motor wouldn’t get in the way of our fence, and made the first of two cuts.

Milwaukee M18 Fuel 7 1/4" Cordless Circular Saw
Making the cut

Holy crap. The cut was perfect. Absolutely perfect. Even on the 30″ span, the brushless motor didn’t run out of power in the least. The cut was clean with no tear out, burning or blade wobble. The thin kerf blade didn’t produce a ton of sawdust, and the extended capacity M18 battery didn’t even register a drop on charge. It is hands down the most powerful circular saw I’ve ever used, and that’s corded or cordless. It has a heavy duty ridged metal base, a 50 degree miter swivel, and adjustable blade depth.

Milwaukee M18 Fuel 7 1/4" Cordless Circular Saw
Now that is a deep blade. Our lumber is 1 3/4″ thick, and the blade can cut even thicker, all the way up to 2 1/2″

A second hand hold makes it comfortable for two handed use, yet the saw is operable one handed. It’s powerful yet not heavy and unwieldy. I think the saw is perfect for job site use, yet still accessible to the amateur woodworker. Overall, I give the saw 4 1/2 hammers out of five.

five out of five
Milwaukee M18 Fuel 7 1/4" Cordless Circular Saw
Overall, an absolutely great saw.

Now, I need to think up some creative excuses for when Toolman James asks when I’m giving back his saw. “The dog ate it” really is not applicable in this situation.


10 Awesome Handmade Gifts

Holy cow, December is upon us, and I am slacking in the Holiday department. I better get off my tush and start making my handmade gifts for this year. If I am this far behind in my holiday gifting, I thought you may need a hand. I have rounded up a few of my favorite DIY gift projects that we have made in the last few years. Happy crafting!

Kristen’s Awesome List of Handmade Gifts


Maple and Oak Cutting Boards

Maple & Oak DIY Cutting Boards

These boards are a fab gift for the foodie or the entertainer. You can make them a traditional shape, or simple & modern. This gift also goes beyond the holidays, and is great for a house warming. Check out the how to here.


Cutting Board Oil/Wax

Cutting Board Oil and Wax

While you’re making your cutting board, make up a batch of Cutting Board Oil/Wax and a pretty tag, and give it along with the cutting board. This oil/wax is the perfect wood conditioner for all your wooden items. From Grandmas vintage salad bowl, to your every day wooden spoons. See the how to here.


House Shaped Candle Holder

House Shaped Candle Holder

This makes for a perfect housewarming or hostess gift. Its a small gift that you can give in addition to a bottle of wine, or just a little something for a teacher or coworker. Check out the how to here.


Beer Can Carrier & Custom Pint Glasses

beercarrierWEB

This is the gift for the beer lover in your life. You know you have one. Pair it with their fave beer, or better yet some new microbrews. Check out the how to here.


Wood & Nail Bottle Opener

DIY Wood and Nail Bottle Opener

This is another good man gift. Its also a small enough that it can slip easily in a stocking, or pairs well with a six pack at a holiday party. Check out the how to here.


Chevron Cheese Board

Chevron Cheese Board

Another awesome board, but this time just for cheese. This chevron cheese board is perfect for setting up a cheese tray. You can arrange one or multiple boards along the center of a table and let your inner foodie out. This is the perfect gift for the entertainer in your life. Pair with a nice cheese knife, and a bottle of wine, and expect to be invited over for the next party. View the how to here.


Custom Door Mat

Custom Door Mat

A custom door mat is a great for the newlyweds, or a first time homeowner.  Heck, its even a great gift for the in-laws. For a classic look, use a monogram, or for the hipster in your life consider a cheeky saying. Check out the tutorial here.


Custom Mailbox

Custom Mailbox

A custom mailbox is another great home owner gift. You can personalize it with their address, or their family name. See the how to here.


Wooden Bath Table

DIY Bath Table

This is a gift perfect for the overworked, stressed out people in your life. Bathtime (when you’re over the age of 8) is a time for relaxation, and a moment of peace and quiet. Pair the bath table with some swanky bath products or a fluffy robe and a bottle of time, and the Moms, sisters, or athletes in your life will love you forever. Bonus points if you offer to take the kids/dog/whining husband out of the house so they can really enjoy their bath. Check out the super simple instructions here.


Concrete Clock

DIY Concrete Clock

Last but not least is the awesome concrete clock project we showed you earlier this week. It would be a great gift for your secret santa, your city dwelling brother, or surprise your spouse with it for their office. See the full tutorial here.


I hope these ideas help you out with your handmade gift ideas! Happy gifting!

10 Awesome Handmade Gifts


DIY Concrete Clock

I’m so excited to share today’s project! It’s something I’ve wanted to make for over a year. When I first started talking to Jeremy at Buddy Rhodes about making our concrete counters, he told me to take a look at his portfolio of work. He wanted me to be inspired by the awesome stuff you could do with artisan concrete, and to brag a bit about how awesome he is.

One of the first projects of his that caught my eye was a series of concrete clocks. I sent him an email saying something along the lines of “omggggg I need to make a clock!” said in over excited girl squeal. He kept saying clocks were easy, and after we pour our kitchen including a badass one piece waterfall countertop, I will be able to make a clock in my sleep. But clocks seemed like such a big project. So much so that I never tried to make one. Then a few buckets of Buddy Rhodes 10lb artisan mix showed up at my door a few weeks ago, with a few curse words gentle push from Jeremy to get off my butt and make something. So I made this:


DIY Concrete Clock

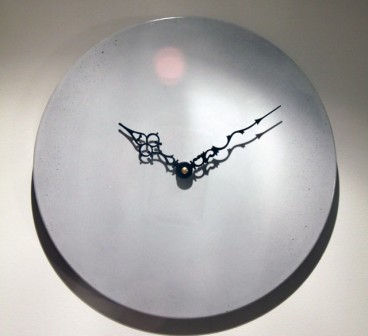
DIY concrete clock! It was so easy. Really truly so easy. Here’s how I did it:

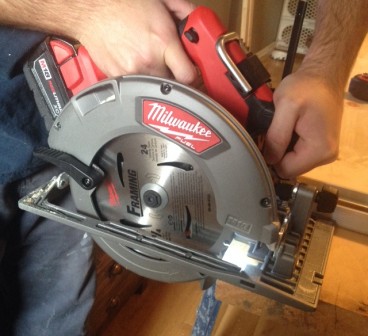
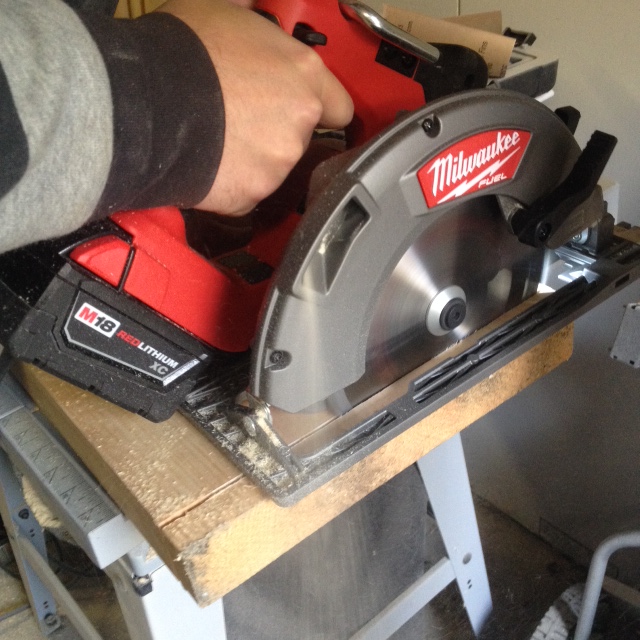
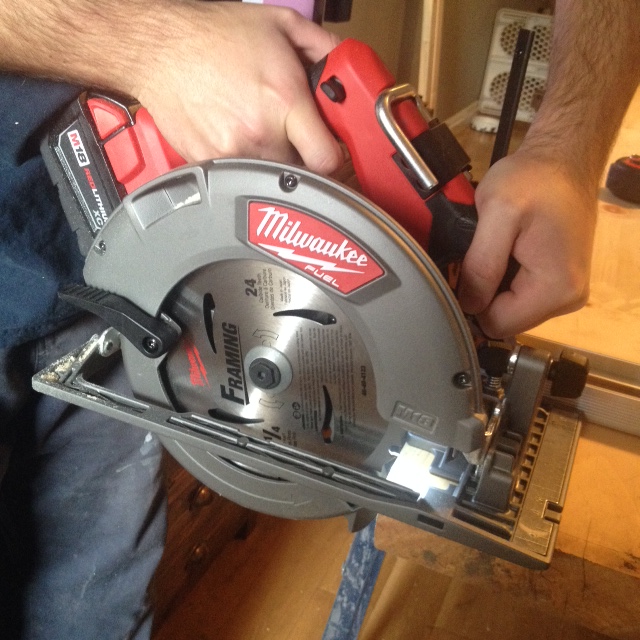
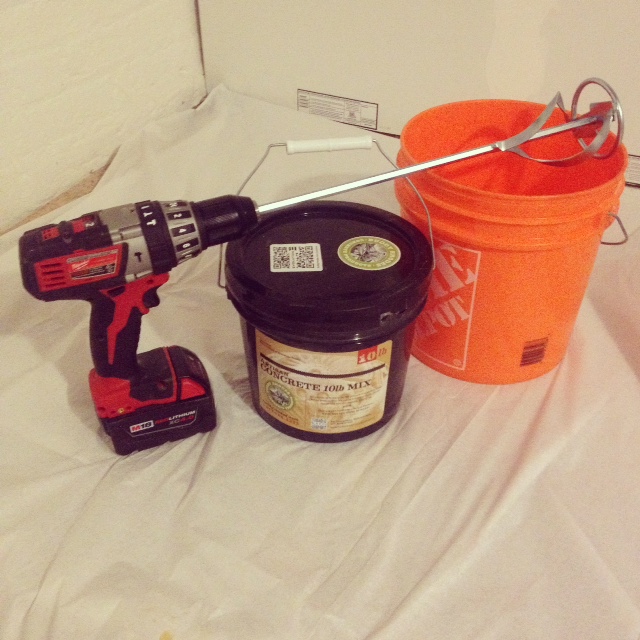
Milwaukee M18 Hammer Drill  + Mixing Paddle + Small Bucket + 10lbs Buddy Rhodes Artisan Mix


photo 3(3)

I sourced a mold in a shape I liked. I went with a $1 Christmas Snowman cookie tray from the dollar store.

photo 1(3)

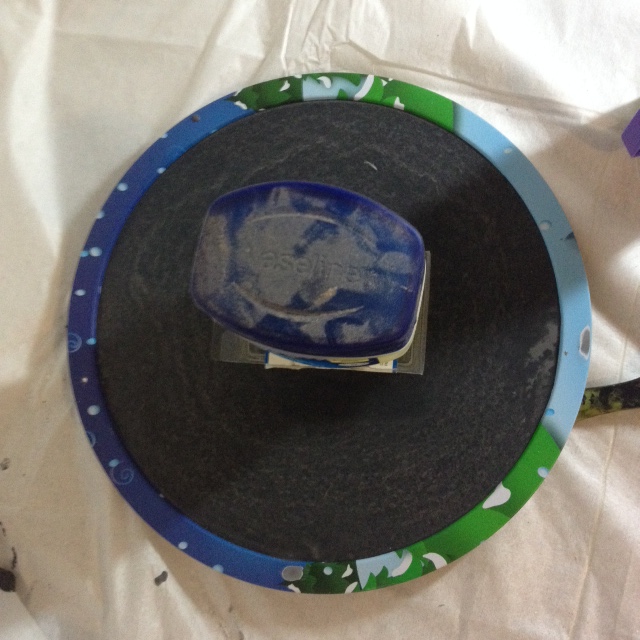
The only other item I used for my mold was an empty plastic screw container. It was the perfect size for a inset in the back of the clock for my clock works. Note, you don’t even have to do this, your clock works can totally stick off the back of your clock.

photo 2(2)

I mixed up a small batch of the BR mix, with a teaspoon of coal coloring & a dash of water reducer. This is also optional. The water reducer will let me put less water in the mix, but still get a nice workable mix. I used coloring to get a grey color, but the BR mix is bone white, and If you don’t want to tint it, you don’t have to. The mix has no large aggregate (gravel) so it can be made into tiny or thin molds without issue. I mixed up my concrete with a paint mixing paddle from the hardware store. My Milwaukee Hammer Drill made quick and easy work of mixing.

photo 3(1)

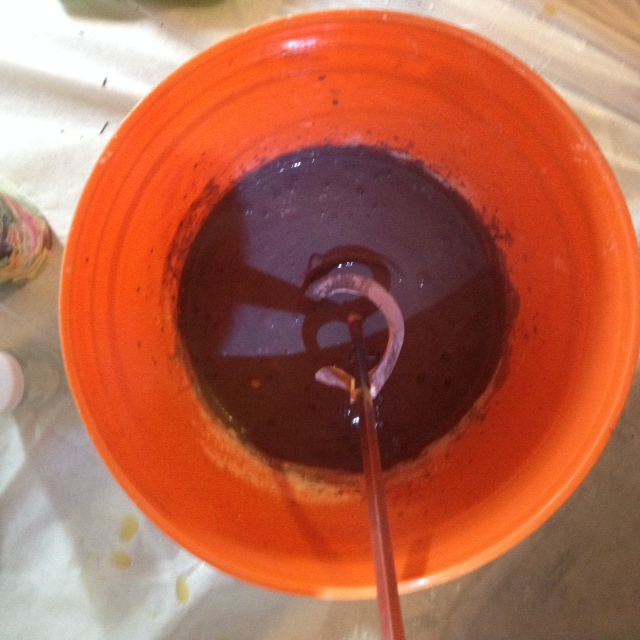
Once it was to the viscosity of a milkshake, I poured it into my mold. I filled it 3/4 full. I inset in the screw container, and weighed it down with a jar of Vaseline (Vaseline can be used as a mold release, so I had it on hand. I’m not a creepy weirdo who keeps Vaseline in their basement workshop for no good reason).

photo 5(3)

I gave it a shake to level everything out, and a bit if vibration from a palm sander. I covered with plastic sheeting, and left to cure in our nice warm basement.

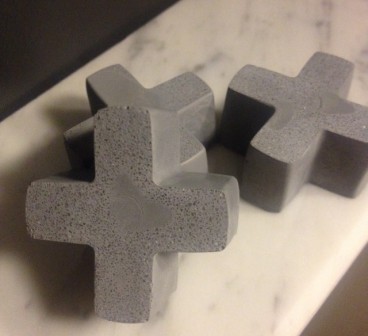
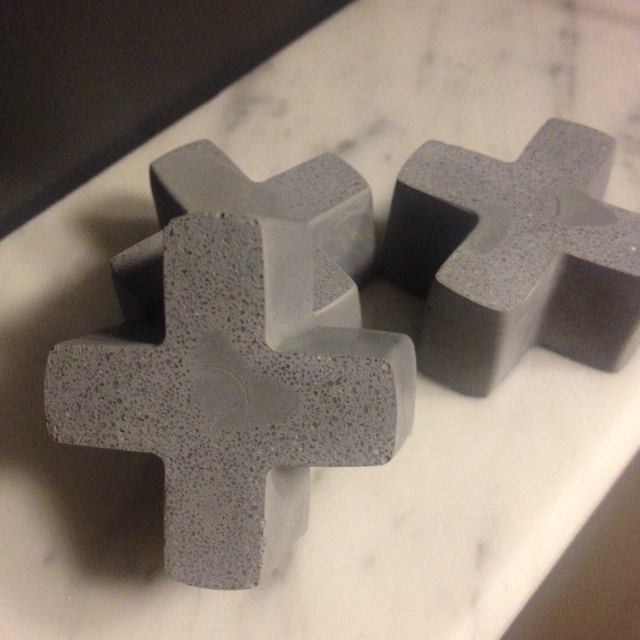
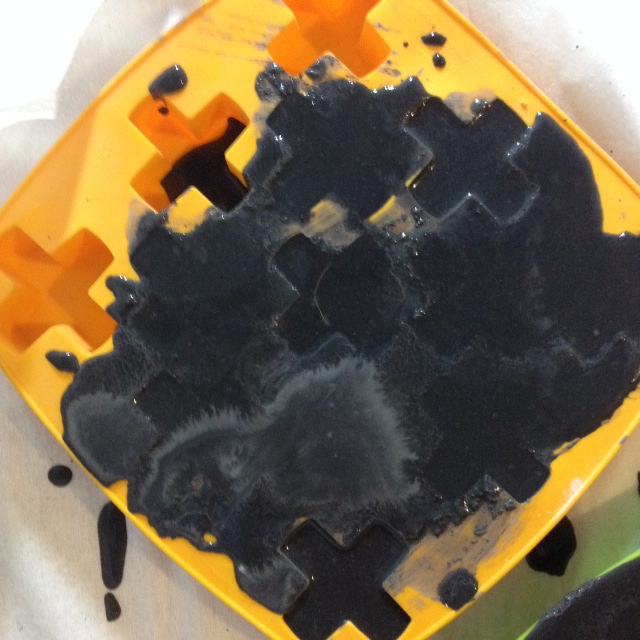
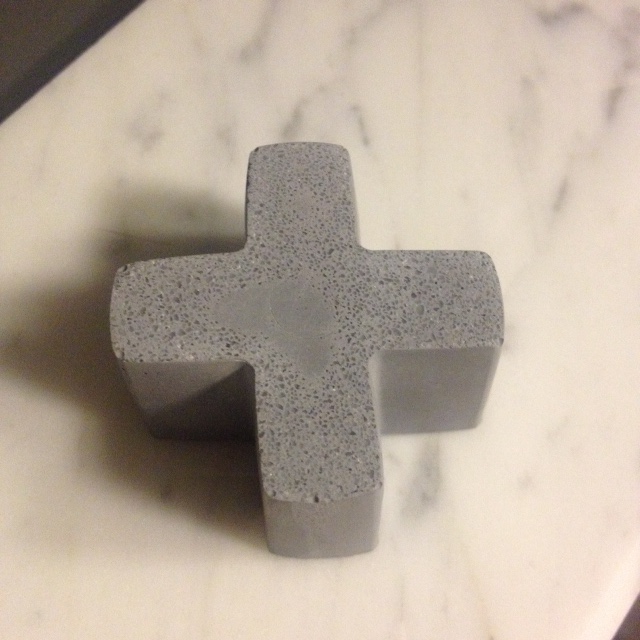
I had a bit of extra mix left over, and I also had some simple silicone molds nearby, so I poured the excess in to them. (I will show you how they turned out next week.)

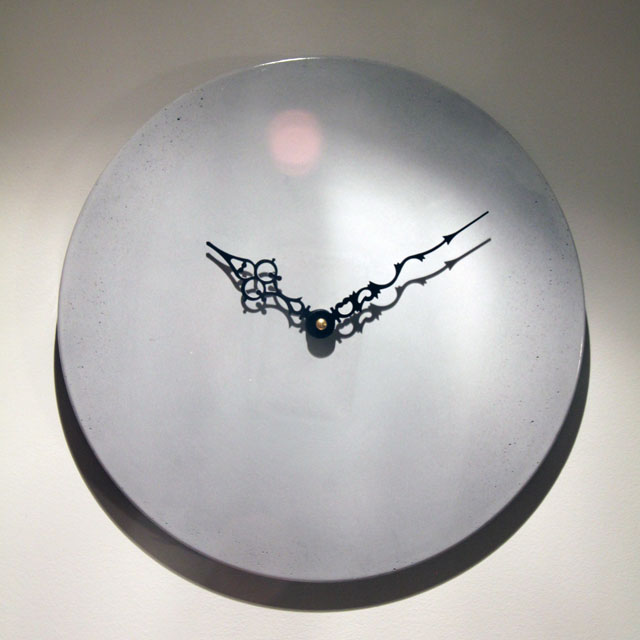
The next day I unmolded it by very carefully flexing the tray until it popped out. This is what it looked like after unmolding.

concrete clock demolded

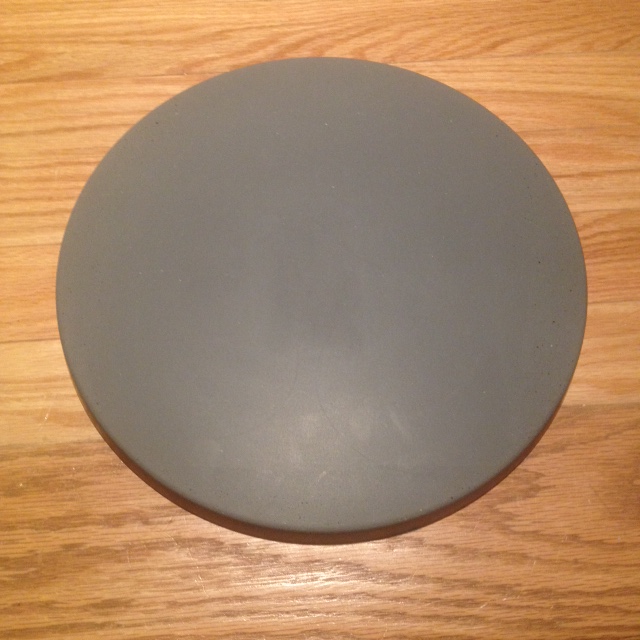
It was almost perfect, except you could just slightly see the outline of the snowman design. To remedy this I lightly wet sanded with 400 grit diamond hand sander. In hindsight, I would have not sanded. The finish was even more perfect before sanding, and I don’t think you would have seen the snowman after a quick buff. Where I did need to sand however was the back of the clock. I evened things out and took off any roughness around the edges.

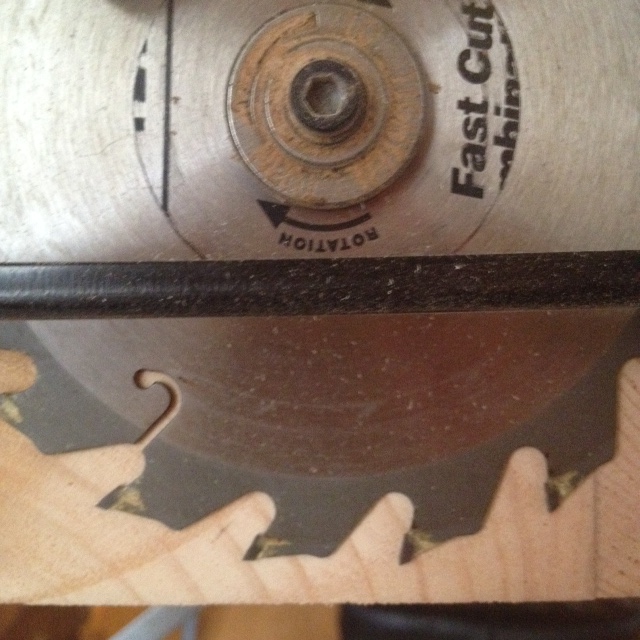
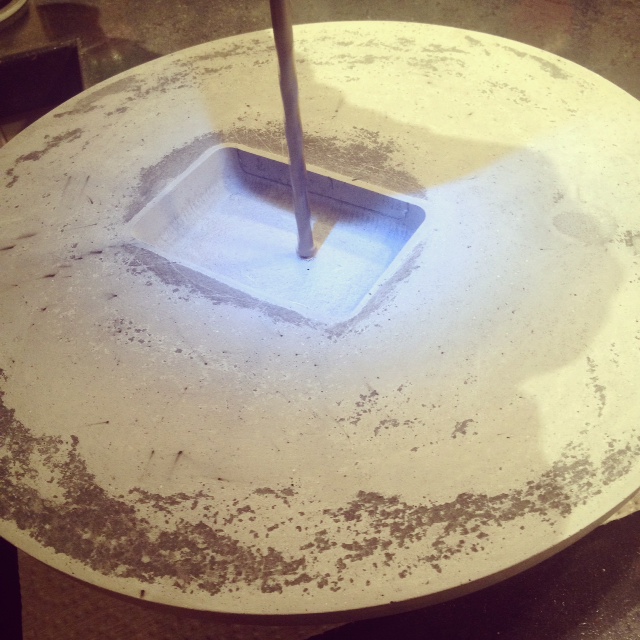
Next we drilled out a hole for the clock works. Note, each brand requires a different size. We used one from Lee Valley, and it required a 5/16 hole. We purchased a masonry bit, marked the center of the clock and got drilling.

Drilling hole in concrete for clock works

I applied four coats of Buddy Rhodes satin sealer with a lint free cloth. After the sealer dried, the clock & hands were quickly installed with the provided hardware (read the directions for your brand). My clock works came with a hanging attachment, which wrapped around the clock works. It saved me figuring a way to attach a hanger to a piece of concrete. I opted to not apply any hour indicators to keep it more modern, but adhesive ones are sold in the clockmaking isle at your local craft store. For my next clock I think I may just put one number on. Perhaps a three? You can also make your own with adhesive vinyl. If you’ve got a craft cutter, you can easily make anything you’d like. Heck, even make an Alice in Wonderland clock with wonky numbers. (Storing that idea for LATER!)

The clock has a nice polished concrete surface, in fact, it’s so polished its hard to photograph. I have tried the clock in a few places in the house. Here is is against the black wall of our powder room. I love the contrast.

Completed DIY Concrete Clock
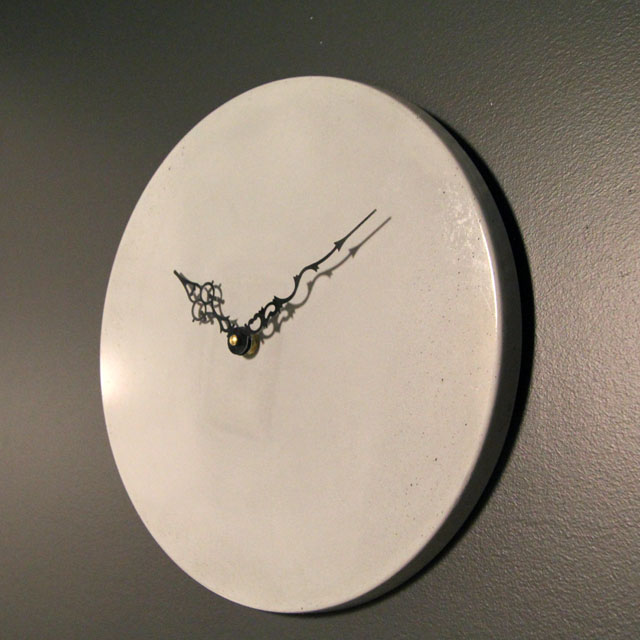
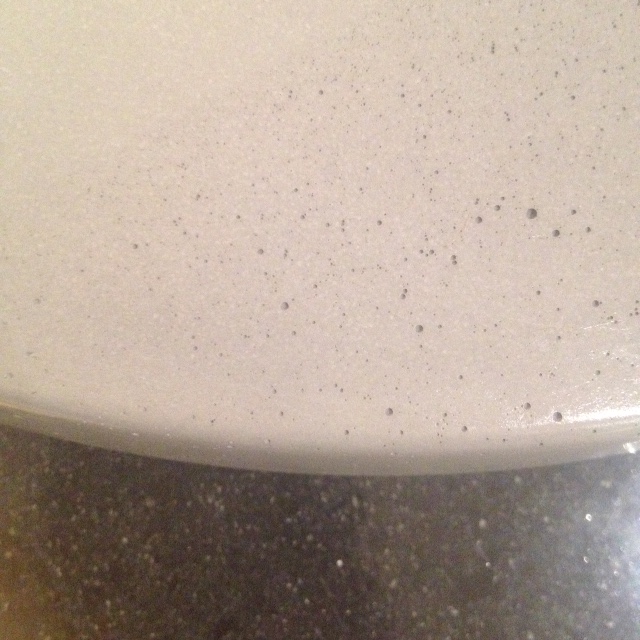
The concrete surface is nice and uniform with a few tiny bubble holes where I could have given it a bit more vibration. Honestly, if it was any more perfect it would look like plastic, so I don’t mind the imperfections much.

detail shot of concrete clock

Overall I’m very happy with the results, and am itching to make concrete clocks for everyone for the holidays.

DIY Concrete Clock

SOURCE INFO:

Materials:
Clock Works $5.40 – Lee Valley
Clock Hands $1.95 – Lee Valley
10lb bucket Buddy Rhodes Artisan Concrete Mix – $18.95 (one bucket would easily make 3-4 clocks)
Buddy Rhodes Water Reducer – $25 (optional)
Buddy Rhodes Coal Coloring – $9.85 (optional)
Buddy Rhodes Satin Sealer – $45 (optional – this will last you for a ton of projects, we did our countertops and still have a bunch left over)

Tools:
Milwaukee M18 Hammer Drill
Bucket
Paint mixing paddle – Paint isle at the hardware store
Buddy Rhodes diamond hand sanding pads
Trowel for scraping bucket
Dust mask (wear during mixing)
Rubber Gloves (concrete dries out your hands)
Plastic drop cloth
Masonry drill bit (the size recommended for your clock works)

Difficulty Level (on a scale of 1-5):

two out of five


Total Cost: $25

Disclosure: Buddy Rhodes sent me a sample of their new mix, with no obligation or compensation for me to post about it.