For those who follow me on Pinterest, you may have noticed a lot of front hall coat storage solutions being pinned to my “Organization” board lately.
Our front entryway is well…a mess. Our front door opens to a square tiled area with no closet and a blank wall. No place to put your keys, coat, shoes or, well… anything.
Slowly we have introduced a few good things to the front entryway. A Ikea Pax wardrobe for storage, a handcrafted bench from a local artisan and a giant mirror that came with our last apartment. The black sheep of the entryway however is an ugly, broken $15 Ikea RIGG coat rack that we’ve had since college.
Ikea RIGG Coat Rack
In fact, I believe its been broken since college. Held together by duct tape and zip ties (really!) The thing fell down every time you put a winter coat on it, and generally looked like a giant blob of coats taking up a massive amount of space in our entryway. We wanted to change it for a long time…we just never actually did.
So finally we got off our butts and decided to make a wall mounted coat rack to streamline the entryway some. Our lovely reclaimed wood bench was our inspiration. We wanted something that looked like it belonged with our bench. Like a brother from another mother. We picked up a piece of 1x12x10 rough pine (also used in the bath table DIY) from Home Depot. We measured our space, and decided for a 12×33″ wide rack with a 4×36″ mini shelf on top (to hold some art etc.)
Cutting the boards to size
We cut down the pieces of wood, sanded the roughest bits out and got to distressing.
Sanding
We hammered, nailed, sawed, chiseled, and generally beat the crap out of our wood. My favourite part is some rusty nails (that I salvaged from my pallets) that we bashed into the wood, leaving nail heads and in one case the whole nail showing. It really does make it look like its been around 100 years.
Distressed Wood
As we wanted to match the bench, I headed out to pick up the darkest brown stain I could find. I came back with Varathane “Chocolate” and put on a coat. It looked great at first, but as it dried, it was still too light. So I put on a second coat of stain, then followed it up with a coat of Minwax Water Based Oil-Modified Polyurethane.
After 2 coats of Chocolate stain
After it dried, I sanded lightly with a fine sandpaper, then gave it a second coat. Once it was completely dry we attached some nice cast iron coat hooks, and attached it to the wall (into the studs) with some nice 2 1/2″ long black screws.
So here is the before and after:
Before: Coat MonsterAfter: YAY!
SOURCE LIST:
Materials:
1×12 wood: Home Depot
Varathane Chocolate Stain: Home Depot
Minwax Water Based Oil-Modified Polyurethane: Home Hardware
Cast Iron Coat Hooks: Home Depot
I loooove baths. Like unhealthy obsession love. Like you may have to call Intervention love. If we had money and space in our backyard I would have a hot tub for sure. A bath is like a hot relaxing hug. When I have had a shitty day, all I ever want to do is take a glass of wine and a book to the bath. When I have baths I drag all sorts of things into the tub with me. My Kobo (e-book reader), beverage, glasses, candles etc. Thats a lot of stuff. About 10 minutes into the bath I start to get all sweaty (cause I have the bath set to boil) and I am always afraid I am going to drop my Kobo in the bath. So about 6 months ago when I pinned this lovely pin to my Pinterest.
I love the whole bathroom, but especially the live edge board acting as a table on the tub. I normally hate bath accessories. I don’t need a wire basket to hold my loofah. I need a wine glass cup holder, and manufacturers don’t seem to be making those… So finally after much procrastination I set out to make myself one.
I loved the thought of using reclaimed wood, or a nice live edge slab like the above photo, but alas I couldn’t source anything easily/locally. So instead I purchased a rough 12″ wide 1″ thick pine board from Home Depot. The rough boards are a good deal. We got a 10′ long one for about $10. We had the guys at HD cut it down to 2 five foot lengths for us, so it would fit in the car. I came home, measured up the width of my bath tub, and cut a board to length. We distressed it a bit, and I took the sander to it smoothing it a bit, but still leaving it fairly rough.
We live in a 100 year old home, and we have plastic heat registers. Hey, I am no historian, but I feel pretty confident in saying that that they aren’t original… Not only are they plastic, but they are different colours and patterns. We’ve got white slatted ones, plastic stainless steel look swirly ones, brown ones that are trying to blend in with the hardwood (but clearly don’t) and we have one pretty black metal one.
Fed up with our ghetto registers, I looked into replacing the whole house with reproduction Edwardian ones. As El Granto and I wanted to keep eating for the next year, that was not an option…
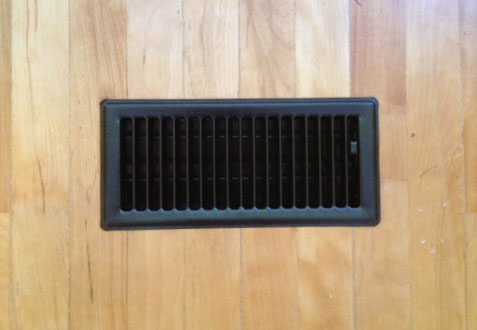
We were left with two viable options, live with them or paint em. Of course, I choose to paint. We headed to the hardware store and picked up some Rustoleum Universal All Surface in Oil Rubbed Bronze. Have you painted with this spray paint? It’s freakin awesome. You can spray any direction, on any surface (even plastic!), with no prep other than making sure the surface is clean. The cleaning is the most time consuming part. When our house was reno’d most outside walls and all the ceilings were torn down and re-drywalled. If any of you have ever drywalled anything you will know that drywall dust is the son of Satan. That shit gets everywhere. When we moved back into the house we spent two weeks cleaning up drywall dust and I still find it in strange hard to reach places (tops of kitchen cabinets, under bathroom vanity, caked onto light fixtures). Drywall dust really is my nemesis.
The heat registers were hiding a dark secret; a plethora of drywall dust stuck in all their nooks and crannies. I painstaking cleaned out every groove with my pinky fingers and a damp rag. After that was done and I had a few recuperating drinks, I headed out to the alleyway behind our house and gave 2-3 thin coats of the oil rubbed bronze spray paint. I let it dry overnight and the difference is incredible! They all match…and don’t look like cheap plastic! A $9 can of spray paint gave new life to 7 regular heat register covers and 4 cold air returns. Got mis-matched registers? Paint em!
Oh, and a bit of advice. I googled painting heat registers before starting out and someone suggested removing the flappy thingies. That is a shitty idea. They do NOT come out easily, and they all fall apart, and you have to bend things and it sucks. So don’t worry about it, just open them slightly and make sure you paint them good. I think my mantra should be “if it sucks, don’t do it”. There, words to live by. Now go paint your ugly heat registers.
Before (UGLY)After (PRETTY)Before – Ugly Mis-Matched RegistersAfter – All the same colour!
SOURCE LIST:
Materials:
RustOleum Universal in Oil Rubbed Bronze: Home Depot
A long long time ago, when El Granto & I moved in together, El Granto was still in school, I had just graduated and was working my first big kid job. We had no money, ate copious amounts of pasta and potatoes, and spent what was left on (cheap) beer.
Needless to say our furniture consisted of things we’d stolen from our parent’s houses. We did manage to purchase a few new things; some drapes, a few Ikea Lack side tables, and a Ikea Goliat drawer unit that we used as a night stand/little dresser in our bedroom.
Ikea Goliat
That unit later graduated to living in our office when we purchased real bedside tables, and has now lived through 8 years of our abuse. It holds all the strange things one accumulates. Also known as the junk drawer. It houses batteries, calculators, phone & camera chargers, memory cards, travel voltage adapters, a screw driver, camera batteries, luggage tags, a sling shot etc. “Important” stuff don’t you know where else to put.
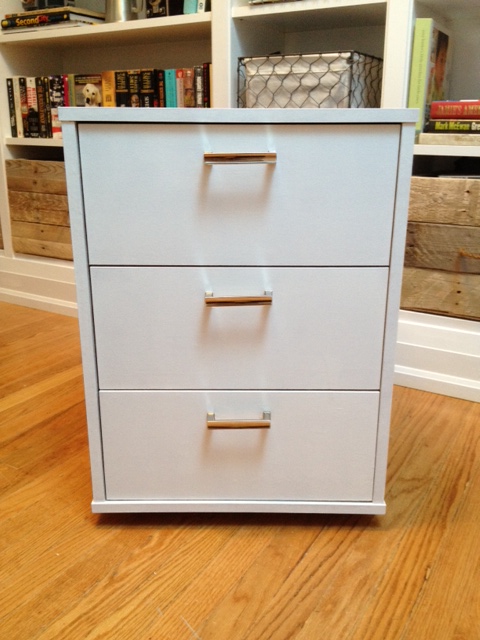
When faced with the office reno, we wanted to keep our useful friend Goliat, but he needed some cosmetic help. His laminate “birch effect” finish looked like plastic, and the handles were not even trying to disguise the fact that they were plastic. He needed help! So we carried him out to the garage, took off the handles, scuffed him up with some sandpaper, and gave him a coat of Zinnsser B-I-N primer. In hindsight I should have given it two coats, it would have probably eliminated one of my coats of paint later.
Goliat Drawer Unit with One Coat of Primer
After priming I gave it a quick sand, and added 3 coats of white gloss interior/exterior paint. We let it dry, and added three new Martha Stewart 3 in. Channel Cabinet Hardware pulls from the Home Depot.
The hardware was a bit of a pain to be honest. I sourced from their website. The handle I chose said “in store only” so I walked the 3km to Home Depot to find the crappiest selection of in stock hardware ever! I was astonished at how dated and bad it was. After spending 20 minutes to finally track down the kitchen designer, I found my hardware on a sample board in a drawer. The Martha Stewart hardware was all spectacular and well priced, but SPECIAL ORDER! UGH. I hate the words special order. It means waiting, delays, incorrect shipments and anger. I had fallen in love with the handles, so I sucked it up and ordered.
I ordered on a Monday, and the kitchen designer said it should be in store in about a week. They arrived in store the following Monday (yay!) I brought them home and realized I had measured incorrectly. BLARG. Stupid Kristen. They’re too big. They’re not even the right size for other projects around the house that need new handles.
So… I had two options. Return them and order some new ones, or fill the holes in the drawer unit, touch up paint, and re-drill them. The problem with ordering new ones, is that the smallest any of the pretty Martha Stewart ones came in was 3″ and the Ikea drawer unit was SMALLER than that. Leave it to Ikea to not use standard sizes!
So I filled the holes… (AFTER I HAD ALREADY PAINTED IT) and then PAINTED IT AGAIN. Do my capitals express some of my angst?
Wood Filling HolesDrawer Pull Holes Filled and Painted
I then marked and drilled new holes for the new hardware, and FINALLY it was done!
Finally Finished!Handle Close-Up
SOURCE LIST:
Materials:
Previously owned Ikea Goliat Drawer Unit
Zinnser B.I.N. Primer (spray can): Canadian Tire
Behr Premium Plus Interior/Exterior Glossy paint in Bright White: Home Depot
Frog Tape: Canadian Tire
Martha Stewart 3 inch Channel Pulls: Home Depot
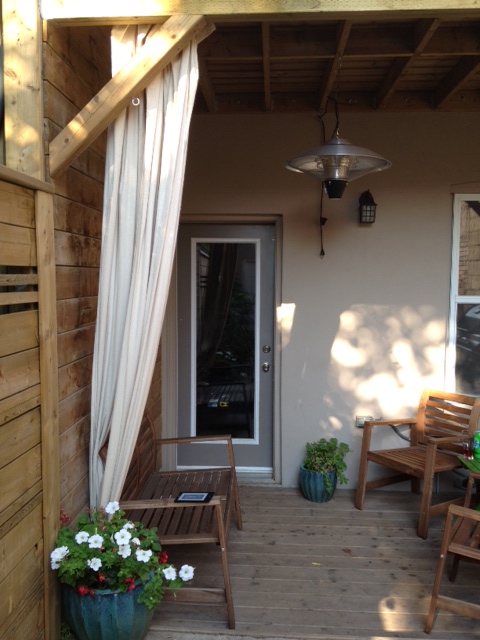
At about 3pm, the sun reaches our back deck in full force. If you happen to be sitting out there at that time, it goes from being a dappled shady retreat to a scorching desert. After getting sick of doing the deck chair shuffle until the sun entirely pushes us inside, we decided to buy some outdoor drapes.
Then we realized outdoor drapes are EXPENSIVE! They are really pricy! Especially for 12 foot long ones that I needed for our deck. I waffled over how to make it happen for weeks at a time, and then threw in the towel. We were not getting outdoor drapes.
Then inspiration struck, I could make some! But UGH, that requires a lot of fabric… and any fabric that is nice and heavy and blocks the light…is also expensive. I wasn’t even considering using outdoor fabric.
Then it struck me. Drop cloths! People use those things for everything! I could definitely make outdoor curtains with them. So we headed to Home Depot to buy some 12′ long drop cloth panels, and to find some inspiration on how to hang them. Our deck is 12′ wide. Can we use curtain rods? Nope, couldn’t find any that big. Wooden dowels? Still not available that long. Gas line pipe? ALMOST! But it was 10′ long and heavy, so it would consist of using two pipes and probably having to have a bracket in the middle to hold the weight…Then El Granto had a brilliant idea. Aircraft cable! BINGO! The drop cloths were light, and the aircraft cable could be tensioned into our deck with a turnbuckle. It would be perfect! We picked up a 50′ aircraft cable kit, two turnbuckles, two 4×12′ drop cloths, some large cup hooks, and some tarp grommets.
Back at home, El Granto got up on the ladder and secured the cup hooks to the deck, and attached one end of the cable system. We measured out where we wanted the grommets to go on the drape panels (Odin really wanted to help)
Odin thinks the curtains are his new bed
Through some trial and error (who doesn’t put instructions on a grommet kit!?) We finally found the best way to put in the grommets. It involved a vice, some rags, a hammer, and a few swear words. (sorry there are no photos, I was too busy using profanities to take any.) After the grommets were in I measured the drapes to hem them and went inside to get out the sewing machine. I managed to find my sewing machine easily enough, but do you think I could find the box with all the thread and notions?! Not a hope. So I grabbed some hemming tape, and ironed the hems in the drapes. I figured if they fell out, I would go buy some thread and sew them back up. Once they were hemmed, we threaded the grommets of the drape panels onto the aircraft cable, attached the cable to the other side and tensioned it with the turnbuckle.
Curtain threaded through the Aircraft CableCup Hook, Turnbuckle & Aircraft Cable
YAY! SHADE! WOOT!
Just one small problem…the space of the cup hook, aircraft cable clamps and turnbuckle means that the drape does not stretch all the way to the side of the deck. One day when we have a bit more patience, we will remove the turnbuckle on the North end of the deck, where the most sun comes in (you really only need one turnbuckle) and it will work and look much nicer.
But enough of my bitching, here are the pics!
Before!
Backyard Before (note this is from when we bought the house, so a few things have changed other than just the curtains)
After!
Curtains in ActionCurtains Drawn to one Side
*To answer a few of the questions you may be thinking of:
Will we leave them out in the winter? We will take them in during the winter, and put them through the wash if necessary
How have they held up so far? Amazing. Water doesn’t seam to soak into them when it rains, they never stay wet or damp, and show no signs of mold or any other nasties yet.
Would we change anything? Only adding a tie back/hook for when they are not in use, otherwise its perfect!
Added Bonus: We have had a sweltering summer, and we have been using the curtains to block some of the sun from hitting the back of the house, and to shade the a/c unit. It has worked wonders.
SOURCE LIST:
Materials:
2x 4×12 Drop Cloths: Home Depot (we only used 2 panels, but could have fit 3 or 4, if your deck gets full sun more panels may be required)
50′ Aircraft Cable Kit: Home Depot
Tarp Grommets: Rona
2 Large Cup Hooks: Home Depot
2 Turnbuckles: Home Depot
Iron-On Hemming Tape: Fabricland
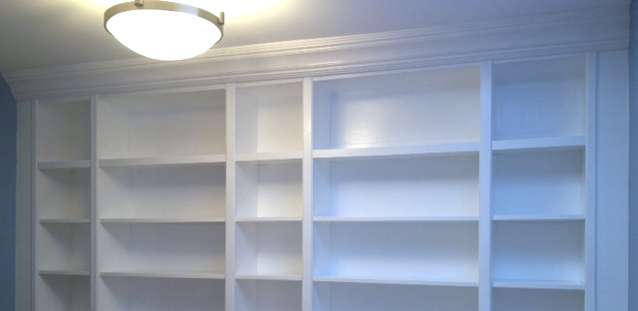
Our house is a three bedroom, two large bedrooms and one smaller. The smaller is of course the best choice for either an office or nursery. We wanted to plan for an office now, and if we ever needed it down the road, an easy transition to a nursery. Continue reading “From Billy to Built-Ins”
If you have been being a good boy or girl, you will have read my Project Office post and you will know I have a lot to do! One of the items on the To Do list was crates for built in bookshelves. Bookscase DIY tutorial will come soon (I promise) but until then here is a sneak peak on how we made the crates to go ON the bookcase.
I was planning on sourcing some framing grade lumber and roughing it up a bit to get a worn look for my crates. Odin & I happened to be walking through an industrial area in our neighbourhood on Friday when we spied a pile of shipping pallets on the side of the road.
Stack of Pallets
I thought to myself, “self, there some rough wood, and its CHEAP rough wood”. You see, cheap is one of my favorite words. I like it so much that people often use it to describe me. So Saturday morning Odin and I took off to steal grab ourselves one of these pallets. I picked one that looked good, didn’t appear to have hobo pee or bugs on it, so I carried it home. By carried it home, I mean I walked 100 feet, rested, walked 100 more feet and had another rest all the way home. It was also a Saturday morning, and I had to walk past a hipster brunch spot in the neighbourhood looking like a crazy person. The dog happily trotted behind me wondering what on earth I was up to.
Stopping to take a break and admiring my “found” pallet
After lugging this darn thing home, swearing a few times, wishing I owned a car, and wondering what I was so damn crazy, I finally got down to work. I thought bringing it home was hard, I hadn’t yet met hard. Hard is not owning a crow bar, and trying to take out massive nails with a hammer and Mjölnir to pry and bash them apart.
Taking Apart Pallet While Trying not to Hit My Foot with a Hammer
Break time yet? GAH! This is hard work. You are probably asking right now, where on earth is El Granto? He was having a lovely day learning to drive NASCAR’s with his Dad and Brother. At about this point in time I was cursing him in every language that I know a curse word in. These include, English, French, Spanish and German. My mother would be disappointed that I don’t know any Danish curse words. The worst thing I know is how to say underwear in Danish. This was a hit when I was six…
So… I finally managed to pry apart some boards, and then bashed out the nails.
Striped Apart Pallet
As you can see the wood before sanding is…well kinda gross. It will get better, I promise. Now I put some super rough sandpaper in my palm sander, and set to work.
Getting Ready to Sand
Once I sanded everything, using the dimensions of my bookshelves, I decided on a size for the crates. I wanted them to fit in the bookcase nicely, but have a little room to slide in and out. I drew up a quick diagram on a piece of wood, and started cutting! The finished size for the crates are 29″x10″x11″ and 13″x10″x11″. I cut my front pieces 29″ long for the big ones and 13″ for the small. The sides were 8 1/4″ and each crate was 3 boards high. I cut the boards to length on the miter saw, and used scrap pieces of 1×2’s as corner braces. I attached the front panels to the corner supports using brad nails. I spaced the corner supports 5/8″ in from the edge to allow space for the sides to fit flush.
One Front of Crate Assembled
I assembled both the fronts, then attached them to the sides with more brad nails. I then traced a bottom for the crate onto some extra hardboard we had laying around the garage. I cut out the hardboard with the circular saw, and nailed it to the bottom of the crate.
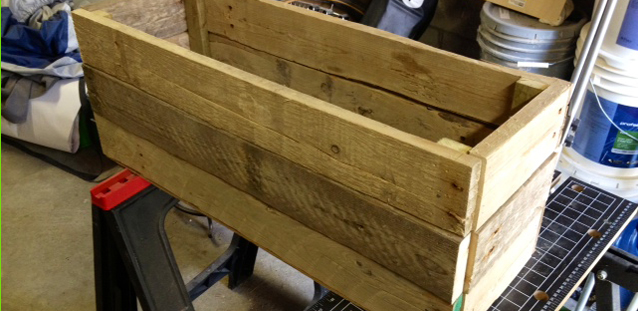
Voila! Crate!
The wood is all different thickness, and I didn’t worry about having everything match perfectly. It just adds to the distressed look. After I had assembled it, I took the palm sander to it again making sure there were no sharp corners or splinters. There, I was done! It only took me 3 hours to make one crate. Wait, what, I need four more of these? DAMMIT! I better get back to work. I sanded and cut the wood to length for one more crate, but I ran out of brad nails. Uck. So I waited for El Granto to get home from his NASCAR adventure and then headed to Canadian Tire to pick up more nails, and some felt furniture sliders for the bottoms of the crates. We also stopped and pilfered one more crate on our way home, which I made El Granto carry, and he cursed me in the same fashion that I had cursed him earlier. Once I got home, a soft couch and a cold drink sounded better than doing more work, so I gave up, and left it for Sunday.
Sunday morning, we got all ready to start work (this time with El Granto in tow). When we went outside our neighbours were putting up a big glass panel on their amazing deck, and asked for some muscle. El Granto went to help, and I got back to work making more crates. El Granto’s work conveniently consisted of standing holding a piece of glass for an hour, then being rewarded with a plethora of yummy beverages. Of course he preferred doing this to helping me make crates…so once again I was bustin my ass alone. El Granto did stop in to help me take apart the second pallet (it’s much easier to watch him then to do it myself.) I proceeded to make one more big crate, and three little ones.
Small Crate
The little ones are cute. Like a puppy version of a crate. I finally finished all five of my crates, and stood back to appreciate my giant stack-o-crates.
Stack-o-crates!
Some of the wood turned out really cool. The ones that look all spotted were really really rough boards, that I sanded and sanded and sanded and they came out all spotty! I also really like the boards with the rough saw marks. I thought I may have to distress the crates more, but I think they look fairly worn. They look like driftwood almost. I was on the fence with staining them, but we like them just the way they are, so we’ll leave them as is for now. They do need some hardware, I am waffling between shiny fancy nickle handles (that I am using elsewhere in the room) or sticking with rustic and using some rope, either as a handle, or making small monkey’s fists and using them as pulls. What do you think?
Sneak Peek of a Crate in the Office
So what do you think? Free crates, were they a pass or a fail?
UPDATE!
My idea to use pretty polished handles on my crate was overruled by El Granto, my Mom, our neighbours, my co-workers and the garbage man. So rope handles it is!
We checked Rona, and their rope was too big, Home Depot had even bigger rope and some smaller rope. We went with the small one. In hindsight, I wish it was a bit chunkier. Will be keeping an eye out for some bigger rope. Also, check out the completed bookcase here.
SOURCE LIST:
Materials:
Wood Shipping Pallets : side of the road
1×2’s: Pile-o-wood in my garage
1/8″ hardboard: My garage
Brad Nails: Canadian Tire
Sandpaper: Canadian Tire
Felt Furniture Pads: Canadian Tire
Rope: Home Depot
Before we got Odin we knew we needed a fence. There was a slightly dilapidated chain link fence between our house and our neighbors to the north (we have a 30′ brick wall to the South and a garage on the West end of our yard). We have an amazing relationship with our neighbors. They are a young family, who is currently renovating their entire house as well. We wanted a fence that would be functional, provide privacy but also allows us to socialize when we want to.
We put pen to paper, and designed a horizontal slat fence with 5″ boards and 2″ boards. We were going for a traditional meets modern design. We then set out to removing the old fence. We prepared shovels and tools, and mustered up the courage to start digging out deep concrete foundations. El Granto started pulling absentmindedly to one of the fence posts and the post easily started to come up, so he pulled more and more, and out came the post! All of the other posts came out just as easily, except one that was too close to our deck foundation, and must have got stuck in the deck’s concrete when it was poured.
Now it was time to build!
Fence Before
Our fence needed to be 26 feet long, and would be anchored on one end to our 2 story deck, and on the other end to our cinder block garage. We used 4×4 posts for our main supports. We used 10″ bolts to attach one 4×4 to the deck, and masonry screws to attach another to the garage. We then spaced out our two center posts equally so that all the fence panels would be the same size. This would involve loads more cutting, and more wasted wood, but visually it was much nicer.
As we were anchored at both the deck and the garage, we used post spikes for the two center posts. Now don’t you do shaking your finger at me… Yes, we could have dug post holes and filled with cement, but our ground is FULL of rocks, and the thought of digging those holes was, well…unplesent. So we looked into other options. We found the level-able post spikes, and after considering our fence (it was a small span, well anchored at either end, was sheltered by a 30′ wall on one side). It wouldn’t be subject to gale force winds, or pole vaulters, so it would be.just.fine. I will hear none of your “you took the easy way out”. OF COURSE we did. The hard way sucks.
Back to the task at hand. We set the fence spikes and El Granto got to hit things with Mjölnir (yes.. that is what we named for our great big hammer. If you’re ever at our house and need the use of a big hammer, you must ask for Mjölnir, anything else and you will be ignored. (No “Maul”, “Big Ass Hammer”, nothin.)
Grant Uses Mjölnir to Hammer in the Post Spikes
We set the posts, leveled them, and then got to putting on the boards. This would have been a time when two cordless drills would have been handy (hint hint Santa). We spaced the boards right tight up to each other knowing that they would gap some as the wood shrinks.
Kristen Screwing on Fence Boards
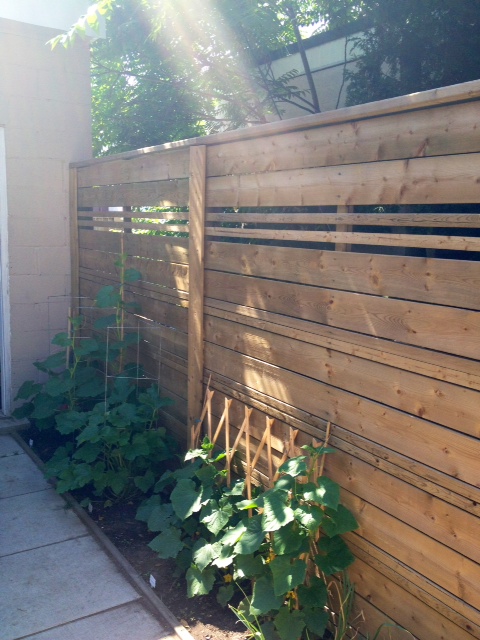
When we got up to eye level, our fence was starting to look like a wall, not a fence, so we spaced out a row of the smaller 2″ boards, so that we would have a space that we could see and converse with our neighbours. Once we finished one fence panel, we dropped a chalk line and cut off the overhanging boards with a circular saw.
El Granto Setting the Chalk Line and Cutting off the Excess BoardsGetting Ready to Cut
Once we finished fencing all the panels, we placed fence boards vertically where the two panels met to cover the cut marks. We screwed in the last board just as the sun was disappearing. Finishing the top of the fence would need to wait for more daylight and lumber. That was one hard days work, time for a drink!
The Last Board Went On as the Sunlight Went Down
The fence stayed ugly like this for a few weeks until my Mom & Dad came down to help us reinforce the deck (that’s another story for later). While they were helping us, we used the opportunity to borrow Dad’s truck, and head to the lumber store for some 2×6’s to make top rails for the deck.


")
")


")