Happy what? Yeah, I know it doesn’t make any sense to me either. Today is Holiday Monday of Civic Holiday weekend in Canada. No one really knows why it’s a holiday, and technically it’s not even a real holiday. (The Government of Canada doesn’t consider it a statutory holiday). Stores are open, but banks are closed. I just consider it a bonus day! Yay, no work! I will be enjoying it with some visiting friends, hanging out with the dog and enjoying a bbq in the backyard. Accomplishing AB-SO-LUT-ELY Nothing. What are you up to today?
Ahh…it’s Friday of the long weekend…time to relax. (well not yet, I still have to get through today’s workday unlike my slacker of a husband who took the day off today!) None the less…as soon as I get home today I am looking forward to a drink on the deck.
This summer with my vegetable garden in full swing, and cucumbers reproducing faster than the Duggar’s, my drink of choice has been:
El Granto’s Gin & CucumberCaesar
For all the American’s our there, a Caesar is the Canadian version of a Bloody Mary, but BETTER cause it’s made with Clamato juice. What is Clamato you ask? Well really it’s a tomato cocktail that contains some clam juice. Don’t you go making a yucky face at me, it’s delicious. You would have no idea that it has clam juice in it, it’s just wonderful. Kinda like how Caesar salad dressing has anchovies in it. Yeah and you love it, so don’t you worry about Clamato, it’s delicious.
Ingredients:
2 oz Gin
Ice
Mott’s Clamato Juice
Lime
Celery Salt
Horshradish
Hot Sauce
3-5 slices of cucumber, peeled Matt & Steve’s Extreme Beans (a spicy pickled green bean, you can find these at gourmet grocery stores or Costco)
Worcestershire Sauce
How to:
Run a wedge of lime around the rim of a pint glass, and then rim it with celery salt.
Place cucumber in bottom of glass, pour 2 oz of Gin over top and using some sort of implement (ideally a mojito muddler) bash up the cucumber into the Gin. Macerate it, and really get the cucumber flavour into the gin. Add a teaspoon or so of horseradish (less if you’re not a big horseradish fan.) A dash of hot sauce, and Worcestershire sauce. Give it a stir, then add a handful of ice, and top with Clamato juice. Give another stir and garnish with a wedge of lime, a slice of cucumber and an Extreme Bean or two. Enjoy!
If I asked most of my female friends what is on their birthday or Christmas wish list, most would say clothes, jewelry, shoes, books etc. You know, normal girl things. Don’t get me wrong, my most prized possession is my wedding Louboutin’s, but my wish list is full of things such as a table saw, Kreg jig and paint gun. Yes that’s right, if anyone was to knock at my door right now with a paint gun wrapped with a bow, I would jump up and down like a kid who got a Red Ryder BB Gun for Christmas.
When did my priorities change? When did I start spending my spare money on lumber instead of clothes? I guess it’s just that I love doing projects around the house. I have tremendous pride in myself when I have completed a project. I even said to El Granto the other day, that wouldn’t it be awesome if I had a job that was just doing DIY’s!? Figuring out problems, sourcing materials, and building. I would be in heaven. (but then probably nothing would get done around my own house!)
Our house is very very skinny (our property alone is 12.5’ wide, and after walls we’re left with less than 12’). I know what you’re thinking, how on earth can we live in such a skinny house? As many other Torontonians know, size isn’t everything, layout is. The people who renovated our house prior to us, did an exceptional job with the layout. On the main floor they squeezed in an open concept 35’ long kitchen/dining/entryway, a compact but cozy living room and a powder room. On the second floor, we have three bedrooms and an 8×8 bathroom. The one problem with the second floor is to make that layout work you need one big long hallway. It is long, and skinny, and dark. It is currently painted (you guessed it) beige, has two “spaceship” lights for lighting, four doors to the bedrooms and bath, one skylight over the staircase and a strange little nook. I have been trying to come up with solutions to make the space feel bigger, lighter, and more polished.
HallwayHallway Nook (Outside Master Bedroom)
Here are some of my (hairbrained) ideas:
Cut out the spaces above all the doors, and install transoms. The bathroom & office each have large skylights, the front bedroom has a big bay window and our master has a glass door and large window. I think that with transoms all this light that is usually kept captive in the rooms will spill out into the hall. I think it will also make the ceilings feel higher.
Paint the walls white, trim white, and the doors gloss black. Wait wait wait, before you have me committed, hear me out. I think the contrast of the dark doors, light walls and all the natural light will actually make the space feel bigger. Contrast does wondrous things.
Replace the lighting. This one is a necessity. There are two forms of cheap flush mount lights from the big box stores. They will hereafter be known as boob lights and spaceship lights. My metaphors are pretty straightforward. One looks like a boob, and the other like a spaceship. They both suck. Cant anyone make cheap attractive flush mounts? I would love some schoolhouse pendants in the hall space.
Large scale artwork. The one problem is that it needs to be thin. The hallway is incredibly narrow, and already the walls get bashed with elbows when you try to carry anything down the hall. The artwork needs to not get in the way, and be well secured to the wall, and it needs to break up the large expanse of space. This is the only part that is still stumping me. You will only be looking at the art while walking down the hall, and even if you stop and look at it, you will be a foot away, so its not an ideal gallery space. May be a good candidate for some Blik vinyl wall art. Graphic and impactful, and gives definition to the space.
Blik Fox
Blik Birds of a Feather
Bigger mirror for the nook, small artwork and a nice large plant, preferably of the citrus tree variety. I love the thought of having a lime or lemon tree in the house, and think this would be a great place for it.
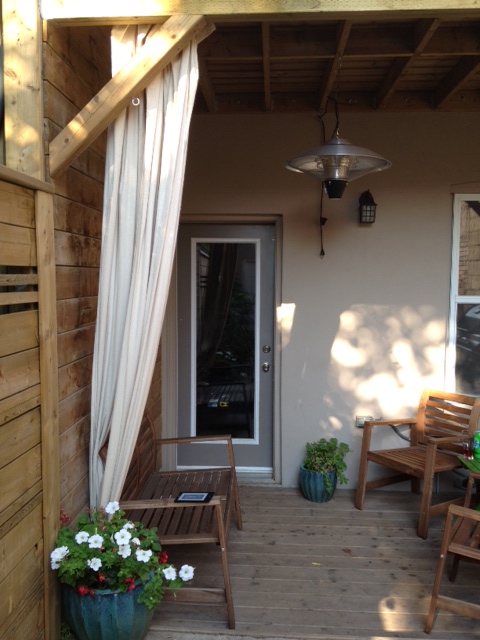
At about 3pm, the sun reaches our back deck in full force. If you happen to be sitting out there at that time, it goes from being a dappled shady retreat to a scorching desert. After getting sick of doing the deck chair shuffle until the sun entirely pushes us inside, we decided to buy some outdoor drapes.
Then we realized outdoor drapes are EXPENSIVE! They are really pricy! Especially for 12 foot long ones that I needed for our deck. I waffled over how to make it happen for weeks at a time, and then threw in the towel. We were not getting outdoor drapes.
Then inspiration struck, I could make some! But UGH, that requires a lot of fabric… and any fabric that is nice and heavy and blocks the light…is also expensive. I wasn’t even considering using outdoor fabric.
Then it struck me. Drop cloths! People use those things for everything! I could definitely make outdoor curtains with them. So we headed to Home Depot to buy some 12′ long drop cloth panels, and to find some inspiration on how to hang them. Our deck is 12′ wide. Can we use curtain rods? Nope, couldn’t find any that big. Wooden dowels? Still not available that long. Gas line pipe? ALMOST! But it was 10′ long and heavy, so it would consist of using two pipes and probably having to have a bracket in the middle to hold the weight…Then El Granto had a brilliant idea. Aircraft cable! BINGO! The drop cloths were light, and the aircraft cable could be tensioned into our deck with a turnbuckle. It would be perfect! We picked up a 50′ aircraft cable kit, two turnbuckles, two 4×12′ drop cloths, some large cup hooks, and some tarp grommets.
Back at home, El Granto got up on the ladder and secured the cup hooks to the deck, and attached one end of the cable system. We measured out where we wanted the grommets to go on the drape panels (Odin really wanted to help)
Odin thinks the curtains are his new bed
Through some trial and error (who doesn’t put instructions on a grommet kit!?) We finally found the best way to put in the grommets. It involved a vice, some rags, a hammer, and a few swear words. (sorry there are no photos, I was too busy using profanities to take any.) After the grommets were in I measured the drapes to hem them and went inside to get out the sewing machine. I managed to find my sewing machine easily enough, but do you think I could find the box with all the thread and notions?! Not a hope. So I grabbed some hemming tape, and ironed the hems in the drapes. I figured if they fell out, I would go buy some thread and sew them back up. Once they were hemmed, we threaded the grommets of the drape panels onto the aircraft cable, attached the cable to the other side and tensioned it with the turnbuckle.
Curtain threaded through the Aircraft CableCup Hook, Turnbuckle & Aircraft Cable
YAY! SHADE! WOOT!
Just one small problem…the space of the cup hook, aircraft cable clamps and turnbuckle means that the drape does not stretch all the way to the side of the deck. One day when we have a bit more patience, we will remove the turnbuckle on the North end of the deck, where the most sun comes in (you really only need one turnbuckle) and it will work and look much nicer.
But enough of my bitching, here are the pics!
Before!
Backyard Before (note this is from when we bought the house, so a few things have changed other than just the curtains)
After!
Curtains in ActionCurtains Drawn to one Side
*To answer a few of the questions you may be thinking of:
Will we leave them out in the winter? We will take them in during the winter, and put them through the wash if necessary
How have they held up so far? Amazing. Water doesn’t seam to soak into them when it rains, they never stay wet or damp, and show no signs of mold or any other nasties yet.
Would we change anything? Only adding a tie back/hook for when they are not in use, otherwise its perfect!
Added Bonus: We have had a sweltering summer, and we have been using the curtains to block some of the sun from hitting the back of the house, and to shade the a/c unit. It has worked wonders.
SOURCE LIST:
Materials:
2x 4×12 Drop Cloths: Home Depot (we only used 2 panels, but could have fit 3 or 4, if your deck gets full sun more panels may be required)
50′ Aircraft Cable Kit: Home Depot
Tarp Grommets: Rona
2 Large Cup Hooks: Home Depot
2 Turnbuckles: Home Depot
Iron-On Hemming Tape: Fabricland
Our pup Odin is a Vizsla. A Hungarian bird dog who’s been bred to point game birds for hunters then retrieve the bird back. I bet you’re asking yourself why on earth do we have a hunting dog in the city? Obviously not all Vizsla’s become hunters, some are just companions. (don’t let the hard core Vizsla owners hear this, I am a black sheep in the Vizsla crowd for not hunting my dog.) However because Odin was bred to work all day running in the field, he’s a bit more…well…energized than some most other breeds. If he doesn’t get enough exercise and mental stimulation he can be a handful. Don’t get me wrong, we knew what we were getting ourselves into long before we got him. We picked the breed for their athletic ability. El Granto and I spend our weekends walking the city, and wanted a dog to accompany us. He’s done even more than that. He gets us out walking rain or shine, hot or cold. We go hiking, jogging, swimming and walking. He has increased our active lifestyle to where we walk at minimum 5km each weekday and 10-15km each day of the weekend. We have also met a ton more people. Odin is the ultimate ice breaker, and we are constantly having people stop us to ask about our red bundle of trouble.
Has it been harder that I expected?! Abso-freakin-loutley. It’s a non stop job keeping up with him and keeping an eye on him. From crate training to loose leash walking, he has been stubborn and trying, but sometimes your hard work pays off. Last night we let Odin sleep out of his crate for the first time on a dog bed in our room. It entailed 15 minutes of us kicking him out of our bed repeatedly, then BAM, he got it and went and curled up on his bed and sleept the night through. A small milestone to some, but for us that was 9 months of work in the making. No bedding was eaten, no doors scratched and no barking screaming puppy. Hopefully one day soon we’ll be able to leave him alone in the house uncrated during the day, but for now I will take this small victory.
The office light was originally a Ikea Erbium ceiling light that the moment a truck drove by would shake and rattle so hard you thought it was going to explode and rain glass down on your head.
Ikea Erbium Light
Not only was the light noisy, it was also b.o.r.i.n.g. So we needed to change things up.
And I swooned over School House Pendant “The Volusia”.
Barn Light Electric’s School House Pendant “The Volusia”
Then I realized I had already long ago spent the whole budget for the room on the makings of the bookcase and the desk, and I had NO budget left for lights. That meant that buying from Barn Light Electric, shipping to Canada, and then paying brokerage & duty fees was not going to be a feasible endeavor. Enter sad sad Kristen face.
So ‘pretty’, ‘new’, and/or their friends ‘shiny’ and ‘fancy’ were out of the question. We needed something cheap.
We just so happened to have a random light we took down from our bedroom sitting around taking up space and we swiftly swapped it out. It’s better, its not great, but will make do for now. The room has so much natural light from the giant skylight, that the light wouldn’t be on much anyways. So here it is, the new old light.
Moving forward I will be daydreaming about changing it out for one of the lusty Barn Light Electric lights.
Our house is a three bedroom, two large bedrooms and one smaller. The smaller is of course the best choice for either an office or nursery. We wanted to plan for an office now, and if we ever needed it down the road, an easy transition to a nursery. Continue reading “From Billy to Built-Ins”
We got a natural gas line and BBQ last spring. I knew we would use it a lot, but it is now the most used appliance in our home. I even cooked Easter turkey on the BBQ!
The BBQ sits beside our A/C unit on a raised platform off our main floor deck. The raised platform is made out of concrete pavers sitting in a bed of concrete. I have no idea why the previous owners would do this. To make matters worse, the concrete pavers were a bit too big for the platform, so some of them were broken and the pieces shoved in. It is beyond unsightly.
We wanted something to cover up the ugly mess, and spied Ikea Platta decking in their summer flyer. Problem is, we don’t have a car, and rarely get out to Ikea. El Granto’s Mum was taking a trip to Ikea last week, so we asked her to pick up a pack of Platta for us.
It took 5 minutes to lay the tiles, then we realized we didn’t have enough. Back to Ikea and another box of platta later and we were ready for another go at the deck tiles. Here is a before look. Note the busted ass patio stones.
BBQ Area BeforeBBQ Area Before
We moved the bbq, then used some Dricore leveling disks to try to level out the uneven pavers. We figured Platta was a deck version of Dricore, so we gave them a shot, and they worked great!
Using a Dricore Leveling Kit to level the Platta Deck Tiles
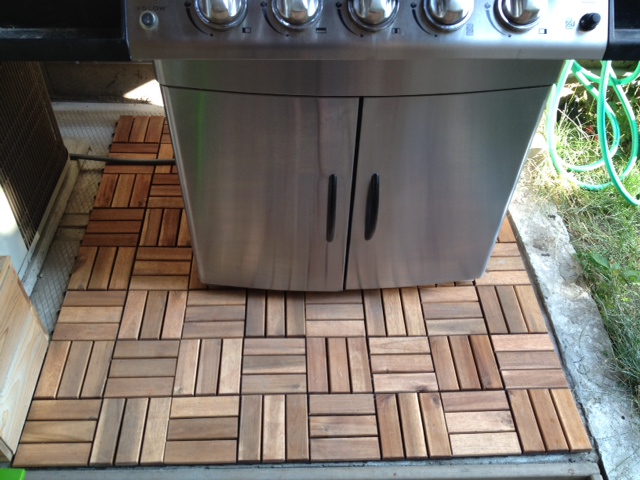
Here’s the area covered in the tiles.
BBQ Area Covered in Deck Tiles
Aaaaaaaand here is the after!
BBQ Area AfterView of Backyard Deck after BBQ Area FaceliftBackyard
A much nicer looking BBQ area. The decking actually matches our Ikea acacia wood chairs. I love how it looks so much that I am contemplating covering our whole lower deck in them. Our poor lower deck really took a beating with the reno, and no matter how much I sweep, scrub or give it a death stare, it looks dirty and shabby. What do you think, to Platta or not to Platta? (and don’t even get me started on that terrible grass and crooked walkway, that is being dealt with later in the fall or next spring.)
I posted about my chair hunt less than a week ago.
By that point I had been scourging Craigslist & Kijiji for an antique bankers chair for weeks. I had dragged El Granto into many an antique store, and even shook my fist at the TV when I saw Sarah Richardson had found one at an antique store on queen street. I wasn’t mad at Sarah, I was mad that I hadn’t been there first!
So I wrote the post, and sent my Mom an email asking her to keep an eye out for a bankers chair (she’s even more resourceful than I am) I then forgot about putting my chair request out into the world, and got back to work.
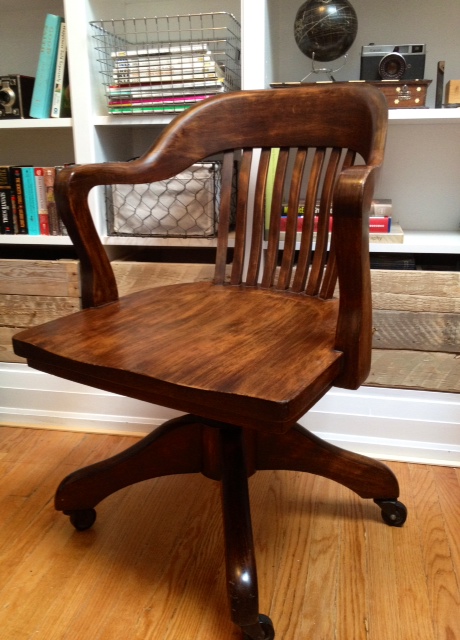
Fast forward to Friday. My Mom comes for a visit, and shows up with not one but TWO bankers chairs. One antique that was in brilliant shape, and had the original chair mechanism and everything, and a second one that was a more modern version. I was flabbergasted. My Mom had found the vintage one on Craigslist for a steal, and the second one was found on the side of the road by my Mom & Dad’s friends.
Antique Bankers Chair that my Mom Sourced from Kijiji (unassembled)Modern Bankers Chair that my Mom’s Friends FOUND on the road! (Mom had to take it apart to fit it in the car)
Then I go into work on Monday morning and get an email from a co-worker that says “Look what we found on the curb!”
The Chair my Awesome Co-Worker found at the Curb
SERIOUSLY?! I couldn’t find one if my life depended on it, and two people managed to find ones thrown out for garbage on the side of the road?! Hell, I should just give up my searching for things, and make a list for everyone else to find. Thank you all so much.
I am also looking for old reclaimed red bricks for a new patio, and some old picture frames…just saying.


")


