Our vacation week was a success! We had a car for the week (thanks in-laws!) so we were able to get out of the city as well as getting some running around done.
Here’s a recap:
Visited family friends cottage in the Muskoka’s. Odin was afraid of the boat motor.
We went for great hikes and Odin swam in the lake.
We headed up to my family cottage waaaay up north on the French river.
We read books,drank lattes lakeside (YES, cityslicker Kristen did bring her espresso machine to the cottage) had camp fires, ate and drank too much!
Oh and we did some hiking too.
Odin celebrated his first birthday at the cottage and got a present of a raw egg followed by a campfire and marshmallows.
We got a lot accomplished around the house including a trip to Home Depot for some big & heavies (wood & cement).
We loaded up on dog food for Odin and took back our beer empties to the beer store (this is one thing that sucks doing when you don’t have a car, you seriously look like a hobo when you’re wobbling down the street overloaded with empty cans and bottles, so we usually wait until we can beg borrow or steal a car.)
We headed to the drive-in.
And went to the beaches for a dog play/swim with El Granto’s oldest friend and his three awesome dogs. We spent time catching up with a good friend in from the UK, and accomplished a few to do’s off the list. All in all it was a great success and I’m terribly sad to go back to work today. Summertime has me wishing I didn’t have to work! It was amazing spending all that time with the hubby and puppy.
When I am on vacation I love sipping girly drinks pool or beach side under an umbrella wearing a floppy hat. A bit specific I know, but it’s the truth. On a vacation to Cuba a few years ago the bartender surprised me with a drink he thought I’d like. It ended up being my favorite drink that holiday and one I still love to this day. So on my summer vacation I thought I’d make something to remember Cuba by. So here it is:
Cuban Miami Vice
Ingredients:
Piña Colada mix (my fave is the frozen Bacardi mix available at any major grocery store)
Strawberry Daiquiri mix (again the Bacardi one is ok, I also like the Mott’s one)
Rum
Ice
Fresh strawberries and/or pineapple (optional)
How To:
Mix up a batch of Piña Colada and Strawberry Daiquiri following the package instructions. You will need a blender or food processor. (don’t worry about having extra, you can either make one for a friend or have extra for later). In a pint glass fill half way up with strawberry daiquiri. Then fill the remainder of the glass with Piña Colada. Garnish with fresh fruit and a straw. Find sexy Cuban man to deliver it to you poolside. Say gracias, tip generously and enjoy.
*Sexy Cuban man is optional, but suggested for authenticity.
Our powder-room was newly renovated before we purchased the house, but was very very bland. The fixtures were in brand new condition, but the space was beige and boring. Continue reading “Powder Room Facelift”
I am on vacation from work for the next week. I have scheduled a few posts while I am relaxing. (So you’re not allowed to call me a lazy bastard…)
We will be staying in and around the city for most of our vacation, but we hope to head up North to my parent’s cottage on the water for a few days. We didn’t take a summer vacation last year as we were gearing up for the wedding, so it’s been a while since we were able to spend our days sitting on the dock with a good book overlooking the water. This year we will have Odin to join us, and I am excited for him to swim in the lake, jump off the dock and run around in the woods. We will also be enjoying spending time with a good friend in from London, and getting a few things checked off our to do list around the house.
Here is the plan:
Good Dog + Good Friends + Good Food + Good Drinks = Good Time
I am not a beer drinker, much to El Granto’s dismay. You see El Granto is what you would call a bit of a beer fanatic. He loves lagers and stouts, ipa’s and porters, bitters and pilsners. He likes to bbq with them, cook with them, and he has even made ice cream with beer. He has probably tried every single craft beer the LCBO carries.
Me, I hate the stuff. A few years ago however I discovered something on tap that I did like; Cider! It comes in a pint glass, it looks like beer, and it doesn’t have an umbrella on it. I can hang with the boys while eating chicken wings at the bar and not get razzed. Since the day I discovered cider, I have also discovered that not all ciders are equal. Myself, I am not a big Strongbow fan, so I started asking bartenders for some grenadine in my Strongbow. It took the tartness down a notch and added a bit of sweetness. Since that day I learned that cider + syrup is called an Irish Rose. Here is my favorite version:
Kristen’s Irish Rose
Ingredients:
Can of Alcoholic Cider (my favourite is Sir Perry’s)
1 oz Lingonberry Drink Syrup (from Ikea, can also use Grenadine)
Ice
How to:
Place a handful of ice into a pint glass, fill the glass half way up with cider, then add the syrup (if you put the syrup in first it never mixes well). After you put the syrup in, add the remainder of the cider. It should mix all by itself, not needing a stir. However if it does settle, give it a stir and enjoy! Best served on a deck in the sunshine.
Our main floor powder room needed some sprucing up, and you guessed it, de-beige-ing. We wanted something dramatic, yet still functional. I will be posting the results of our powder room facelift in the next week, but wanted to give you a sneak peak of our inspiration, and our to do list. Even though it was a small room, there are still a lot of things on that to do list! (and they are still not all finished…)
It’s official, we graduated to our own domain today! El Granto deemed my blogging effort a win, and decided to buy me storefrontlife.com.
The truth is neither of us knew if I would take to blogging, and if I would well…actually do it. Turns out I’m not half the lazy bastard we all thought I was.
So if you had your RSS feed set for the old site, please make the switch, and check back here for all future posts!
A long long time ago, when El Granto & I moved in together, El Granto was still in school, I had just graduated and was working my first big kid job. We had no money, ate copious amounts of pasta and potatoes, and spent what was left on (cheap) beer.
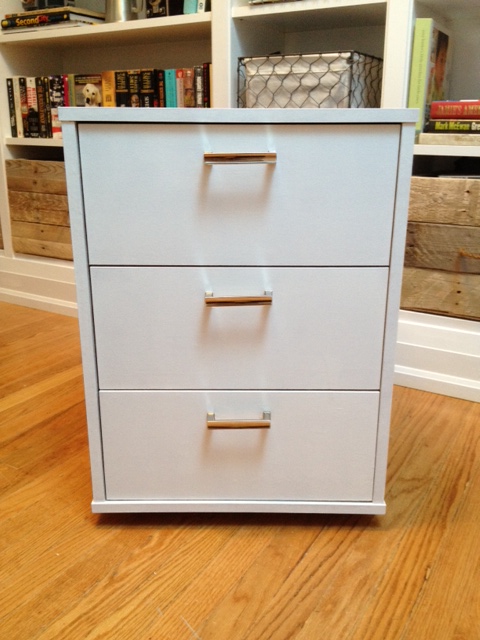
Needless to say our furniture consisted of things we’d stolen from our parent’s houses. We did manage to purchase a few new things; some drapes, a few Ikea Lack side tables, and a Ikea Goliat drawer unit that we used as a night stand/little dresser in our bedroom.
Ikea Goliat
That unit later graduated to living in our office when we purchased real bedside tables, and has now lived through 8 years of our abuse. It holds all the strange things one accumulates. Also known as the junk drawer. It houses batteries, calculators, phone & camera chargers, memory cards, travel voltage adapters, a screw driver, camera batteries, luggage tags, a sling shot etc. “Important” stuff don’t you know where else to put.
When faced with the office reno, we wanted to keep our useful friend Goliat, but he needed some cosmetic help. His laminate “birch effect” finish looked like plastic, and the handles were not even trying to disguise the fact that they were plastic. He needed help! So we carried him out to the garage, took off the handles, scuffed him up with some sandpaper, and gave him a coat of Zinnsser B-I-N primer. In hindsight I should have given it two coats, it would have probably eliminated one of my coats of paint later.
Goliat Drawer Unit with One Coat of Primer
After priming I gave it a quick sand, and added 3 coats of white gloss interior/exterior paint. We let it dry, and added three new Martha Stewart 3 in. Channel Cabinet Hardware pulls from the Home Depot.
The hardware was a bit of a pain to be honest. I sourced from their website. The handle I chose said “in store only” so I walked the 3km to Home Depot to find the crappiest selection of in stock hardware ever! I was astonished at how dated and bad it was. After spending 20 minutes to finally track down the kitchen designer, I found my hardware on a sample board in a drawer. The Martha Stewart hardware was all spectacular and well priced, but SPECIAL ORDER! UGH. I hate the words special order. It means waiting, delays, incorrect shipments and anger. I had fallen in love with the handles, so I sucked it up and ordered.
I ordered on a Monday, and the kitchen designer said it should be in store in about a week. They arrived in store the following Monday (yay!) I brought them home and realized I had measured incorrectly. BLARG. Stupid Kristen. They’re too big. They’re not even the right size for other projects around the house that need new handles.
So… I had two options. Return them and order some new ones, or fill the holes in the drawer unit, touch up paint, and re-drill them. The problem with ordering new ones, is that the smallest any of the pretty Martha Stewart ones came in was 3″ and the Ikea drawer unit was SMALLER than that. Leave it to Ikea to not use standard sizes!
So I filled the holes… (AFTER I HAD ALREADY PAINTED IT) and then PAINTED IT AGAIN. Do my capitals express some of my angst?
Wood Filling HolesDrawer Pull Holes Filled and Painted
I then marked and drilled new holes for the new hardware, and FINALLY it was done!
Finally Finished!Handle Close-Up
SOURCE LIST:
Materials:
Previously owned Ikea Goliat Drawer Unit
Zinnser B.I.N. Primer (spray can): Canadian Tire
Behr Premium Plus Interior/Exterior Glossy paint in Bright White: Home Depot
Frog Tape: Canadian Tire
Martha Stewart 3 inch Channel Pulls: Home Depot
We needed a desk for the office. We loved old bankers desks, and lovely chunky vintage desks, but we had one problem. Whatever desk we wanted in the office needed to be able to fit up our tiny staircase, or be hefted up and over our second floor deck. Otherwise it needed to be assembled on site. After lugging our mattress and other large furniture up and over the deck, I was in no way, shape, or form, about to do that again. So it looks like we were building something on site. We didn’t need anything fancy, just a desk to use the computer on and store unpaid bills. I cost out the materials to build a simple table ourselves, then I thought to myself: self just suck it up, be the cheap ass that you are and buy something from Ikea! It will be less expensive, less work, and you get to spend time with the happy little Ikea man assembling it. So we reviewed the cheapest Ikea desk solutions, and discovered that the Ingo Dining Table was exactly the size we needed, and was made of solid unfinished wood, and was SIXTY NINE dollars.
Ikea Ingo Dining Table
Yes that’s right, a solid wood desk for less a hundo. Sign me up. So we got our dining table, assembled, and then decide what to do with it. I loved Katie’s Ingo desk hack so I thought I would give that a try. Then my brad nailer and I got in a fight, he decided he would shoot nails sideways out of my project and after many a screaming match, we decided to divorce. So decorative trim on the desk just wasn’t going to happen. Instead, I installed a bottom cross piece, primed, sanded and painted it with two coats of white paint, wiped my hands, signed the alimony agreement, and called it a day.
SOURCE LIST:
Materials:
Ingo Dining Table: Ikea
Zinnser B.I.N. Primer: Home Depot
Behr Premium Plus Interior/Exterior Glossy paint in Bright White: Home Depot
Tools Used:
Paint Brush, Small Foam Roller & Tray, Sand paper


")
