Two years ago, El Granto & I were walking through the Junction headed for an Americano @ Crema, when we spotted a great worn black bankers chair outside the front of a reclaimed architectural salvage shop. The chair was great. It was worn in all the right places, had fabulous old castors, and was a steal for $25. Problem was, we were still living in the loft, had no place for it, and were walking about 3km from home. We decided to pass for now. El Granto sat brooding over the chair for the next day, and decided to go back to see if it was still there. Alas of course it was gone. Someone else had the same vision we did. Since that day, we have regretted that decision, and have been on a hunt for another bankers chair. Skip ahead to last spring. We were at my favourite place on earth; The Aberfoyle Antique Market when we spotted a guy selling not one, not two but THREE bankers chairs. He had stripped and refinished them all with an (ugh) honey oak finish, but they were in excellent condition. We could either live with the colour, or refinish them to something darker. Problem was, we were at Aberfoyle with El Granto’s Mum, and were driving a small car. The chair was not going to fit in the car. We visited Aberfoyle a month or so later, and (of course) all of the bankers chairs were long sold.
Now that the office is progressing, we really really need a chair. Do you think I can find one? Not a chance.
I could buy gorgeous one new at Restoration Hardware for $495. Uhhh no, that’s out of the question.
Restoration Hardware 1940′ Banker’s Chair Weathered Oak Drifted
How about Pottery Barn’s Swivel Desk Chair? Oh wait, $533? HA.
Pottery Barn Swivel Desk Chair
So I will continue to haunt Craigslist & Kijiji in hopes of finding one in my price range (aka free – $40). I know, wish me luck.
Our other temporary option, is buying a $35 Ikea Ivar chair, and giving it a paint job. Then finding another use for it once we finally find a bankers chair.
Ikea Ivar Chair
Why is it that every project always has one sticking point? One missing piece of the puzzle?! *sigh
If you have been being a good boy or girl, you will have read my Project Office post and you will know I have a lot to do! One of the items on the To Do list was crates for built in bookshelves. Bookscase DIY tutorial will come soon (I promise) but until then here is a sneak peak on how we made the crates to go ON the bookcase.
I was planning on sourcing some framing grade lumber and roughing it up a bit to get a worn look for my crates. Odin & I happened to be walking through an industrial area in our neighbourhood on Friday when we spied a pile of shipping pallets on the side of the road.
Stack of Pallets
I thought to myself, “self, there some rough wood, and its CHEAP rough wood”. You see, cheap is one of my favorite words. I like it so much that people often use it to describe me. So Saturday morning Odin and I took off to steal grab ourselves one of these pallets. I picked one that looked good, didn’t appear to have hobo pee or bugs on it, so I carried it home. By carried it home, I mean I walked 100 feet, rested, walked 100 more feet and had another rest all the way home. It was also a Saturday morning, and I had to walk past a hipster brunch spot in the neighbourhood looking like a crazy person. The dog happily trotted behind me wondering what on earth I was up to.
Stopping to take a break and admiring my “found” pallet
After lugging this darn thing home, swearing a few times, wishing I owned a car, and wondering what I was so damn crazy, I finally got down to work. I thought bringing it home was hard, I hadn’t yet met hard. Hard is not owning a crow bar, and trying to take out massive nails with a hammer and Mjölnir to pry and bash them apart.
Taking Apart Pallet While Trying not to Hit My Foot with a Hammer
Break time yet? GAH! This is hard work. You are probably asking right now, where on earth is El Granto? He was having a lovely day learning to drive NASCAR’s with his Dad and Brother. At about this point in time I was cursing him in every language that I know a curse word in. These include, English, French, Spanish and German. My mother would be disappointed that I don’t know any Danish curse words. The worst thing I know is how to say underwear in Danish. This was a hit when I was six…
So… I finally managed to pry apart some boards, and then bashed out the nails.
Striped Apart Pallet
As you can see the wood before sanding is…well kinda gross. It will get better, I promise. Now I put some super rough sandpaper in my palm sander, and set to work.
Getting Ready to Sand
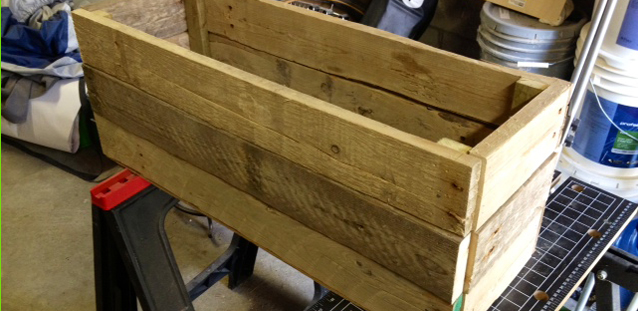
Once I sanded everything, using the dimensions of my bookshelves, I decided on a size for the crates. I wanted them to fit in the bookcase nicely, but have a little room to slide in and out. I drew up a quick diagram on a piece of wood, and started cutting! The finished size for the crates are 29″x10″x11″ and 13″x10″x11″. I cut my front pieces 29″ long for the big ones and 13″ for the small. The sides were 8 1/4″ and each crate was 3 boards high. I cut the boards to length on the miter saw, and used scrap pieces of 1×2’s as corner braces. I attached the front panels to the corner supports using brad nails. I spaced the corner supports 5/8″ in from the edge to allow space for the sides to fit flush.
One Front of Crate Assembled
I assembled both the fronts, then attached them to the sides with more brad nails. I then traced a bottom for the crate onto some extra hardboard we had laying around the garage. I cut out the hardboard with the circular saw, and nailed it to the bottom of the crate.
Voila! Crate!
The wood is all different thickness, and I didn’t worry about having everything match perfectly. It just adds to the distressed look. After I had assembled it, I took the palm sander to it again making sure there were no sharp corners or splinters. There, I was done! It only took me 3 hours to make one crate. Wait, what, I need four more of these? DAMMIT! I better get back to work. I sanded and cut the wood to length for one more crate, but I ran out of brad nails. Uck. So I waited for El Granto to get home from his NASCAR adventure and then headed to Canadian Tire to pick up more nails, and some felt furniture sliders for the bottoms of the crates. We also stopped and pilfered one more crate on our way home, which I made El Granto carry, and he cursed me in the same fashion that I had cursed him earlier. Once I got home, a soft couch and a cold drink sounded better than doing more work, so I gave up, and left it for Sunday.
Sunday morning, we got all ready to start work (this time with El Granto in tow). When we went outside our neighbours were putting up a big glass panel on their amazing deck, and asked for some muscle. El Granto went to help, and I got back to work making more crates. El Granto’s work conveniently consisted of standing holding a piece of glass for an hour, then being rewarded with a plethora of yummy beverages. Of course he preferred doing this to helping me make crates…so once again I was bustin my ass alone. El Granto did stop in to help me take apart the second pallet (it’s much easier to watch him then to do it myself.) I proceeded to make one more big crate, and three little ones.
Small Crate
The little ones are cute. Like a puppy version of a crate. I finally finished all five of my crates, and stood back to appreciate my giant stack-o-crates.
Stack-o-crates!
Some of the wood turned out really cool. The ones that look all spotted were really really rough boards, that I sanded and sanded and sanded and they came out all spotty! I also really like the boards with the rough saw marks. I thought I may have to distress the crates more, but I think they look fairly worn. They look like driftwood almost. I was on the fence with staining them, but we like them just the way they are, so we’ll leave them as is for now. They do need some hardware, I am waffling between shiny fancy nickle handles (that I am using elsewhere in the room) or sticking with rustic and using some rope, either as a handle, or making small monkey’s fists and using them as pulls. What do you think?
Sneak Peek of a Crate in the Office
So what do you think? Free crates, were they a pass or a fail?
UPDATE!
My idea to use pretty polished handles on my crate was overruled by El Granto, my Mom, our neighbours, my co-workers and the garbage man. So rope handles it is!
We checked Rona, and their rope was too big, Home Depot had even bigger rope and some smaller rope. We went with the small one. In hindsight, I wish it was a bit chunkier. Will be keeping an eye out for some bigger rope. Also, check out the completed bookcase here.
SOURCE LIST:
Materials:
Wood Shipping Pallets : side of the road
1×2’s: Pile-o-wood in my garage
1/8″ hardboard: My garage
Brad Nails: Canadian Tire
Sandpaper: Canadian Tire
Felt Furniture Pads: Canadian Tire
Rope: Home Depot
I have been working on our office for SIX MONTHS now. That’s right, half a year! Having a clingy spazzy puppy around doesn’t help. The moment you try to get some work done, he wants to play, or is hungry, or wants to go for a walk, or chew on the baseboard, or just wants so sit there and whine until you stop doing work and pay attention to him.
If having a puppy is this bad, I have no idea how people with babies eat, go pee or bathe. If I ever have kids, I just know I am going to be one of those mothers who puts the baby in the crib screaming and goes downstairs and has a glass of wine.
Where was I? Oh yes the office.
Wrangling the puppy was especially difficult when we were painting, or doing things that he could in no way be near. We would take turns working while the other watched the dog, or built a dog play area in the hallway. Needless to say the simplest task ended up taking days or weeks. I am still finishing a few things up, and a few projects are still incomplete, but it’s finally gotten to a point where I may actually let someone see it.
As for furniture; in our last office we built in a custom desk so when we moved to the storefront the desk stayed behind. We also owned a crappy old office chair, that I happily pushed to the curb before we carried away our last moving box.
So coming into the office in the new house, we owned:
A filing cabinet covered in El Granto’s music and snowboarding stickers, which is missing the rails to actually hang files on
A cheap Ikea drawer unit
LOTS AND LOTS of books, antique cameras and crap.
That is not a lot to work from…Try as hard as I did, you just cant make a desk out of crap. It topples over…
So for the first six months of living in the house we used my Grandmother’s 50 year old Ikea card table as a desk, and a folding chair. More often than not we ended up working with the laptop on the sofa downstairs.
Before I post pictures of all our office projects, here is some insight on what we had planned
This board is giving away a ton of hints of what we were up to, so stay tuned for the results!
And here is our great big office plan/project to do list.
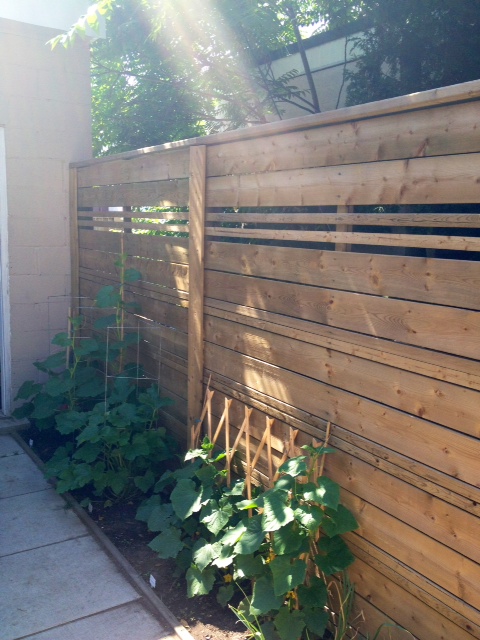
Before we got Odin we knew we needed a fence. There was a slightly dilapidated chain link fence between our house and our neighbors to the north (we have a 30′ brick wall to the South and a garage on the West end of our yard). We have an amazing relationship with our neighbors. They are a young family, who is currently renovating their entire house as well. We wanted a fence that would be functional, provide privacy but also allows us to socialize when we want to.
We put pen to paper, and designed a horizontal slat fence with 5″ boards and 2″ boards. We were going for a traditional meets modern design. We then set out to removing the old fence. We prepared shovels and tools, and mustered up the courage to start digging out deep concrete foundations. El Granto started pulling absentmindedly to one of the fence posts and the post easily started to come up, so he pulled more and more, and out came the post! All of the other posts came out just as easily, except one that was too close to our deck foundation, and must have got stuck in the deck’s concrete when it was poured.
Now it was time to build!
Fence Before
Our fence needed to be 26 feet long, and would be anchored on one end to our 2 story deck, and on the other end to our cinder block garage. We used 4×4 posts for our main supports. We used 10″ bolts to attach one 4×4 to the deck, and masonry screws to attach another to the garage. We then spaced out our two center posts equally so that all the fence panels would be the same size. This would involve loads more cutting, and more wasted wood, but visually it was much nicer.
As we were anchored at both the deck and the garage, we used post spikes for the two center posts. Now don’t you do shaking your finger at me… Yes, we could have dug post holes and filled with cement, but our ground is FULL of rocks, and the thought of digging those holes was, well…unplesent. So we looked into other options. We found the level-able post spikes, and after considering our fence (it was a small span, well anchored at either end, was sheltered by a 30′ wall on one side). It wouldn’t be subject to gale force winds, or pole vaulters, so it would be.just.fine. I will hear none of your “you took the easy way out”. OF COURSE we did. The hard way sucks.
Back to the task at hand. We set the fence spikes and El Granto got to hit things with Mjölnir (yes.. that is what we named for our great big hammer. If you’re ever at our house and need the use of a big hammer, you must ask for Mjölnir, anything else and you will be ignored. (No “Maul”, “Big Ass Hammer”, nothin.)
Grant Uses Mjölnir to Hammer in the Post Spikes
We set the posts, leveled them, and then got to putting on the boards. This would have been a time when two cordless drills would have been handy (hint hint Santa). We spaced the boards right tight up to each other knowing that they would gap some as the wood shrinks.
Kristen Screwing on Fence Boards
When we got up to eye level, our fence was starting to look like a wall, not a fence, so we spaced out a row of the smaller 2″ boards, so that we would have a space that we could see and converse with our neighbours. Once we finished one fence panel, we dropped a chalk line and cut off the overhanging boards with a circular saw.
El Granto Setting the Chalk Line and Cutting off the Excess BoardsGetting Ready to Cut
Once we finished fencing all the panels, we placed fence boards vertically where the two panels met to cover the cut marks. We screwed in the last board just as the sun was disappearing. Finishing the top of the fence would need to wait for more daylight and lumber. That was one hard days work, time for a drink!
The Last Board Went On as the Sunlight Went Down
The fence stayed ugly like this for a few weeks until my Mom & Dad came down to help us reinforce the deck (that’s another story for later). While they were helping us, we used the opportunity to borrow Dad’s truck, and head to the lumber store for some 2×6’s to make top rails for the deck.
El Granto and I knew long before we bought our house that we wanted a dog. In fact, one of the requirements for our future home was a yard for our future dog.
We both had dogs growing up, and were anxious to bring home a new member of the family. However, there was the problem of having to move out of our house for almost three months for the unplanned renovations, then our upcoming wedding. So finally once we’d tied the knot, and things had settled down a bit, we looked into getting a puppy.
El Granto grew up with Rhodesian Ridgebacks, and I with a German Shorthaired Pointer. After much debate we met in the middle and settled on a Weimeraner. That was until one fateful day… We were walking past our favourite chocolate shop Stubbe and a Vizsla was tied up out front. He was incredibly beautifull, and when we leaned down to pet him he was gentle, sweet and full of love. After looking into his amazing eyes, we knew that a Vizsla was for us.
A Vizsla however…is not for everyone. They require about 2 hours a day of exercise, as well as mental stimulation. These dogs are working dogs, and without a task, they can get restless, and destructive. El Granto and I live in an urban environment, and we don’t own a car. We walk or take transit everywhere. We wanted a dog who would fit into that lifestyle, and come everywhere with us. A Vizsla fit the bill.
Last fall we contacted pretty much every Vizsla breeder in Ontario. We had missed the summer/fall litters and would be waiting until the spring to bring home a pup. Resigned to that, we put it out of our minds and got right into the house renovations. Then we received an email from one of the breeders we had contacted. All the pups in their current litter had been spoken for, but one of the new owner’s circumstances had changed. They had a newborn baby, and the husband was in the military and was being dispatched overseas. They no longer felt that they would be able to give a new puppy all it needed. That meant that there was a puppy available, but it was available NOW. El Granto and I knew we were ready, and jumped! We went to meet the pup the next day, and of course he came home with us. We were so unprepared, we had to stop at PetSmart on the way home and buy the crate and everything else we needed for him. We named him Odin, and his name suits him perfectly. He thinks he is a God, and that El Granto and I were put on this earth solely for him!
It was a tiring first few days, with house training and potty training, and lack of sleep for everyone, but so worth it
These gorgeous photos are by the talented Allyson Scott. Check out more of her work at allysonscott.com. They were taken at High Park when Odin was 10 weeks.
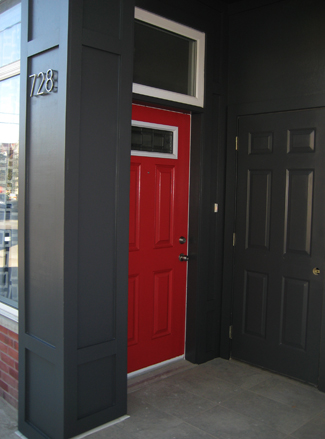
When we purchased the house it was beige. Beige exterior, beige on every single wall inside, and a beige garage. We knew right away that one of our first tasks would be to “un-beige” the house.
We decided to tackle the front of the house last fall. It was a simple project that had a lot of impact. We looked at lots of photos of historical storefronts, and decided to go with a simple dark grey colour. It would offset our storefront window, and look nice with the brick under it.
The project took two days, one day cleaning everything, the second taping and painting. We also have two doors at the front of our house which confuses delivery people to no end. Its actually a pretty smart design, as we are a row house of sorts, there is no place to store our garbage and recycling cans out of sight, other than having to keep them in the garage, and wheel them around the block on garbage day. So they built in a “utility room” into the front of our house. Its great, but confusing! So we wanted to make the door to it disappear, and make our front door stand out. We painted out the utility room door the same colour as the house, and our front door in a bright red.
We used Behr Premium Plus Ultra Paint + Primer and it painted beautifully! The door took three coats, but the house only took two.
Without further adieu, here are the before and afters!
Front of house before.Front of house after.Door before.Door after
SOURCE LIST:
Materials:
Behr Premium Plus Ultra Exterior Satin in Cracked Pepper: Home Depot
Behr Premium Plus Ultra Exterior Semi Gloss in California Poppy: Home Depot
2″ Frog Tape: Home Depot
A year and a half ago, El Granto and I purchased our first home. A 100 year old storefront in downtown Toronto. It was recently converted, had a beautiful reno, was ideally located, had a yard for a future dog and a garage for El Granto’s motorcycle. Perfect. We signed the papers, and moved in a month later. Then the skylight leaked, the sink leaked, the brand new dishwasher didn’t work, the basement leaked, the storefront window leaked and the icing on the cake; the dryer vent leaked into our bedroom ceiling making for a hell of a mess days before Christmas. We were in trouble. Luckily we received some awesome help from Mike Holmes and his Holmes Inspection crew.
Here is our story!
let me introduce myself, I am Kristen. I have an awesome husband named El Granto, a crazy puppy named Odin, and we all live in a 100 year old Storefront Conversion in downtown Toronto.
We’re so cute 🙂
This will (hopefully) be a place for our adventures in home ownership, raising a puppy, living and working in an urban environment.
Our Storefront Life!