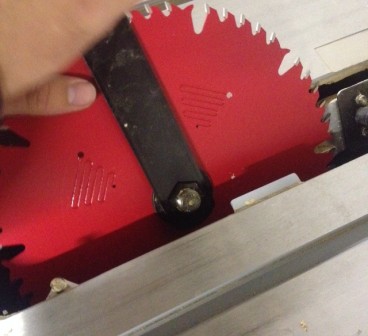
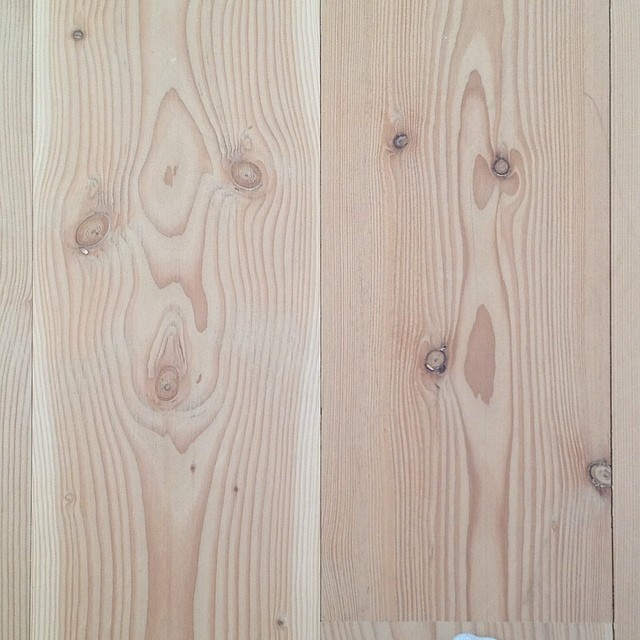
In this weeks inaugural What We’re Working On post, I touched on how we changed our table saw blade. I wanted to come back and give you a quick how to if you are looking to change yours as well. Continue reading “How to Change a Table Saw Blade”
Author: Kristen
Kristen & her husband El Granto & their Vizsla Odin live in a converted Storefront in downtown Toronto.
What We’re Working On – Nov 12
I have a new weekly feature on the blog starting today! It’s going to be called “What We’re Working On”. As we often have a bunch of larger projects on the go, our updates and project reveals are a long time in the making. As such, you don’t really see what we’ve been up to, and what we’re working on. This will be a weekly update with a quick check-in and summary of what we’ve got on our plate.
So here goes!
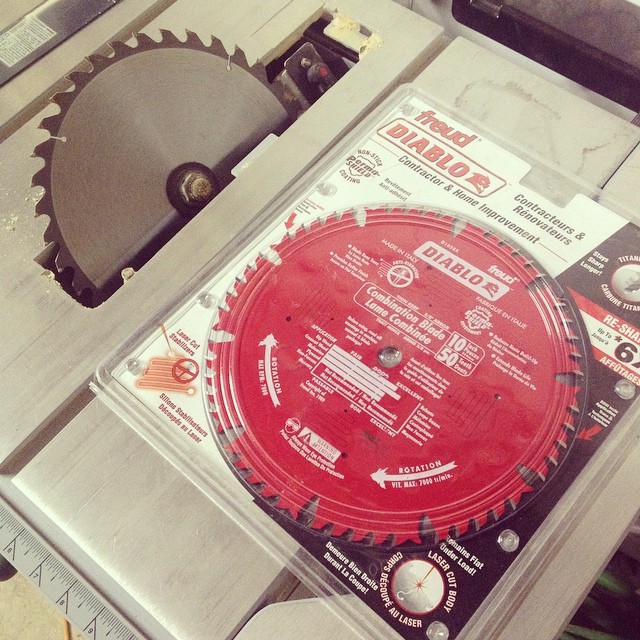
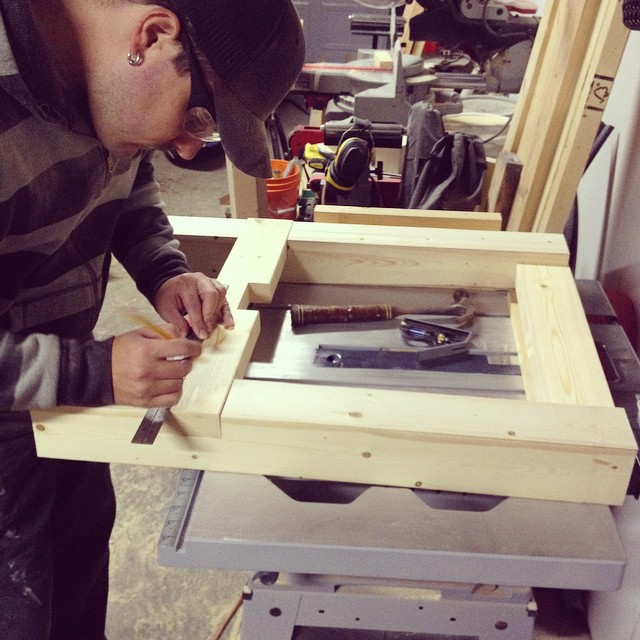
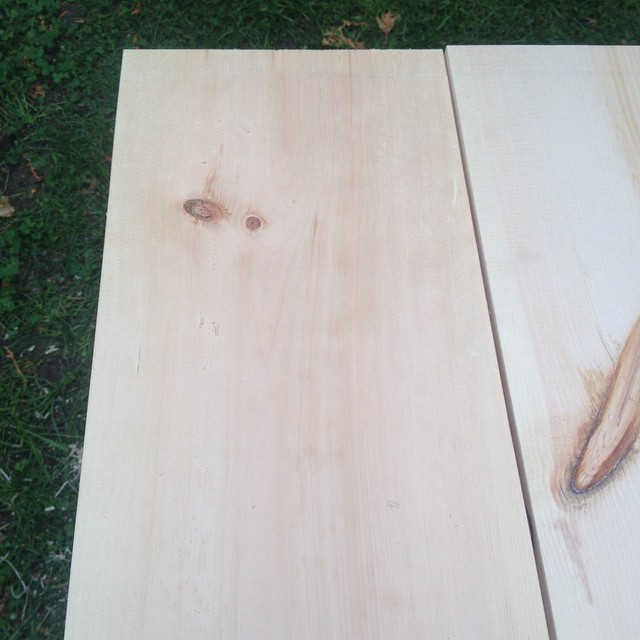
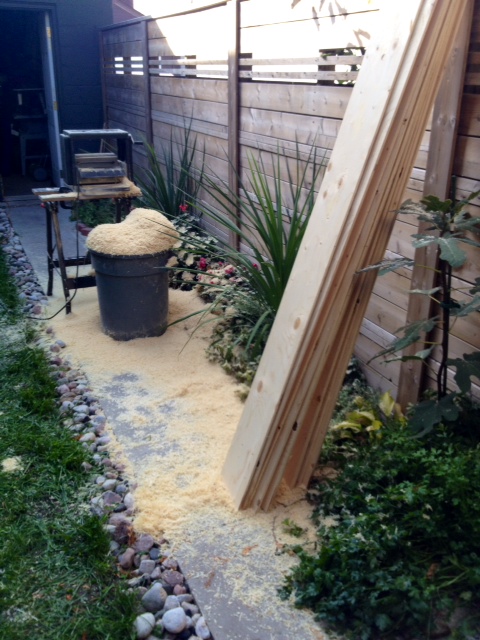
We are moving ahead well on the dining table & benches for Project Nelson. The table top is built, and this past weekend we got started on the legs after a quick stop to change the table saw blade. The new blade is an awesomesauce Freud blade. Once you switch to Freud blades, you will never go back.
With the new saw blade installed, we did all the kerf cuts for the table legs.
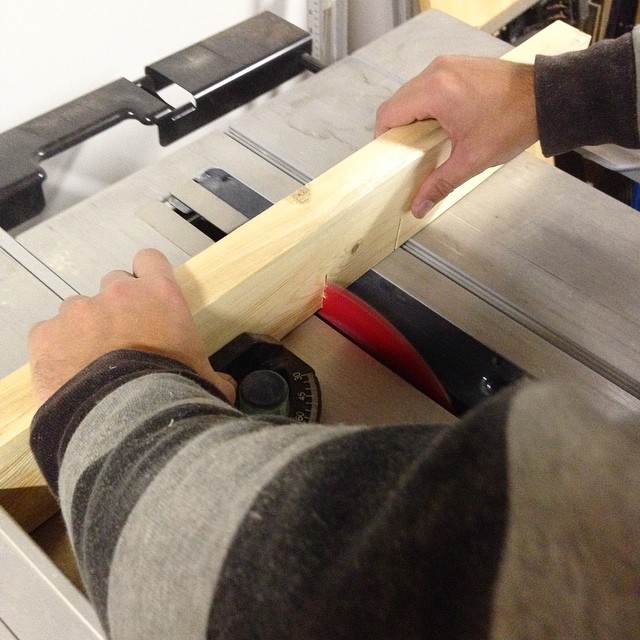
The legs are notched out for the stretcher support to fit in, as well as the stretcher support is notched for the stretcher. (lots of gibberish I know, but it will make sense when you see it.) El Granto kerfed away on the table saw, while I removed the kerfed slices of wood, and cleaned up the joints with a chisel and an orbital multi tool. (check out this post from a previous table build to see how kerfing/notching the legs is done.)
After everything was notched, it was all assembled.
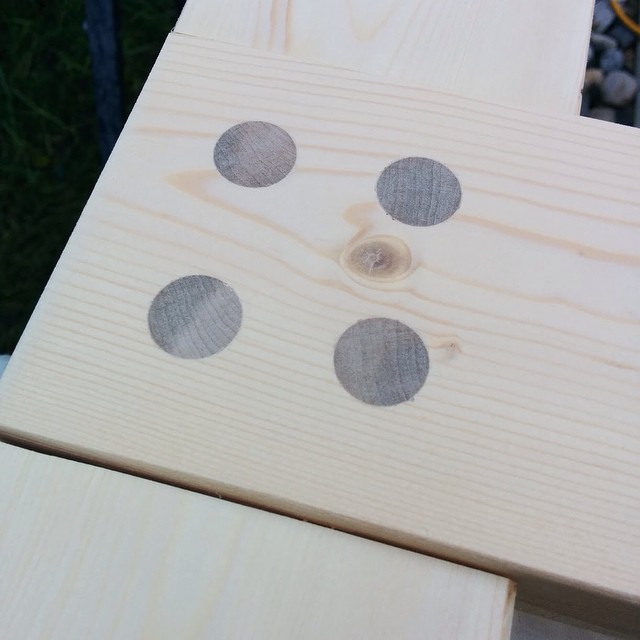
We made the dowels connecting the legs to the stretcher support visible for an interesting detail. El Granto then spent a morning sanding down the legs, and they are now ready for stain.
I am also slowing working away at the powder room. I got a print of a vintage 1930’s Toronto street barber, and set out to framing it. It’s not going so well. Love the print, but the framing situation is off the mark. The mat either needs to go, our the frame (or both!)

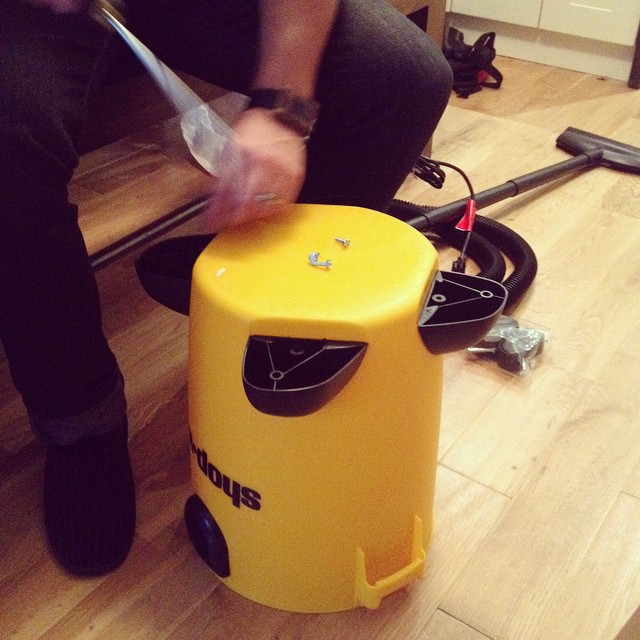
Last weekend we added a couple new things to the workshop. We picked up a small heater (this one). This will hopefully give us a bit more time to work in the garage. While picking up our heater, El Granto happened to stumble on Shop Vac’s on sale, so a new shop vac came home with us as well. This lil yellow fella will be a sawdust vacuum, and spend his life hooked up to various tools in the garage, in an effort to control the sawdust issues a bit.
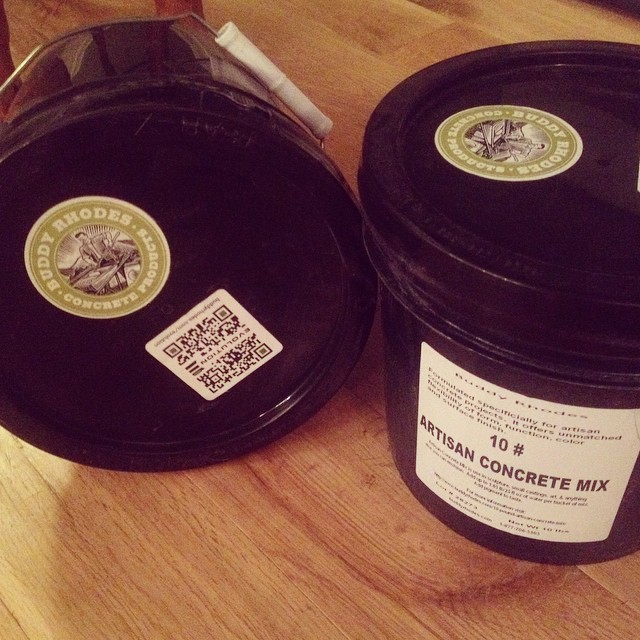
I arrived home to a super fun delivery last week. Jeremy from Buddy Rhodes sent me down some of their new 10lbs mix. Cant wait to try it out, and show you what projects I come up with.
So that’s what we’ve been working on this past week. What have you been up to?
DIY Shadowbox Mirror
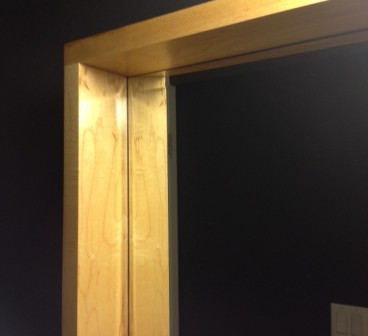
Here is how we created a maple shadow box mirror for the powder room. Originally we sourced the Ikea Molger mirror, but in real life the shadowbox was much too deep, and would not only block the faucet, but also jut into the room too far.
This is what we made instead: Continue reading “DIY Shadowbox Mirror”
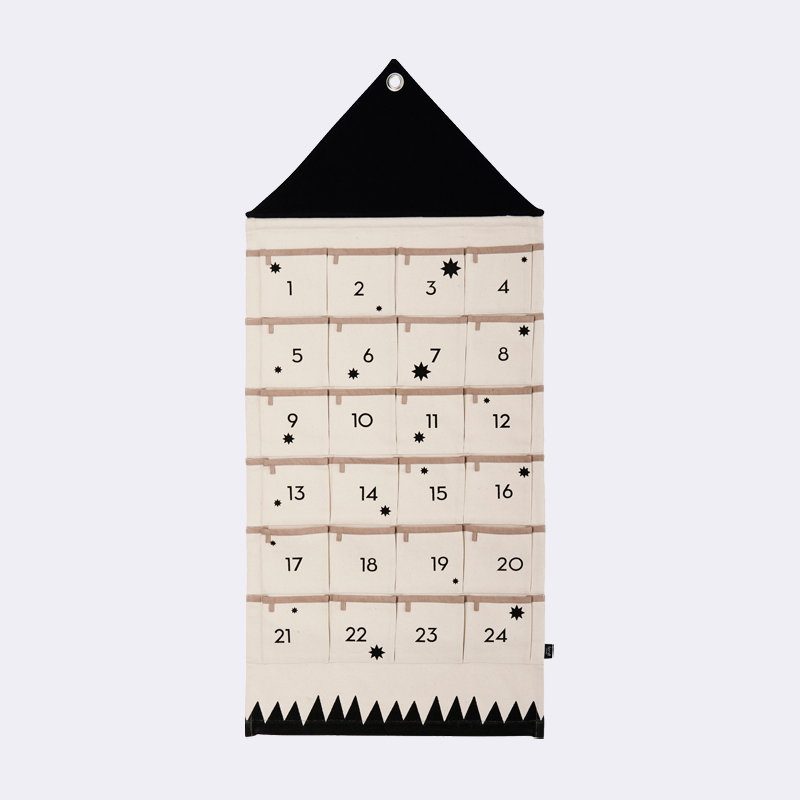
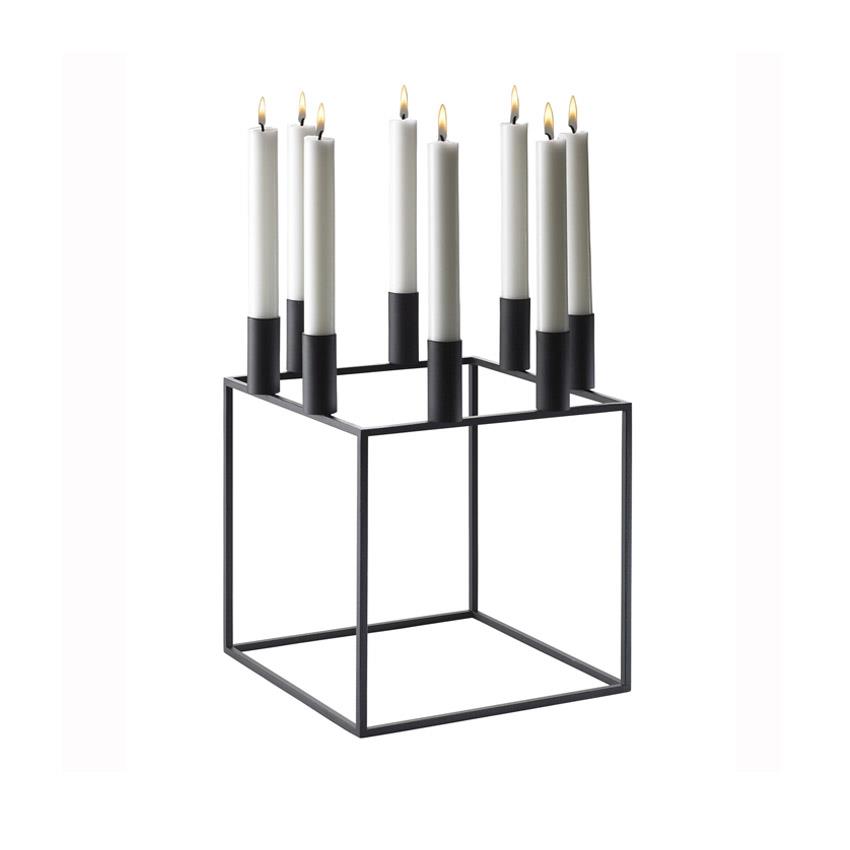
Dreaming of a Scandinavian Christmas

I got REALLY inspired after my trip to Denmark this year. You can see a more streamlined Scandinavian style slipping into my home (hello, the powder room!). My trip fell over the Easter holiday. All of the stores were decked out for the holidays, and there were candles everywhere. As I am starting to plan for the Christmas season, my mind keeps drifting back to Denmark and to Scandinavian Christmas decor consisting of candelabras, fresh greenery and wood.
I have a few DIY ideas in mind, but have also been sourcing some awesome holiday decor from great European sources. Here are some of my picks.
Ferm Living Christmas Calendar:
Granit Wooden Tree:

Lassen Kubis Candle Holder:
Granit Candelabra:

Ferm Living Christmas Tree Blanket:

Trip Trap Teak & Brass Tree Stand:

Kahler Urban Lanterns:

Ferm Living Brass Ornament:

Also check out my Holiday Decor board on Pinterest for more inspiration.
DIY Marble Shelf

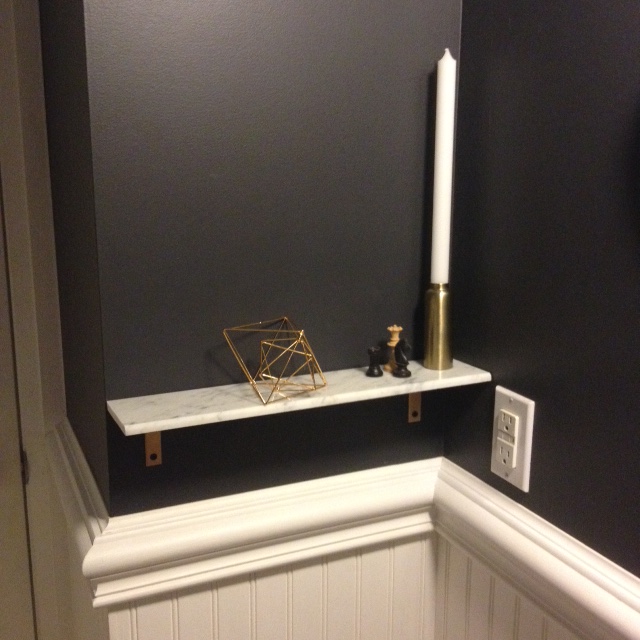
The powder room is small. At only about 4′ wide and 8′ long, with a closet jutting into it, it’s practically miniscule. To even be able to fit into the room, a vanity was vetoed for a pedestal sink. It’s great for the flow of the room, but offers no storage, and barely a surface to sit a bottle of soap. If you want to set your phone down, or touch up your makeup, you end up having to use the toilet tank as a shelf for your things. Not ideal (or very sanitary for that matter). To gain a much needed horizontal surface in our Powder Room Makeover, we opted to install a small shelf. Take a look at what we made.
Custom Marble Shelf
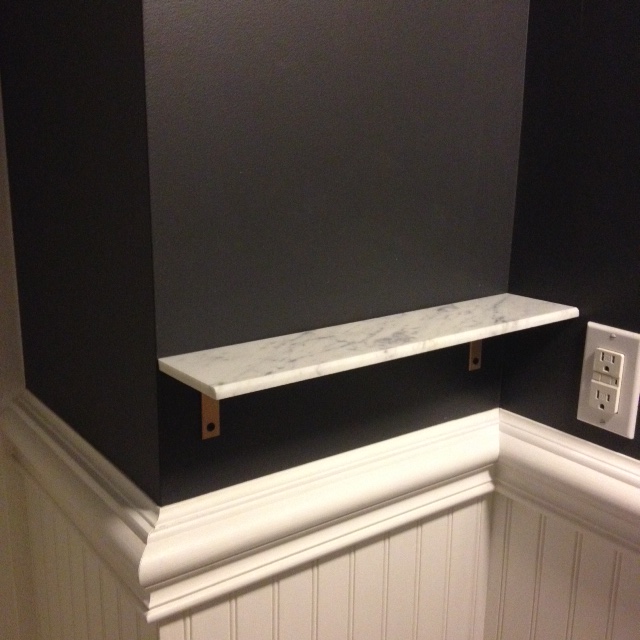
- 1 4″ wide x 3′ marble shower sill
- 1 pkg corner brackets
- Spray primer
- Krylon gold spray paint
- 1 tube PL Premium construction adhesive
Tools:
- Wet tile saw
- Measuring Tape
- Drill
- Level
- Caulking gun
How To:
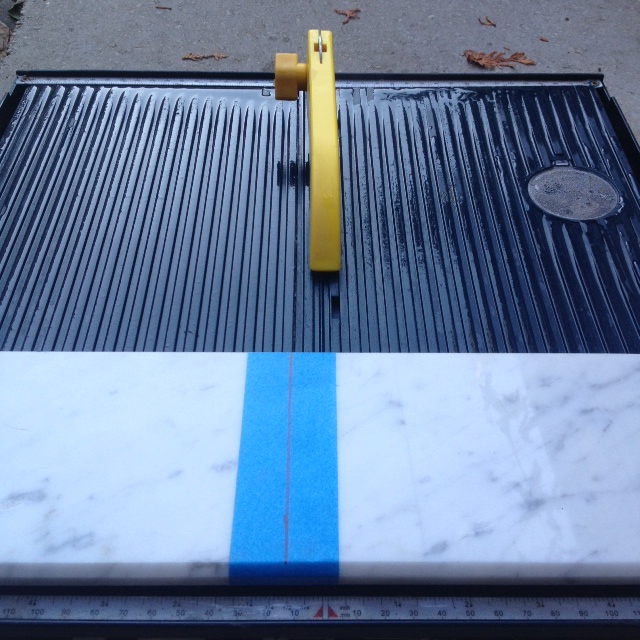
Measure available space (ours was 18″). Mark and cut marble to length with wet tile saw and diamond blade.
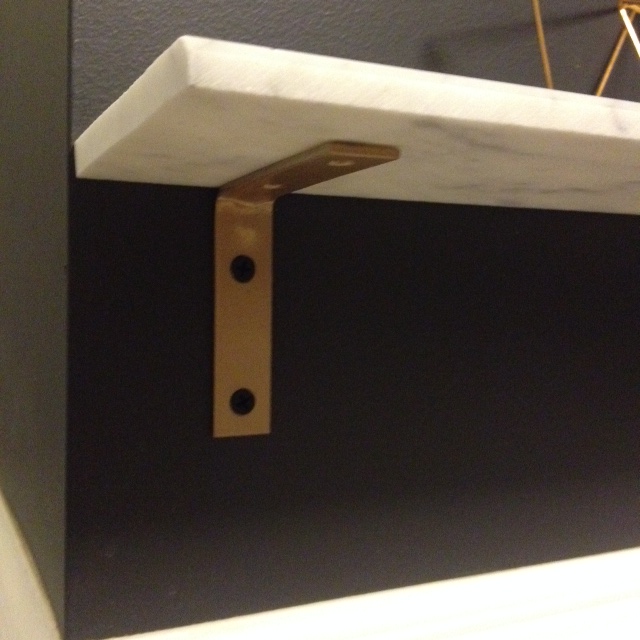
Install your corner brackets as shelf brackets screwing into studs, or using hollow wall anchors. We used black screws as we liked the contrast with the gold, and we have black accents in the room.
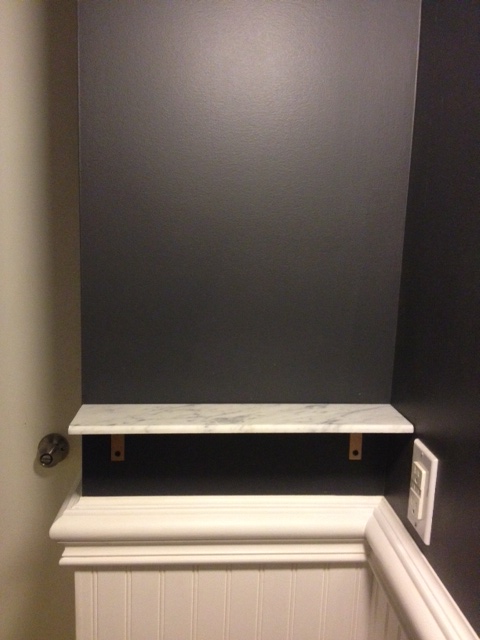

The bathroom is really coming along now. I will be back with another DIY project later on in the week.
SOURCE LIST:
Materialst:
Marble – Home Depot
Primer – Zinnser – Home Depot
Paint – Krylon Gold Metallic
Brackets – Brass corner brackets – Home Depot
PL Premium Adhesive – Home Depot
Difficulty Level (on a scale of 1-5):
two out of five
Total Cost $25
Tips for Traveling with Celiac Disease
As my two year Celiac diagnosis approaches, I have had time to reflect on how my life has changed in the last two years. When I was first diagnosed, I was naive, and thought I could perhaps cheat and enjoy a bit of gluten now and then. After my first month gluten free, I quickly came to realize that when I gave my body reprieve from gluten and then accidentally re-introduced it, my body now had violent reactions. I went from having no visible signs of a gluten allergy, to being a vomit comit if so much as a crumb of gluten made it into my body. There was no playing around, this was serious, and I could never ever have another bite of gluten in my life. That was really hard to come to terms with. Really hard. I LOVE food. If I won the lottery, I would enroll in culinary school, and spend my days perfecting new foods. Food was a huge part of my life, and a big chunk of that was taken away. I could no longer to go restaurants and eat anything I wanted. I couldn’t have canapes at cocktail parties, and I couldn’t enjoy most of my first post diagnosis Christmas dinner. (No turkey if it has been stuffed, no stuffing, no rolls, no gravy, no casseroles, and no pie.)
About 6 months post diagnosis, I had my worst gluten reaction to date. I ate a bunless hamburger that I purchased from my local butcher shop, and spent 6 excruciating hours vomiting. It was so bad, my body was in uncontrollable convulsions, and I was vomiting blood (later learned that I tore my esophagus.) That was scary, and something I never want to relive.
Two weeks after that episode I was scheduled to travel to Las Vegas. It was my first trip as a Celiac sufferer, and I was petrified of not having anything safe to eat, or worse yet getting sick away from home. That trip taught me a lot, and since then I have traveled to New York City, Copenhagen Denmark, and Cuba
Here are my secrets to traveling with Celiac Disease without missing out or getting sick.

RESEARCH, RESEARCH, RESEARCH
I cannot stress this enough. Before traveling anywhere I do a ton of research on safe places to eat. When we traveled to Las Vegas we stayed at Mandalay Bay. Before traveling I made a list of places with known gluten free options, or full GF menus, and where they were located. For instance, I knew that there was a pizza place in Mandalay Bay called Slice of Vegas that had a whole GF menu including gluten free pizza, pasta and buns. I also knew that Border Grill has gluten free menu options, and as does Verandah. All this was available without leaving the hotel. Some other places with Gluten Free options nearby were Nine Fine Irishmen, In & Out Burger, PF Changs, Mon Ami Gabi & Chipotle. I even marked out these places on a map, and carried it with me.
How did I learn about all these restaurants? I hit up Trip Advisor first, searching for things like “Las Vegas Gluten Free”. If I didn’t find enough results, I would often ask a new question to the Trip Advisor forums. I also started Googling, and checking out the menus online of the local restaurants. The next step is calling or emailing restaurants that do not have things marked on their menu. You will soon have a list of safe spots to eat. If you are traveling to a place that does not speak your native language, always print and carry around these Celiac travel cards. They are available in a multitude of languages and they explain the disease, and what you can and cannot eat. They were a life saver in Cuba where most servers speak English but may not have an understanding of what gluten is.
STAYING WITH FRIENDS OR FAMILY? EDUCATE THEM.
When I traveled to Denmark, we were staying and visiting with family. The last time I saw any of that side of the family I was still eating gluten, and they didn’t even know about my diagnosis. My Mom emailed the Danish family ahead of time and told them about the seriousness of my Celiac, and my special diet. When we arrived in Denmark I was absolutely blown away with my family. I cannot express enough how amazing they were. They all knew about my diet, and had went above and beyond to ensure I had things to eat. The spouse of one of my cousins is a chef, and everything he made, he made a gluten free option for me. From gluten free sausages and sauces, to toast points with foie gras. It was spectacular, and incredibly moving how much effort they put in for me.
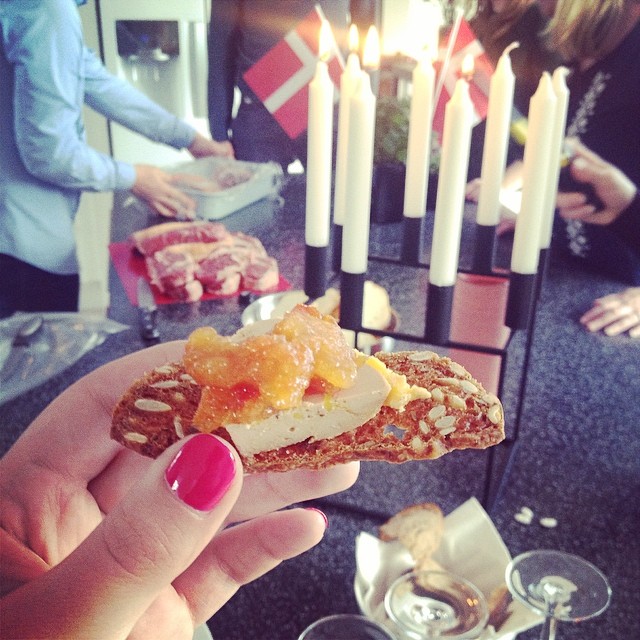
Some family friends even found a bakery called Lagkegehuset that carried fresh daily gluten free bread, and they came over bearing loaves. It was incredible. By far the most delicious gluten free bread I have ever had. I was able to have my bread and cheese for breakfast and lunch the same as my Danish hosts. My family was also amazing for conversing to wait staff in restaurants about what I could and couldn’t eat. The above mentioned chef even saved me at dinner one night, as he suspected the sauce on my plate contained gluten. He told me not to eat it, and went and found the chef at the hotel, and questioned the ingredients. It turned out that there was in fact gluten in the sauce, and they made me a new dish. I am so thankful to my family for taking care of me, and giving me such an amazing trip.

PACK SOME SNACKS.
Even with all the research in the world, there will still be situations where there is nothing you can eat. Carry around some protein bars and other non-perishable snacks for such occasions. When you arrive in a new city, try to find a grocery store or somewhere you can pick up a few things to have on hand for breakfasts and snacks. Fresh fruit and cheeses are perfect for keeping in your hotel fridge.
BRING YOUR OWN MEAL ON THE PLANE.
I have tried calling airlines and requesting gluten free meals to no avail. My last flight I requested a gluten free meal, and this is what I got: piece of papaya and grapefruit, and a roll. While better than nothing (and luckily the fruit was separate from the roll, so I was still able to eat the fruit) it was a far cry from a complete meal or actually gluten free. Luckily I travel with fruit and nut bars, and was able to get something filling in my tummy. Airport lounges don’t often have much better fare. Fruit cups, cheese sticks and loose fruit are the best of the airport slog, but can be costly. On the way to the airport for the Denmark trip, we actually stopped at Chipotle and purchased burrito bowls, with the salsa & sour creme on the side . We took them through airport security (with the liquids in their little containers packed in my liquids ziplock bag). I half expected airport security may find problems with my burrito bowl, but they let me in, and in turn I had a wonderful meal on the plane. That kept me fed until we landed in Copenhagen.
KNOW WHAT FOODS ARE INHERENTLY GLUTEN FREE.
I hate being difficult. I do not like being the person at the restaurant demanding my meal be made special. Even prior to Celiac diagnosis, I was not the person who asked for their meal to be made specially. After diagnosis, I became even more aware of that, and fearful that servers would think I was being a gluten avoider for fad diet reasons, not that I actually needed to eat this way for my health. I had a total fear of server eye roll, and less than careful handling of my food.
As such, before asking for anything to be made gluten free, I will scan the menu for the most plausible gluten free item. A cheese plate sans crackers? Perfect. Salad? Yes! Grilled steak w/ veg? All right! All viable options. I will then broach my waiter with a version of the following “I’m so sorry to bother you, but I have Celiac Disease and I cannot eat any gluten. Do you know if the _______ has gluten in it? Can you check with the kitchen? Thank you so much for your help!” I have found this is MUCH easier (and less eye rolling) than doing the whole “is there anything on your menu that’s gluten free?”

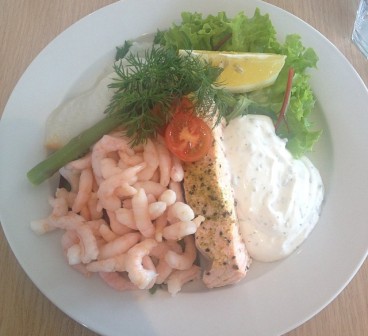
While traveling to Cuba, I knew that Cuban rice and beans were never made with gluten, so this was always a safe meal even at the buffet. If you are staying at an all inclusive resort, the omelet bar will be your best friend for breakfast, and the grill stations will keep you fed with meat and fish at dinner. For dessert, I often hit up the cheese plates with fresh fruit.
CHOOSE SMALLER OR FANCIER RESTAURANTS & AVOID THE CHAINS (unless they are chain restaurants that offer gluten free menus that is)
I find that smaller or fancier restaurants have a more hands on approach. The chef will know exactly what’s in the food they are cooking, and the wait staff may know as well. Heck, I have even had chefs tell me about the farms where the produce came from. People that love and care about food are usually pretty happy to accommodate your allergies. Whereas the kid working at the chain restaurant has no idea what gluten is, or whats in the meal he’s taken from the freezer to the deep fryer to your plate. Find people who are passionate about food and make things from scratch, and they will usually make you a meal to die for. The best is when chefs ask me if they can just make me a custom meal, which I adore, and will let them go wild. As long as it wont make me sick, I will try anything!

With several trips under my belt, I am now 100% confident while traveling and maintaining my gluten free diet. As the world becomes more educated about Celiac disease and Gluten Free dining, I think things are going to get even better.
What are your Gluten Free Travel Tips?
Project Nelson
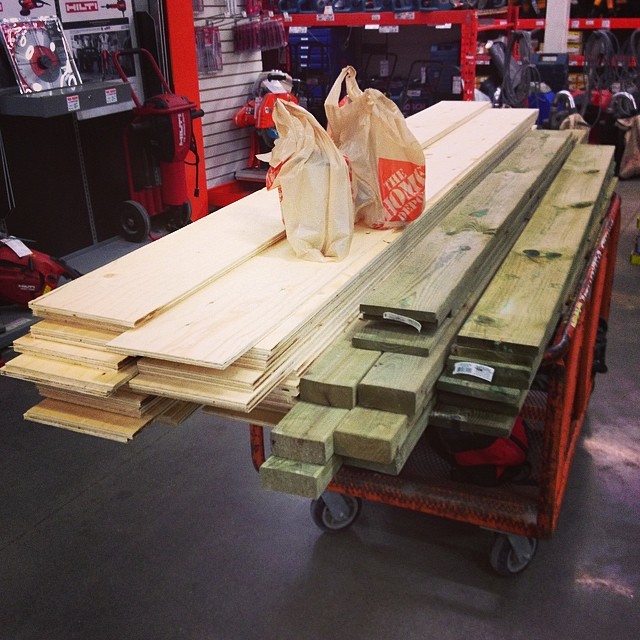
We have started a new project in the Storefront garage; Project Nelson. We are making a Modern Farmhouse table and matching benches for a gentleman named Nelson. The table will be pretty much exactly the same as Dan’s table. As such, I won’t be boring you all with another build how-to from start to finish. I will however be popping in to share a few tips and tricks with you guys along the way, and keeping you up to date on the progress.
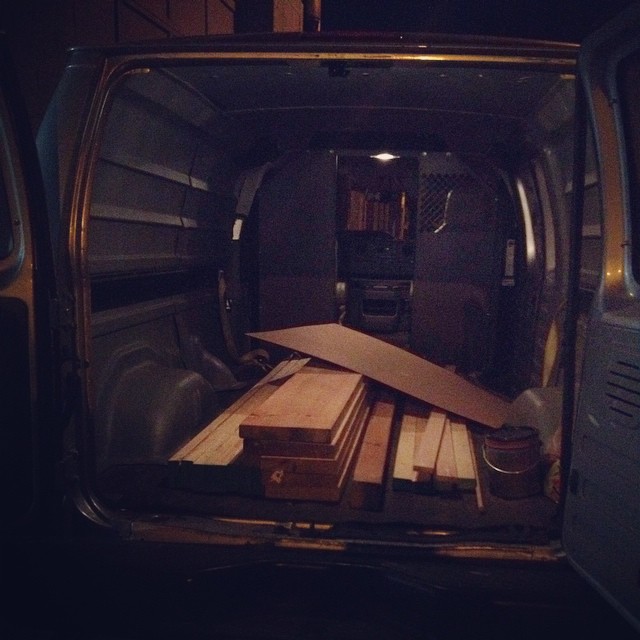
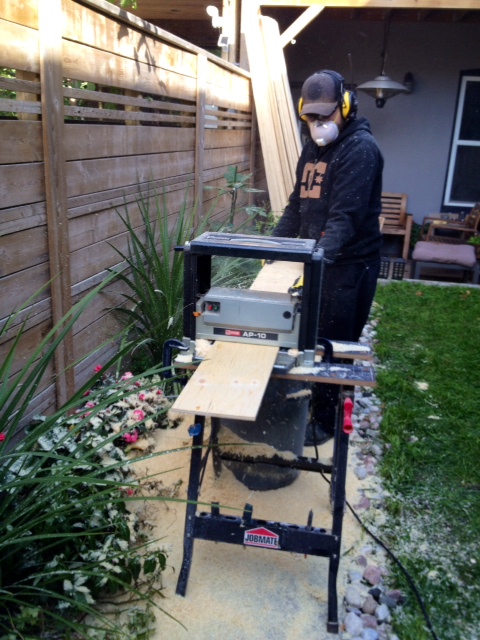
Progress got started this past weekend. A Zipvan was rented. Can I mention again how fantastic this concept is? We can have access to a large fully loaded cargo van without having to well… store or pay for a large cargo van. Instead we can get one once a month when we absolutely need it, and pay $30 or so for an hour and a half. With said Zipvan, we headed to Downtown Lumber and picked up lumber. We are using Canadian kiln dried 2″ thick pine for this project. (Although for the record, Downtown Lumber also sells 2×12 oak at about $18/board foot.)
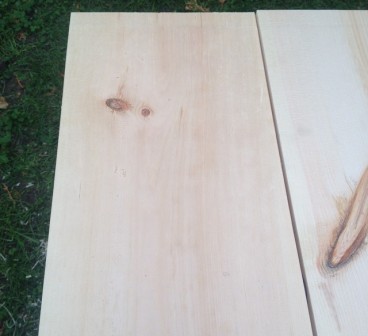
With lumber in the garage and a fine fall day, we planed all the lumber. My goodness, its amazing when you have the right tool for the job.
Turning this:

Into this:
Will save me hours sanding!
With all that lovely smooth pine, we cut everything to length, giving our new Milwaukee 12″ sliding compound miter saw a workout.
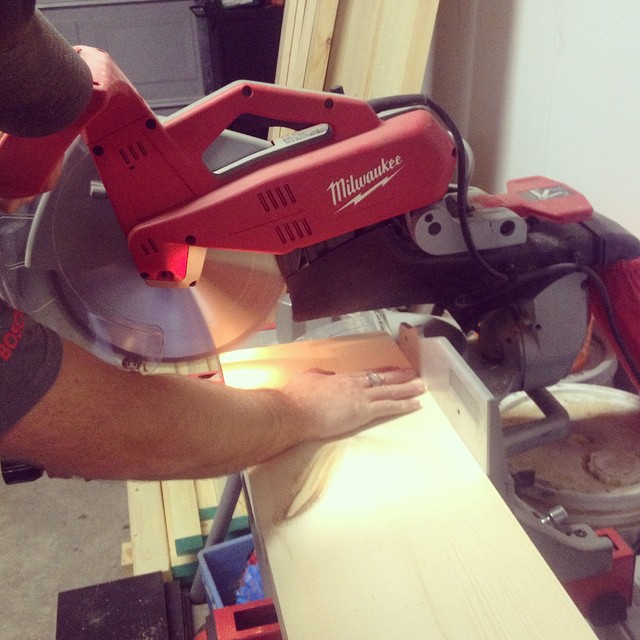
Maaaaan, the last table we built with our old Mastercraft saw. Comparing that saw to the Milwaukee is night and day. The beast Milwaukee cut through that pine like butter, not burning, sticking or generally seeming like it had to try very hard at all. AND it is accurate. Our old saw liked to waiver. Slowly creeping out of true and making us perpetually need to square it up, and never being happy with the results. We did a test cut with the Milwaukee, checked it with a square, and BAM it was perfect. That makes my life ever so much easier.
With everything cut to length. We glued up the table top, added some back supports, and filled a few knots with epoxy. Is anyone interested in how to epoxy knot holes? If so, let me know, and I will give a how to. While the epoxy & glue were drying, we cut down the legs, and got started on stain samples for Nelson. A good days progress. We hope to have Nelsons table finished and ready for delivery in a month.
We also got a bit of work done on the powder room, and will have a progress update for you later in the week.
Powder Room Art
What a difference a little bit of art can make. After lugging home the big frames last week, and flattening the stored-too-long-in-a-tube art prints, I finally got a print framed and up on the wall. Continue reading “Powder Room Art”
Basement Flooring
When we last left the basement, we had laid the DRIcore subfloor and installed the SMARTWALL wall finishing system. Then we ran into spring, and had to move our work outside. So what was left on our basement list? Get some paint on the walls, and some flooring on the floors. Then we could move to the pretty finishing touches!
So let’s talk basement flooring. I was inspired by white soaped floors while in Denmark. I even wrote a post on them.
So how do I plan on getting it?
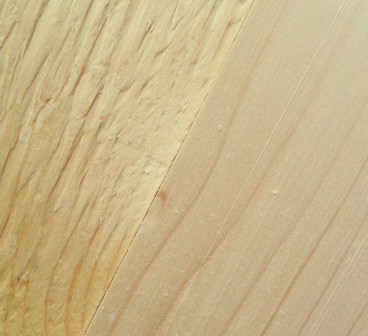
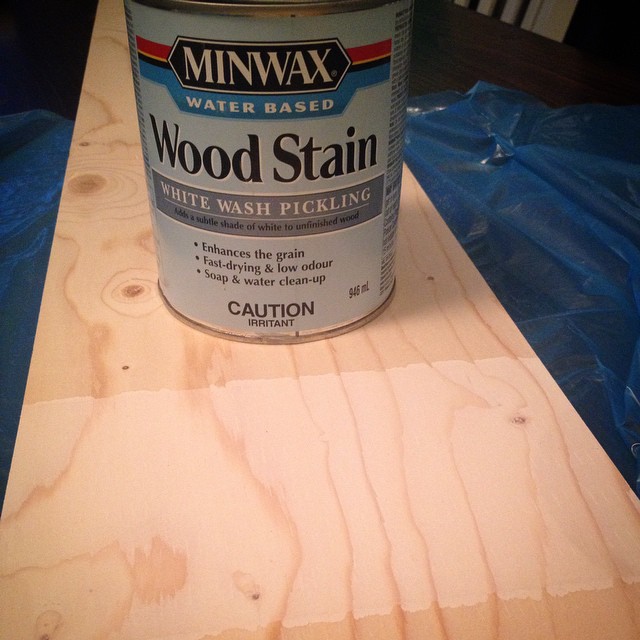
A few weeks ago I sanded and sanded and sanded a piece of the plywood, and applied some test stains. I tried Weathered Oak, Grey, and White Wash Pickling Stain. There was one clear winner. The Minwax White Wash Picking stain.
Now to deal with the sanding issue. We could lay the whole floor, then rent a floor sander and go at the whole thing. Problem is, we could easily sand through the first layer of plywood with the big sander thus ruining the floor. Next idea… use a belt sander and orbital to sand each board before laying. Okay idea, but still very very time consuming. Third idea: rent, beg, borrow or steal a planer and gently shave off a tiny bit of the boards.
While a planer may be on my Christmas list (please Santa please!) Such an expensive tool could not be justified for this project. Enter the begging and borrowing. When we got our new Milwaukee sliding compound miter saw, we gave our old 10″ slider to my Dad. He was building a deck, and his saw wouldn’t handle 6″ wide boards. So I causally mentioned the gifted saw, smiled a sheepish good daughter smile, and asked to borrow his planer. He said yes! His beast of a planer (this thing is solid metal and must weigh 100lbs) came home with us at Thanksgiving. Thanks Dad!
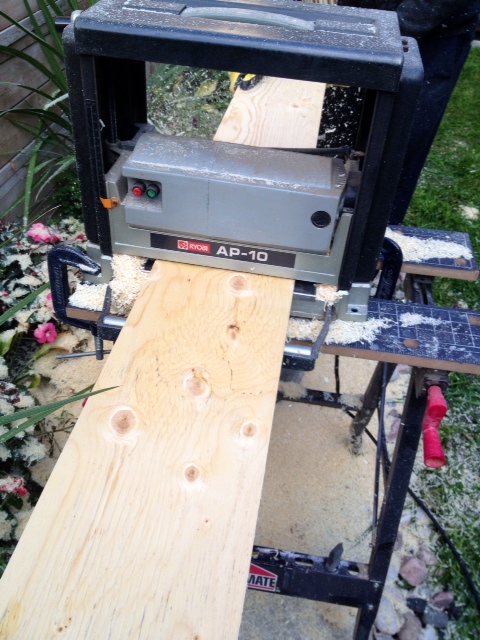


Right: after planing
We did run into a few issues with the knots tearing out in the planer. We will strategically cut out the bad parts when we lay the floor, and then wood fill and sand the others before staining.
We got all the flooring planed, and it is stacked back in the basement ready to be laid. I would like to get the basement wall painted before laying the floor. Is it wishful thinking that I could paint it after work one day this week? Hahaha yeah.
Powder Room Progress
Work on the powder room mini makeover has begun, even with a 3 day trip to the cottage for Thanksgiving thrown in. Here’s a quick update on what I’ve been up to:
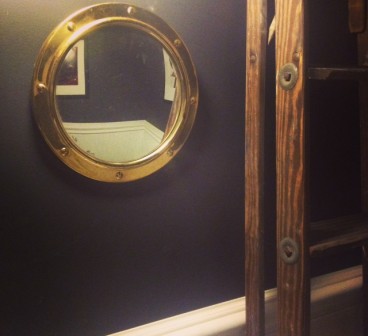
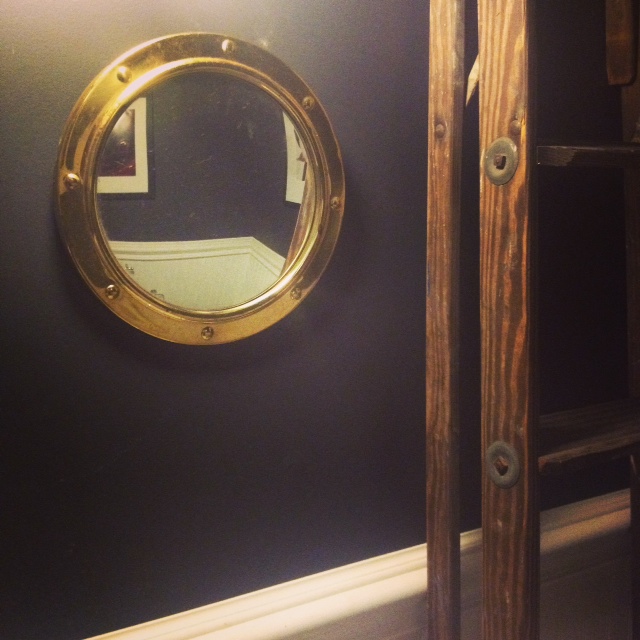
Removed the ornate mirror, and tried hanging the great portal mirror I grabbed at Value Village during the blogger thrift store tour. The mirror is AMAZING, and looks so good with the black wall color.
However… it is just too small for the space. Even with the convex shape of the mirror, it is just not big enough. Sad face.
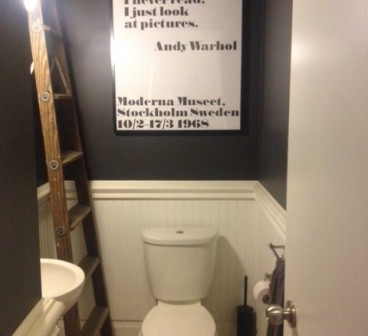
When I was in Denmark and Sweden this spring, I went on a bit of an art print binge, and during that time I picked up the full set of Warhol quote posters from Moderna Museet in Malmo, Sweden. They are nice big prints (70cm x 100cm or close to 27 1/2″ x 40″) and I thought one or two from the series would look great in the bathroom. We have 12′ ceilings in there, so they should be able to hold the big art prints without feeling claustrophobic. Now all I needed were frames. Of course, there is really only one place to get good quality frames that large (we’re talking three and a half feet tall!) for a good price. Like the prints themselves, my frame source was also Swedish. Can you guess where that is?
I hopped on the subway last night, and trekked out to Ikea Etobicoke, and picked up two large 70cmx100cm Ribba frames in black.
While at Ikea, I did a good amount of perusing. They have upped their game with their new store displays. It was looking good! There were also a few new great items in store, that are not listed online yet. I could do a whole post on it, but here is one of my instagrams from last night:
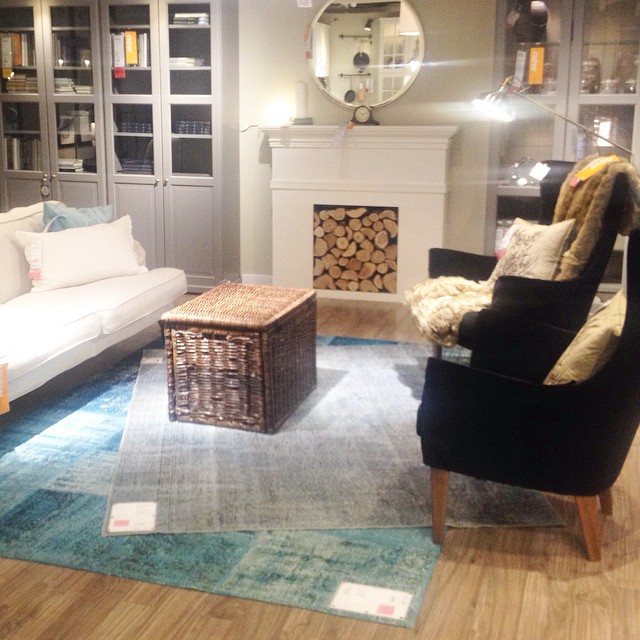
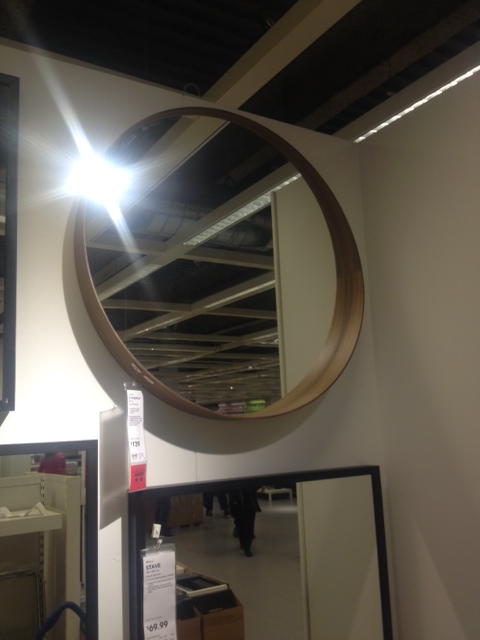
Alas I was not shopping for new armchairs or rugs (but hey, that faux fireplace would look great in my house!) I needed to source some bathroom items. I was hoping to pickup this Molger mirror (in birch):
I saw this fab beauty, but it was like $120 (sorry no exact price as its not on Ikea’s site.) and thats more than I wanted to spend for the mirror for this project. Although I think two of them would be fab for my upstairs bathroom reno!
Then I went and carried everything home on the shuttle bus and the subway.
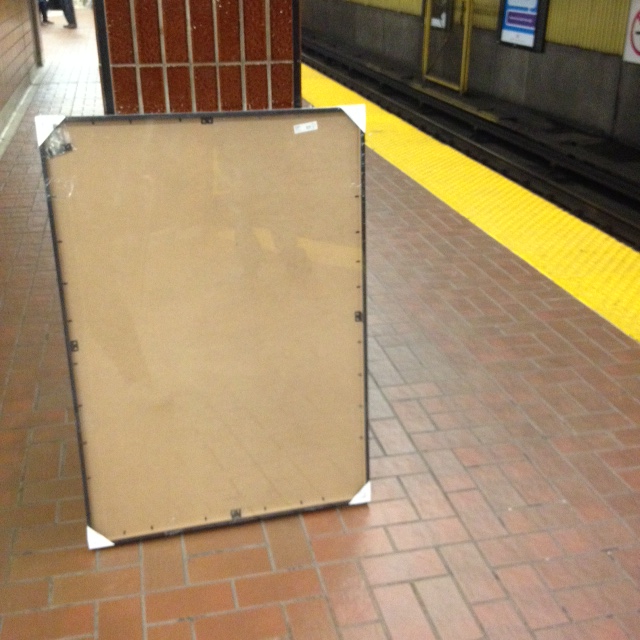
And no, that was not the most awkward nor heavy item I’ve carried home from Ikea on the Subway.
I can’t wait to get home from work tonight and start framing the posters. I want to see them on the wall!
I am still however on the hunt for a light, a small shelf, towel & tp holders, trash can, and accessories. I also added to my wish list a set of antique taps, which I have my eye out for (aka stalking craigslist and eBay).
If you guys see any taps like these (for cheap) let me know!