Weekend To-Do

It’s the weekend again. YAY. I am looking forward to having a nice weekend at home, getting some work done around the house, and competing in Beer Quest on Sunday.

Here’s my to-do list for these two days out of the office. Whats on your list this weekend?

Weekend To Do

  • Paint guest room board & batten
  • Paint guestroom walls, and put the room back to some semblance of order
  • Convince El Granto to let me cut a hole in the wall (more on that later, I hope…)
  • Do some small maintenance on the exterior of the Storefront in preparation for winter. WINTER IS COMING. Will also try to get a new mailbox and install that.
  • Clean up the vegetable garden (or whats left of it)
  • Oh and clean the house, cook, walk the dog, do laundry and all the regular stuff…

I am considering giving up sleeping…I hear its overrated anyways

Hallway Schoolhouse Light

You may have noticed that I have gushed about schoolhouse lights once or twice in the last few weeks. It’s true, I was in love. However my budget wasn’t allowing me to date any of those lights (sad face).

Not to be so easily broken, I set out to find a way to get my schoolhouse lights in my budget. I found schoolhouse glass at Home Depot for $7.50 (awesome!) I just needed to find an inexpensive fixture to use with the glass…not so awesome. I must have opened every box in Home Depot trying to find one that fit the glass. I didn’t even care about colour, as I could easily spray paint them. I struck out, hard. Nothing would work. In my depressed state, I wandered around Home Depot feeling sorry for myself. Then I spied on a bottom shelf, a clearance priced Hampton Bay Schoolhouse Semi-Flush pendant. Priced at…wait for it…$36. WTF? Where did this come from? I had never before seen this light (and I was SURE I knew of each and every schoolhouse light HD carried.) I took a pic, sent it to El Granto for approval. He gave me the thumbs up, so I promptly marched one over to the checkout.

Hampton Bay $36 Schoolhouse Light

Ideally I would have gotten three, so I could replace all the heinous hallway lights in the house, but they only had 2 left at my Home Depot (boo) and realistically I was already buying paint, so I really couldn’t carry them all. So I just took my one treasured light home, and vowed to check other Home Depot’s later.

I quickly roped El Granto into swaping out our main floor hallway light for the new schoolhouse light. So quickly in fact that I didn’t take a pic. So instead here is a pic of an identical spaceship light elsewhere in my house. (all told my teeny tiny house holds 6, yes six of these ugly little UFO’s.)

Careful; this UFO masquerading as a light may steal your children from their beds at night and take them off to space
After: New Hallway Schoolhouse Light
View down Main Floor Hallway

Ahhh…so much better. I have been loving gazing at my new light every time I pass it by. It’s true love I say.


SOURCE LIST:

Materials:
Hampton Bay Schoolhouse Light: Home Depot

Tools Used:
Screw Driver, Ladder

Difficulty Level (on a scale of 1-5):

One out of five

Total Cost: $36

Neighbourhood Walk Score

In reading a recent Toronto Life article “House Wars: true tales from the Toronto real estate market” I got to thinking about how the walkability of your home effects your life, and where exactly you live.

El Granto & I do not own a car, we commute via TTC to our jobs and walk pretty much everywhere else. I buy groceries 3 times a week (Monday, Wednesday and Friday) because I can only carry so much. I buy only the food we plan to eat for that week, and as such we don’t have a lot of pantry items, snack goods or the like hanging about. I buy milk from the corner store as it’s too heavy to schlep farther than that, and we buy all our bread and meats from a local bakery & butcher, and in the summers we frequent local farmers markets.

Living downtown sans car means a lot of things to your lifestyle. Our weekends are spent walking to local amenities, restaurants and parks. To the hardware store to procure items for our home projects, and grabbing a coffee and heading out for an adventure with the dog. So when the Toronto Life article touched on Walk Score it got me thinking. We knew that when we bought our house the location played an important role. We could get a much bigger house say north of St. Clair and west of Jane, but we would be stuck on a bus to get anywhere near the subway, and lacked a lot of the things we loved. (Evening drinks with friends, Thai takeout etc.) We set a goal of living south of Dupont, and luckily we found it. Truth be told, our house was one of only 3 houses that we even looked at south of Dupont. One of the three was a major fixer on Euclid that went several hundred thousand over asking, and the other was a hoarders house in the Junction, that again, went over asking. We looked at over 100 houses, and really felt that we lucked out finding a house in the location that we did.

So back to Walk Score, I checked out our score today and noted that our house gets an 82 (out of 100) on its Walk Score and a 94 on Transit Score. That’s not bad and pretty much what we thought. Our neighbourhood is transitional (drug dealers and hookers are moving out, and hipsters  & young families are moving in.) As this transition moves forward more amenities move into the neighbourhood. We’ve got some great local restaurants (Starving Artist, Bloordale Pantry, Farmhouse Tavern to name a few) as well as great places to grab a pint (3 Speed, Bar Neon & Boo Radley’s) and lately coffee shops have been popping up like acne on teenage face. Café Neon and the Toronto Coffee Company among others. In contrast, when we moved into the house, Bloordale Pantry, Farmhouse Tavern, Bar Neon, Café Neon and Toronto Coffee Company didn’t exist. That’s a lot of new amenities moving in to the hood in the last year and a half. Hell, even the New York Times recently featured the neighbourhood in a Travel slideshow/article. Check it out here.

Transit however has always been good. We’ve got Bloor/Danforth subway, the Bloor GO Station, a plethora of buses (Lansdowne, Dupont, Symington, Dufferin) and the 504 & 505 streetcars. We knew with good transit options that our neighbourhood had too much to offer to stay underutilized forever. Now as we grow together in our first home we keep seeing the building permits go up in the windows around us, the junkies disappearing and the neighbourhood seems to get better every day.

So whats your Walk Score? Did you move into your neighbourhood before it was hip?

Guest Bedroom Progress Report

It’s day four of Project Guestroom and although lots of work has went on, there’s still a ton to do. Here’s an update in pictures:

The weekend got started by prepping for our big project; board & batten. Well truthfully its not really board and batten, its more like shaker style paneling.

We got 1/4″ mdf custom cut at our awesome local lumber yard Downtown Lumber and attempted to walk it all the way home on a dolly that didnt want to cooperate. But after an hour and a half of El Granto and I yelling at the lumber, each other, and strangers passing by, we got it all home.

We then laid out our paneling, which required math, engineering and thought. It took a long time and my head hurt. The end result was a line of tape on the wall…

Tape Line Up (Will Be the Top of the Paneling)

Then we painted and stuff, and then it looked like this:

Wall Painted White

Then we started paneling

Top Rail Installed
Vertical Stiles Installed
All the Rails & Stiles Installed

Then we sanded, spackled, spackled and more spackled and then cried some, cause spackling sucks

OMG look at all the stupid spackling

Next up, caulking, cause as if spackling didn’t suck enough…

(yes yes there will be a full board & batten post and a how-to after I complete it all, so hold your horses)

Project Guest Bedroom

When we purchased the house, we envisioned a cottagy guest room, and both of us instantly thought yellow. We picked out a sunny buttery yellow, and purchased the paint prior to moving in. Our first weekend in the house we painted, and it was….BRIGHT.  We decided to try to live with it, see if we liked it any better. Then when Holmes Inspection renovated our house, they colour matched the room and re-painted, but the colour was even BRIGHTER. Now when the sun pours in the bay window every morning, it’s a bit…well…neon.

We did do a few things right, we bought a nice bed, linens, hung custom blinds, and re-used some dressers. It just needs a bit more “lipstick and mascara” (and maybe a pair of killer heels).

So here goes Project Guest Bedroom

Pinterest Guest Bedroom Inspiration Board


To Do List

Really?! All that for a room I thought was almost finished? Eeep, what do I get myself into?

Backyard Mural – How to Paint a “Faux” Ghost Sign

Sorry for the long post, I doubt many of you will ever want to paint a ghost sign of your own, but if I help one person, I will consider my life fulfilled.  Yeah sure…

There really is no info on how to do this on the web, and I did it all trial and error. So I am putting my wisdom blubbering nonsense into the world, and maybe somewhere I will inspire a DIY ghost sign.

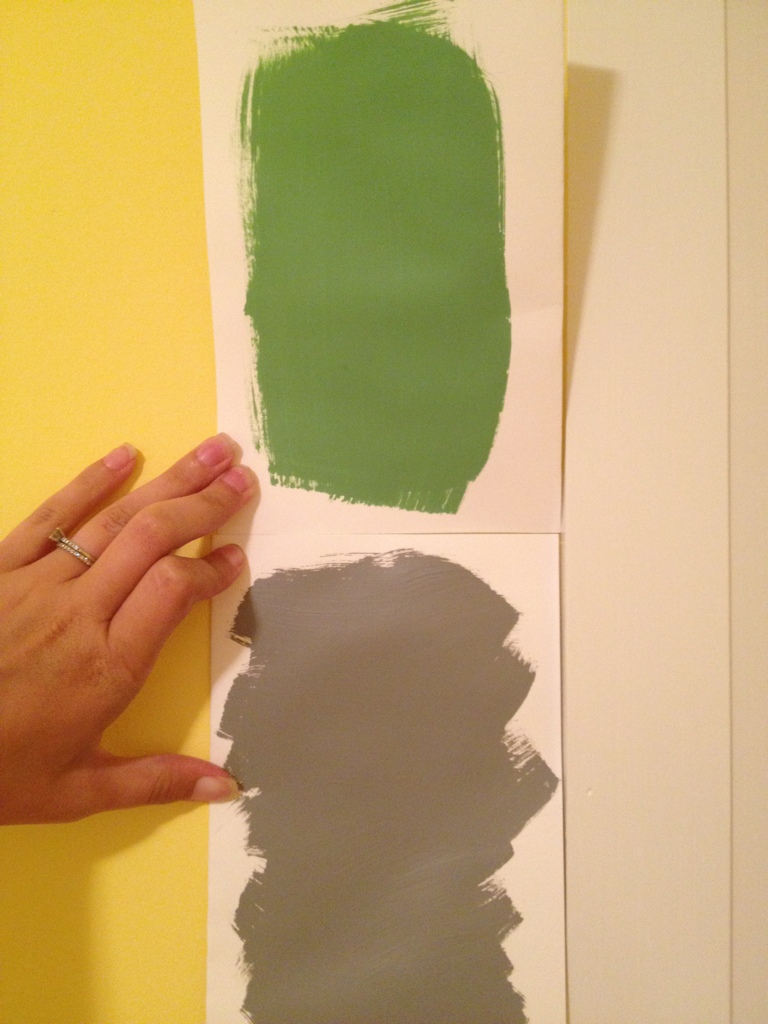
Now lets get this party started. First up, I painted my cinderblock wall with a base color of dark grey exterior flat paint. Ideally I would have had a lovely brick wall, but instead I had an ugly beige cinder block wall, so I gotta deal with the hand I’ve been dealt. If you have a wonderful old brick wall, don’t paint a base color!

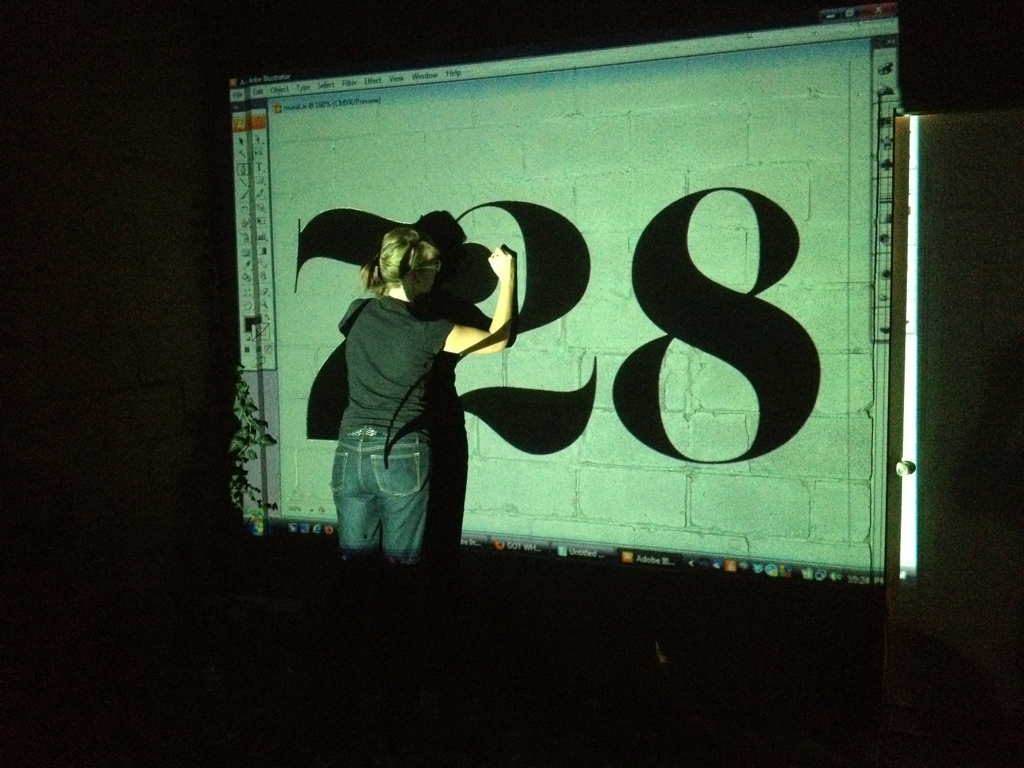
After my base had cured for a week(ish) I set out to project my design onto the wall. I used a digital projector and a design I laid out in Adobe Illustrator. I lucked out with this and was able to borrow a projector. However, if you are unable to. Check Craigslist for Artist Projectors. Like the Artograph Tracer Projector. Even new, it only retails for $100.

I projected the design onto the wall (at night), centered and leveled it, and got to tracing the outline with chalk. I used Crayola childrens sidewalk chalk in yellow, because that’s what the dollar store had. In hindsight, I would recommend regular white chalk, in the skinnier variety. My chalk came pre “sharpened” on one end, but quickly dulled and I was left with a large blunt blob of chalk to draw crisp lines with… so yeah, get the regular old chalk your school teacher used.

After you draw your outline, go to bed. It’s dark, and you cannot paint. No matter how excited you are to get started.

Then get yourself some Annie Sloan Chalk Paint. I got mine from Canadian distributer Diamonds & Toads in St. Thomas Ontario. If you’re doing a small mural like me, just get a sample pot. That stuff goes a loooooong way. I have a quart, and maybe used a 1/4″ worth of paint from the can. Seriously. Also get yourself an artist paint brush to do the outlining of your design, and a wider brush for filling in. Now, this is NOT chalkboard paint, it’s a variety of paint all it’s own. It’s great for furniture, adheres to most surfaces without any sanding or removing of old material, and is even durable outdoors with no extra finishing. (really). Now if you were putting it on furniture you would probably want to wax or seal it, however its important for outdoor uses NOT to wax. Wax will hold in moisture and wreck your shit. So paint it and leave it alone to age gracefully.

Once you’ve got your supplies, outline and fill in your design with one coat of chalk paint. It wont be even, it wont be perfect, but that doesn’t matter, you’re going to be removing most of the paint anyways. Now this stuff dries fast, so work quick. Try not to leave big ridges or globs of paint, but make a smooth even layer. Chalk paint is weird. It’s more like a really thick watercolour paint than a latex or acrylic. It blends and moves like an artist paint. You can also thin it down with water, or thicken it by leaving the lid open (really). You also don’t have to worry that much about screwing anything up, as its supposed to look old. As I said, it dries fast. So clean your brushes pronto after finishing.

After an hour you can start to distress the paint. It took me about an hour to do my one coat of paint, so as soon as I finished painting I went back to the areas I started first, and got to distressing. If you were painting on wood, you would probably want to try sanding for distressing. However, being on a cement wall, that’s not the best or easiest way to do it.  Instead, you can use another technique; a rag and warm water. But wait, I said that chalk paint was durable outdoors, but how can that be if it can be removed with water?! The thing is, when you wipe the dry paint with a wet cloth, the paint doesn’t wash off. However, when you SCRUB the paint with the wet cloth, the paint RUBS off. It doesn’t dilute and smear, it just comes off the areas you scrubbed. Leaving the base colour paint below intact, and not smearing paint into other areas of your mural. Say what?! Really, that’s how it works, I promise. I have no idea why, it just does. So needless to say, that’s perfect for an old looking weathered signs on walls.  So start scrubbing! I thought I’d try a cleaning sponge, but it was too. well. spongey. A white clean heavy duty rag worked best. Now the thing is, when you distress chalk paint with water, it’s kinda like working with grout. Huh?! You know how when you are washing away excess grout, your sponge is constantly covered in grout sludge, and you have to repeatedly wash it to get all the film off the tiles? Distressing chalk paint with water is the same way. Your rag will leave excess paint hanging about. So just make sure you have a different clean rag or sponge and are always cleaning up after yourself, or you will have a wishy washy paint sludge over everything.

Now distressing chalk paint with a wet rag isn’t easy per se. It requires massive amounts of scrubbing. And scrubbing and more scrubbing. BUT it rubs off beautifully. It sticks better to rough surfaces, and rubs off easier on smooth ones, making the distressing rather easy. It looks natural because its exactly how paint would naturally fade/age.

So grab an unsuspecting lacky and scrub scrub scrub. Now if you scrubbed off too much, don’t worry you can always layer more paint back on. I did notice that the areas where I had a nice even coat of paint were easier to distress then the more dry brushed thin areas. So I actually wished I had a more solid layer of paint to begin with.

And that’s it. After you finish distressing and cleaning up after yourself, it’s done. No sealer, no nothing. It will be fine out in all weather and will age nicely.


Backyard Mural – Ghost Sign Reveal

My backyard ghost sign mural is finally done. (there will be a how-to tomorrow, so check back if you want to know how we did it)

So here is some background. We had a boring beige cinderblock wall at the back of our yard. It was boring to look at, and well BEIGE. I cant leave anything beige in my wake, so I set out to ramp it up some. After we found a $9 ‘Oops’ can of paint at Home Depot, and my Mom picked up some chalk paint for us, we set out to create a faux Ghost Sign. What’s a ghost sign? Those old faded sign’s and ads on the sides of buildings! We live in an old storefront, so we wanted something that looked old and cool. What design did we end up going with? Inspired by this image of bold graphic beautiful type, we decided to do a typographic approach to our house number.

So here it is. The before and afters!

Before:

Beige cinder block wall

During:

Base colour of dark grey on the wall
Tracing the design onto the wall
The chalk outline
Paint on, ready for distressing

After:

I would like it more distressed but my arms hurt…


SOURCE LIST:

Materials:
Base Paint – Behr Premium Plus Ultra: Home Depot
Annie Sloan Chalk Paint in Bright White: Diamonds & Toads

Tools Used:
Paint brush, tray, roller, tape, rag, sponge, muscles

Difficulty Level (on a scale of 1-5):

Three out of five

Total Cost: $50

Guest Room Paint Colour

Help! I have three vastly different ideas on paint colour for our guest room. Here’s the down low:

The guest room is getting a facelift with a new wall treatment & plate rail. The wall treatment will be white. Yes boring old white. Don’t worry, this room needs some boring. Currently it’s a whole-hella-lotta-yellow. A hangover’s worst nightmare yellow.

So here’s were I need your help. Above the wall treatment there’s like 2 feet of regular old wall. What colour do I paint it? I can leave my old friend yellow (who will probably look way less acid-trippish when hes confined to 2 feet of space). Or I could go all crazy on it and do green. Last but not least is my old standby; medium grey.

So what camp are you in; yellow, green or grey?

20120903-212403.jpg

Hide Your Ugly Office Tech

I enjoy having internet, hell without it I wouldn’t be posting this. However I hate all the technology required for it. Wifi cable modem, router, cables, wires…yuck. They are always a tangled mess of blinking lights and ugly plastic. So what do you do about it? Make friends with some cigar smokers (thanks El Granto & Father in-law) & steal some of their pretty cigar boxes.

Drill some holes for cables, antennas and air flow in your cigar boxes. Plunk your tech junk in them and stack em up.

20120903-191824.jpg

20120903-192041.jpg

All our tech fit into two boxes other than my stupid VOIP gateway which is giant and stupid, and wouldn’t fit in anything. There… I told it. (until I find a box or old book for the gateway to fit in, he will just sit below the boxes.)

No one would know these unsuspecting boxes on my bookshelf hold all that ugly crap. There may be dirty dishes in the sink and laundry piling up but it makes me sleep a little better at night knowing that my tech junk is neatly tucked away.


So now you have no excuse. Go hide your tech!

SOURCE LIST:

Materials:
Cigar Boxes: Unsuspecting Family

Tools Used:
Pencil, Drill,

Difficulty Level (on a scale of 1-5):

One out of five

Total Cost: $0