Ever tried to open an Ikea box and got so frustrated you just started ripping the cardboard hoping to somehow get that damn box open? Dont worry, we have all been there. Ikea boxes are strong and sturdy but glued shut encased in a little Swedish tomb that you think you’ll never be able to open. Well my friends, we have figured out how to open most Ikea boxes simply and easily (I say most cause some boxes are so well glued nothing will open them. In those cases I resort to tearing and swearing.)
So what you ask is our trick?
Take screwdriver of your choice, and weedle it into one end of the box.
Pull up on the screwdriver.
Then slide the screwdriver along the box, opening the end in its wake.
*one word of caution, watch where your screw driver is going, and don’t let it come flying off the box and make a divot in the hardwood in the dining room, or else your wife will screech at you “watch the floors dumbass!”
I know. Its so simple you’re surprised you never thought of it. Instead you broke countless fingernails and scratched your new cabinet when you tried to open the package with a box cutter. Now you love me and will forever be grateful for saving your marriage. I wonder what the divorce rate as a direct result of Ikea arguments is? Oh come on, you know you’ve had an Ikea argument. “If you like the Kivik sofa with the Dansbro red slip cover so much you can sleep on it indefinitely!” Shopping at Ikea is a domestic situation in the making. Don’t believe me? Check out this post from Apartment Therapy.
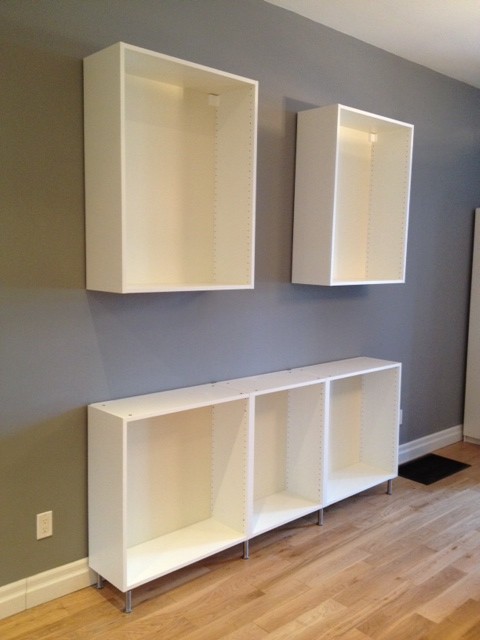
On our list of 2013 DIY Goals we noted one big project being the coffee bar. The coffee bar will be placed in our open concept kitchen/dining room. It will be on the opposite wall from our U shaped kitchen, and will be placed half way between the kitchen and dining room.
Before
We decided to build a coffee bar there for several reasons. A.) We wanted more counterspace to house our prolific array of coffee paraphania. B.) We needed more storage for kitchen dishes and barware, and C.) we wanted more space to lay dishes during parties. We decided instead of getting a freestanding buffet, we would build in the coffee bar using cabinets that match our kitchen. I set to planning the coffee bar about a year ago, but it hasn’t been on the top of our DIY priority list, and to be honest its also a bit of a big ticket item. We decided to do it in stages to alleviate the financial burden. Thanks to some Ikea gift cards for my last birthday and Christmas, we were able to use our time off between Christmas and New Years to get started!
The first stage was buying and installing the cabinet bases, then making a temporary countertop. Stage two will be wiring in new electrical outlets, pouring a DIY concrete countertop, adding some reclaimed wood open shelving and getting a few doors for the bottom cabinets. The last stage will be adding glass doors to the uppers, and a three drawer unit to the middle base cabinet.
So here’s part 1 (aka the manual labour):
We headed to Ikea with plans in hand and had the friendly kitchen department write us up a purchase order for the cabinet bases. We went with two 12″ deep, 30″ wide lower cabinets as as well as a 12″ deep 24″ wide lower (which will have a drawer unit in it). For the uppers we went with two extra tall 12″ deep 30″ wide cabinets which will eventually have glass doors. We also purchased some feet and the hanging rail for the upper cabinets. What we forgot to purchase were any shelves for said cabinets. Oops, looks like another trip to Ikea is in our future! After our purchase order was made up, we headed down to the checkout to pay and then off to full serve pickup to get our order. It was fast and easy and we were outta there in no time.
Ikea Full Serve Pick-Up
We got home and set to assembling and installing. We had previously assembled and hung an Ikea kitchen for a friends reno, and having assembled our fair share of Ikea we were fairly proficient in our assembly.
Cabinet Parts
We averaged about 12-15 minutes per cabinet, and with the help of a brad nailer to nail on the back panels, we were ready to install!
Brad nailer = best friend
We started with the lower cabinets which we attached together by clamping them, drilling out the hole and attaching with the accompanying screws.
Drilling out hole to attach cabinets together (protect your cabinets from the clamps!)
We then attached the stainless steel feet we had purchased. We decided to go with the feet so that it looked more like a piece of furniture, rather than the rest of our kitchen which has a toe kick panel. It also made the unit look a little less domineering from the hallway.
Attaching the foot bases to the cabinets. When you’ve got two cabinets right beside eachother you dont want a foot on each cabinet (would look silly) so you place the foot right in the middle of both cabinets. It saves you buying more feet, and it looks better.
8 feet later and we had ourselves a fully assembled base unit.
All the feet attached, ready to be flipped and installed
We flipped it over, decided on the position on the wall, we leveled it using the level-able feet (thank you Ikea, you are awesome for owners of an old crooked house!).
El Granto looking super impressed while leveling the cabinets
Once everything was correctly positioned we attached it to the wall. Our biggest issue was that we were attaching to a firewall which has 1 1/2″ thick drywall and our stud finder was having a hell of a time finding anything! After a few curse words and a couple heavy duty EZ Ancors we were in business.
Lower cabinets installed
After the lowers were done, we set to hanging the uppers. They were to be placed one cabinet on either end with a stretch of open wall 24″ wide in the middle. We want to put some reclaimed wood open shelving in there, so we left the space open for now.
Hanging the uppers was also super simple, as Ikea’s system is amazeballs. You hang a track on the wall all level and nice, screw it into the studs, then your uppers float on the track!
Ikea cabinet rail attached to the studs and showing the movable anchor where you attach the cabinet
It’s super simple for a long row of cabinets, and makes it so that you don’t have to worry about finding studs to attached each cabinet to. We only needed to hang two smaller individual cabinets. So we cut the rail into two pieces slightly smaller than the cabinets, and following Ikea’s instructions installed them in short order. All in all it took the two of us one evening and one morning to have everything hung.
Upper cabinets half hung, art project sneak peek on the ground and general mayhem and messCabinets Installed
The next steps to stage 1 will be getting the shelves we forgot at Ikea, adding a temporary countertop and some filler panels. This should all be complete by the end of January 2013.
Stage 2 will involve a DIY concrete countertop, some electrical outlets, open shelving between the two upper cabinets and hopefully a few doors and hardware. (ETA Summer 2013)
Stage 3 will complete the coffee bar with all the cabinet doors, drawers, and hardware. (ETA Fall/Winter 2013)
I am not a beer drinker, much to El Granto’s dismay. You see El Granto is what you would call a bit of a beer fanatic. He loves lagers and stouts, ipa’s and porters, bitters and pilsners. He likes to bbq with them, cook with them, and he has even made ice cream with beer. He has probably tried every single craft beer the LCBO carries.
Me, I hate the stuff. A few years ago however I discovered something on tap that I did like; Cider! It comes in a pint glass, it looks like beer, and it doesn’t have an umbrella on it. I can hang with the boys while eating chicken wings at the bar and not get razzed. Since the day I discovered cider, I have also discovered that not all ciders are equal. Myself, I am not a big Strongbow fan, so I started asking bartenders for some grenadine in my Strongbow. It took the tartness down a notch and added a bit of sweetness. Since that day I learned that cider + syrup is called an Irish Rose. Here is my favorite version:
Kristen’s Irish Rose
Ingredients:
Can of Alcoholic Cider (my favourite is Sir Perry’s)
1 oz Lingonberry Drink Syrup (from Ikea, can also use Grenadine)
Ice
How to:
Place a handful of ice into a pint glass, fill the glass half way up with cider, then add the syrup (if you put the syrup in first it never mixes well). After you put the syrup in, add the remainder of the cider. It should mix all by itself, not needing a stir. However if it does settle, give it a stir and enjoy! Best served on a deck in the sunshine.
We needed a desk for the office. We loved old bankers desks, and lovely chunky vintage desks, but we had one problem. Whatever desk we wanted in the office needed to be able to fit up our tiny staircase, or be hefted up and over our second floor deck. Otherwise it needed to be assembled on site. After lugging our mattress and other large furniture up and over the deck, I was in no way, shape, or form, about to do that again. So it looks like we were building something on site. We didn’t need anything fancy, just a desk to use the computer on and store unpaid bills. I cost out the materials to build a simple table ourselves, then I thought to myself: self just suck it up, be the cheap ass that you are and buy something from Ikea! It will be less expensive, less work, and you get to spend time with the happy little Ikea man assembling it. So we reviewed the cheapest Ikea desk solutions, and discovered that the Ingo Dining Table was exactly the size we needed, and was made of solid unfinished wood, and was SIXTY NINE dollars.
Ikea Ingo Dining Table
Yes that’s right, a solid wood desk for less a hundo. Sign me up. So we got our dining table, assembled, and then decide what to do with it. I loved Katie’s Ingo desk hack so I thought I would give that a try. Then my brad nailer and I got in a fight, he decided he would shoot nails sideways out of my project and after many a screaming match, we decided to divorce. So decorative trim on the desk just wasn’t going to happen. Instead, I installed a bottom cross piece, primed, sanded and painted it with two coats of white paint, wiped my hands, signed the alimony agreement, and called it a day.
SOURCE LIST:
Materials:
Ingo Dining Table: Ikea
Zinnser B.I.N. Primer: Home Depot
Behr Premium Plus Interior/Exterior Glossy paint in Bright White: Home Depot
Tools Used:
Paint Brush, Small Foam Roller & Tray, Sand paper
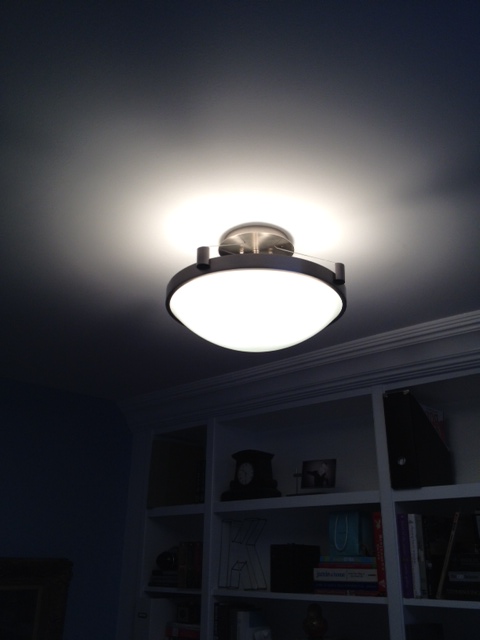
The office light was originally a Ikea Erbium ceiling light that the moment a truck drove by would shake and rattle so hard you thought it was going to explode and rain glass down on your head.
Ikea Erbium Light
Not only was the light noisy, it was also b.o.r.i.n.g. So we needed to change things up.
And I swooned over School House Pendant “The Volusia”.
Barn Light Electric’s School House Pendant “The Volusia”
Then I realized I had already long ago spent the whole budget for the room on the makings of the bookcase and the desk, and I had NO budget left for lights. That meant that buying from Barn Light Electric, shipping to Canada, and then paying brokerage & duty fees was not going to be a feasible endeavor. Enter sad sad Kristen face.
So ‘pretty’, ‘new’, and/or their friends ‘shiny’ and ‘fancy’ were out of the question. We needed something cheap.
We just so happened to have a random light we took down from our bedroom sitting around taking up space and we swiftly swapped it out. It’s better, its not great, but will make do for now. The room has so much natural light from the giant skylight, that the light wouldn’t be on much anyways. So here it is, the new old light.
Moving forward I will be daydreaming about changing it out for one of the lusty Barn Light Electric lights.
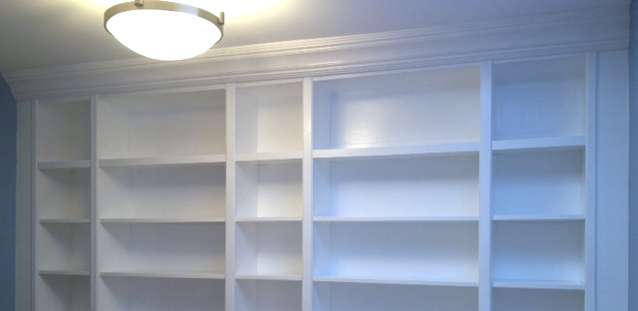
Our house is a three bedroom, two large bedrooms and one smaller. The smaller is of course the best choice for either an office or nursery. We wanted to plan for an office now, and if we ever needed it down the road, an easy transition to a nursery. Continue reading “From Billy to Built-Ins”
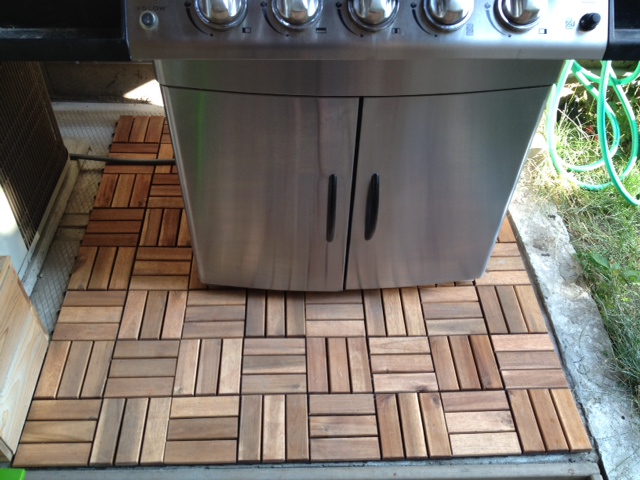
We got a natural gas line and BBQ last spring. I knew we would use it a lot, but it is now the most used appliance in our home. I even cooked Easter turkey on the BBQ!
The BBQ sits beside our A/C unit on a raised platform off our main floor deck. The raised platform is made out of concrete pavers sitting in a bed of concrete. I have no idea why the previous owners would do this. To make matters worse, the concrete pavers were a bit too big for the platform, so some of them were broken and the pieces shoved in. It is beyond unsightly.
We wanted something to cover up the ugly mess, and spied Ikea Platta decking in their summer flyer. Problem is, we don’t have a car, and rarely get out to Ikea. El Granto’s Mum was taking a trip to Ikea last week, so we asked her to pick up a pack of Platta for us.
It took 5 minutes to lay the tiles, then we realized we didn’t have enough. Back to Ikea and another box of platta later and we were ready for another go at the deck tiles. Here is a before look. Note the busted ass patio stones.
BBQ Area BeforeBBQ Area Before
We moved the bbq, then used some Dricore leveling disks to try to level out the uneven pavers. We figured Platta was a deck version of Dricore, so we gave them a shot, and they worked great!
Using a Dricore Leveling Kit to level the Platta Deck Tiles
Here’s the area covered in the tiles.
BBQ Area Covered in Deck Tiles
Aaaaaaaand here is the after!
BBQ Area AfterView of Backyard Deck after BBQ Area FaceliftBackyard
A much nicer looking BBQ area. The decking actually matches our Ikea acacia wood chairs. I love how it looks so much that I am contemplating covering our whole lower deck in them. Our poor lower deck really took a beating with the reno, and no matter how much I sweep, scrub or give it a death stare, it looks dirty and shabby. What do you think, to Platta or not to Platta? (and don’t even get me started on that terrible grass and crooked walkway, that is being dealt with later in the fall or next spring.)
Two years ago, El Granto & I were walking through the Junction headed for an Americano @ Crema, when we spotted a great worn black bankers chair outside the front of a reclaimed architectural salvage shop. The chair was great. It was worn in all the right places, had fabulous old castors, and was a steal for $25. Problem was, we were still living in the loft, had no place for it, and were walking about 3km from home. We decided to pass for now. El Granto sat brooding over the chair for the next day, and decided to go back to see if it was still there. Alas of course it was gone. Someone else had the same vision we did. Since that day, we have regretted that decision, and have been on a hunt for another bankers chair. Skip ahead to last spring. We were at my favourite place on earth; The Aberfoyle Antique Market when we spotted a guy selling not one, not two but THREE bankers chairs. He had stripped and refinished them all with an (ugh) honey oak finish, but they were in excellent condition. We could either live with the colour, or refinish them to something darker. Problem was, we were at Aberfoyle with El Granto’s Mum, and were driving a small car. The chair was not going to fit in the car. We visited Aberfoyle a month or so later, and (of course) all of the bankers chairs were long sold.
Now that the office is progressing, we really really need a chair. Do you think I can find one? Not a chance.
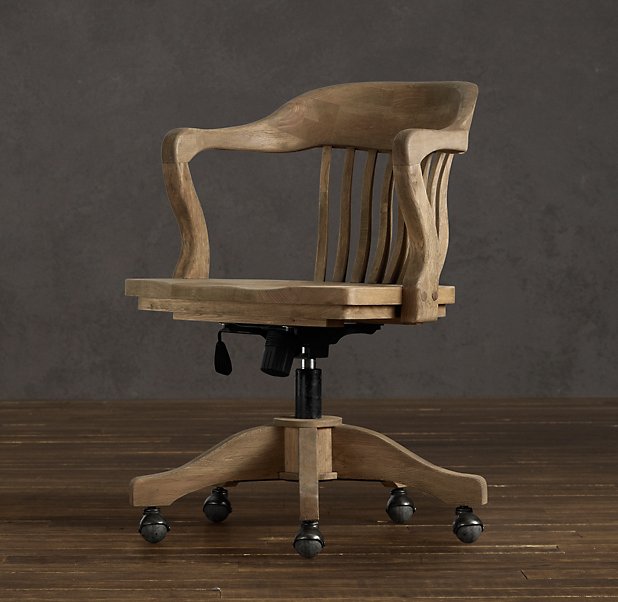
I could buy gorgeous one new at Restoration Hardware for $495. Uhhh no, that’s out of the question.
Restoration Hardware 1940′ Banker’s Chair Weathered Oak Drifted
How about Pottery Barn’s Swivel Desk Chair? Oh wait, $533? HA.
Pottery Barn Swivel Desk Chair
So I will continue to haunt Craigslist & Kijiji in hopes of finding one in my price range (aka free – $40). I know, wish me luck.
Our other temporary option, is buying a $35 Ikea Ivar chair, and giving it a paint job. Then finding another use for it once we finally find a bankers chair.
Ikea Ivar Chair
Why is it that every project always has one sticking point? One missing piece of the puzzle?! *sigh
")
")
")
")


")
")
")
")


")