My backyard ghost sign mural is finally done. (there will be a how-to tomorrow, so check back if you want to know how we did it)
So here is some background. We had a boring beige cinderblock wall at the back of our yard. It was boring to look at, and well BEIGE. I cant leave anything beige in my wake, so I set out to ramp it up some. After we found a $9 ‘Oops’ can of paint at Home Depot, and my Mom picked up some chalk paint for us, we set out to create a faux Ghost Sign. What’s a ghost sign? Those old faded sign’s and ads on the sides of buildings! We live in an old storefront, so we wanted something that looked old and cool. What design did we end up going with? Inspired by this image of bold graphic beautiful type, we decided to do a typographic approach to our house number.
So here it is. The before and afters!
Before:
Beige cinder block wall
During:
Base colour of dark grey on the wallTracing the design onto the wallThe chalk outlinePaint on, ready for distressing
After:
I would like it more distressed but my arms hurt…
SOURCE LIST:
Materials:
Base Paint – Behr Premium Plus Ultra: Home Depot
Annie Sloan Chalk Paint in Bright White: Diamonds & Toads
I was going to have an awesome post for you today about our front entryway, but instead I stayed up way too late last night working on the backyard mural.
I begged and borrowed to get use of a projector, and late last night I traced my design onto the back wall. Hopefully today I can get some paint on it. Until then, here’s a sneak peek.
Our house used to be a store. How cool is that?! We’ve been wanting to pay homage to that somehow when decorating the house. We have been on the hunt for an old grocery store sign for the kitchen (the storefront was originally built as a grocery store) and we want something barbershopy to reflect another one of the former businesses. (so if you come accross an old (cheap)barbers pole, let me know!)
Another aspect of old stores that I really love are ghost signs. Ghost signs are those old faded ads on the sides of buildings often advertising beer, liquor, cigarettes etc. I wish wish wish we had a ghost sign, but sadly we’re too close to our neighbors and have no walls that face the street. Sad face.
There is however a graffiti mural on the side of our garage that faces our neighbors yard. I love the idea of also having a mural on the side of the wall that faces our backyard. I don’t have any graffiti artist friends however and the painter friend I do have is incredibly busy and successful with his fine art career (go check out Martin Wittfooth’s work, it’s amazeballs.)
I also wanted something…well…cool. I didn’t want a sunflower and happy dancing children mural. I wanted something that I’d like to see hanging in my livingroom.
So… Now what? Stencil something? Design a mural on my own? Contact a community outreach program and see if they have any teens who want a canvas? Gah I have no idea. Then it struck me, a ghost sign! A great idea if I may say so myself. So I started researching and pinning.
But…wait…how do I make it look like it’s been there 50 years? I have NO idea. I could not find a faux ghost sign tutorial anywhere and had no idea where to start. It needed to be fairly durable (as it’s outside), but not look perfect and new. I contemplated using Elmer’s wood glue to try to do a crackle effect then sanding the paint. Or painting the mural then pressure washing the whole thing to try to wear off most of the paint. Or doing the design in chalk and then clear coating it, but really I was up a creek and had no idea where to start.
So the project sat for a few months until one day El Granto and I spied a can of dark grey flat exterior Behr Premium Plus Ultra paint in the ‘oops’ shelf at home depot. Usually the oops shelf is full of colors such as baby puke and mustard. However this looked like a pretty warm dark gray and it was priced at $9 (regularly $50+). We tossed it in the cart and decided to give it a try on the garage.
Two days later I was reading Centsatonal Girl and she posted about chalk paint. Hrrm…chalk paint? Could that work for my old worn looking ghost sign? I dunno! So I sent an email to the chalk paint people and my local retailer and awaited their response with baited breath. (No really, I sat there watching the computer like a 14 year old girl waiting for a boy to txt her.)
All I can say thus far… is my Mom is heading out Saturday to pick up a can of chalk paint for me, and I will be putting on a coat of our $9 oops paint on the garage wall this weekend. Wish me luck!
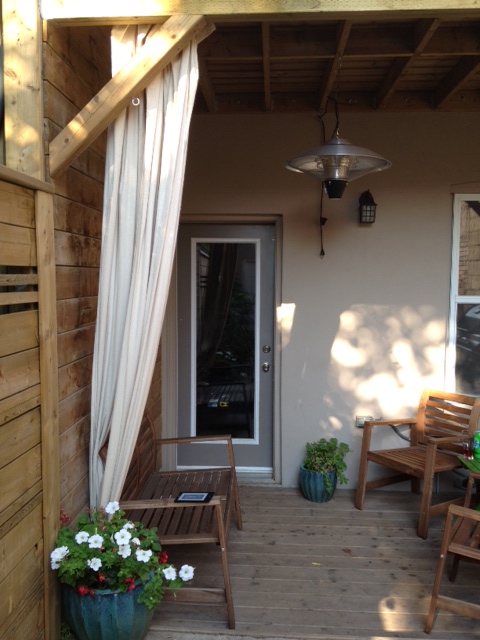
At about 3pm, the sun reaches our back deck in full force. If you happen to be sitting out there at that time, it goes from being a dappled shady retreat to a scorching desert. After getting sick of doing the deck chair shuffle until the sun entirely pushes us inside, we decided to buy some outdoor drapes.
Then we realized outdoor drapes are EXPENSIVE! They are really pricy! Especially for 12 foot long ones that I needed for our deck. I waffled over how to make it happen for weeks at a time, and then threw in the towel. We were not getting outdoor drapes.
Then inspiration struck, I could make some! But UGH, that requires a lot of fabric… and any fabric that is nice and heavy and blocks the light…is also expensive. I wasn’t even considering using outdoor fabric.
Then it struck me. Drop cloths! People use those things for everything! I could definitely make outdoor curtains with them. So we headed to Home Depot to buy some 12′ long drop cloth panels, and to find some inspiration on how to hang them. Our deck is 12′ wide. Can we use curtain rods? Nope, couldn’t find any that big. Wooden dowels? Still not available that long. Gas line pipe? ALMOST! But it was 10′ long and heavy, so it would consist of using two pipes and probably having to have a bracket in the middle to hold the weight…Then El Granto had a brilliant idea. Aircraft cable! BINGO! The drop cloths were light, and the aircraft cable could be tensioned into our deck with a turnbuckle. It would be perfect! We picked up a 50′ aircraft cable kit, two turnbuckles, two 4×12′ drop cloths, some large cup hooks, and some tarp grommets.
Back at home, El Granto got up on the ladder and secured the cup hooks to the deck, and attached one end of the cable system. We measured out where we wanted the grommets to go on the drape panels (Odin really wanted to help)
Odin thinks the curtains are his new bed
Through some trial and error (who doesn’t put instructions on a grommet kit!?) We finally found the best way to put in the grommets. It involved a vice, some rags, a hammer, and a few swear words. (sorry there are no photos, I was too busy using profanities to take any.) After the grommets were in I measured the drapes to hem them and went inside to get out the sewing machine. I managed to find my sewing machine easily enough, but do you think I could find the box with all the thread and notions?! Not a hope. So I grabbed some hemming tape, and ironed the hems in the drapes. I figured if they fell out, I would go buy some thread and sew them back up. Once they were hemmed, we threaded the grommets of the drape panels onto the aircraft cable, attached the cable to the other side and tensioned it with the turnbuckle.
Curtain threaded through the Aircraft CableCup Hook, Turnbuckle & Aircraft Cable
YAY! SHADE! WOOT!
Just one small problem…the space of the cup hook, aircraft cable clamps and turnbuckle means that the drape does not stretch all the way to the side of the deck. One day when we have a bit more patience, we will remove the turnbuckle on the North end of the deck, where the most sun comes in (you really only need one turnbuckle) and it will work and look much nicer.
But enough of my bitching, here are the pics!
Before!
Backyard Before (note this is from when we bought the house, so a few things have changed other than just the curtains)
After!
Curtains in ActionCurtains Drawn to one Side
*To answer a few of the questions you may be thinking of:
Will we leave them out in the winter? We will take them in during the winter, and put them through the wash if necessary
How have they held up so far? Amazing. Water doesn’t seam to soak into them when it rains, they never stay wet or damp, and show no signs of mold or any other nasties yet.
Would we change anything? Only adding a tie back/hook for when they are not in use, otherwise its perfect!
Added Bonus: We have had a sweltering summer, and we have been using the curtains to block some of the sun from hitting the back of the house, and to shade the a/c unit. It has worked wonders.
SOURCE LIST:
Materials:
2x 4×12 Drop Cloths: Home Depot (we only used 2 panels, but could have fit 3 or 4, if your deck gets full sun more panels may be required)
50′ Aircraft Cable Kit: Home Depot
Tarp Grommets: Rona
2 Large Cup Hooks: Home Depot
2 Turnbuckles: Home Depot
Iron-On Hemming Tape: Fabricland
We got a natural gas line and BBQ last spring. I knew we would use it a lot, but it is now the most used appliance in our home. I even cooked Easter turkey on the BBQ!
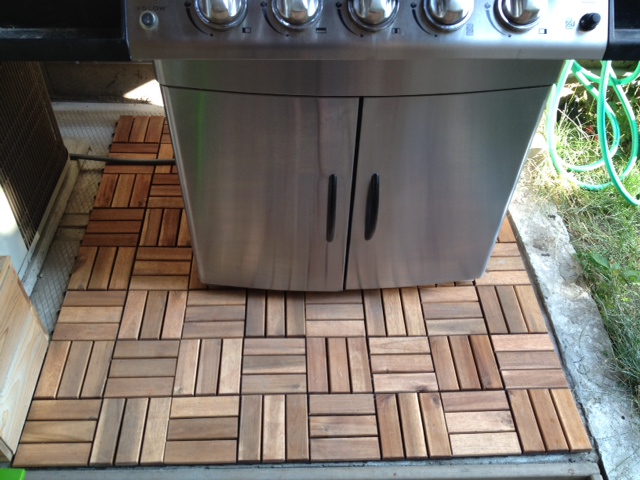
The BBQ sits beside our A/C unit on a raised platform off our main floor deck. The raised platform is made out of concrete pavers sitting in a bed of concrete. I have no idea why the previous owners would do this. To make matters worse, the concrete pavers were a bit too big for the platform, so some of them were broken and the pieces shoved in. It is beyond unsightly.
We wanted something to cover up the ugly mess, and spied Ikea Platta decking in their summer flyer. Problem is, we don’t have a car, and rarely get out to Ikea. El Granto’s Mum was taking a trip to Ikea last week, so we asked her to pick up a pack of Platta for us.
It took 5 minutes to lay the tiles, then we realized we didn’t have enough. Back to Ikea and another box of platta later and we were ready for another go at the deck tiles. Here is a before look. Note the busted ass patio stones.
BBQ Area BeforeBBQ Area Before
We moved the bbq, then used some Dricore leveling disks to try to level out the uneven pavers. We figured Platta was a deck version of Dricore, so we gave them a shot, and they worked great!
Using a Dricore Leveling Kit to level the Platta Deck Tiles
Here’s the area covered in the tiles.
BBQ Area Covered in Deck Tiles
Aaaaaaaand here is the after!
BBQ Area AfterView of Backyard Deck after BBQ Area FaceliftBackyard
A much nicer looking BBQ area. The decking actually matches our Ikea acacia wood chairs. I love how it looks so much that I am contemplating covering our whole lower deck in them. Our poor lower deck really took a beating with the reno, and no matter how much I sweep, scrub or give it a death stare, it looks dirty and shabby. What do you think, to Platta or not to Platta? (and don’t even get me started on that terrible grass and crooked walkway, that is being dealt with later in the fall or next spring.)
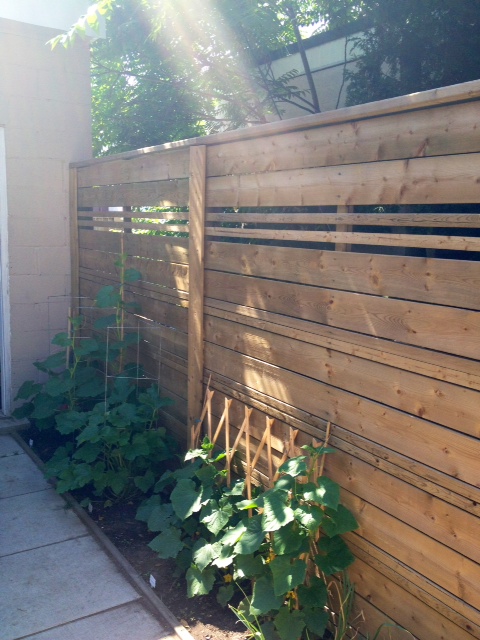
Before we got Odin we knew we needed a fence. There was a slightly dilapidated chain link fence between our house and our neighbors to the north (we have a 30′ brick wall to the South and a garage on the West end of our yard). We have an amazing relationship with our neighbors. They are a young family, who is currently renovating their entire house as well. We wanted a fence that would be functional, provide privacy but also allows us to socialize when we want to.
We put pen to paper, and designed a horizontal slat fence with 5″ boards and 2″ boards. We were going for a traditional meets modern design. We then set out to removing the old fence. We prepared shovels and tools, and mustered up the courage to start digging out deep concrete foundations. El Granto started pulling absentmindedly to one of the fence posts and the post easily started to come up, so he pulled more and more, and out came the post! All of the other posts came out just as easily, except one that was too close to our deck foundation, and must have got stuck in the deck’s concrete when it was poured.
Now it was time to build!
Fence Before
Our fence needed to be 26 feet long, and would be anchored on one end to our 2 story deck, and on the other end to our cinder block garage. We used 4×4 posts for our main supports. We used 10″ bolts to attach one 4×4 to the deck, and masonry screws to attach another to the garage. We then spaced out our two center posts equally so that all the fence panels would be the same size. This would involve loads more cutting, and more wasted wood, but visually it was much nicer.
As we were anchored at both the deck and the garage, we used post spikes for the two center posts. Now don’t you do shaking your finger at me… Yes, we could have dug post holes and filled with cement, but our ground is FULL of rocks, and the thought of digging those holes was, well…unplesent. So we looked into other options. We found the level-able post spikes, and after considering our fence (it was a small span, well anchored at either end, was sheltered by a 30′ wall on one side). It wouldn’t be subject to gale force winds, or pole vaulters, so it would be.just.fine. I will hear none of your “you took the easy way out”. OF COURSE we did. The hard way sucks.
Back to the task at hand. We set the fence spikes and El Granto got to hit things with Mjölnir (yes.. that is what we named for our great big hammer. If you’re ever at our house and need the use of a big hammer, you must ask for Mjölnir, anything else and you will be ignored. (No “Maul”, “Big Ass Hammer”, nothin.)
Grant Uses Mjölnir to Hammer in the Post Spikes
We set the posts, leveled them, and then got to putting on the boards. This would have been a time when two cordless drills would have been handy (hint hint Santa). We spaced the boards right tight up to each other knowing that they would gap some as the wood shrinks.
Kristen Screwing on Fence Boards
When we got up to eye level, our fence was starting to look like a wall, not a fence, so we spaced out a row of the smaller 2″ boards, so that we would have a space that we could see and converse with our neighbours. Once we finished one fence panel, we dropped a chalk line and cut off the overhanging boards with a circular saw.
El Granto Setting the Chalk Line and Cutting off the Excess BoardsGetting Ready to Cut
Once we finished fencing all the panels, we placed fence boards vertically where the two panels met to cover the cut marks. We screwed in the last board just as the sun was disappearing. Finishing the top of the fence would need to wait for more daylight and lumber. That was one hard days work, time for a drink!
The Last Board Went On as the Sunlight Went Down
The fence stayed ugly like this for a few weeks until my Mom & Dad came down to help us reinforce the deck (that’s another story for later). While they were helping us, we used the opportunity to borrow Dad’s truck, and head to the lumber store for some 2×6’s to make top rails for the deck.


")