Custom Framing Mats

Have you purchased any Ikea (or similar) frames only to have the provided mat be completely the wrong size for your art? You could go to an art or framing store and pay (heavily) for custom cut mats, or if you’ve got a few dollars and some time and patience you can do it yourself.

Back in my art school days, sick of trying (and failing) to cut mats with a straight edge, I broke down spent $50 of my poor ass college budget on a mat cutting kit. I then proceeded to cut all my art school project mats, as well as did a pretty handsome black market trade in cutting mats for my fellow students.

Mat Cutting Kit
Mat Cutting Kit

That (old battered) mat cutting kit still gets used several times a year, and has paid for itself many times over. If you are in need of several mats cut (doing a gallery wall any time soon?) If so, this may be the tool for you. Let me show you how it works.

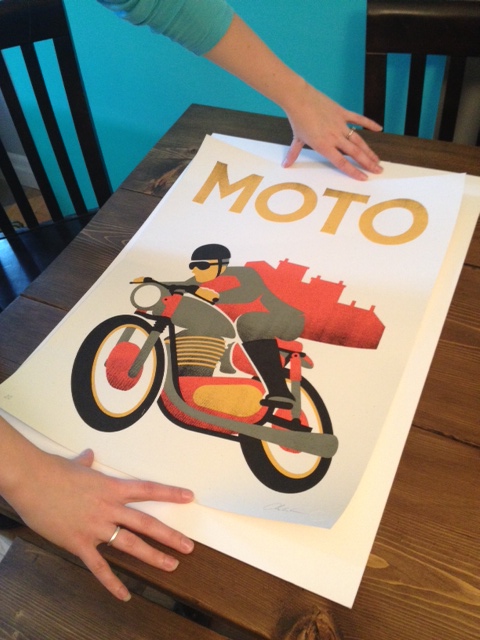
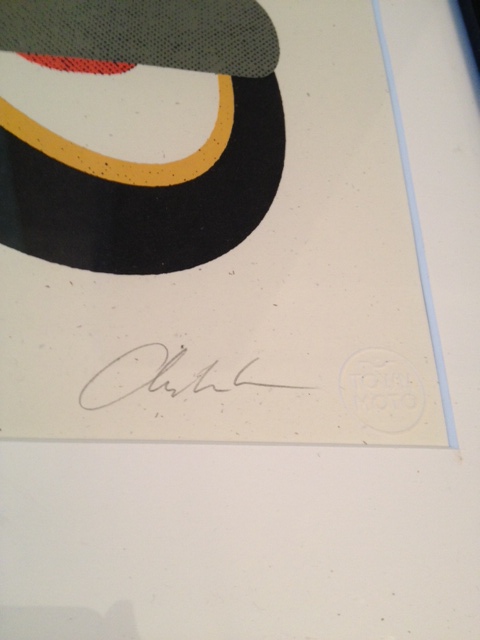
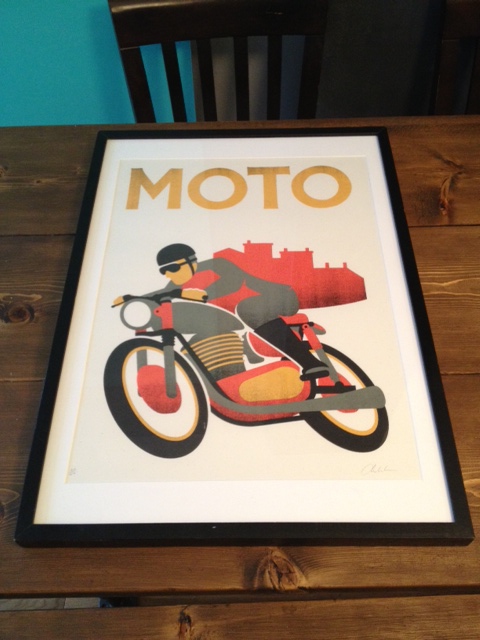
A few weeks ago we purchased a beautiful print from a great local shop Town Moto. This vintage inspired motorcycle gear shop is one of El Granto’s favorite places. They have great gear & accessories as well as an in house design & print shop. They produce some beautiful motorcycle themed prints, and we brought a purdy new Moto print home. The print is gorgeous. Its printed on a lovely heavy paper, and its signed, stamped and numbered. A print like this needs to be presented in a way that equals its awesomeness. So I went frame hunting in the basement and found a great big Ikea Ribba frame previously used for an old highschool drawing. I ousted the drawing from its frame and stole the mat to use with the Moto print.

Reclaimed Mat
Reclaimed Mat

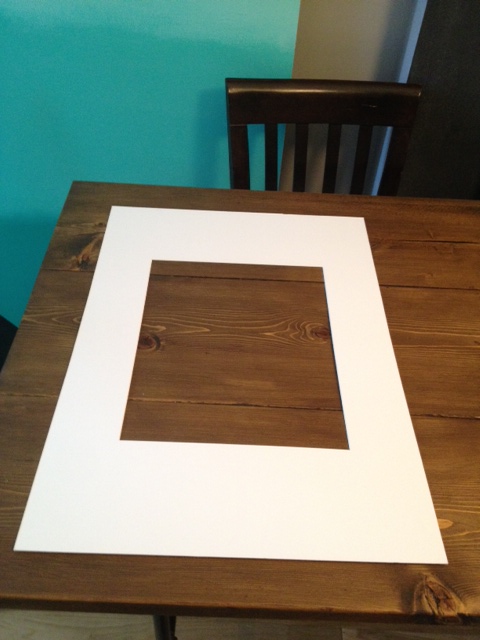
Problem is, the mat hole is MUCH too small for my print. The easiest thing to do here is flat mount the print, but that doesn’t look as nice.

Print much too big for the old mat

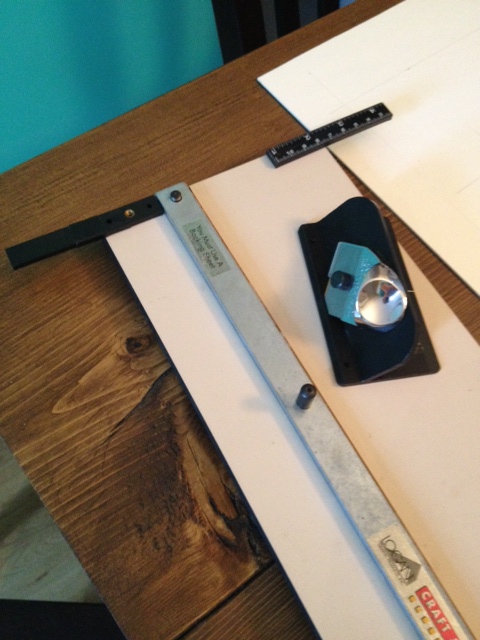
So I got out my mat cutting kit and set to work.

You need to figure out how big you want the new mat hole to be, and you need to draw the location of the new hole on the back of the mat so you can cut it. There are several different ways to do this. We wanted our print centered, so we did a bit of math (minusing the size of the new cut hole from the overall size of the mat to figure out how far from each side the cut hole needed to be.) Measure twice, if not three times before you cut, its easy to go astray especially if you’re dealing with 16ths of an inch etc. If you’re having problems with this step, feel free to ask questions and I will try (as best I can!) to explain in greater detail.

New cut lines drawn on mat

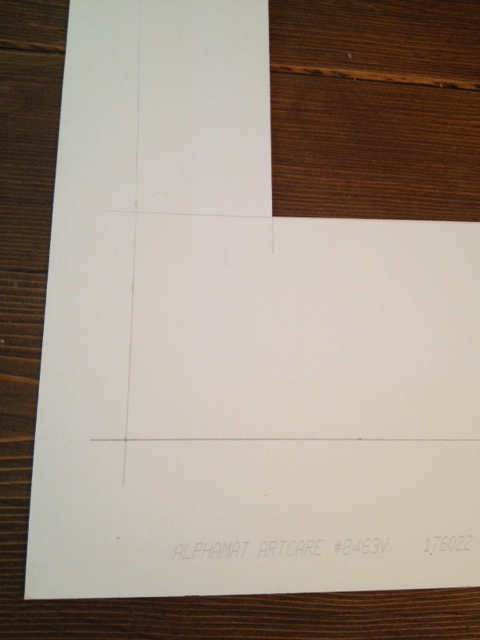
Place the mat (still upside down) into the mat cutter, and align one of your lines to the straight edge of the cutter.

See how theres a line on the cutter? Match that up to your cut line. It will ensure that you start & stop the cut right where you need to
Your vertical cut line is aligned with the straight edge and see how there’s a line on the cutter? Match that up to your horizontal cut line. It will ensure that you start & stop the cut right where you need to

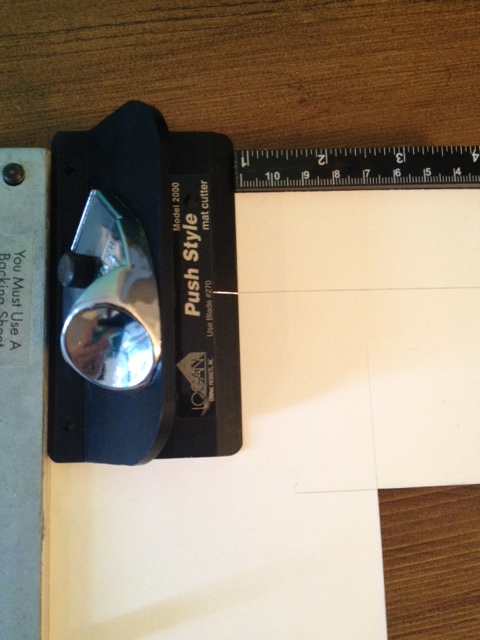
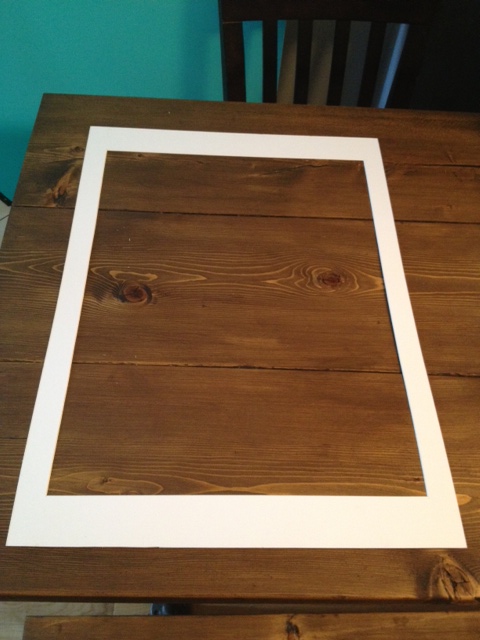
Now starting at the bottom of the mat, place your cutter onto the mat, matching up the starting line on the cutter with the corner of the intersecting cut line. Push the blade into the mat, while holding the straight edge steady, and push the cutter along the straight edge, stopping at the top line of your cut hole. The key to this step is using a steady hand and pressure. Proceed to do all four sides of the mat, and ta da! Beautifully cut mat.

Newly cut mat with larger hole for our print
Testing to see how our new mat fits. Its perfect!
We framed the print so you could still see the signature and the embossed stamp on the print

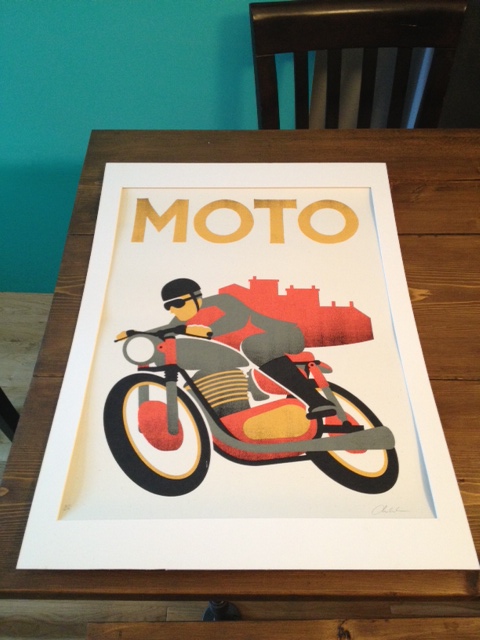
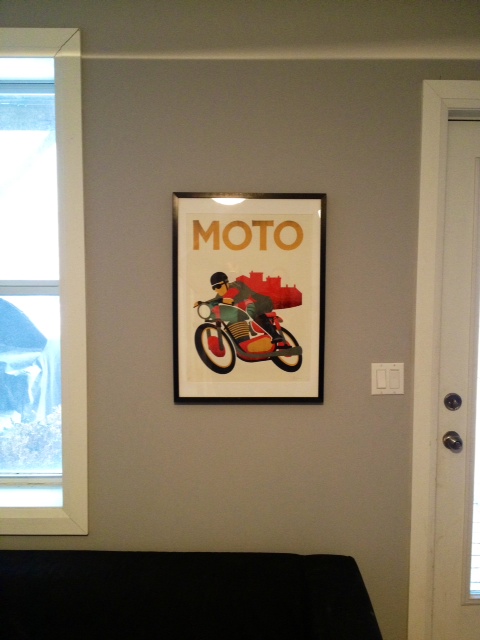
Now insert your print, attach the back and hang your professional framed print on your wall.

Print framed
Print framed
The new print is hanging out on our back livingroom wall

*If my instructions are confusing, let me know. This may be a situation where its easier explained by a video tutorial*

SOURCE LIST:

Materials:

Print – Town Moto
Frame – Ikea
Mat – Art Store

Tools Used:

Mat Cutting Kit (we have the Logan one, you can pick up a basic mat cutting kit for about $50 at art stores)
Measuring tape or ruler
Hammer & Nail (to hang)
Old Butter Knife (my secret for prying up the tabs on the back of the frame)

Difficulty Level (on a scale of 1-5):

one out of five

Total Cost: $30

Tin Ceiling Part 3 – The Reveal

Three weekends of sore muscles and standing on ladders are over, and we are now the proud (and tired) owners of a reclaimed tin ceiling. We first showed you how we prepped the ceiling, then how we prepped the tiles, today you finally get to see the finished product.

It was a bigger project than we anticipated. Anything where you’re working on the ceiling is exponentially harder. If we were to do it again, we would rent some scaffolding, as moving ladders around was a pain. We did borrow a work light from our neighbours, which was a necessity.

Work Light & Brad Nailer, our tools for the day

This is what the ceiling looked like before.

Ceiling Before
Ceiling Before

This is what we started with on installation day.

Ceiling Sheeted Ready for Tiles

When installing the tiles you need to decide where you enter the room the most. The tiles overlap, so you want to make sure the edges overlap away from where you see the ceiling from most. We enter the living room from the hallway so we started the tiles at the corner farthest from the entryway (kitty-corner to the hallway).

The tiles overlap and have little notches where they fit in together. We figured this was enough to be able to line up the tiles properly, but once you’re standing on the ladder with the tile over your head, it’s much harder. We wish we had laid out a chalk line grid, it would have made the installation quicker and preventing one crooked tile that moved when I was nailing it. (arg)

After the first tile is up, we continued along that row to the end, then started the next now. Your arms get very tired, so this process ended up taking us two weekends to get done.

First Tile Up!
First Tile Up!

When we got to the middle of the ceiling we needed to deal with the electrical box. We had planned the tiles so that the light  ended up in the middle of two tiles. We just needed to cut a half circle out of each tile around the light, and it should work perfectly. We traced the shape of the electrical box onto the tiles that needed to be cut.

Tracing for Electrical Box Cut-Out

Then headed out to the garage and El Granto cut the tiles with a metal cutting blade on his Dremel. (We could have used tin snips, but the curve is a bit tricky and the Dremel is waaaay easier.)

Cutting the Tile
Cutting the Tile

After the tiles were cut, we added an extension box onto our ceiling electrical box so that it would allow us room for the plywood and the tin tile. The box is easy to install (again the power is still OFF to this room!)

El Granto Intsalling Box Extension
El Granto Installing Box Extension
Box Extender Installed

After the box was up we installed the cut tiles around it.

Cut Tiles Installed
Cut Tiles Installed

Then re-installed the light fixture.

Light Intsalled
Light Installed

We then installed the remainder of the tiles. The result is a very eclectic ceiling, but we love it. Some of the tiles are much more worn than others. We tried to make the layout look random, but still balanced. We would like to add some panel molding around the edges, but that will have to wait until we have access to a truck or van.

Without further adieu, here is the finished product.

ceilingcomplete

ceilingcomplete5

ceilingcomplete4

ceilingcomplete3

ceilingcomplete2

The living room is starting to come along now. Next up, we need to trim out the tin ceiling, and swap out the light fixture for a more elaborate chandelier. A few more big projects and it will hopefully start looking more like the period building it once was.

SOURCE LIST:

Materials:
20 2′ Square Reclaimed Tin Ceiling Tiles – Aberfoyle Antique Market
3 4×8 Sheets of 3/8″ chipboard – Rona
Round Electrical Box Extender – Home Depot
Screws – Home Depot
Brad Nails – Home Depot
Clear Coat – Canadian Tire

Tools Used:

Drill
Compressor & Brad Nailer
Ladder(s)
Work Light
Chalk Line
Dremel

Difficulty Level (on a scale of 1-5):

four out of five

(Really it deserves about a 3.5 it was just a pain as you are standing on a ladder working over your head)
Total Cost: $430

Tin Ceiling Part 2 – The Prep

How was your weekend? We knocked out our Pinterest Challenge project (check back Wednesday to see it!), we fixed a few nagging things around the house. (Our front door finally shuts/locks without jiggling the handle and shoving the door with your shoulder.) Unfortunately our doorbell still isnt working, but you cant win em all. Any doorbell experts out there that want to lend a hand?! (and/or any leads on where to buy Victorian Twist Doorbells?)

We have finished our tin ceiling project (full reveal tomorrow, I promise) but first I wanted to talk a bit about prepping the tiles for installation.

tintile

Our reclaimed tin tiles are 100+ years old, and covered in paint (which is most probably lead based paint.) The paint on our tiles had over the years seen some wear and tear. Some of the tiles were chipping, and the paint flaking off. Now the last thing you’re going to want is flaking lead paint falling from your ceiling, babies and puppies eating it and growing two heads so prep is important. (although two headed puppies would be cute)

*This is what WE did, we’re not experts, so please don’t take our story as gospel. Lead paint is a serious toxic substance, so ensure you contact your local government for how to safely handle & dispose of lead paint, and seriously consider calling in the pros*

To curb loose paint falling on heads, I took all the tiles to the basement, covered the floor in a plastic drop cloth, donned work clothes, heavy gloves, a respirator and safety glasses. I then proceeded to wire brush all the loose paint off the tiles. It was a bit of hard work, but worth it. I brushed quite aggressively ensuring all the loose paint came off. This process took a solid few hours. I then carefully folded the drop cloth in on itself, ensuring all the flaked off paint was trapped inside. I then sealed the drop cloth in a garbage bag, and its ready to head off to our city’s next hazardous waste drop off day. * DON’T PUT IT IN YOUR REGULAR GARBAGE! Lead = toxic! *

Basement+drop cloth+tile & wire brush
Basement + drop cloth + tile & wire brush

After the tiles were wire brushed, I headed to the garage and gave each tile two coats of clear coat. I then laid them out on every single surface of the garage to dry. I even gathered things for them to sit on; styrofoam pieces, boxes, bar stools, patio furniture etc. It looked like a very strange game of True American without the booze (any other New Girl fans out there?)

Tin Tile True American

After the tiles are dry, its time to install (but you still have some prep left!) Some more paint MAY fall off when you’re installing the tiles. They are thin metal. and when you nail them up, they will flex and more paint may flake off (even though you carefully clear coated them!) SO, to ensure you don’t have lead paint all over your furniture, cover your floor & all surfaces where any paint may land, with more plastic drop cloths.

When installing, ensure you are again wearing eye protection (safety first kids!) and heavy gloves. The tin tiles can be sharp!

Geeze this post has been preachy. I expect I will make quite the nagging mother should I ever have children.

Staircase Inspiration

After painting the upstairs hall, getting started on our tin ceiling, and adding a new light to the staircase, the shabby beige walls of the staircase are looking pretty sad. Not to mention they are the LAST beige walls inside the house. (I have been mounting a war on beige as the entire house was beige when we moved in, no really outside and in, whole house was beige.)

The walls in the staircase (the back wall in this pic) are the last beige walls in the house

The problem with doing anything to the staircase walls, is that they’re HUGE and TALL. Remember El Granto precariously hanging on the top of a ladder to hang the new light? Yeah…not fun.

Giant scary staircase
The Staircase
The Staircase

I would really like to do something with high impact in the space. I am thinking a bold paint colour, wallpaper or a stencil. The entire main floor is a light grey, and the upstairs hall is white. I think this is the perfect place to inject something a little crazy.

Here are some ideas that I am loving right now, I just cant decide on one direction!


I am loving the panelling with the pop of the runner!


Houndstooth is a big fave in the Storefront house right now. Even the dog sports a houndstooth coat. Would it be too much on the staircase walls?


I love a wallpaper with some humour, and this dog print makes my heart smile.


I LOVE the drama in this space!

Source: auctiva.com via Kristen on Pinterest


I am loving the blue in this wallpaper, but is it too close to the damask in our master bedroom?


This is a more classic style with the wainscoting + wallpaper. Is it fun enough?

Now this is colour!!!

So what do you think I should do to the staircase? Bold colour? Crazy wallpaper? Or keep it more traditional and do paneling or a mix of paneling & wallpaper?

Tin Ceiling Part 1

**This is Part 1, as this is a lengthy (and wordy) project, so we’ve split it up to avoid you falling asleep in your coffee **

We’ve been a bit quiet on the DIY front as of late, don’t worry, we have been working albeit slowly on project for the last three weeks. If you remember we were brainstorming inspiration for our vintage reclaimed tin ceiling tiles. After much deliberation we decided to leave the tiles as they were in all their rusted peeling paint glory.

One of the tiles in better shape

Why you ask? They are over 120 years old sporting their original paint. These tiles were reclaimed from a store in London Ontario. It seemed a shame to strip or paint over all their history just to have them look like brand new tin tiles. Our Storefront had been stripped of every single original detail when we bought it, and we drool with envy when we look at other homes with original details still in place (like the houses over at Old Town Home and Victoria Elizabeth Barnes Victorian house blog) in our hearts we knew we needed to leave the tiles as is.

We were also going to put the tiles on our master bedroom ceiling, then we thought it a shame as no one but us would ever see them (we’re not the type to have guests hanging out in our bed looking up at the ceiling…) So we decided to have the tiles grace our living room ceiling where they would be there for all to see.

Ceiling looking towards our backyard
Living room ceiling looking towards our backyard
Ceiling looking towards our staircase
Living room ceiling looking towards our staircase

We have 20 tiles which means we can cover an 8×10 foot area. We decided to do a kind of panel inset in the center of the living room, centering around our lighting fixture. Now that we had it planned out (phew that was tiring!) we needed a plan of execution…

I don’t know if you know this about me, but I am a PLANNER (aka anal retentive). I always want to do something to the best of my ability, do it the easiest way, and for the least amount of money. So I research, and plan. I may not SHARE my plan with my husband, but I do always have one up in my noggin.  So for this project I contacted a tin ceiling expert, and picked his brain. What I learned was that you can put tiles up two ways; glue or nails (or both!) Glue is easiest, but does the most damage to both the tiles and the ceiling if you ever want to remove. Nails require more work, but do much less damage to the tiles, and your ceiling can always be patched. We decided to go with the nails.

Now we needed something to nail to…You cant just nail into your drywall, its just not strong enough. You need some wood for the nails to bite into.  Next up, we needed to decide if we were going to strap the ceiling or sheet it (run strips of wood in a grid to nail to, or just cover the area of the ceiling in plywood.) Both will work, its just whichever you prefer. We decided to go with the sheeting, as then we could nail anywhere we wanted without a problem. Another decision done!!

We sourced some 3/8″ chipboard from HD as our sheeting material. We got three 4×8 sheets of chipboard, and got one of them cut down into 2×4′ pieces at the hardware store (still waiting on that table saw Santa). We decided to do a 2×8 piece of wood in the middle of the ceiling around the light, then a full 4×8 sheet on either side. We also cut the 2×8 in half so that it would be easier to cut and put up around the light fixture.

Speaking of the light fixture. We traced a spare electrical box onto the ends of the 2×4 sheets and cut it out with a jig saw. This would make it so that we could easily fit around the light fixture (which we would deal with later.)

boxtraced (2)boxtraced (1)boxholecut

Now came the fun part…putting up the sheeting. Here’s what you need:

  • Two ladders
  • Drill & screws
  • Swear Words
  • Stud Finder
  • Chalk Line
  • Divorce Papers
  • Borrowed work lights from the neighbours (have I mentioned how awesome our neighbours are?! I need to bake them some cookies)
  • Tears

Mark your studs on your ceiling using masking tape. Mark them OUTSIDE the area you’re sheeting. If the ceiling joists in your 100 year old home magically change direction, you are not crazy, cause apparently that can happen, and defy all logic…

Now turn off the power and take down the ceiling light. Swear at wife for having insisted on re-installing repainted light fixture before it was completely dry. (Who would have thought that it would stick together?) oops

Put up the first pieces of sheeting, and make sure they’re straight (or straight-ish if you live in a crooked-ass-house.) Screw into the studs using at least 2″ wood screws

First Piece Getting Screwed into Studs
Second Piece Installed (my husband has long ass girly hair, but he drives a motorcycle and lives in a hipster neighbourhood so its all good)
Second Piece Installed. Yes my husband has long ass girly hair, but he drives a motorcycle and lives in a hipster neighbourhood so its sexy and not at all white trash

For the next sheets, both you and your spouse will need to simultaneously stand on ladders, holding a 4×8 sheet of plywood over your heads and screw it into your 10 foot tall ceiling making sure its straight and perfect. Name calling and/or tears are optional. If you eff it up, you MUST take it down and fix it. (that totally didnt happen to us… wait yes it did… shh)

Once you have a couple screws in place around the edges, you can then chalk line between your screws to give yourself a guide where the studs are for easily screwing in more screws to make sure its super oober dooperly attached to the ceiling.

chalkline
Weird angle showing the chalk lines marking the studs

After you are finished, drink several beers and try to forget the urge to kill your spouse.

Ceiling Sheeting Installed (by now its dark, and you have no light in your room, and you give up and eat chicken wings and drink liquor)
This better be correct, cause I am never sheeting a ceiling ever again...
This better be correct, cause I am never sheeting a ceiling ever again…

If you’ve managed to make it through this entire post, I’m proud of you, perhaps a gold star is in order. Now come back next week while I bore you with more words, but actually put some tin tiles up (I know how dare I call this post Tin Ceiling Part 1 and there is in fact NO TIN CEILING.) I’m a jerk.

Light Fixture Facelift

Do you have something in your house that works perfectly well, it looks fine, and you have no justification what so ever to replace it, but you HATE IT? Yeah…that was my living room light fixture. It was fine…I just didn’t like it. It was also big, and costly to replace with anything I like. So it had no hope of getting replaced anytime soon. I had come to terms that our whole living room is in fact an epic fail (sofas don’t fit the space, the tv console is hideous, the dogs crate lives in the living room, and there’s no place to set down a drink.) So you think I would just concede the light failure and learn to live with it. Like the way hoarders seem to have come to terms with crawling over their belongings to get to the bathroom. Not so. I my friend am what you would call anal retentive, and if I can possibly change something I hate; I will.

This weekend I had enough of that light fixture, so I got El Granto to take it down, and I marched it outside and I spray painted that light. Take that heinous light. Now you are the same heinous light with a prettier color! Nah, I’m not giving it enough credit, I think it looks much better, and definitely good enough to get it off my hit list for a few months.


So here’s what we did.

Took the light apart (the bowl came attached from the rods, and the rods from the light fixture). It’s hard to see the lights terrible color from my before pic. It was white with gold brush strokes and a hint of green. Waaaay to country for this city house.

Close up of strange gold faux finish

I cleaned everything, then dragged a few saw horses outside, and made myself a little work station. I hung the rods and the hoop that the bowl sits in from an old piece of wood with some nails in it. I sat the light on some cardboard. In hindsight I should have hung the light as well as it would have been easier to paint. I made sure to mask off the light socket with tape. I painted with my favorite spray paint; Rustoleum Universal. This time with some left over Oil Rubbed Bronze. I painted with several light coats, ensuring I got into the nooks and crannies of the light.  Sorry grass, you were collateral damage in this project.

Painting the light in the backyard

After it dried we took it back inside and re-hung. Easy peasy lemon squeezy.

SOURCE LIST:

Materials:
Rustoleum Universal Spray Paint in Oil Rubbed Bronze – Home Depot

Tools Used:
Screw Driver, Ladder, Husband

Difficulty Level (on a scale of 1-5):

One out of five

Total Cost: $0 (already owned the paint, $10 if you needed paint)