It’s starting to get warmer out again. Do you know what that means? It’s finally warm enough to stand out in our unheated garage for more than 30 seconds, and be able to operate saws and equipment without mittens. Yep kids, that means it’s project time.
I have had my eye on a new media cabinet for the living room for a good long time. There’s nothing wrong with out current cabinet per see, it has just seen better days, and its not really our style. The little cabinet was a big box purchase of El Granto’s from his college days. It has done us well, but its not really big enough for all our electronics, and its center shelf is sagging a bit from the weight of our receiver.
So a new cabinet it is! As we love Restoration Hardware, I fell fast and hard for this fellow; the Restoration Hardware Printmakers Media Cabinet.
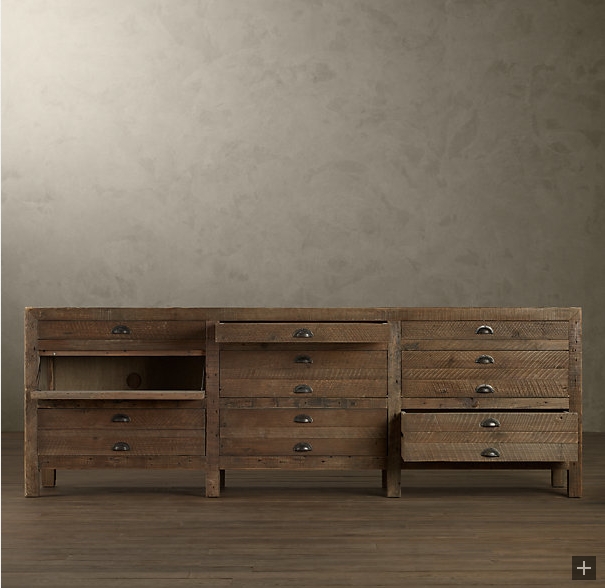
The cabinet has three shallow drawers for remotes, magazines and the like. Three fold down doors to hide your electronics, and three deep drawers for dvd and other assorted storage. There are two sizes available. We liked the 55″ wide one, as it would hold our 46″ tv and not be too big for our small space. The only problem is that the cabinet has a price tag of almost $1000. Not really in our budget, especially when we want to add a new sofa to the living room sometime in the next decade.
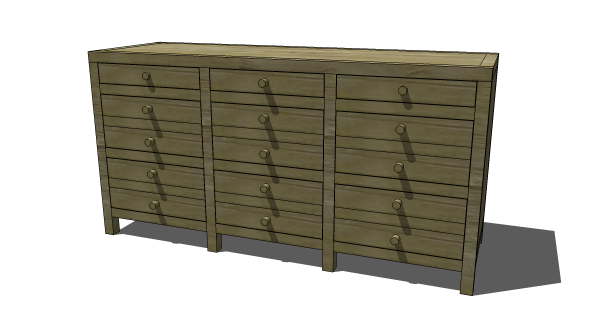
So we did decided to take things into our own hands, and looked into building a similar cabinet. I checked my go to spot for furniture plans; The Design Confidential, and low and behold they had plans for a similar cabinet. Awesomesauce.
We printed out the plans, looked at the vast lumber and cut lists, cried a little, and then decided to nut up and take on this project. I had helped my dad make drawer boxes in the past (and by helped, I mean watched) and the rest of the cabinet was held together by pocket screws, so I felt confident that we could bumble our way through it.
The first hurtle was deciding on wood. I loved the antique pine finish of the RH cabinet, so I decided pine was the way to go.
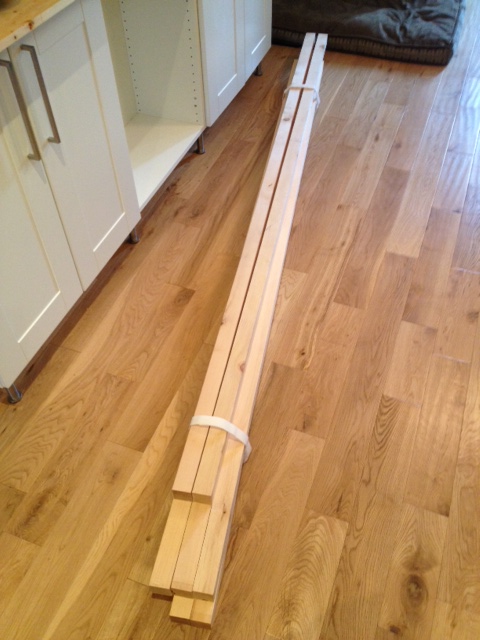
Last weekend we walked the dog and our Ikea cart to my favorite place on earth; our local lumber yard Downtown Lumber. I love this place. I have yet to find a wood product they don’t have, and they’re happy to rip things down for me on request, which is awesome since we don’t own a table saw. I called ahead and confirmed that they could cut me 2×2 pine boards that we needed for the first step of the project; the frame.
When we got to the lumber yard, paid for our order and went to the back to pick it up. We watched the yard worker pull beautiful solid straight as an arrow kiln dried pine 2×10’s down from the shelf, and rip them into our 2×2’s. Yep that’s right, they used 2×10’s to cut our 2×2’s. Now if you’re unfamiliar with wood, 2×2’s are like the lowest wood on the totem pole, and quality is usually crap. The 2×2’s are cut from the smallest pieces of wood, often young wood, and they are usually found twisted and turned like a corkscrew. That’s why a framing grade 2x2x8 will only cost you about $2 at the big box store. To have 2×2’s cut from 2×10’s is like making hamburgers with prime rib. Expensive, but amazing.
We watched in awe as they ripped down our lumber order and smiled like bank robbers as we carted it all home. (Yep, I say “carted” as we literally dragged it the 3.5km home on a cart. Hobo style.)

After we got the wood home, we set to making our cuts. I soon noticed that our 2×2’s looked a bit bigger than I was expecting. The big box stores 2×2’s usually measure in at 1 1/2″ x 1 1/2″ . Our fancy schmancy lumber yard boards were 1 3/4″ x 1 3/4″.
That was great news for us (who doesn’t like bigger wood, eh eh?) however it threw the plans a monkey wrench. After some quick math we opted to lengthen the frame by an 1″ to compensate (as to not skew the drawer sizes). However we didn’t want to futz with the height, as it was already quite high, and we didn’t want the TV to be any taller, and harder to see.
El Granto measured the cuts, I cut them on our new miter saw; Martha. (It’s named Martha because the saw is a Mastercraft brand, and Martha Stewart is the master crafter…see it makes perfect sense, right?)

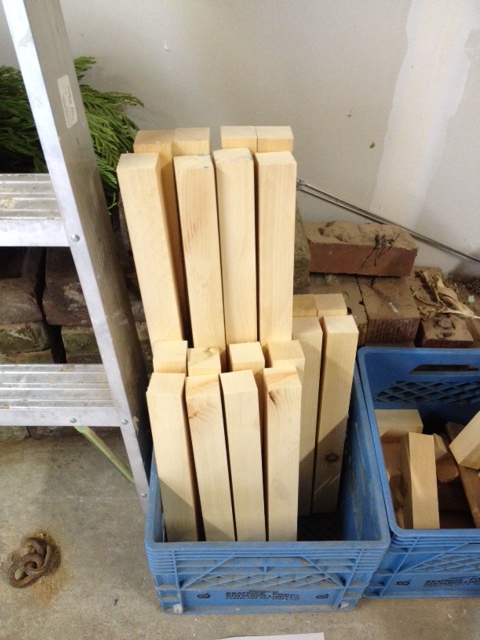
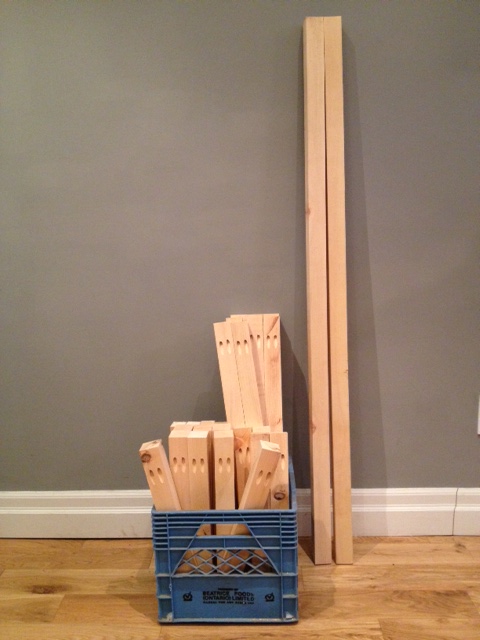
DIY TIP! We keep all the cuts for one project in a milk crate. This keeps your offcuts from mixing with your good pieces, and ensures you don’t forget anything.
Then El Granto started drilling the pocket holes for assembling the frame. OMG there are a bucketload of pocketholes. We cut all the frame & supports, and drilled all our pocket holes. I counted them up and El Granto made a total of 104 pocket holes. This isn’t even counting the holes we’ll need for attaching the shelves, sides, back and top. Holy hell batman.
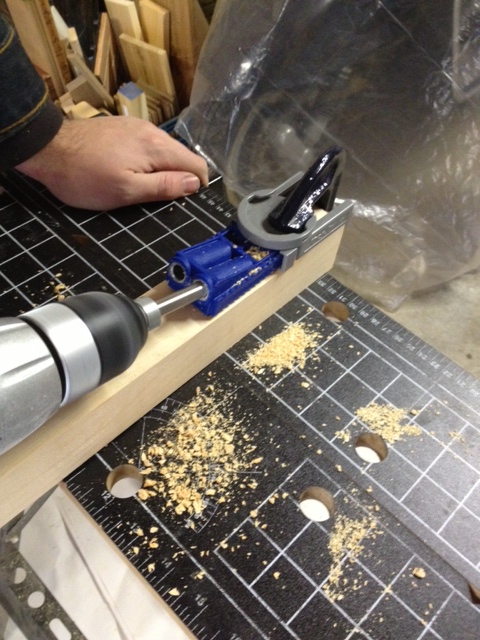
Here’s a video of El Granto drilling some pocket holes. He attaches the Kreg Jig with a regular clamp directly to his small work table. This makes the whole thing steady, and keeps the clamp from digging into the wood. Yep, that’s Green Day playing in the background. El Granto has his garage stereo hooked up to his phone so he can blast inspiration woodworking music, like punk rock or heavy metal.
We brought the wood in, and let it warm back up, and I laid out how the front of the frame is to be assembled.
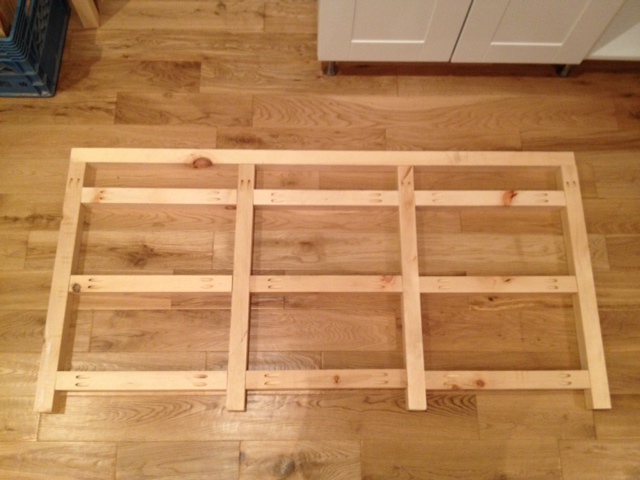
That was enough work for one day! The frame assembly will have to wait for next weekend.
What did you get up to last weekend? Any big woodworking projects you’re taking on this spring?