We needed a new door mat for the front door. We started hunting around for something useful but nice. What I found was a lot of ugly door mats, or ones that were hugely expensive. ARG. The problem is, when I get frustrated with not being able to find what I want for the price I want, I take matters into my own hands. So I refuse your overpriced or ugly door mats, and I will make my own thank you very much. So I stubbornly lugged my ass on the bus to Ikea and picked up some large coir rubber backed mats.

Coir is a natural coconut fiber and is very durable. If your mat gets dirty, shake it out, and you can even sweep it. Note to self, large coir mats are pretty heavy. After lugging them back on the bus I sure had sore arms the next day!
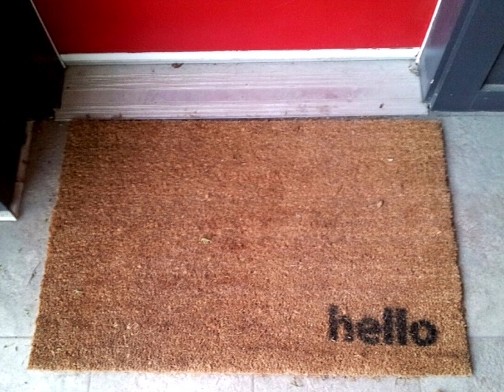
Okay, so now I had a plain mat. It would be fine as is, however I am never one to leave well enough alone. I decided to add some simple painted type or a design to the mat. I made a few layouts, but ended up loving a simple design of a small lowercase “hello” on the bottom right corner of the mat. I could have easily embellished the mat further with a border etc, but I liked the negative space the “hello” left on the mat. To save time, I broke out my Silhouette SD (yes I do use it for everything!) and cut out the hello from some cardstock. I popped out the letters, and used the cardstock as a stencil. I taped it onto my mat, and then used some sewing pins to get the paper to stay put.

The rough surface of the coir mat made it hard for spray adhesive or tape to adhere, so I found the pins the best course of action to get my stencil stay in place. I covered the other areas of the mat to make sure I didn’t get any overspray on the mat.

Using a can of spray paint, I carefully painted my letters trying to spray completely parallel with the mat, to try to limit how much paint sneaks under the stencil. You will have some, but this careful paint technique should limit the paint’s sneaky sneak under the stencil. Give the stencil a few passes with the spray can, then let it dry for 5 minutes or so. When you go back you will notice that its lighted up quite a bit as the paint soaked in, so give it another couple passes with the spray paint, then let it dry. I got a bit impatient and removed the stencil about 10 minutes after I painted. Just make sure that you’re careful and don’t get paint on anything (including your hands, spray paint is hard to get off your cuticles!)
")
We let the paint dry for at a day or two, and the placed it at our front door.

What do you think?
SOURCE LIST:
Materials:
Ikea Trampa Door Mat – Ikea
Spray Paint – Left Over Rust-oleum Universal in Black
Tools Used:
Silhouette SD
Sewing Pins
Difficulty Level (on a scale of 1-5):
Total Cost: $16