Aaaaand were done! Daniel and Adelle moved into their new place and took their newly finished modern farmhouse table and benches with them. Mind you as much as we will enjoy our garage space back, we will miss working with Daniel and Adelle on this project! It’s different working with friends than a spouse, it’s laid back and there (usually) isn’t any swearing involved. Throw in a piña colada or two, and it’s a party with work involved.
If you missed the beginning of the project, check out part one, two, three, and four.)
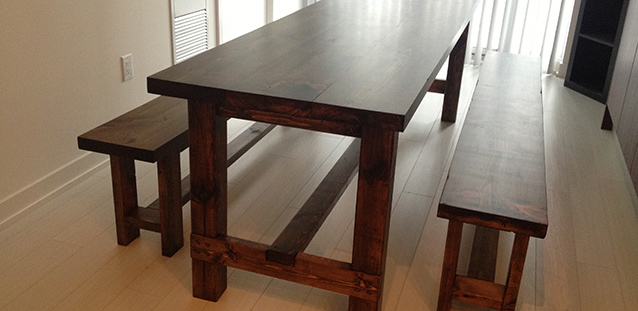
So without further adieu, here is the table!
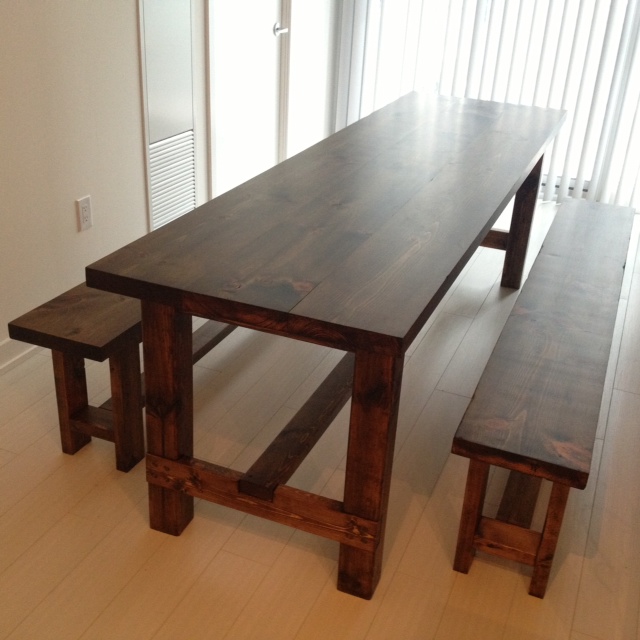
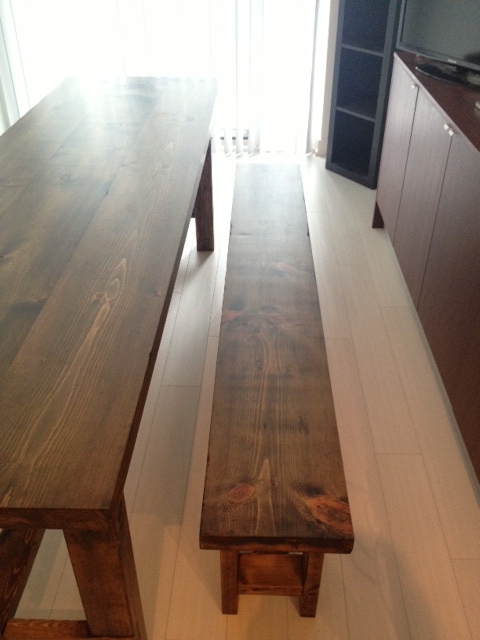
It fits perfectly in their narrow condo, and the benches hide away completely when not in use, making this table able to function as stand in kitchen prep surface.
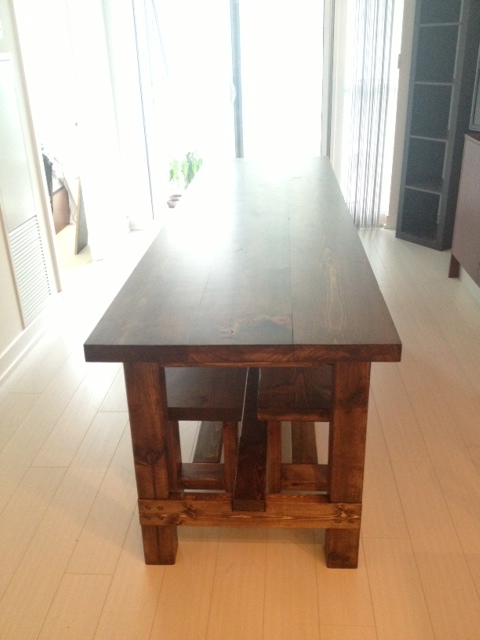
The deep stain color works great with their white walls and light floors.
The table also does a mean job of holding a glass of wine or two (we had to test the table out…come on!)

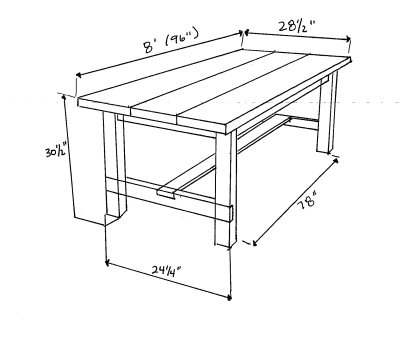
SPECS & PLANS:
The table is loosely based on the Ana White farmhouse table plans. (We changed size, removed the breadboard ends, and used dowels instead of screws for the table legs. ) For in depth instructions on how to assemble the table check out her plans here.
Farmhouse Table
Lumber Buy List:
5 – 2×4 @ 8′
3 – 2×10 @ 8′ (we used kiln dried pine from Downtown Lumber for the table top, it was worth the extra expense! If you cant find kiln dried pine, purchase spruce 2×12’s from your local hardware store, and rip down to 9 1/2″ wide removing the beveled edges while you’re at it (they will be huge crumb catchers if you leave them)
1 – 4×4 @ 10′ (if you cant find 4×4’s in untreated spruce or pine, use cedar)
Cut list:
4 – 4×4 @ 29″ (legs)
2 – 2×4 @ 78″ (long aprons)
2 – 2×4 @ 17 1/4″ (short aprons)
1 – 2×4 @ 85″ (stretcher)
2 – 2×4 @ 24 1/4″ (stretcher supports)
3 – 2×10 @ 96″ (table top pieces)
Instructions:
Cut all lumber to length.
With Kreg Jig set to 1 1/2″ material, drill one pocket hole every 8″ or so on one side of two of the table top pieces (the outside tabletop boards). Then attach the outside table top pieces to the center table top board with wood glue and 2 1/2″ pocket hole screws. (see our post on building the table top here.)
Drill Kreg Pocket holes on top and sides of all apron pieces. Make 2 holes on the ends, and a hole about every 8″ on the tops.
Notch out legs for the stretcher supports. Make notches 3 1/2″ high by 1 1/2″ deep positioned 6″ up from the bottom of the leg, and 19 1/2″ down from the top of the leg.
Notch out stretcher supports. Make one notch in the center of each stretcher support. Make notch 3 1/2″ wide by 1 1/2″ deep.
Assemble legs by attaching short aprons to legs (inset by 3/4″) then set stretcher support into leg notches, and attach with screws or dowels (see how we did the dowels here).
Attach long aprons to legs, with pocket screws.
Flip tabletop upside down, center legs upside down on the table bottom, and attach legs to table top with pocket hole screws.
Attach stretcher to stretcher supports with screws or dowel.
Sand, stain & finish as desired.
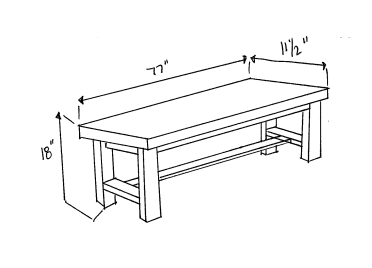
Farmhouse Bench
(for TWO benches, halve the amounts if you’re only making one)
Lumber Buy List:
7 – 2×4 @ 8′
2 – 2×12 @ 8′ (7′ if possible)
Cut List:
8 – 2×4 @ 16 3/4″ (legs)
2 – 2×4* @ 61″ (aprons) *= we ripped a 2×4 down to 2″ wide. You can also buy 2×3’s instead of 2×4’s
2 – 2×4* @ 6″ (short aprons) **= we ripped a 2×4 down to 2″ wide. You can also buy 2×3’s instead of 2×4’s
2 – 2×4 @ 61″ (stretchers)
4 – 2×4 @ 6″ (stretcher supports)
2 – 2×12 @ 77″ (bench tops)
Instructions:
Cut all lumber to size.
Drill pocket holes on apron pieces (Kreg set for 1 1/2″ thick material). Two holes on each end, and about every 8″ on the top. Drill two pocket holes on top of small aprons. Drill two pocket holes on each end of stretcher supports. Drill two pocket holes on each end of stretchers.
Attach stretcher supports to legs 3 1/2″ up from the bottom with 2 1/2″ pocket hole screws. Attach long aprons to legs with pocket hole screws.
Flip bench top upside down, and attach legs (also upside down) to bench using the apron pocket holes and pocket screws. Attach side aprons to bench top. Attach stretcher to stretcher supports.
Repeat for second bench.
Sand, stain and finish as desired.
SOURCE LIST: (one table + two benches)
Materials:
Lumber (see above)
Minwax oil based stain in Jacobean
Minwax wood conditioner
Polyurethane – Minwax Oil Modified in Satin
200 2 1/2″ Kreg pocket hole screws (Lee Valley)
Wood Glue
Foam brushes (Dollarama)
Rags
Sandpaper (150, 220 and 320)
Kreg Screws – Lee Valley & Home Depot
Tools Used:
Miter saw
Table saw *not necessary, you can get material ripped to size at the lumber yard
Circular saw
Square
Kreg jig
Drill
Palm & orbital sanders
Measuring Tape
Difficulty Level (on a scale of 1-5):
Total Cost: $400 (Lumber $320, Screws $20, Finishing materials $60)
Time frame: Two weekends (one to build, one to finish)
Thank you so much for this design. Built one like it for my home. My family loved it so much, now I have to make another one for my son.
How do you put the second set of pocket screws in on the stretcher supports? The bit gets caught on one of the leg.
We used a socket wrench with a screw bit and did it by hand.
Would love the this in a 6′
8′ too long, do u have modified instructions?
This table and bench is the perfect fit for my small kitchen in my apartment. This definitely something I will have my husband work on soon. Thanks again. Great work!!!
This looks great! Love that the benches hide under the table, great work.
LOVE the table & benches. Exactly what I was looking for. Thanks so much for sharing!
Thanks so much for sharing your hard work! I am making the bench and following your plans. Did you notch the legs for the stretcher support or just use pocket holes & screws? I’m a little nervous about notching. Thanks for your help!
Hi Michelle,
With the benches we just pocket hole screwed them in. If you’re wary of notches, the bench would be a perfect project to start with!
great bench
Beautiful work. Great job!