Thanks guys for sticking with us through five yes FIVE posts on concrete countertops. The thing is, this project was BIG. Even with five posts I have probably bored you all to death with my insistence on telling you exactly how we did everything. The thing is, I want you guys to make your own counters too! You CAN do it! Real concrete, solid surface, with professional looking results. So thanks for sticking with me, cause I think it was totally worth it. Wanna see what all our hard work actually looks like?
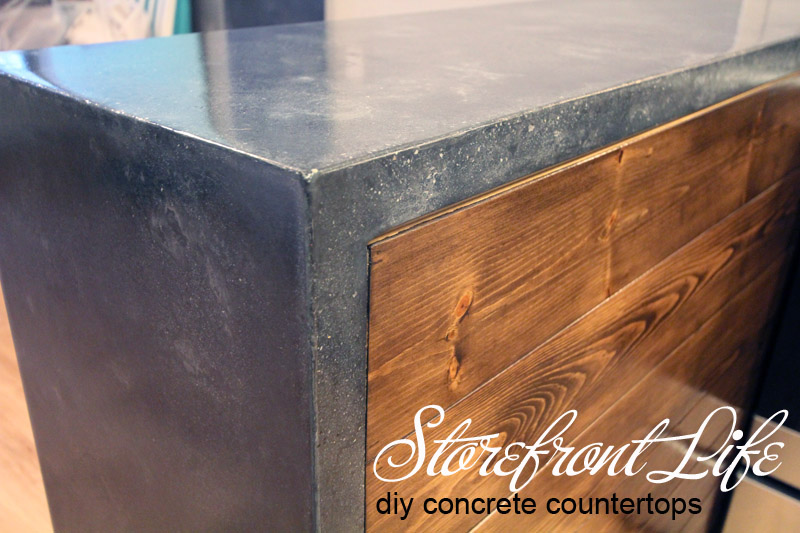
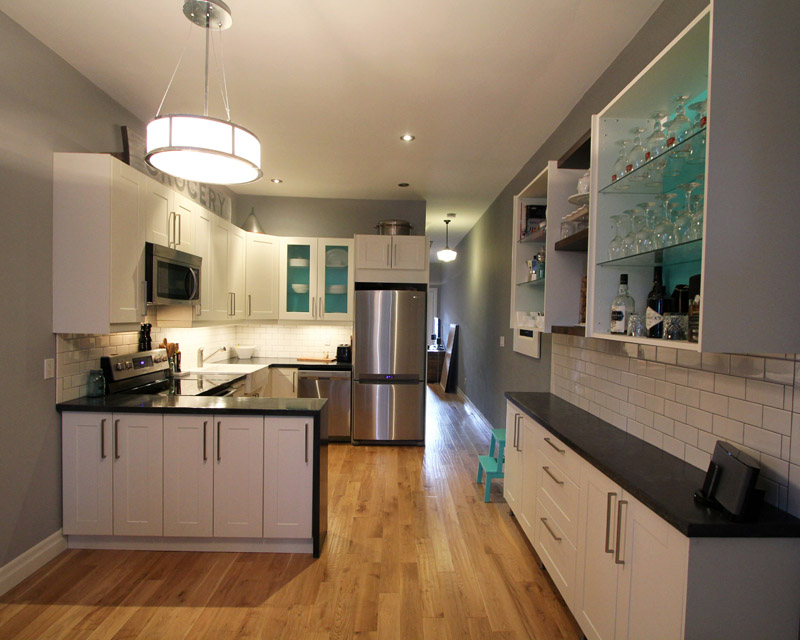
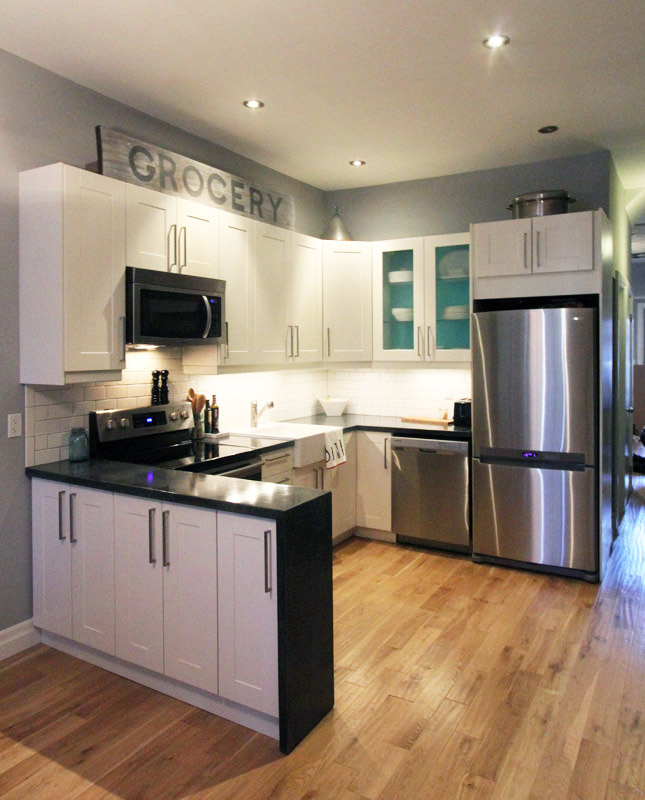
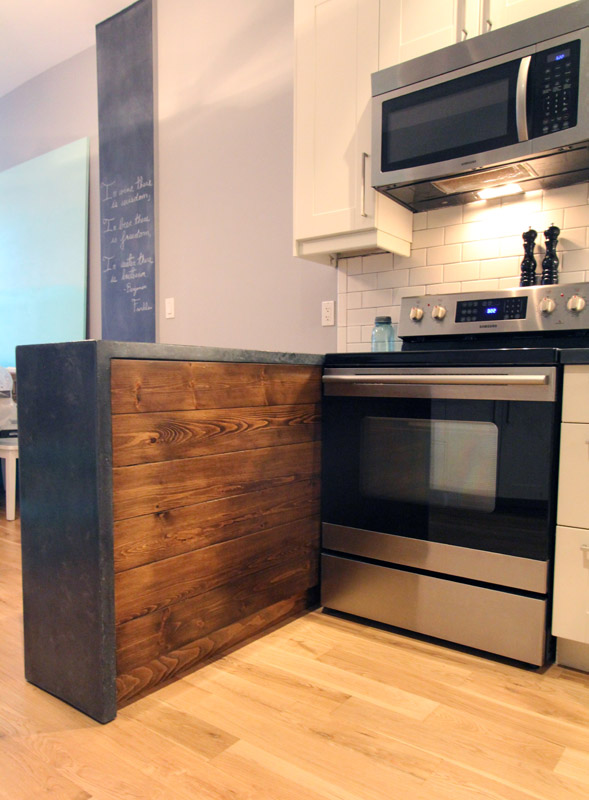
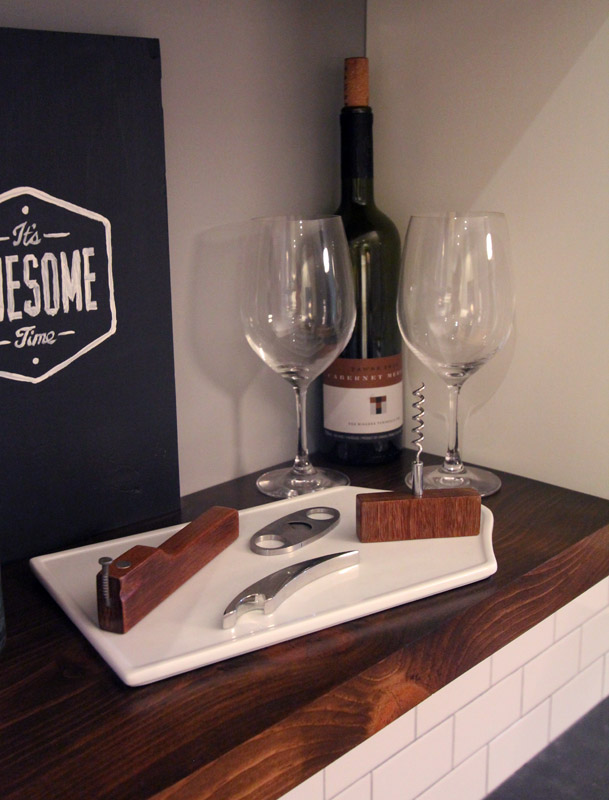
The counters were done in four pieces, including the single piece waterfall, which is by far my favorite piece! The color we used is “coal” but the color of the concrete can look very different at different times of the day. From a medium gray when the light is hitting it to a deep charcoal in the shadows. The color has so much texture and movement. I just love it! We paired the white cabinets with a pop of bright teal, and black and white accents.
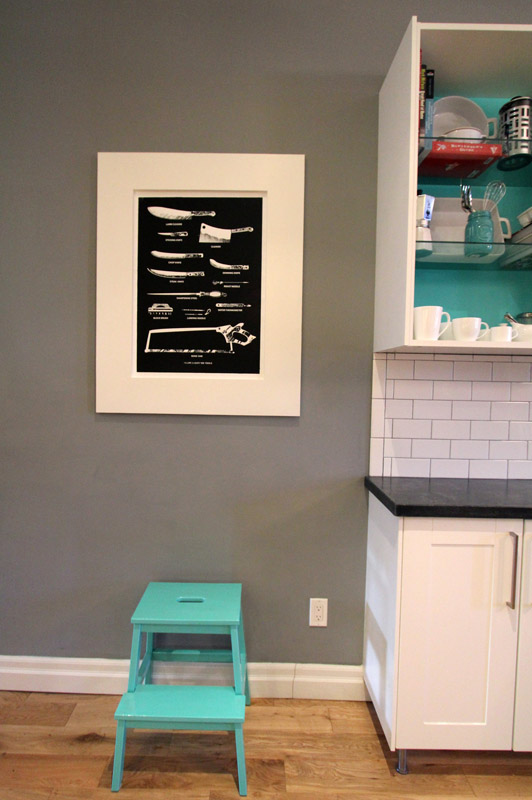
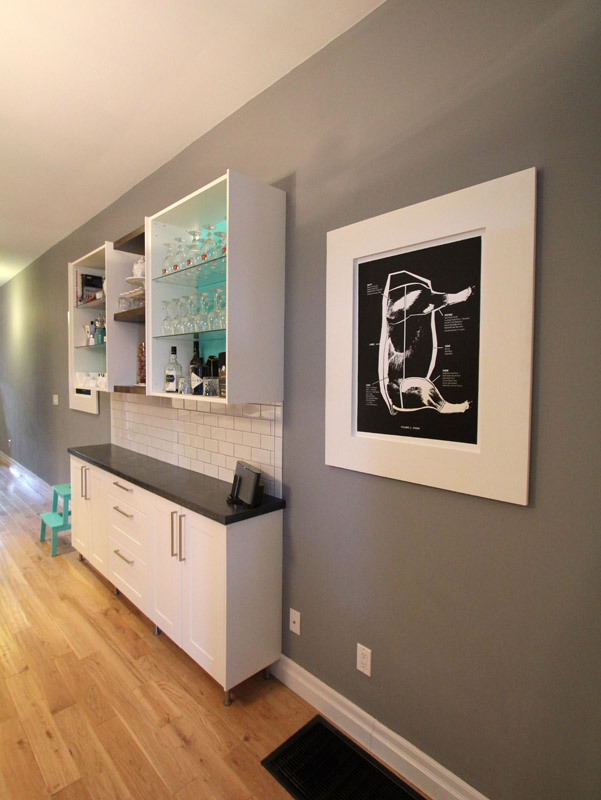
For the back of the peninsula we opted to add a pop of wood. The kitchen already had a lot of white, so adding wood really ties it into the dining room with its wood table & bench. It also matches the floating shelves on the coffee bar.
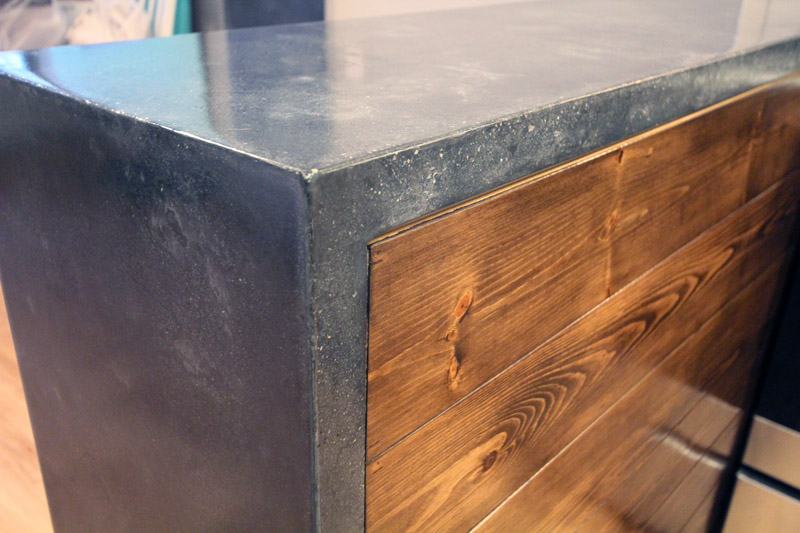

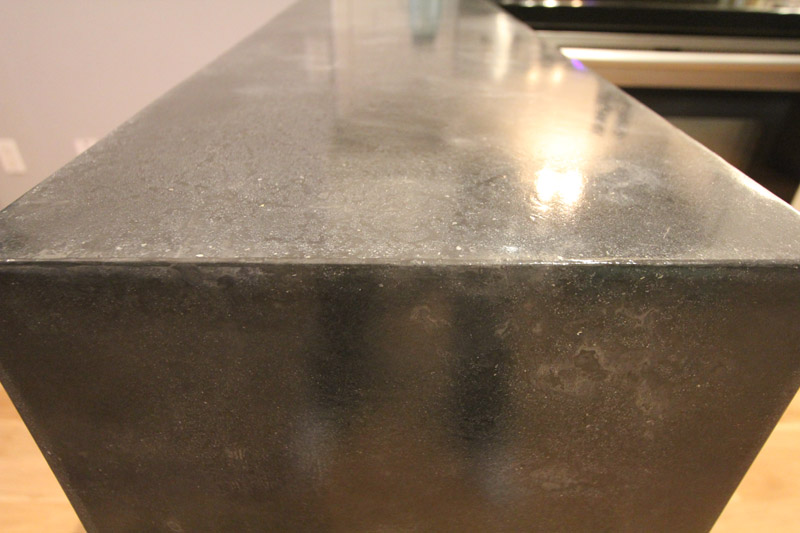
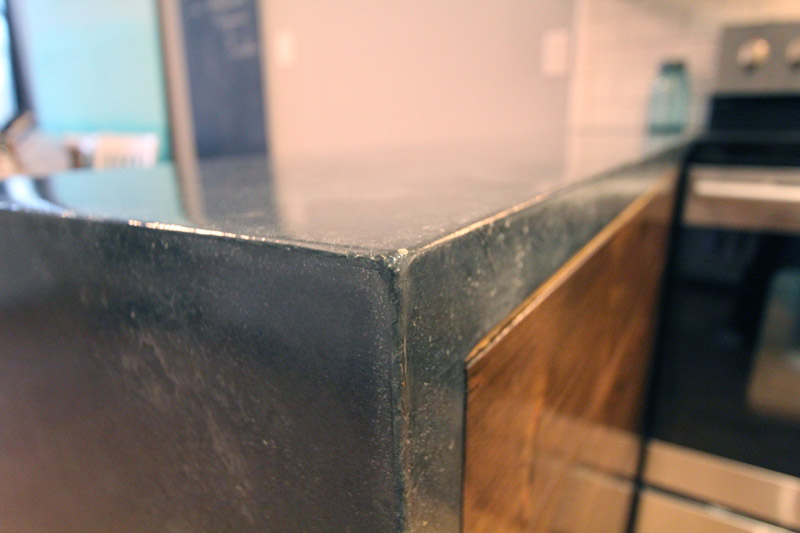
The waterfall is just sexy! I love how seamless it is. I would never have dreamed that we could do it in one piece. It is simply a work of art.
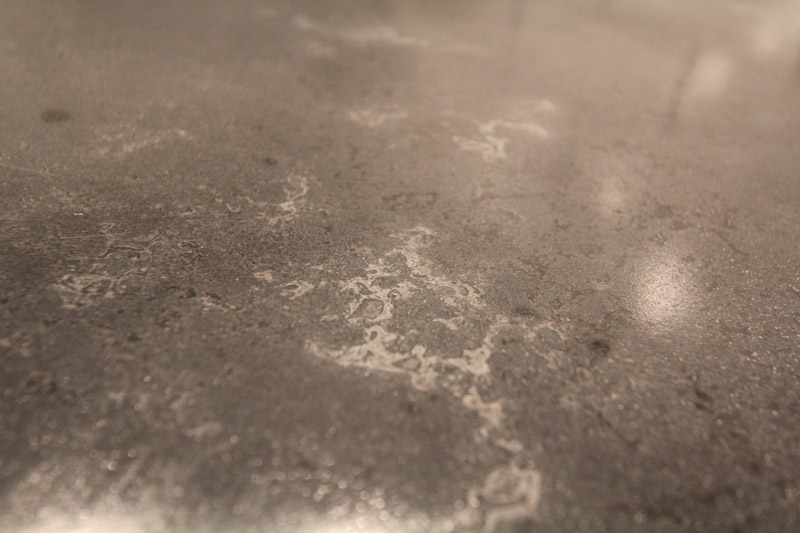
Speaking of the color varying. Here is one of my favorite spots with a lot of texture. This was produced by adding a slightly lighter color slurry for the middle slurry coat. I heart.
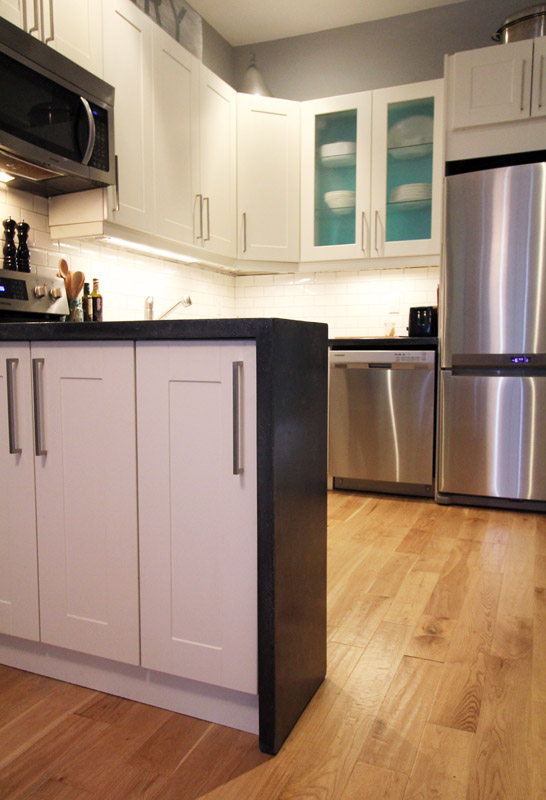
The front of the peninsula has cupboards, and when you open them you can see more of the exposed waterfall.
![]()
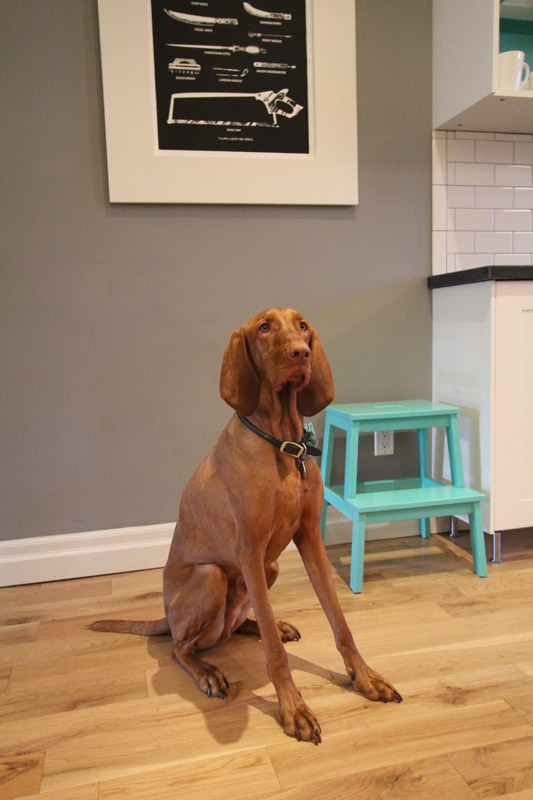
Sorry, had to throw one of Odin in. I can’t have my camera out and not take a photo (or ten) of him.
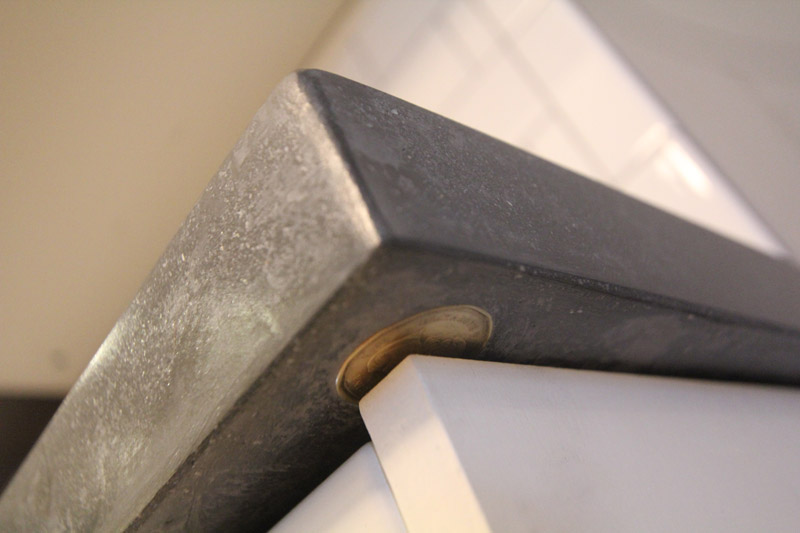
Do you remember when we hid a 2013 Loonie? Here’s the Queen peeking out from under the coffee bar counter.
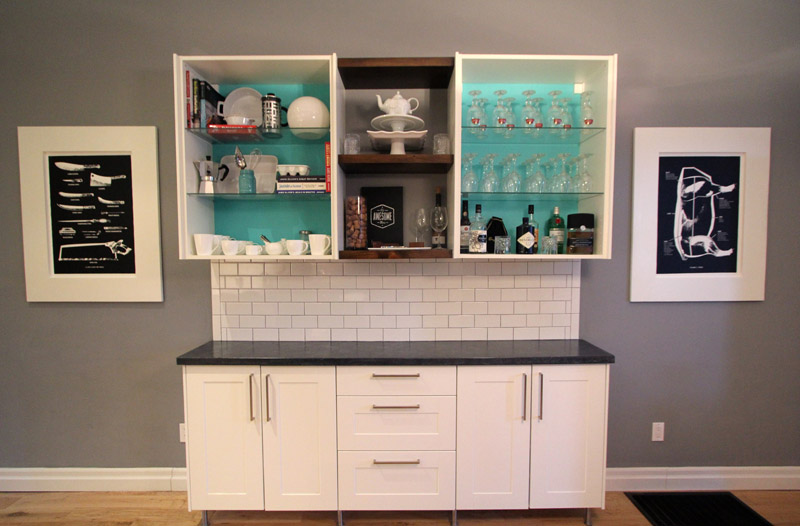
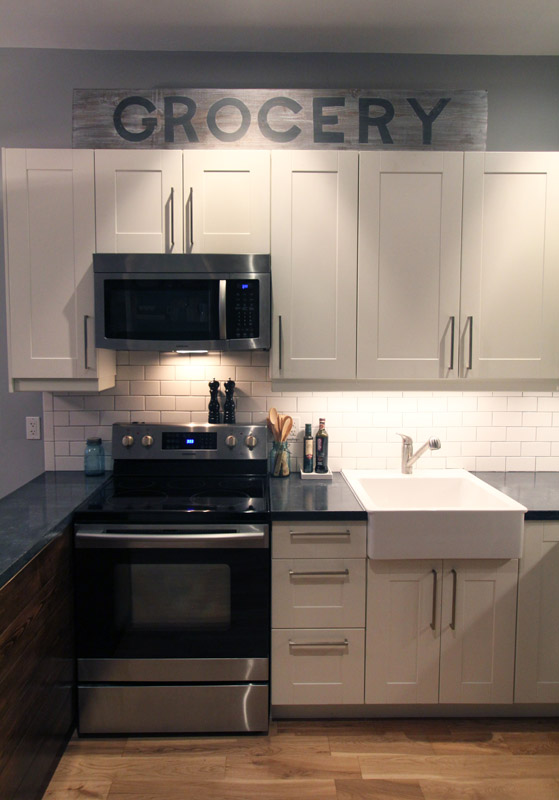
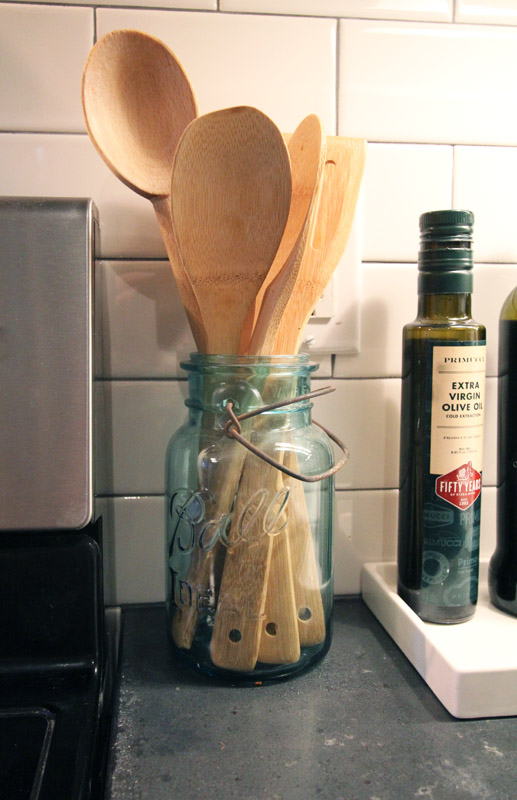
Now for a few of the other kitchen details. El Granto picked me up a couple vintage Bell jars one day at The Junction Flea. I love this one which holds my wooden spoons beside the stove. We also use a small ceramic tray to keep oil and vinegar off the counter (it would stain the tops).
I am still very happy with the wood shelves we added to the coffee bar. Now with the wood clad peninsula, it really pulls the coffee bar into the kitchen.
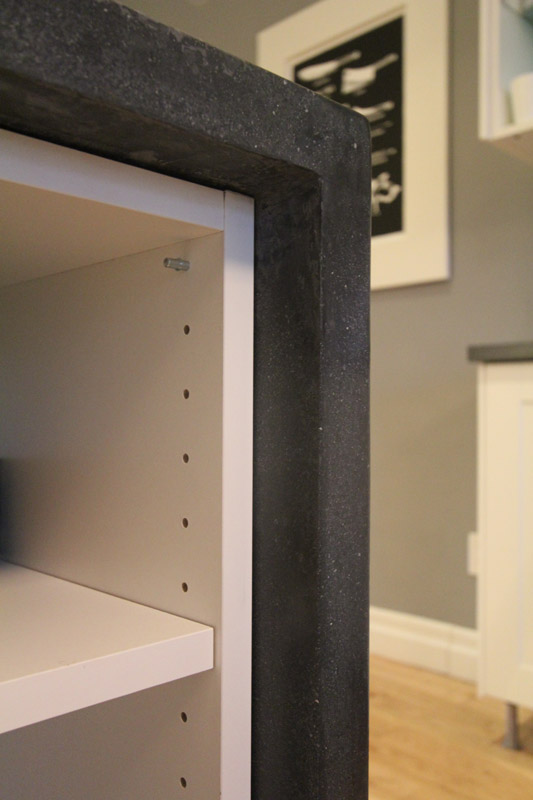
The inside counter was one piece I worried about a lot, but in the end its imperfectly perfect.
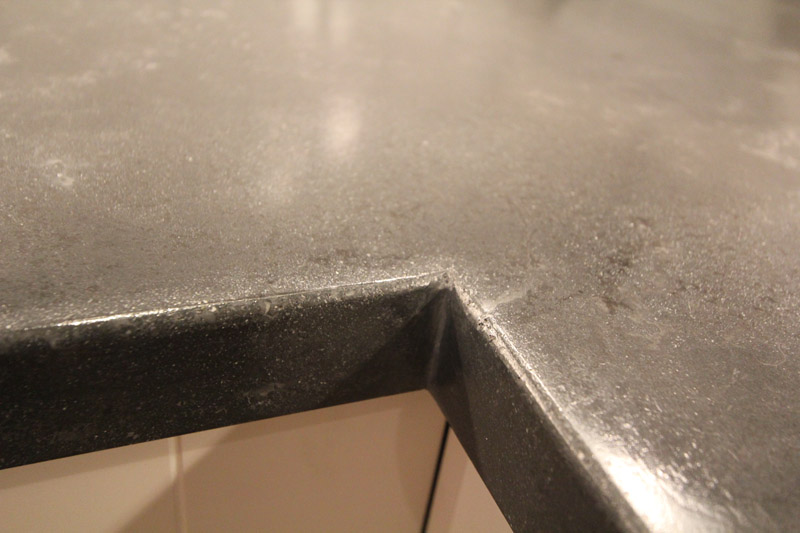
Okay, one more pic of the waterfall! We slightly rounded the counter edges. Littles and dogs wont poke their eyes out, and it makes me swear less when I bump into the counters.
So what do you think?! We’re super happy with them. They turned out better than we ever could have imagined!
I will be back later in the week with a few more kitchen items. Such as the source list, a few more project how to’s, as well as how we installed and sealed the counters. But for now, I am going to go and makeout with my counters. Wha? Uh. I mean stare at them lovingly, and maybe touch them a little. So smooth… and sexy…
This project is part of Project Concrete Countertops. Make sure you check out the rest of the series starting with Concrete Countertops – The Mix, The Templates, The Forms, The Pour, Fill & Sand,The Reveal and Finishing Touches.
*We were gifted some (awesome) Buddy Rhodes Concrete Products, but all opinions are our own!
P.S. We’re participating with Creating with the Stars this year! Make sure to check out East Coast Creative and vote for us!
Concrete countertops give you so many options. They are great for outdoor kitchens as well. Love it!
I ended up here via a post you made at Apartment Therapy.
These are GORGEOUS! I’m just speechless. I love concrete, terrazzo, and other “composed” stone but would never have thought of doing it myself. You got moxie!
Also love the aqua step-stool and inside of the coffee bar AND your poster of the various butchering tools.
(I woulda posted twice as many photos of that waterfall, btw; it is definitely brag-worthy, and Odin is so cute it’s hard to believe!)
I was flipping through because I am researching concrete counter DIYs. ( Yours look marvelous BTW!) But I stopped when I came upon on Odin because he’s so handsome! We are vizsla fans,too! Thank you for sharing both your kitchen and pup!
Hey there guys,
I came across your post, and you have encouraged me to try it out myself. I just have to wait for the weather to start getting warmer.
If you don’t mind sharing, how is your counter top doing after these past couple of years. Is it holding up, or misbehaving?
I am very curious to know if it stands up to all of your cooking 🙂
Would you guys have done anything different, or have any advice for someone that is new to this concrete counter top concept.
Much appreciated,
-e
Wow, your counter tops turned out absolute stunning, as well as the complete kitchen
I just poured (handpressed) mine and I am playing around with the right mix for the bone paste. If I understand correctly you used charcoal, a lighter shade of charcoal / grey and then charcoal again. Is that correct.
Did you do anything between the applications of bone past to minimize the build up of material on the surface? e.g. wipe down or squeegee
Thanks
Patrick
Hi Patrick,
Thanks for the kind words!
For bone paste slurry, we did three layers. Charcoal, grey, charcoal. We used a spackle knife to apply a thin even layer (i.e. laid it on, then scraped it off, like applying drywall mud.) We let the coat dry, and then added the next color. No need to squeegee/clean between layers. You don’t need to worry much about it, just apply a small amount, and move on. It will turn out perfectly once you sand, I promise! You can see what a the slurry process looked like here: http://www.storefrontlife.com/fill-sand-sand-sand-project-concrete-countertops/
Would love to see some pics when you are done!
Love your kitchen! How did you get the pretty shimmers in the concrete? Is that specific to Buddy Rhodes pigment? Thanks!!
Hi Kendra,
The shimmers is what happens when we sanded down the countertops. Concrete is made up of water, cement and aggregate. In sidewalk concrete, the aggregate is large gravel. In Buddy Rhodes mix, the aggregate is smaller fine rocks and sand. When you wet sand the countertops it polishes everything and the little pieces of aggregate polish up and sparkle. (see the wet sanding here: http://www.storefrontlife.com/fill-sand-sand-sand-project-concrete-countertops/ ) It’s one of my favorite parts, and really adds depth to the counters.
wow!!! Love them!! Love the varying colors! why did you choose to pour them in molds and then move in the kitchen? When I talked with Jeremy this weekend he said they had counter edges that you could install in place right on top of backer board on the cabinets and “pour” right in place, then break off the edge form. I was thinking we would go that route but just trying to learn more/consider both options. And that waterfall – just beautiful!
Thanks so much Christina! We had the flexibility to do it offsite in our garage, and make all the mess there, so that’s why we chose that option. It allowed us to use the hand pressed technique (with the color veining) and to wet sand to a polished finish! Let me know if you have any more questions about the process, I am happy to answer them all!
When you mentioned you did concrete counter tops in the group discussion, I had to come see them… we, I have always wanted to do my own… these are stunning and so professional looking, just amazing! I’m beyond impressed!Off to check out the rest of the series. How are they holding up BTW, over a year using them, do you still love them?
Hi Laurie,
We still absolutely adore them! They are holding up very well. A few stains (my fault!) no cracks, chips or other large marks. I need to do a quick stain removal and reseal of them. I should do a post on how they’re wearing!
wow wow wow wow the kitchen is gorgeous.I see in a previous post you mentioned that the project cost you about a thousand dollars how many square foot counter did you run?
Hi Tamara, I think it was about 40 square feet, and worked out to be about $25/square foot. This included our tools, new cabinets, finishing supplies etc. We also have some mix left over for new projects!
Wow! Love love love all of it! I’ve never liked a gray room before, but I actually could live here and not feel morose. I particularly like how the splashes of blue pop against the gray/white/stainless/wood. You must really be enjoying your beautiful room.
These are amazing!!! So impressed that you were able to do this & the whole kitchen is incredible. Just wow!!!
xo ~kim & chloe
awesome project and I too am impress by the way the color plays in the light. well done and thanks for sharing.~jb
Pure gorgeousness!! Grey and turquoise make me swoon… L.O.V.E. the countertops!
Love it!
I love it! Just found your blog and I’m looking forward to looking through your posts. We’re renovated a loft above business right now and are looking for as many DIY projects as we can handle, so I’m sure I’ll be taking notes looking through the blog!
If you’re bored, feel free to check us out and provide any suggestions. We could use the help, ha!
http://frugaltofreedom.wordpress.com/
Hi OhioDoug! I cant wait to give your blog a read. I always love old buildings (especially big storefront ones!) Don’t hesitate to get in touch if you have any questions about any of our projects.
I am amazed at what a great job you guys did, and so inexpensively! It looks so rich!
Love the blog.
Thanks so much Ann! We really appreciate it!
I LOVE this project! Your kitchen looks amazing, and I was shocked that a concrete waterfall could be made… And so easily!
How much did the project cost you?
Can’t wait to do this!
Hi Lorelei,
All told I think we were about $1000 for this project, and some of the tools/materials we can reuse on future projects.
I love these counter tops as well. Your tutorial is wonderful thank you so much. So it cost a total of $1000 for the project. How many sq. ft. of counter tops did you make? Does that mean that the tools that you reused weren’t included in the cost? We are just trying to see if it is worth the time to put into a project like this. Thanks!
Hi Jessica,
It was about 200 square feet, including the waterfall. I put everything in that cost that we didn’t already own.
Okay Great! Thank you soo much!!!
Rounding the edges was a great idea. Square corners are much more likely to chip. The entire project came out great!
Thanks Anthony!
Wow! Fabulous and very inspiring! love it.
Amazing results! I wish I had discovered your project a month ago because I recently attempted to cast a concrete 3-sided vanity (you could call it a double waterfall edge), and it is amazingly heavy. I cracked one of the legs while removing the form, and I haven’t even put it in the room yet. How did you move your concrete slabs without cracking them? Is Buddy’s product really that much more rigid, especially in the weak parts such as the 90 degree angle?
And did you use any sort of finishing wax or polish?
Thanks for sharing your project with us 🙂
Hi Stephanie! We were able to reduce weight by not making the slab completely solid. With Buddy’s Handpressed technique you push the concrete up the sides of your form, then come back with a glass fiber reinforced round of mix for a total thickness of about 1″. With this technique you could actually make a hollow box of concrete.
As for strength Buddy’s mix is super strong. With the glass fiber reinforcement and the additives we put into the concrete we didn’t crack (or even worry about cracking) anything. We moved all the pieces several times and they were just fine. We had two guys (El Granto & Jeremy) and myself and we had no problem moving everything.
We finished the counters with acrylic sealer. We have not waxed it yet, we are seeing how we like it with just acrylic sealer first. The wax will aid in stain protection though!
Wow great info! Gahh why didn’t I discover you a month ago? :). I’m gonna try to salvage our cracked vanity just because the form was such a pain to build, but if that fails, I’m using your technique! Thanks again!
I saw your post on Apartment Therapy and I’d love to put in concrete counters in our house. I realize from the Tower image that we are in the same neighbourhood. We just moved from St Helens Ave to Sterling Road. It is nice to see awesome projects in the area.
Hi Laura! Its great to meet someone else in the neighbourhood! I think you’re the first person who’s recognized the water tower!
I want this kitchen!! Like mega huge WANT!!!
Pin all the images!!
I was going to say STUNNING! but i see thousands have already said so. I loved concrete counters before. I love them even more now. You’ve certainly done them justice. Well done! A big Canadian Yeh! to that Eh.
well you guys certainly nailed that DIY , those counters are a thing of beauty
Seriously stunning! Your work definitely paid off.
This is absolutely beautiful. I came across your blog a little while ago via Apartment Therapy and I love your home, DIYs and sense of style. As an ex-Torontonian living in England it’s nice to check out a cool Canadian blog. Kudos to you on your countertops, I want to do something similar in our house and have bookmarked your detailed posts for future reference!
A work of art is right! My favourite part is the wood on the back. Just perfect.
I’ve been meaning to say this for some time, I have decided I am just going to either move in, buy the house from you when you’re done or hire you to renovate our kitchen in the future. Everything you do and make I love. Everything.
oh my gosh! can I move in to your kitchen?! this is FAB! I love everything about it:) those counter tops are simply stunning. and so is your dog:)
Thanks Heather! You can have the kitchen, but I cant give up the dog. I am rather partial to him! 😉
Those are really amazing – can’t believe you did them yourself. Totally professional looking! You must be thrilled.
Thanks Dani! We are super thrilled! We actually cant really believe it’s all ours (and we made it!)
The countertops are chic and well-designed. It gives elegance to the kitchen. Excellent job. It looks very professional. I would like my kitchen to be designed that way.
Thanks John!
Great job guy’s!!!!! You make is look so easy. It was fun following your progress over the last couple of weeks.
What’s next?
Thanks Buddy! I think we may have caught the concrete bug! We are already planning some fun little projects, and dreaming of a bathroom sink/counter. I keep spotting everyday objects and considering if I could make them out of concrete. Bowl? Doable! Lamp? Maybe! Jewelry? Awesome!
These look fantastic! So impressed! And I really appreciate the enormous amount of detail you went into when describing each step, since I plan to make my own someday. So thanks a lot!!
Elise, you should totally do your own! It wasn’t as hard as I thought. Some planning, and some heavy duty muscle work, but totally feasible!
These are absolutely gorgeous, Kristen! I can’t believe how nicely they turned out – and your turquoise accents are stunning. What a beautiful space!
Thank you Tara!
your whole kitchen is stunning!
Thanks so much Stephanie! We still have a few things left that we want to do, but we’re really happy with the results thus far!
Amazing countertop! Can’t believe you did it yourself. Love the wooden back and the loonie detail.
When I was a kid we poured a garage floor at my house, and we put in coins for our each member of our family’s birthday, as well as a coin for the year we did the project. I hope one day someone will find this loonie in the counters, and know when we built it!
Wow ! Great job, lots of details, makes me want to do my own ! The Loonie in the corner just makes me smile :).
Thanks for all the great ideas and enjoy your beautiful kitchen !!
wow they look simply AMAZING!!!! I love the whole kitchen!
Wow! You’re so brave to attempt such a huge project and it totally paid off. It looks fantastic.
Thanks Andrea! It was a big project, but totally doable! I’m so glad we have it a shot!
They’re absolutely beautiful guys!! You did an incredible job. And I am completely in LOVE with the wooden back you put on the peninsula! UBER sexy!
Thanks Tash! The wood is one of my favorite features too! We almost did concrete on the back, but I’m so happy we went with wood instead!
Everything you guys touch looks great, so I knew this would look great. Now that I see the final pictures, it looks better than I imagined it would. It’s perfect!
Thanks so much Matt!
Looks awesome! You guys did an amazing job! The kitchen looks so much bigger with the coffee bar addition too. Love it!
Thanks Julie! To think that the coffee bar area was just “hallway”! I’m upset that I lived without it for so long!
What a gorgeous kitchen. You guys really did a great job and I loved all the pictures and details you included.
Thanks Tracey!!
beautiful. keep up the great work and details. the more posts the better.
Thanks Jim! You shouldn’t encourage me to write more details! I will never stop 😉
I love them, they are beautiful, I love the color and it looks great in your beautiful kitchen too! 🙂
Ingrid
Thanks Ingrid. We hemmed and hawed on the color, but are so glad we went with dark gray. It makes the kitchen feel grown up.
Nailed it!
Thanks Lyndsey!!!
The counter tops are gorgeous. They look like honed granite. Fantastic job guys. You should be proud.
I love how they turned out & I love that you explained the entire process.
Thanks so much Anita! I’m glad I didn’t bore you with all the specifics!