
Last week I had an especially bad week. I went in for my second round of iron infusions, and this session was not kind to me. I came home with a fever and my whole body felt like it had been run over by a truck. I took a few days off and got some rest, and finally this week things are starting to get better. Continue reading “Is it Spring Yet?”
Month: February 2013
Pinterest Challenge – Restoration Hardware Shelf
We had so much fun doing the Fall Pinterest Challenge, that we jumped at the opportunity to do it again this time. The jist of the Pinterest Challenge is to stop just pinning ideas, and start creating. You’re supposed to DIY something from Pinterest. Whether it be a recipe, craft, home project etc.

I have a few pins over on Pinterest (only 2,555 or so…) so I had a good amount of things to choose from! I figured this was a good opportunity to knock something off the to-do list as well.
Our front door opens onto the dining room. We have built a coat rack, installed an Ikea wardrobe and we have a nice bench and mirror. The only thing lacking in the entry was somewhere to put your keys and mail, or to keep a coffee away from the dog while you’re tying your shoes pre-puppy walk. We don’t have a lot of space, so a traditional console table was going to be too big.

Here is our inspiration:

Source: restorationhardware.com via Kristen on Pinterest
If we love the shelf so much, why didn’t we just go buy one? errrr… The price for shelf + brackets was $240. Yep, for one lil shelf. Ouch. We just don’t roll like that.
So we made it (with our spin on it of course)

So how’d we do it?
Bought some 1″ gas line pipe (it matches our dining table!) from Home Depot.
Supply List:
- 2 – Floor Flanges
- 2 – 6″ Nipples (teehee)
- 2 – End Caps

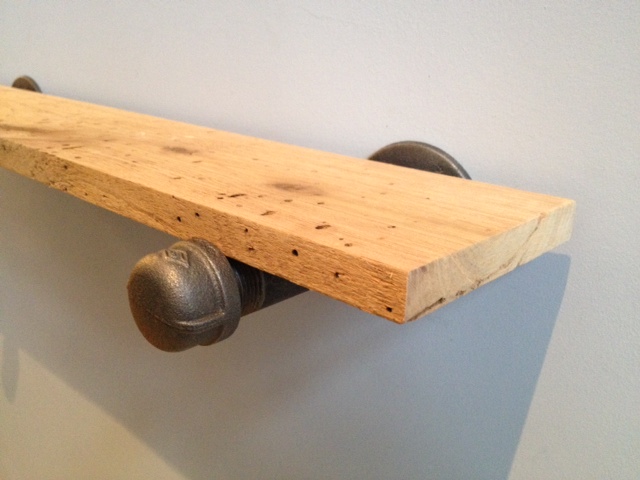
Assemble them all together and this is what you get:

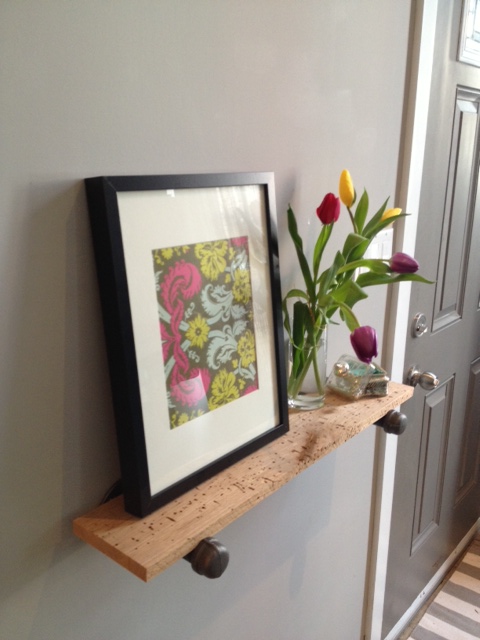
Now you need a shelf. We headed to the garage to check out what cool wood we had. We found some awesome worm eaten Butternut that El Granto had gotten for Christmas (yep we ask for building materials for Christmas). We loved the character of the butternut and decided it was the way to go.
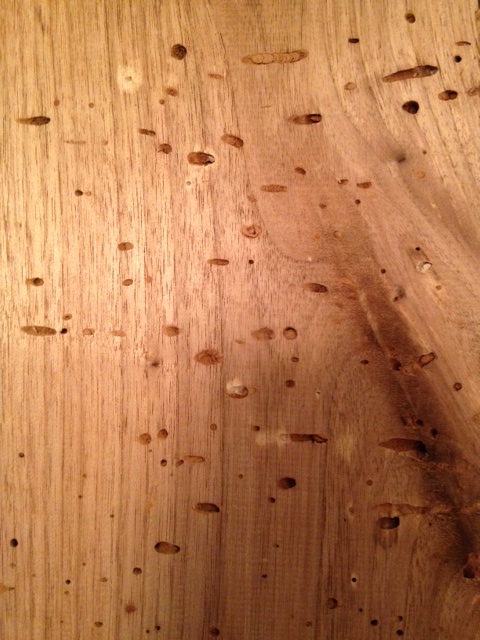
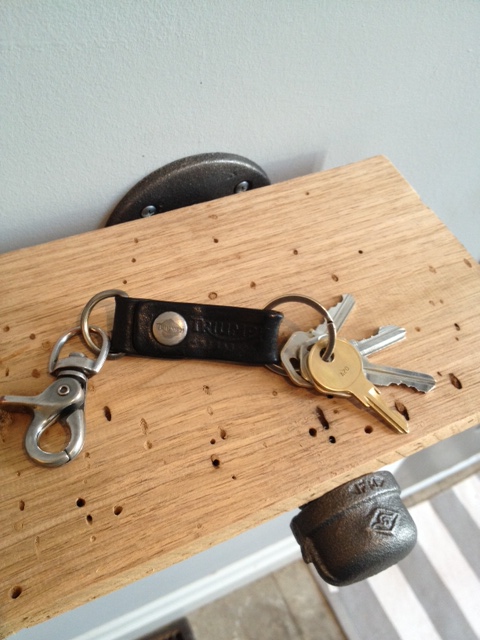
We cut the piece of wood 28″ long, and trimmed the width to 5.5″. This would enable the wood to sit on the pipe, but inside the edges of the end cap and flange. We wanted to be able to see the cool bracket. You can easily make the shelf wider by resting it on top instead of inset.
Next up, after deciding on placement and height (centered on the wall and 40″ off the floor) we went stud hunting, and found that we could hit one of our brackets into a stud. So we marked out the placement.
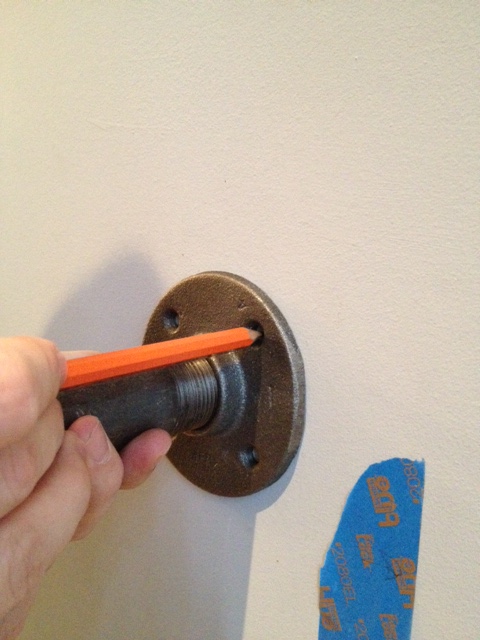
After the holes were marked, El Granto screwed the bracket into the studs.
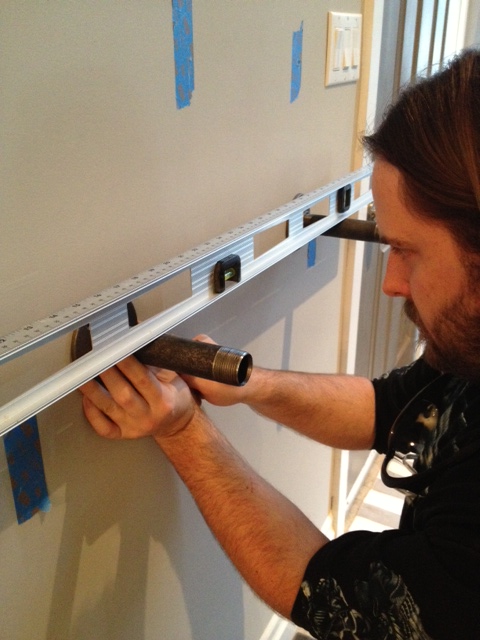
After the first bracket was attached, we attached the pipe nipple and used it to help us level the second bracket.
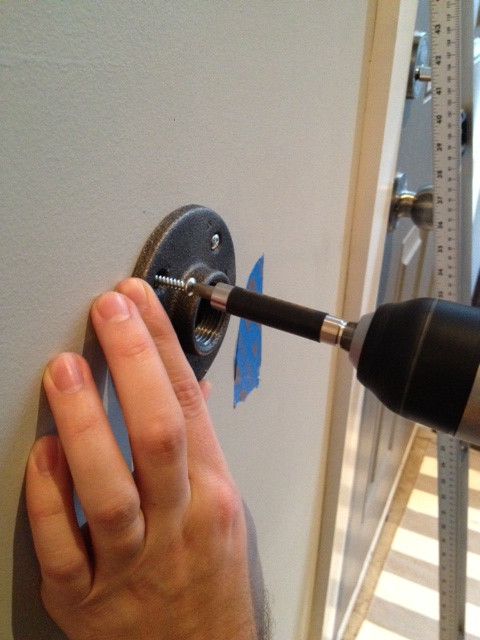
Next up we marked the second bracket, and used EZ Ancors to ensure the shelf would be attached to the drywall nice and sturdy.
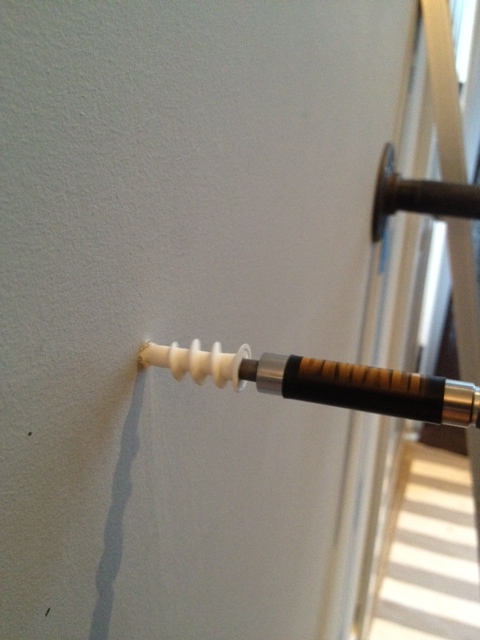
We then attached the other flange to the wall with screws into the wall anchors, and then screwed on the pipe nipple and end cap.
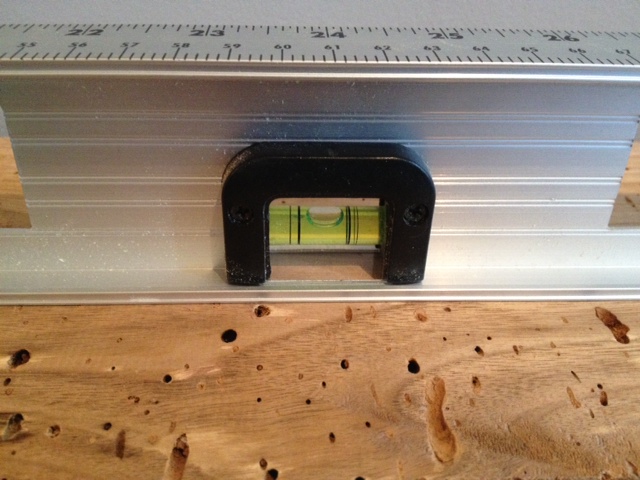
We gave our wood two coats of furniture wax and laid it on top of the pipe, screwing the end caps against the wood to hold it steady. Oh and it’s nice and level!
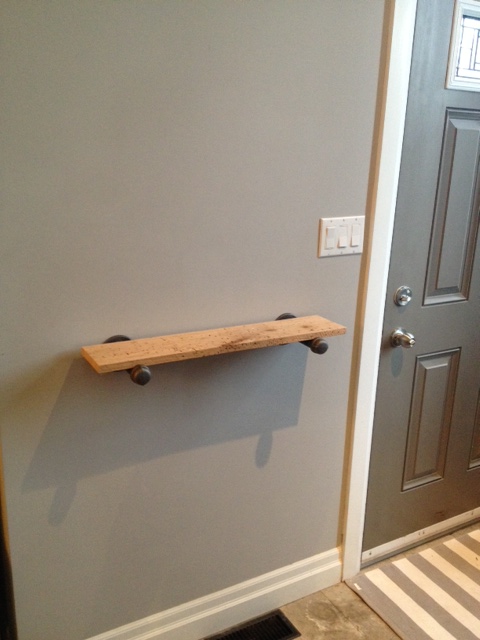
TA DA! What do you think of our DIY Restoration Hardware Shelf & Bracket?

Make sure you check out all the other awesome Pinterest Challenge projects, check out the hosts blogs too!
Sherry @ Young House Love
Katie @ Bower Power
Megan @ The Remodeled Life
Michelle @ Decor and The Dog
SOURCE LIST:
Materials:
1″ Gas Line Pipe (2 flanges, 2 end caps & 2 6″ pipe nipples) – Home Depot
Butternut Wood – Gift
Furniture Wax – Home Depot
EZ Ancors – Home Depot
Tools Used:
Miter Saw
Sandpaper
Dish Soap (to wash the pipes)
Drill
Level
Pencil
Difficulty Level (on a scale of 1-5):
one out of five
Total Cost: $16
Tin Ceiling Part 3 – The Reveal
Three weekends of sore muscles and standing on ladders are over, and we are now the proud (and tired) owners of a reclaimed tin ceiling. We first showed you how we prepped the ceiling, then how we prepped the tiles, today you finally get to see the finished product.
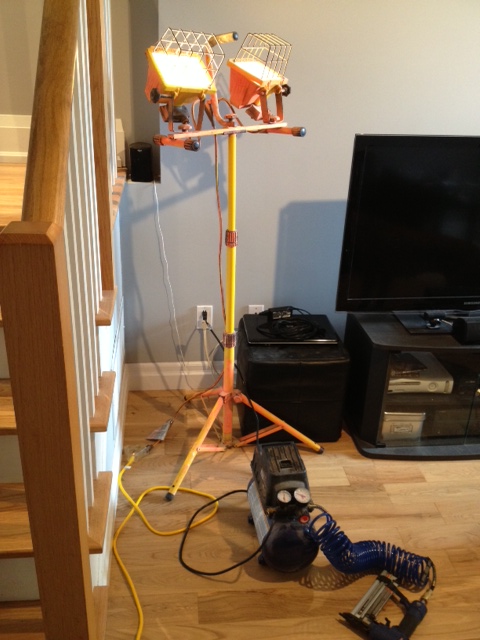
It was a bigger project than we anticipated. Anything where you’re working on the ceiling is exponentially harder. If we were to do it again, we would rent some scaffolding, as moving ladders around was a pain. We did borrow a work light from our neighbours, which was a necessity.
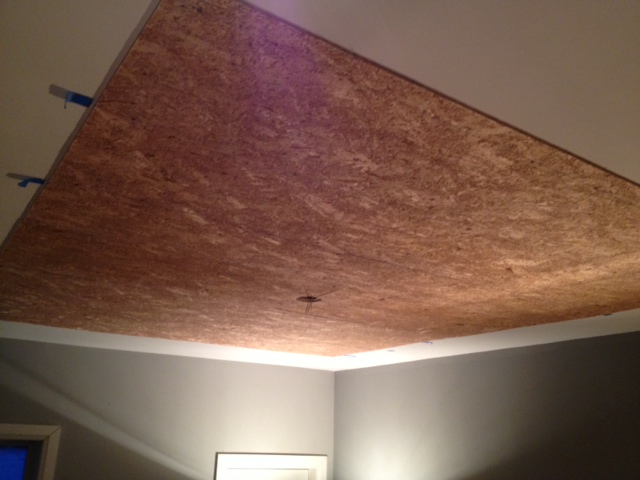
This is what the ceiling looked like before.
This is what we started with on installation day.

When installing the tiles you need to decide where you enter the room the most. The tiles overlap, so you want to make sure the edges overlap away from where you see the ceiling from most. We enter the living room from the hallway so we started the tiles at the corner farthest from the entryway (kitty-corner to the hallway).
The tiles overlap and have little notches where they fit in together. We figured this was enough to be able to line up the tiles properly, but once you’re standing on the ladder with the tile over your head, it’s much harder. We wish we had laid out a chalk line grid, it would have made the installation quicker and preventing one crooked tile that moved when I was nailing it. (arg)
After the first tile is up, we continued along that row to the end, then started the next now. Your arms get very tired, so this process ended up taking us two weekends to get done.
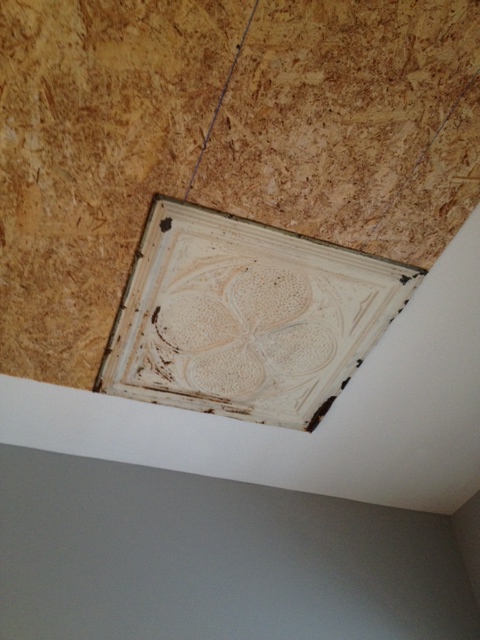
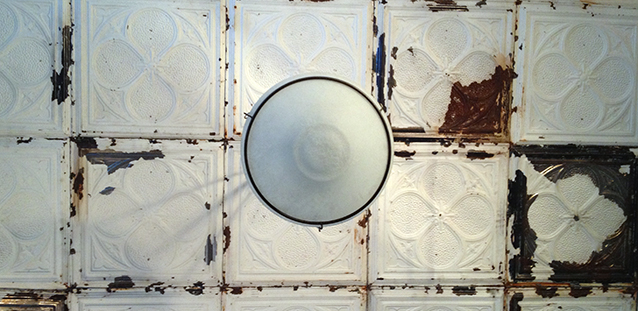
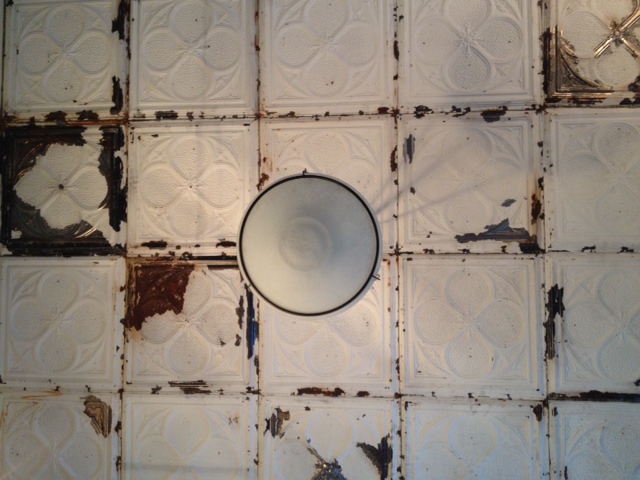
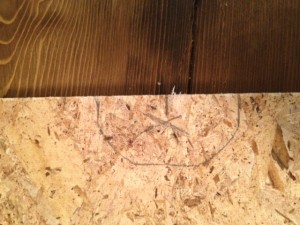
When we got to the middle of the ceiling we needed to deal with the electrical box. We had planned the tiles so that the light ended up in the middle of two tiles. We just needed to cut a half circle out of each tile around the light, and it should work perfectly. We traced the shape of the electrical box onto the tiles that needed to be cut.
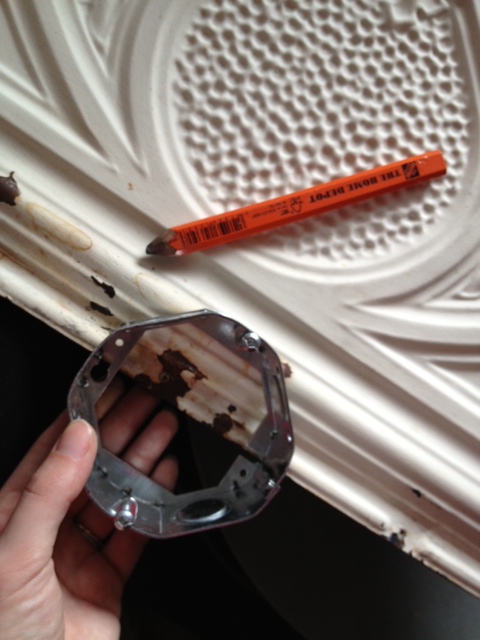
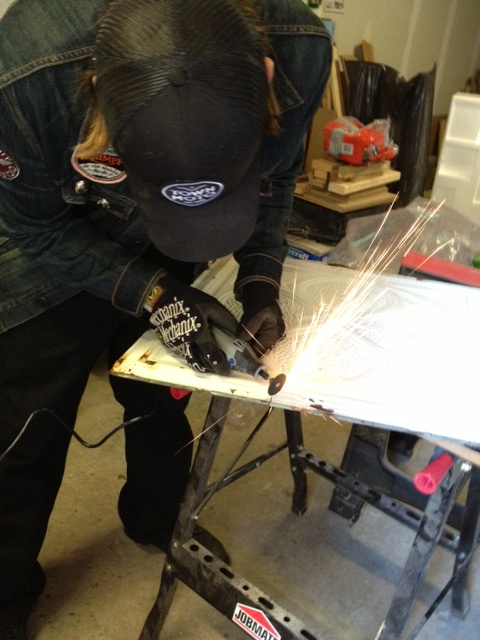
Then headed out to the garage and El Granto cut the tiles with a metal cutting blade on his Dremel. (We could have used tin snips, but the curve is a bit tricky and the Dremel is waaaay easier.)
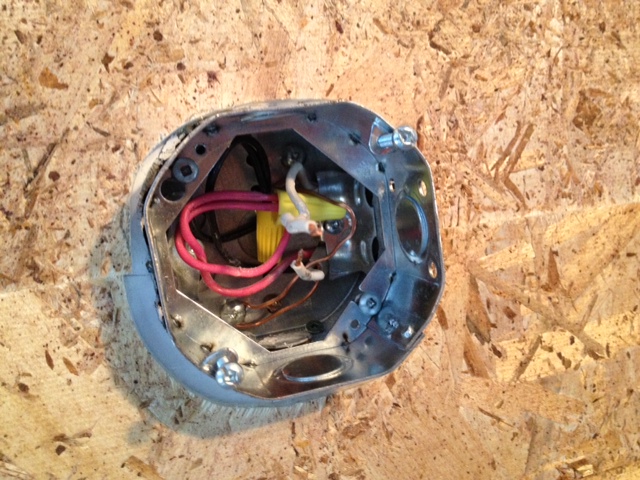
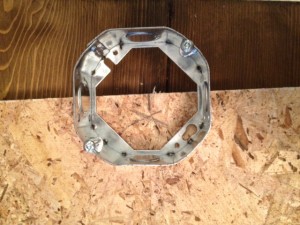
After the tiles were cut, we added an extension box onto our ceiling electrical box so that it would allow us room for the plywood and the tin tile. The box is easy to install (again the power is still OFF to this room!)
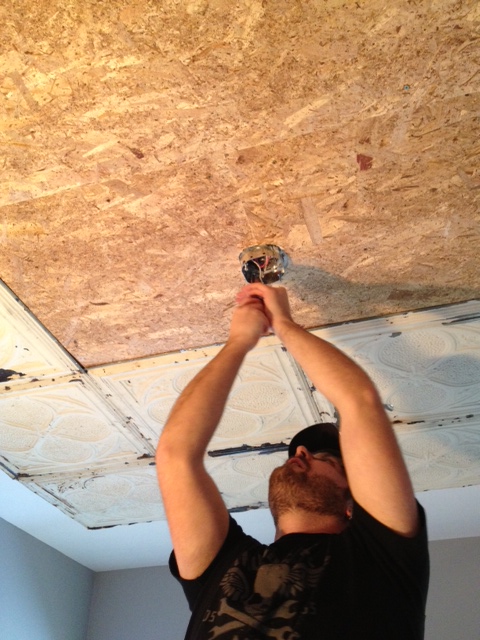
After the box was up we installed the cut tiles around it.
Then re-installed the light fixture.
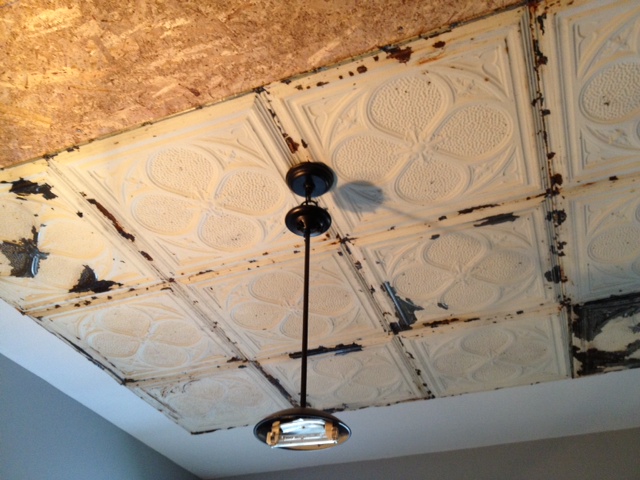
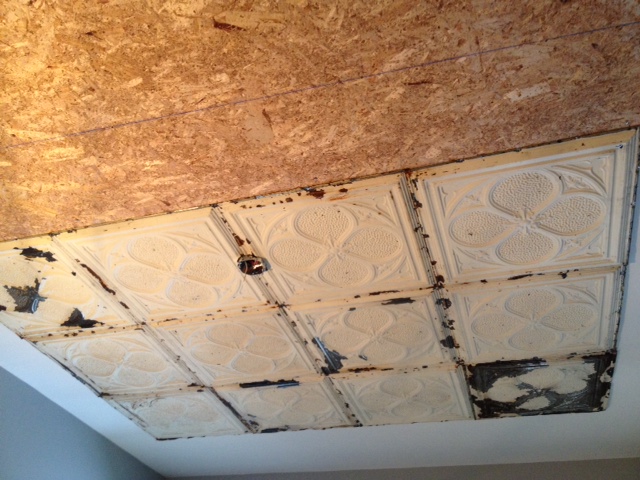
We then installed the remainder of the tiles. The result is a very eclectic ceiling, but we love it. Some of the tiles are much more worn than others. We tried to make the layout look random, but still balanced. We would like to add some panel molding around the edges, but that will have to wait until we have access to a truck or van.
Without further adieu, here is the finished product.
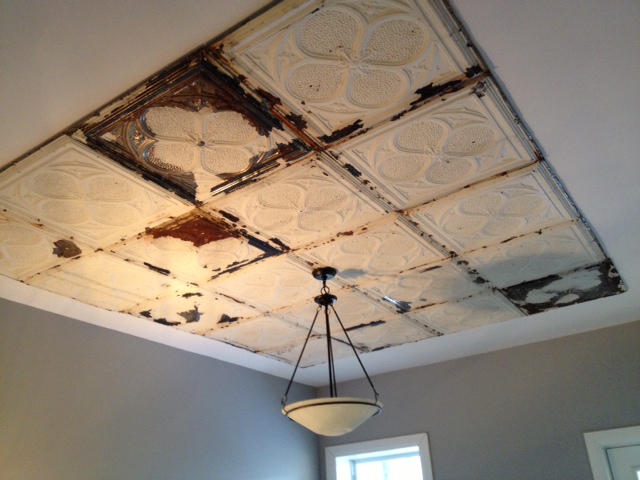
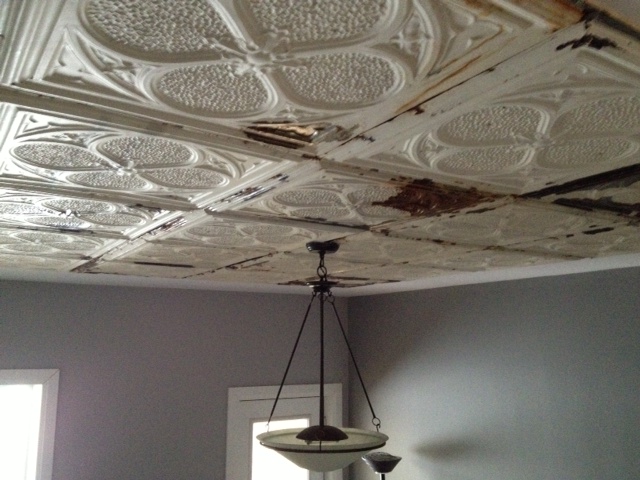
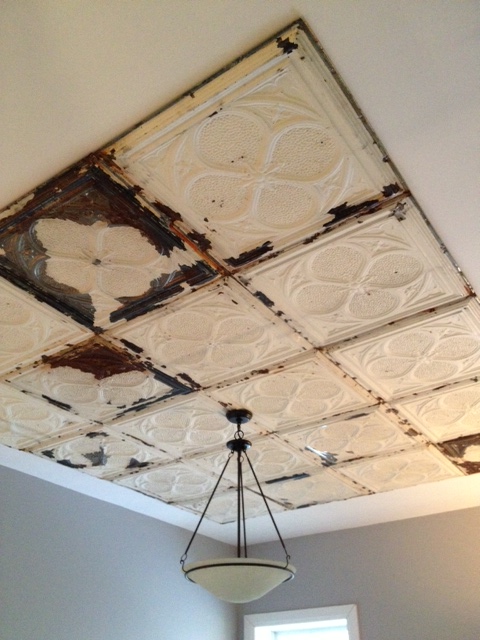

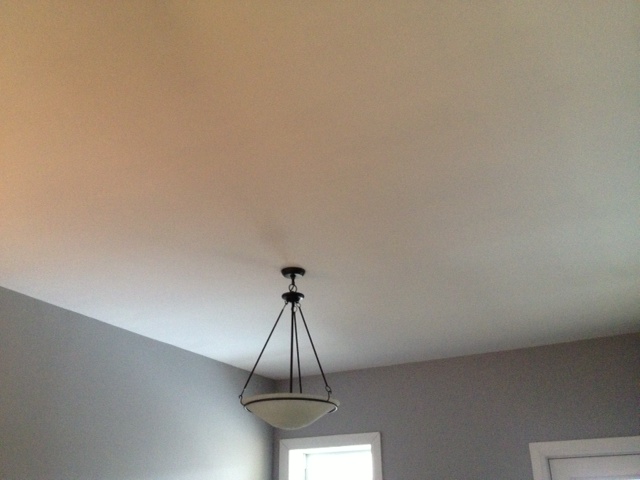
The living room is starting to come along now. Next up, we need to trim out the tin ceiling, and swap out the light fixture for a more elaborate chandelier. A few more big projects and it will hopefully start looking more like the period building it once was.
SOURCE LIST:
Materials:
20 2′ Square Reclaimed Tin Ceiling Tiles – Aberfoyle Antique Market
3 4×8 Sheets of 3/8″ chipboard – Rona
Round Electrical Box Extender – Home Depot
Screws – Home Depot
Brad Nails – Home Depot
Clear Coat – Canadian Tire
Tools Used:
Drill
Compressor & Brad Nailer
Ladder(s)
Work Light
Chalk Line
Dremel
Difficulty Level (on a scale of 1-5):
four out of five
(Really it deserves about a 3.5 it was just a pain as you are standing on a ladder working over your head)
Total Cost: $430
Tin Ceiling Part 2 – The Prep
How was your weekend? We knocked out our Pinterest Challenge project (check back Wednesday to see it!), we fixed a few nagging things around the house. (Our front door finally shuts/locks without jiggling the handle and shoving the door with your shoulder.) Unfortunately our doorbell still isnt working, but you cant win em all. Any doorbell experts out there that want to lend a hand?! (and/or any leads on where to buy Victorian Twist Doorbells?)
We have finished our tin ceiling project (full reveal tomorrow, I promise) but first I wanted to talk a bit about prepping the tiles for installation.
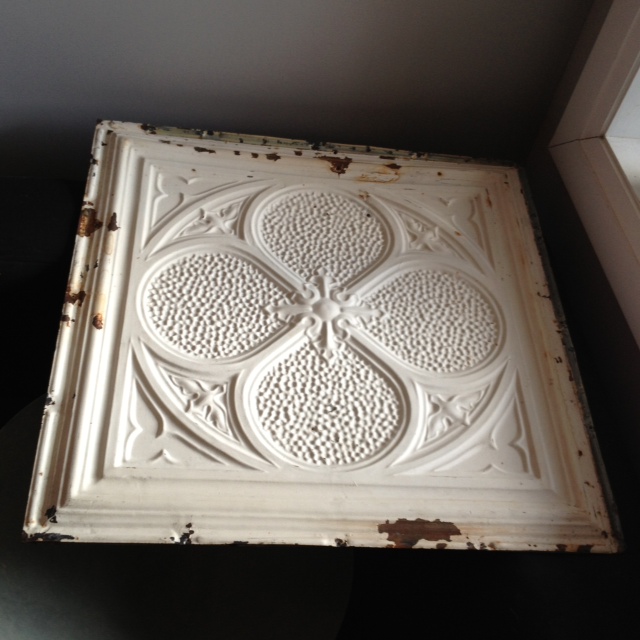
Our reclaimed tin tiles are 100+ years old, and covered in paint (which is most probably lead based paint.) The paint on our tiles had over the years seen some wear and tear. Some of the tiles were chipping, and the paint flaking off. Now the last thing you’re going to want is flaking lead paint falling from your ceiling, babies and puppies eating it and growing two heads so prep is important. (although two headed puppies would be cute)
*This is what WE did, we’re not experts, so please don’t take our story as gospel. Lead paint is a serious toxic substance, so ensure you contact your local government for how to safely handle & dispose of lead paint, and seriously consider calling in the pros*
To curb loose paint falling on heads, I took all the tiles to the basement, covered the floor in a plastic drop cloth, donned work clothes, heavy gloves, a respirator and safety glasses. I then proceeded to wire brush all the loose paint off the tiles. It was a bit of hard work, but worth it. I brushed quite aggressively ensuring all the loose paint came off. This process took a solid few hours. I then carefully folded the drop cloth in on itself, ensuring all the flaked off paint was trapped inside. I then sealed the drop cloth in a garbage bag, and its ready to head off to our city’s next hazardous waste drop off day. * DON’T PUT IT IN YOUR REGULAR GARBAGE! Lead = toxic! *

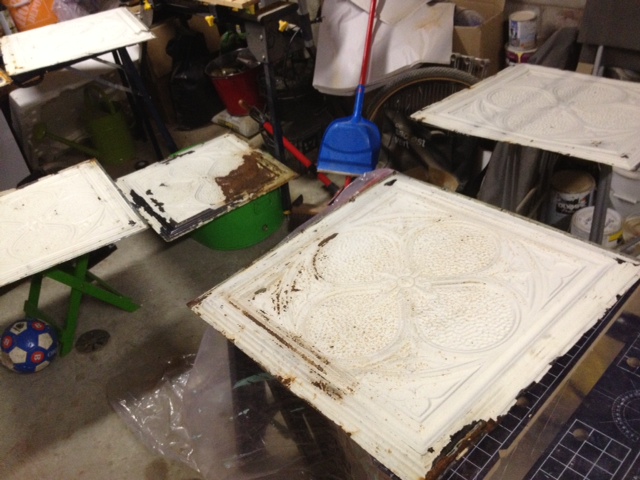
After the tiles were wire brushed, I headed to the garage and gave each tile two coats of clear coat. I then laid them out on every single surface of the garage to dry. I even gathered things for them to sit on; styrofoam pieces, boxes, bar stools, patio furniture etc. It looked like a very strange game of True American without the booze (any other New Girl fans out there?)
After the tiles are dry, its time to install (but you still have some prep left!) Some more paint MAY fall off when you’re installing the tiles. They are thin metal. and when you nail them up, they will flex and more paint may flake off (even though you carefully clear coated them!) SO, to ensure you don’t have lead paint all over your furniture, cover your floor & all surfaces where any paint may land, with more plastic drop cloths.
When installing, ensure you are again wearing eye protection (safety first kids!) and heavy gloves. The tin tiles can be sharp!
Geeze this post has been preachy. I expect I will make quite the nagging mother should I ever have children.
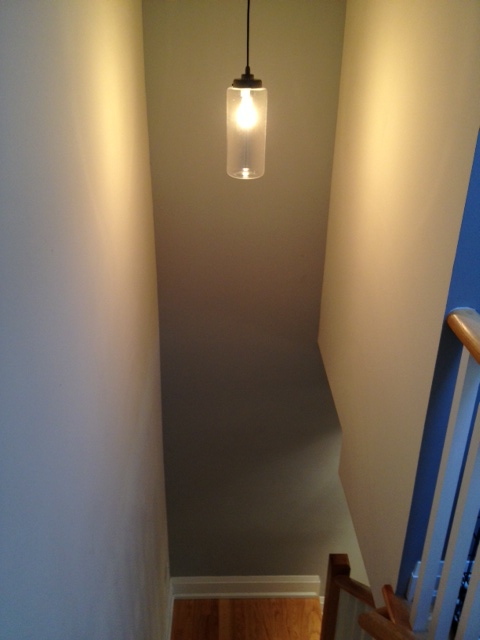
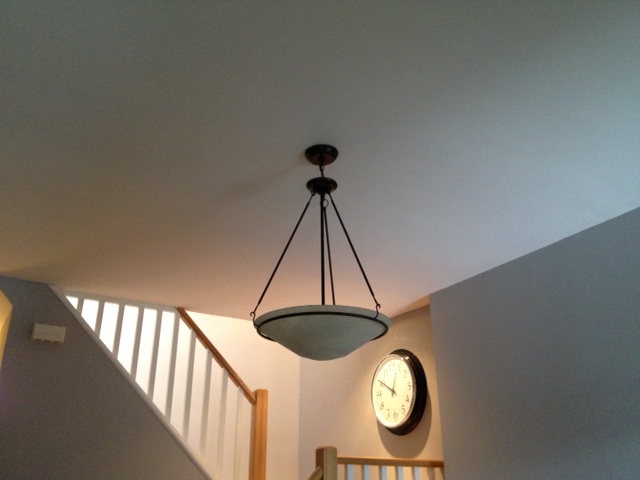
Staircase Inspiration
After painting the upstairs hall, getting started on our tin ceiling, and adding a new light to the staircase, the shabby beige walls of the staircase are looking pretty sad. Not to mention they are the LAST beige walls inside the house. (I have been mounting a war on beige as the entire house was beige when we moved in, no really outside and in, whole house was beige.)
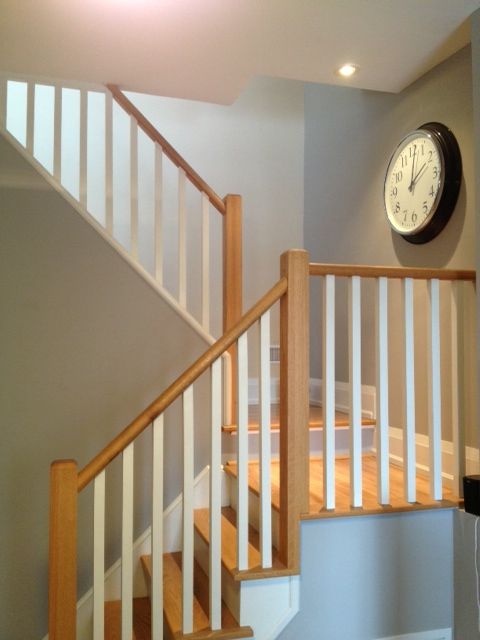
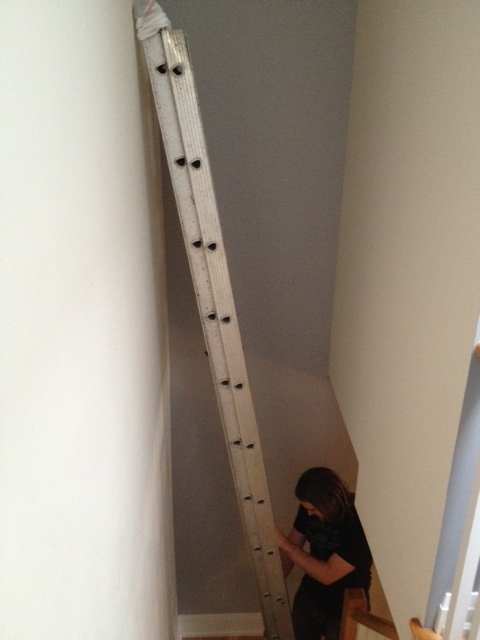
The problem with doing anything to the staircase walls, is that they’re HUGE and TALL. Remember El Granto precariously hanging on the top of a ladder to hang the new light? Yeah…not fun.
I would really like to do something with high impact in the space. I am thinking a bold paint colour, wallpaper or a stencil. The entire main floor is a light grey, and the upstairs hall is white. I think this is the perfect place to inject something a little crazy.
Here are some ideas that I am loving right now, I just cant decide on one direction!

Source: designsponge.com via Kristen on Pinterest
I am loving the panelling with the pop of the runner!

Source: customizedwalls.com via Kristen on Pinterest
Houndstooth is a big fave in the Storefront house right now. Even the dog sports a houndstooth coat. Would it be too much on the staircase walls?

Source: matchbookmag.tumblr.com via Kristen on Pinterest
I love a wallpaper with some humour, and this dog print makes my heart smile.

Source: maxrollitt.com via Kristen on Pinterest
I LOVE the drama in this space!

Source: auctiva.com via Kristen on Pinterest
I am loving the blue in this wallpaper, but is it too close to the damask in our master bedroom?

Source: thezhush.blogspot.com via Kristen on Pinterest
This is a more classic style with the wainscoting + wallpaper. Is it fun enough?

Source: dorothydraper.com via Kristen on Pinterest
Now this is colour!!!
So what do you think I should do to the staircase? Bold colour? Crazy wallpaper? Or keep it more traditional and do paneling or a mix of paneling & wallpaper?
Tin Ceiling Part 1
**This is Part 1, as this is a lengthy (and wordy) project, so we’ve split it up to avoid you falling asleep in your coffee **
We’ve been a bit quiet on the DIY front as of late, don’t worry, we have been working albeit slowly on project for the last three weeks. If you remember we were brainstorming inspiration for our vintage reclaimed tin ceiling tiles. After much deliberation we decided to leave the tiles as they were in all their rusted peeling paint glory.
Why you ask? They are over 120 years old sporting their original paint. These tiles were reclaimed from a store in London Ontario. It seemed a shame to strip or paint over all their history just to have them look like brand new tin tiles. Our Storefront had been stripped of every single original detail when we bought it, and we drool with envy when we look at other homes with original details still in place (like the houses over at Old Town Home and Victoria Elizabeth Barnes Victorian house blog) in our hearts we knew we needed to leave the tiles as is.
We were also going to put the tiles on our master bedroom ceiling, then we thought it a shame as no one but us would ever see them (we’re not the type to have guests hanging out in our bed looking up at the ceiling…) So we decided to have the tiles grace our living room ceiling where they would be there for all to see.
We have 20 tiles which means we can cover an 8×10 foot area. We decided to do a kind of panel inset in the center of the living room, centering around our lighting fixture. Now that we had it planned out (phew that was tiring!) we needed a plan of execution…
I don’t know if you know this about me, but I am a PLANNER (aka anal retentive). I always want to do something to the best of my ability, do it the easiest way, and for the least amount of money. So I research, and plan. I may not SHARE my plan with my husband, but I do always have one up in my noggin. So for this project I contacted a tin ceiling expert, and picked his brain. What I learned was that you can put tiles up two ways; glue or nails (or both!) Glue is easiest, but does the most damage to both the tiles and the ceiling if you ever want to remove. Nails require more work, but do much less damage to the tiles, and your ceiling can always be patched. We decided to go with the nails.
Now we needed something to nail to…You cant just nail into your drywall, its just not strong enough. You need some wood for the nails to bite into. Next up, we needed to decide if we were going to strap the ceiling or sheet it (run strips of wood in a grid to nail to, or just cover the area of the ceiling in plywood.) Both will work, its just whichever you prefer. We decided to go with the sheeting, as then we could nail anywhere we wanted without a problem. Another decision done!!
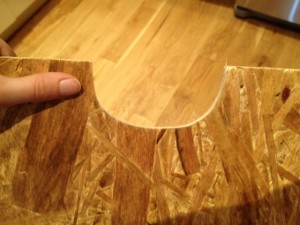
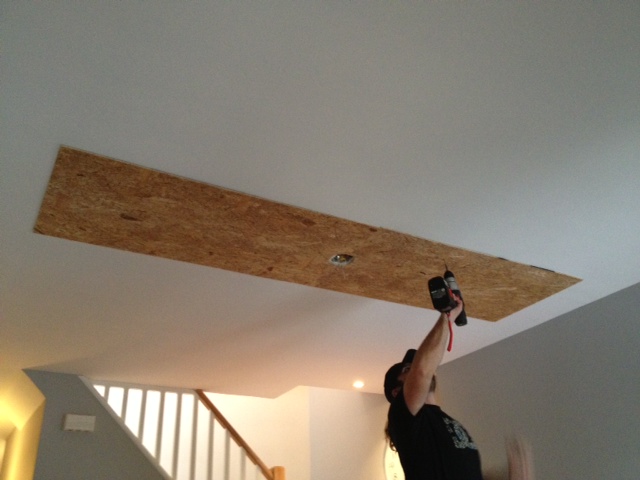
We sourced some 3/8″ chipboard from HD as our sheeting material. We got three 4×8 sheets of chipboard, and got one of them cut down into 2×4′ pieces at the hardware store (still waiting on that table saw Santa). We decided to do a 2×8 piece of wood in the middle of the ceiling around the light, then a full 4×8 sheet on either side. We also cut the 2×8 in half so that it would be easier to cut and put up around the light fixture.
Speaking of the light fixture. We traced a spare electrical box onto the ends of the 2×4 sheets and cut it out with a jig saw. This would make it so that we could easily fit around the light fixture (which we would deal with later.)
Now came the fun part…putting up the sheeting. Here’s what you need:
- Two ladders
- Drill & screws
- Swear Words
- Stud Finder
- Chalk Line
- Divorce Papers
- Borrowed work lights from the neighbours (have I mentioned how awesome our neighbours are?! I need to bake them some cookies)
- Tears
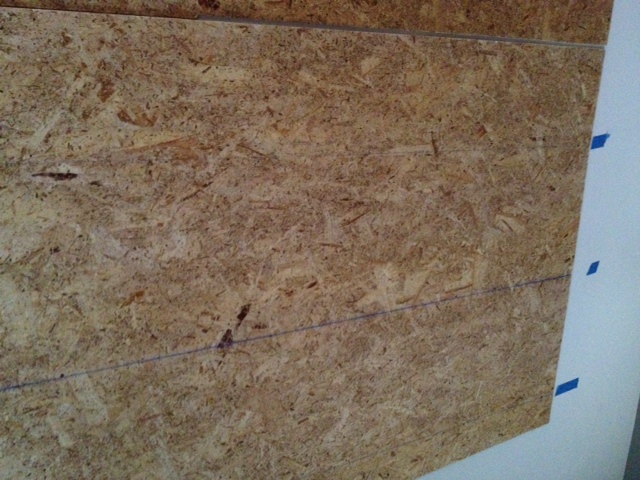
Mark your studs on your ceiling using masking tape. Mark them OUTSIDE the area you’re sheeting. If the ceiling joists in your 100 year old home magically change direction, you are not crazy, cause apparently that can happen, and defy all logic…
Now turn off the power and take down the ceiling light. Swear at wife for having insisted on re-installing repainted light fixture before it was completely dry. (Who would have thought that it would stick together?) oops
Put up the first pieces of sheeting, and make sure they’re straight (or straight-ish if you live in a crooked-ass-house.) Screw into the studs using at least 2″ wood screws
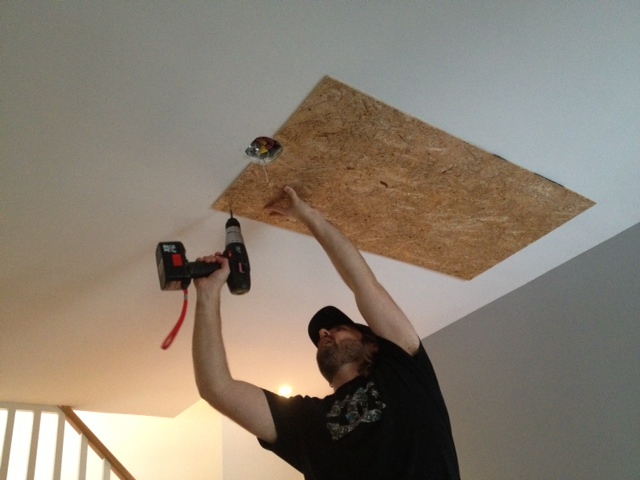
For the next sheets, both you and your spouse will need to simultaneously stand on ladders, holding a 4×8 sheet of plywood over your heads and screw it into your 10 foot tall ceiling making sure its straight and perfect. Name calling and/or tears are optional. If you eff it up, you MUST take it down and fix it. (that totally didnt happen to us… wait yes it did… shh)
Once you have a couple screws in place around the edges, you can then chalk line between your screws to give yourself a guide where the studs are for easily screwing in more screws to make sure its super oober dooperly attached to the ceiling.
After you are finished, drink several beers and try to forget the urge to kill your spouse.
If you’ve managed to make it through this entire post, I’m proud of you, perhaps a gold star is in order. Now come back next week while I bore you with more words, but actually put some tin tiles up (I know how dare I call this post Tin Ceiling Part 1 and there is in fact NO TIN CEILING.) I’m a jerk.
Family Day

It’s Family Day in Ontario today (essentially a day off work to hang out with your family.) Continue reading “Family Day”
Happy Valentines Day

Hope you have a lovetastic day today! Continue reading “Happy Valentines Day”
Midwinter House Maintenance
It’s the middle of winter and your poor old house has been working very hard to keep you warm and dry in this miserable season. So on this week-o-love why not show your house a little TLC with some midwinter maintenance? Continue reading “Midwinter House Maintenance”
Valentines Day is a Two Way Street

I had the discussion with some co-workers yesterday about how they thought it was strange that I was planning a dinner for El Granto on Valentines Day. The general consensus seems to be that most girls think Valentines Day is a day for guys to spoil them, and they get to kick back and enjoy the pampering. My response to that is: you greedy girls! Love is not one sided my friend, it’s a two way street. Why are you not showing your loved one how much you love and care about them right back this Valentines Day? Continue reading “Valentines Day is a Two Way Street”